Emulated Intel Processor on Mac M1 or Later
If you are using a Mac M1 machine,
you cannot use the prebuilt machine in the previous section, because
you have the newer ARM processor.
Instead, do these things:
First, install UTM.
Then, go to this page: Installing Debian via the Internet.
In the "Small CDs or USB sticks", download the amd64 ISO file.
Creating an Emulated AMD64 Machine
Launch UTM and do these steps:
- Click File, New, Emulate, Linux
- On the Boot Image Type page, in the "Boot ISO Image" section, click the Browse button.
- Navigate to the Debian arm64 ISO file you downloaded. Click the Continue button.
- On the Hardware page, click Continue
- On the Storage page, click Continue
- On the Shared Directory page, click Continue
- On the Summary page, enter a name of "AMD64 Linux" and click Save
- Click the large right-arrow to launch the VM.
Installing Debian Linux
Note: this process will probably take an hour or more.
- At the first screen, accept the default selection of "Graphical Install" and press Enter.
- At the "Select a language" screen, accept the default selection and click the Continue button.
- At the "Select your location" screen, accept the default selection of "United States" and click the Continue button.
- At the "Configure the keyboard" screen, accept the default selection of "American English" and click the Continue button.
- At the "Please enter the hostname for this system" screen, accept the default Hostname of "debian" and click the Continue button.
- At the "Domain name" screen, leave the domain name blank and click the Continue button.
- At the "Set up users and passwords" screen, enter a root password of P@ssw0rd in both boxes and click the Continue button.
- At the next screen, enter a Full Name of student and click the Continue button.
- At the next screen, accept the default name of student and click the Continue button.
- At the next screen, enter a password of P@ssw0rd in both boxes and click the Continue button.
- At the "Configure the clock" screen, select Pacific and click the Continue button.
- At the "Partition disks" screen, accept the default selection of "Guided - use entire disk" and click the Continue button.
- At the next screen, accept the default selection of "SCSI2..." and click the Continue button.
- At the next screen, accept the default selection of "All files in one partition..." and click the Continue button.
- At the next screen, accept the default selection of "SCSI2..." and click the Continue button.
- At the next screen, accept the default selection of "Finish partitioning..." and click the Continue button.
- At the next screen, select Yes and click the Continue button.
- At the "Configure the package manager" screen, accept the default selection of "No" and click the Continue button.
- At the next screen, accept the default selection of "United States" and click the Continue button.
- At the next screen, accept the default selection and click the Continue button.
- At the next screen, leave the HTTP proxy blank and click the Continue button.
- At the "Configuring popularity-contest" screen, accept the default selection of "No" and click the Continue button.
- At the "Software selection" screen, clear the checkmarks for "Debian desktop environment" and
"GNOME". Check "SSh server". Leave "standard system utilities" checked and click the Continue button.
When the "Finish the installation" screen appears,
move your mouse to the top right portion of the UTM window
and click the tiny CD icon.
Point to "CD/DVD (ISO) Image..." and
click Eject,
as shown below.
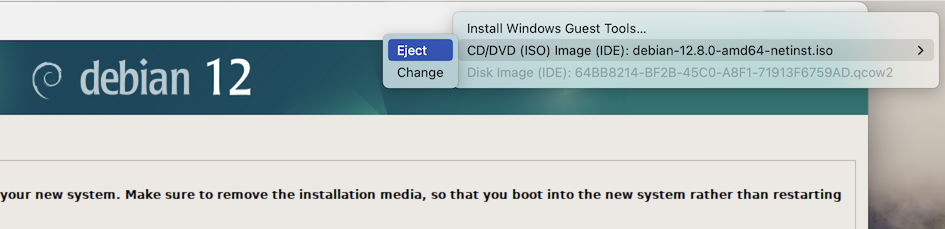
Them click the Continue button.
Preparing sudo
When your Debian machine starts up.
log in as root with the password
P@ssw0rd
Then execute these commands to make "sudo" work,
assuming your regular account is named "student".
apt update
apt install sudo -y
usermod -aG sudo student
reboot
Networking in Debian 13
For some ungodly reason, Debian 13 has
no networking by default.
After installation, execute this command:
ip a
Find the name of your network interface.
On my machine, it was ens160
Execute this command to make the
necessary file, changing the name
to match your network adapter:
sudo systemctl start systemd-networkd
sudo systemctl enable systemd-networkd

sudo nano /etc/systemd/network/ens160.network
Enter these contents, changing the name
to match your network adapter:
[Match]
Name=ens160

[Network]
DHCP=yes
Save the file with Ctrl+X, Y, Enter.
Execute these commands:
sudo networkctl reload
ip a
Now networking should work.
|
Connecting via SSH
When your Debian machine starts up.
log in as student with the password
P@ssw0rd
Then execute this command:
ip a
Make a note of your Debian machine's IP address.
On your host Mac system, open a Terminal window
and execute this command, replacing the IP
address with the correct address of your Debian
machine:
ssh student@192.168.64.8
Agree to the connection by typing yes
Log in with the password
P@ssw0rd
Note: UTM doesn't suspend virtual machines the
way VMware does. When you are done using your
machine, shut it down with this command:
sudo poweroff
|