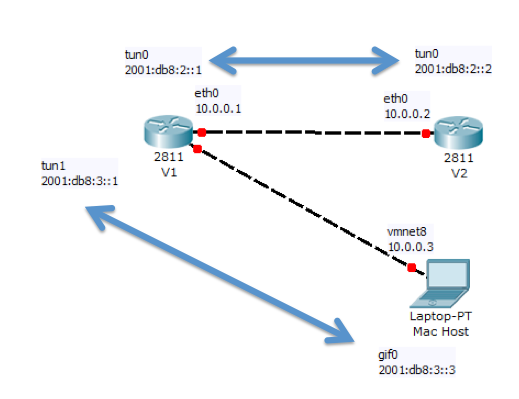
(The connection to the Mac OS X host is optional.)
By configuring tunnel interfaces "tun0" on the routers, you will be able to send IPv6 packets through the IPv4-only connection.
SIT stands for Simple Internet Transition, also known as 6in4. As you will see, it is very easy to set up.
Download the VC6.4 - Virtualization iso (Size: 206MB)
Create a new VM, of type "Ubuntu Linux" with the default RAM and hard disk size.
Connect the VM's virtual CD to the Vyatta ISO file you downloaded.
Set the VM to connect to the Internet in a way that provides DHCP service, such as NAT.
Start the new VM.
Log in as vyatta with password vyatta
To install Vyatta on the virtual machine's hard drive, execute this command:
install system
At the "Partition (Auto/Union/PartEd/Skip) [Auto]: " prompt, press Enter
At the "Install the image on? [sda]: " prompt, press Enter
At the "Continue? (Yes/No) [No]: " prompt, type Yes and press Enter
At the "How big of a root partition should I create?" prompt, press Enter to accept the default size.
At the "Which one should I copy to sda?" prompt, press Enter to accept the default choice.
At the "Enter password for the administrator account" prompt, type vyatta and press Enter
At the "Retype vyatta password:" prompt, type vyatta and press Enter
At the "Which drive should GRUB modify the boot partition on?" prompt, press Enter to accept the default choice.
When you see the "Done!" message, execute this command to power your Vyatta virtual machine down:
poweroff
At the "Proceed with poweroff? (Yes/No) [No]" prompt, type Yes and press Enter
When the virtual machine powers off, enter the VM Settings and disconnect the ISO image from your Vyatta virtual machine.
Find the folder containing your Vyatta Virtual Machine and copy the whole folder.
Log in with the username vyatta and the password vyatta
Start the copied Vyatta VM. When VMware asks you if you moved it or copied it, click "I Copied It".
Log in with the username vyatta and the password vyatta
Configure it with these commands:
configure

set interfaces ethernet eth0 address 10.0.0.1/24

commit

save

exit
configure

set interfaces tunnel tun0 encapsulation sit

set interfaces tunnel tun0 local-ip 10.0.0.1

set interfaces tunnel tun0 remote-ip 10.0.0.2

set interfaces tunnel tun0 address 2001:db8:2::1/64

commit

save

exit
Configure it with these commands:
configure

set interfaces ethernet eth0 address 10.0.0.2/24

commit

save

exit
configure

set interfaces tunnel tun0 encapsulation sit

set interfaces tunnel tun0 local-ip 10.0.0.2

set interfaces tunnel tun0 remote-ip 10.0.0.1

set interfaces tunnel tun0 address 2001:db8:2::2/64

commit

save

exit
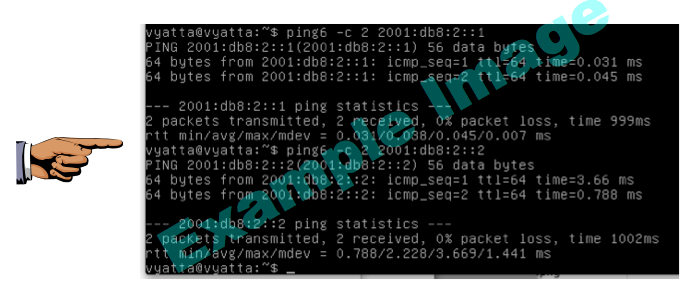
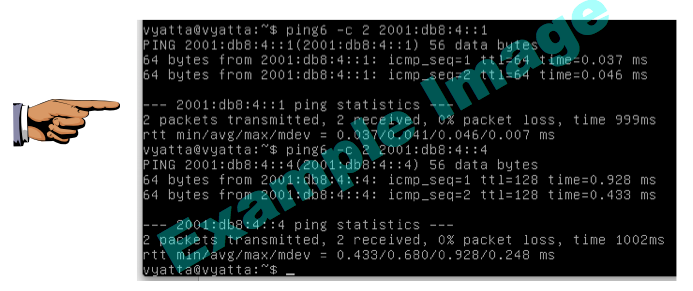
ping6 -c 2 2001:db8:2::1

ping6 -c 2 2001:db8:2::2
If you don't see replies, try setting both virtual adapters to NAT mode.
Make sure you see replies to both pings, as shown in the image above on this page.
Save a screen image with the filename Proj V2 from Your Name.
If you want to tunnel to Windows 7, see the "Tunneling from Vyatta to Windows 7" section below.
ping6 ::1
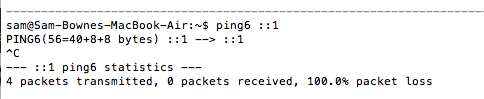
The Mac OS X firewall is stopping the pings, which use ICMPv6 types 128 and 129.
Turning off the firewall will let them through. This is, of course, not a security best practice. It would be better to specifically allow ICMPv6 types 128 and 129 through the firewall, but that is difficult to do because the Mac OS X firewall is broken, as explained here:
http://otrs.menandmice.com/otrs/public.pl?Action=PublicFAQZoom;ItemID=138
I tried the fix in that article but I was still unable to get replies to pings from the localhost.
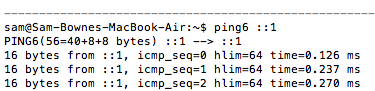
So I just turned the firewall off, with these steps:
Open "System Preferences, click "Security & Privacy", Click the Firewall tab. Unlock the panel and turn off the firewall.
On the host Mac OS X, in a Terminal window, execute this command:
ping6 ::1
ifconfig
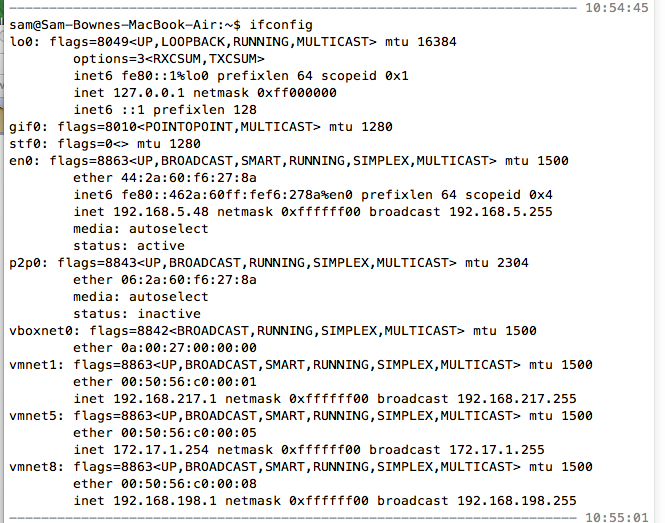
Interface vmnet8 is used for NAT mode, and goes to the Vyatta interfaces. To send IPv4 traffic to virtual router V1, you need to add an IPv4 address in the 10.0.3.0/24 subnet to vmnet8.
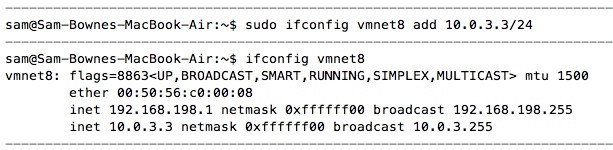
On the host Mac OS X, in a Terminal window, execute these commands:
sudo ifconfig vmnet8 add 10.0.3.3/24

ifconfig vmnet8
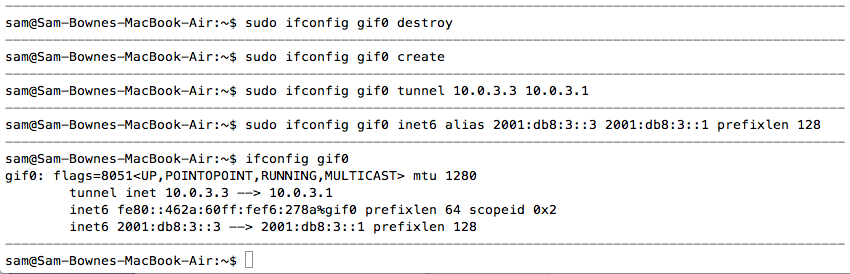
sudo ifconfig gif0 destroy

sudo ifconfig gif0 create

sudo ifconfig gif0 tunnel 10.0.3.3 10.0.3.1

sudo ifconfig gif0 inet6 alias 2001:db8:3::3 2001:db8:3::1 prefixlen 128

ifconfig gif0
inet 10.0.3.3 --> 10.0.3.1

inet6 2001:db8:3::3 --> 2001:db8:3::1
configure

set interfaces ethernet eth0 address 10.0.3.1/24

set interfaces tunnel tun1 encapsulation sit

set interfaces tunnel tun1 local-ip 10.0.3.1

set interfaces tunnel tun1 remote-ip 10.0.3.3

set interfaces tunnel tun1 address 2001:db8:3::1/64

commit

save

exit
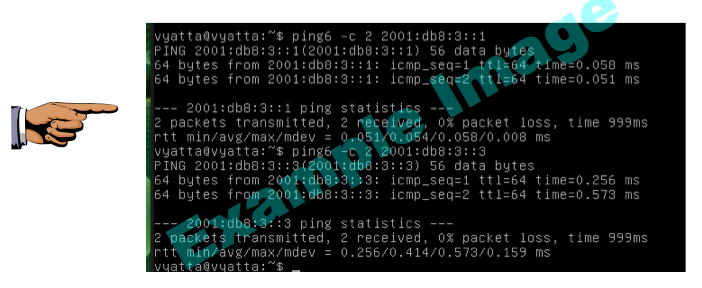
ping6 -c 2 2001:db8:3::1

ping6 -c 2 2001:db8:3::3
On virtual router V1,
sudo tcpdump -i eth2 -c 4 -w pv2.pcap
You can download my pcap file here if you want it:
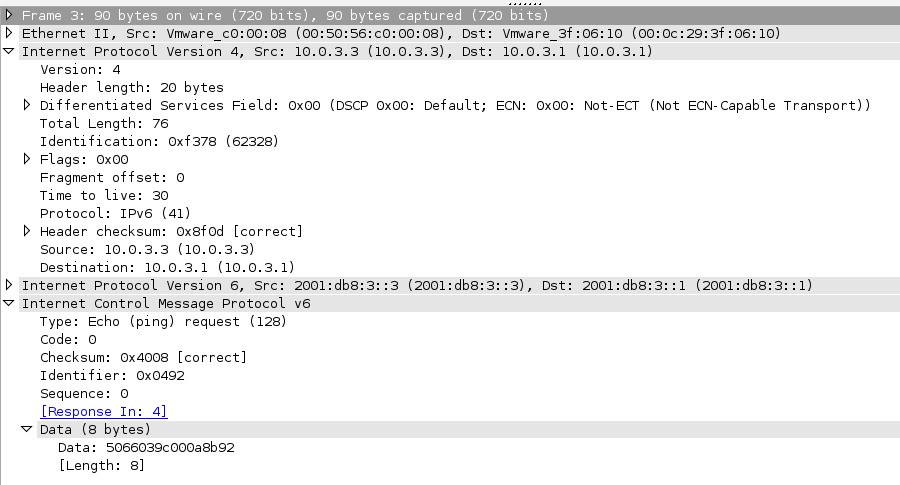
Opening that pcap file in Wireshark shows 6in4 packets. Look at the middle pane here--the protocols are
Ethernet
IPv4
IPv6
ICMPv6
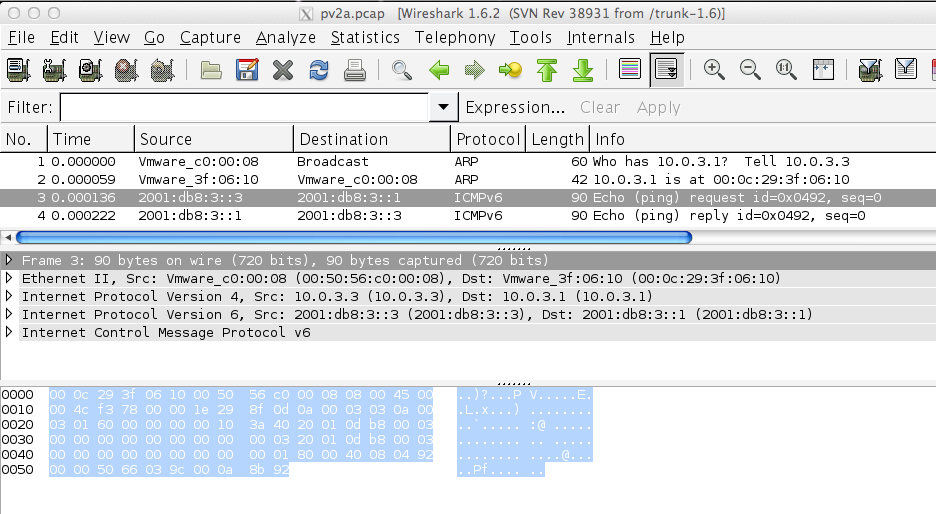
Drawing these in the usual order shows that we are violating the OSI model:
----------------  --------
7. Application    ICMPv6

6. Presentation

5. Session

4. Transport

3. Network        IPv6

4. Transport      Protocol 41

3. Network        IPv4

2. Data Link      Ethernet

1. Physical
----------------  --------
As you can see at this link, IANA has reserved protocol number 6 for TCP, 17 for UDP, and 41 for IPv6 Encapsulation.
http://www.iana.org/assignments/protocol-numbers/protocol-numbers.xml
This is a problem for most home routers, because they only allow TCP and UDP and ICMP traffic--they fail to forward Protocol 41 traffic.
netsh interface ipv4 add address "Local Area Connection" 10.0.4.4/24

netsh interface ipv6 add v6v4tunnel interface=IP6Tunnel 10.0.4.4 10.0.4.1

netsh interface ipv6 add address IP6Tunnel 2001:db8:4::4/64

ipconfig


configure

set interfaces ethernet eth0 address 10.0.4.1/24

set interfaces tunnel tun2 encapsulation sit

set interfaces tunnel tun2 local-ip 10.0.4.1

set interfaces tunnel tun2 remote-ip 10.0.4.4

set interfaces tunnel tun2 address 2001:db8:4::1/64

commit

save

exit
ping6 -c 2 2001:db8:4::1

ping6 -c 2 2001:db8:4::4
Email the image(s) to cnit.60@gmail.com with a Subject line of Proj V2 from Your Name.
http://www.vyatta.com//sites/vyatta.com/files/pdfs/Vyatta_QuickStart_R6.1_v02_1.pdf
http://wiki.het.net/wiki/IPv6_tunnel
http://dice.neko-san.net/2012/02/creating-a-6in4-router-using-mac-os-x-10-7/
http://otrs.menandmice.com/otrs/public.pl?Action=PublicFAQZoom;ItemID=138
Last modified 11 am 9-28-2012