Download the VC6.4 - Virtualization iso (Size: 206MB)
Create a new VM, of type "Ubuntu Linux" with the default RAM and hard disk size.
Connect the VM's virtual CD to the Vyatta ISO file you downloaded.
Set the VM to connect to the Internet in a way that provides DHCP service, such as NAT.
Start the new VM.
Log in as vyatta with password vyatta
To install Vyatta on the virtual machine's hard drive, execute this command:
install system
At the "Partition (Auto/Union/PartEd/Skip) [Auto]: " prompt, press Enter
At the "Install the image on? [sda]: " prompt, press Enter
At the "Continue? (Yes/No) [No]: " prompt, type Yes and press Enter
At the "How big of a root partition should I create?" prompt, press Enter to accept the default size.
At the "Which one should I copy to sda?" prompt, press Enter to accept the default choice.
At the "Enter password for the administrator account" prompt, type vyatta and press Enter
At the "Retype vyatta password:" prompt, type vyatta and press Enter
At the "Which drive should GRUB modify the boot partition on?" prompt, press Enter to accept the default choice.
When you see the "Done!" message, execute this command to power your Vyatta virtual machine down:
poweroff
At the "Proceed with poweroff? (Yes/No) [No]" prompt, type Yes and press Enter
When the virtual machine powers off, enter the VM Settings and disconnect the ISO image from your Vyatta virtual machine.
Log in with the username vyatta and the password vyatta
configure
set interfaces ethernet eth0 address dhcp
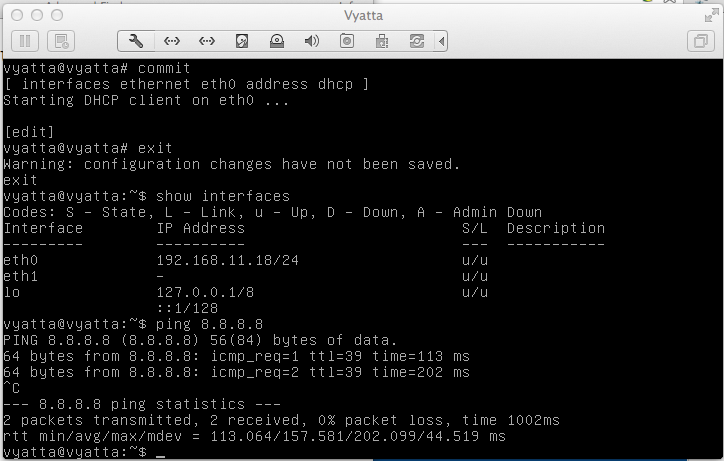
commit
exit
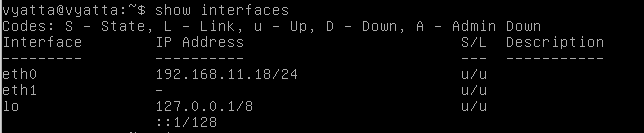
show interfaces
Test IPv4 connectivity with this command:
ping 8.8.8.8
To save the configuration, execute these commands:
configure
save
commit
exit
poweroff
Then power the Vyatta VM on again.
Log in as you did before, with a username of vyatta and a password of vyatta
Test IPv4 connectivity with the ping you used before:
ping 8.8.8.8
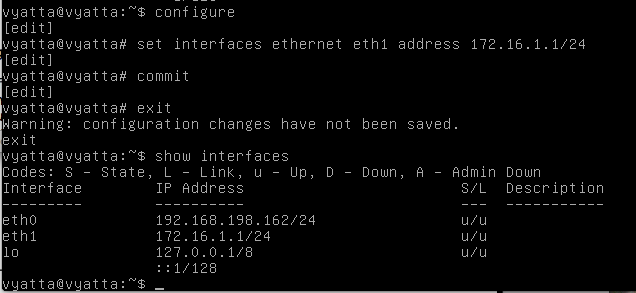
configure

set interfaces ethernet eth1 address 172.17.1.1/24

commit

exit

show interfaces
To do this, three things are required:
configure

set service dhcp-server shared-network-name PRIVATE subnet 172.17.1.0/24 start 172.17.1.101 stop 172.17.1.150

set service dhcp-server shared-network-name PRIVATE subnet 172.17.1.0/24 dns-server 8.8.8.8

set service dhcp-server shared-network-name PRIVATE subnet 172.17.1.0/24 dns-server 208.67.222.222

set service dhcp-server shared-network-name PRIVATE subnet 172.17.1.0/24 default-router 172.17.1.1

commit

exit

show interfaces
By default, VMware makes two connections: vmnet1 and vmnet8, but they both have DHCP service already from VMware, which interferes with testing the Vyatta DHCP server.
You need to activate another virtual network, such as vmnet2, without NAT, DHCP, or a bridged connection to the host.
I managed to set it up with quite a lot of tricky work, editing config files as explained on these pages:
https://eos.aristanetworks.com/2012/06/vmware-fusion-virtual-networks/
http://communities.vmware.com/message/1803720
A simpler method would be to use two real computers, with the Vyatta virtual machine running on a computer with two network adapters.
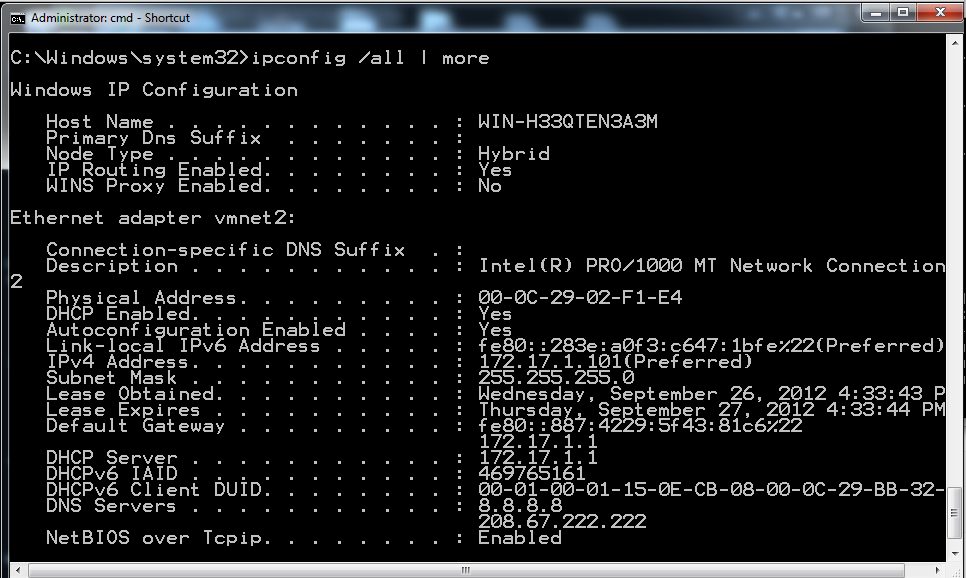
I added a second network interface to a Windows 7 virtual machine and connected it to vmnet2 to act as the client.
In the Windows 7 machine, execute the IPCONFIG /ALL command and scroll back to see the details of the adapter you connected to vmnet2.
When you get it working, it should show these items, as shown below:
show dhcp server leases
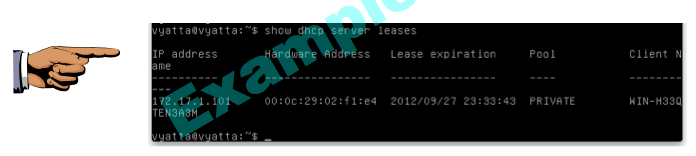
Make sure you can see the lease for an address starting with 172.17.1, as shown in the image above on this page.
Save a screen image with the filename Proj V1a from Your Name.
ping 172.17.1.1

ping 8.8.8.8
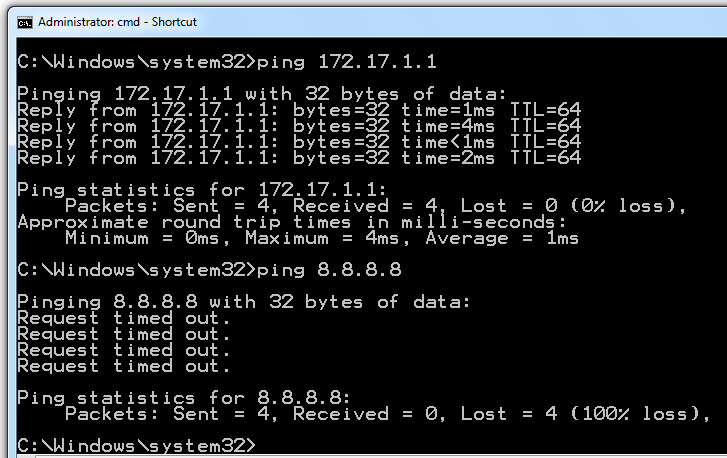
This indicates that you are connected to the Vyatta router, but not to the Internet.
That's because the Vyatta router is providing DHCP service, but not NAT.
configure

set nat source rule 1 source address 172.17.1.0/24

set nat source rule 1 outbound-interface eth0

set nat source rule 1 translation address masquerade

commit

save

exit

show interfaces
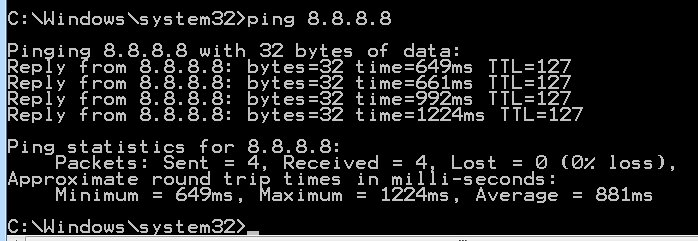
ping 8.8.8.8
show nat source translations
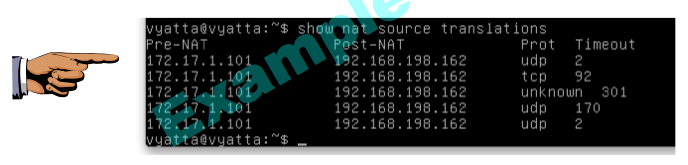
Make sure you can see at least one translation line, as shown in the image above on this page.
Save a screen image with the filename Proj V1b from Your Name.
Email the image to cnit.60@gmail.com with a Subject line of Proj V1 from Your Name.
renew dhcp interface eth0
delete interfaces ethernet eth0 address dhcp
set system name-server 8.8.8.8
set system gateway-address 192.168.1.1
sset system login user vyatta authenticationplaintext-password 12new$pwd34
sudo ifconfig
http://blogs.technet.com/b/stefan_stranger/archive/2008/08/25/vyatta-virtual-router-on-hyper-v.aspx
http://www.carbonwind.net/VyattaOFR/VyattaCiscos2stunmode/VyattaCiscos2stunmode.htm
http://www.vyatta.org/getting-started/how-to-install
http://www.wikihow.com/Enable-IP-Routing
http://technet.microsoft.com/en-us/library/cc753256(v=ws.10).aspx#BKMK_4
https://eos.aristanetworks.com/2012/06/vmware-fusion-virtual-networks/
http://communities.vmware.com/message/1803720
http://www.vyatta.org/forum/viewtopic.php?t=8108&sid=bd53108fcf2e756cb01e3dfc298f81b6
http://www.v12n.com/mediawiki/index.php/Vyatta_How_To#Version_6.4
http://www.scribd.com/doc/52411762/60/Changing%C2%A0Passwords?