A honeypot is a trap, designed to collect information. The monitoring software should have these properties:
Here are features I'd like to add to future honeypots:
dpkg-reconfigure tzdata
apt-get update
apt-get install apache2 -y
apt-get install apparmor-utils -y

aa-complain /usr/sbin/tcpdump
mkdir /var/www/html/tw
echo \<pre\> > /var/www/html/tw/index.html
nano /root/.bashrc
function log2syslog
{
   declare COMMAND
   COMMAND=$(fc -ln -0)
   logger -p local1.notice -t bash -i -- "${USER}:${SUDO_USER}:${COMMAND}"
}
trap log2syslog DEBUG
cd

wget -O dropbox.tar.gz "http://www.dropbox.com/download/?plat=lnx.x86_64"

tar -xvzf dropbox.tar.gz

printenv | grep LANG
~/.dropbox-dist/dropboxd
On your own computer, in a Web browser, go to the linking and click Link. When it links, you should see "This computer is now linked to Dropbox" on your honeypot's console.
Press Ctrl+C to stop the dropboxd process.
Troubleshooting
If you see a "Couldn't start Dropbox." message, try starting Dropbox with this command:If you get this message: "[ALERT]: Your Dropbox folder has been moved or deleted from its original location", execute these commands:
mkdir /root/Dropbox/tw

mkdir /root/Dropbox/tcp
I use tcpdump to make a rolling archive of the last 500 MB of packets, excluding Dropbox traffic, in 50 files with a maximum size of 10 MB.
Dropbox and Tripwire aren't installed yet, but they will be below.
I made sure everything interesting is exported from the honeypot via Dropbox, and create several Web pages locally which to monitor the status of the honeypot.
nano /root/cron5
#!/bin/bash

# TRIPWIRE REPORTS

/usr/sbin/tripwire --check > /tmp/trip
cp /tmp/trip /root/Dropbox/tw/TW$(date +%F-%H-%M)

# Summary file to quickly see when your honeybot gets hacked
echo $(grep "Report created" /tmp/trip) $(grep "Total violations" /tmp/trip) | cut -d' ' -f4- >> /var/www/html/tw/index.html

# A one-liner to see current honeypot status
tail -n 1 /var/www/html/tw/index.html > /var/www/html/tw/status.html

# Put current Tripwire report in a handy location
echo \<pre\> > /var/www/html/tw/trip.htm
cat /tmp/trip >> /var/www/html/tw/trip.htm


# Copy various log files to the Dropbox
cp /var/log/auth.log /root/Dropbox
cp /root/.bash_history /root/Dropbox/bash_history
cp /var/log/apache2/* /root/Dropbox/apache2 -r
cp /var/log/mysql/* /root/Dropbox/mysql -r
nano /root/cron1
You should also edit the list of IP addresses to match the ones you really use.
#!/bin/bash


# Make sure tcpdump and Dropbox keep running
pgrep tcpdump
if [ $? -eq 1 ]; then
nohup /usr/sbin/tcpdump port not 443 -pn -C 10 -W 50 -w /root/Dropbox/tcp/capture &
fi

pgrep dropboxd
if [ $? -eq 1 ]; then
nohup /root/.dropbox-dist/dropboxd &
fi

# Log all commands to a remote server
pgrep tail
if [ $? -eq 1 ]; then
nohup tail -f /var/log/syslog | nc example.com 20022 &
fi


# These commands throttle the network interface to 100 Kbps
# This limits the harm an attacker can do using my honeypot for attacks
/sbin/tc qdisc add dev eth0 handle 1: root htb default 11
/sbin/tc class add dev eth0 parent 1: classid 1:1 htb rate 100kbps
/sbin/tc class add dev eth0 parent 1:1 classid 1:11 htb rate 100kbps


# Record suspicious SSH logins (excluding IP addresses I use)
grep Accepted /var/log/auth.log | grep -v "4.16.40.19 \| 50.156.105.174 \| 104.9.120.158 \| 107.199.202.34" > /var/www/html/accepted.html

grep "Failed" /var/log/auth.log | grep root | wc -l > /var/www/html/failed.html

echo \<pre\> > /var/www/html/auth.htm
cat /var/log/auth.log >> /var/www/html/auth.htm

echo \<pre\> > /var/www/html/failure.htm
grep "authentication failure" /var/log/auth.log >> /var/www/html/failure.htm


# Record recent Bash history in a convenient file

echo \<pre\> > /var/www/html/bash.htm

tail -n 30 /root/.bash_history >> /var/www/html/bash.htm

service apache2 start
Execute these commands:
Python Listener
On the logging server, run this Python listener:#!/usr/bin/python import socket, os s = socket.socket() s.bind(("0.0.0.0", 20022)) s.listen(5) c, addr = s.accept() print "Connected from ", addr while True: data = c.recv(1024) if not data: print "Closed" break print data sys.stdout.flush() c.close()
chmod a+x /root/cron?

crontab -e
Add these lines at the bottom of the file. They will run the scripts every 1 minute and 5 minutes.
*/1 * * * * /root/cron1
*/5 * * * * /root/cron5
apt-get install tripwire -y
cp /etc/tripwire/twpol.txt /etc/tripwire/twpol.txt.bak

curl https://samsclass.info/129S/proj/twpol.txt > /etc/tripwire/twpol.txt
Making the Tripwire Policy File
If you want to make your own file, here's how I did it:This initializes the tripwire database, and gets a list of files it shouldn't be monitoring:
On my Ubuntu 14.04.03 server, these were the files flagged by tripwire:Filename: /etc/rc.boot Filename: /root/mail Filename: /root/Mail Filename: /root/.xsession-errors Filename: /root/.xauth Filename: /root/.tcshrc Filename: /root/.sawfish Filename: /root/.pinerc Filename: /root/.mc Filename: /root/.gnome_private Filename: /root/.gnome-desktop Filename: /root/.gnome Filename: /root/.esd_auth Filename: /root/.elm Filename: /root/.cshrc Filename: /root/.bash_profile Filename: /root/.bash_logout Filename: /root/.amandahosts Filename: /root/.addressbook.lu Filename: /root/.addressbook Filename: /root/.Xresources Filename: /root/.Xauthority Filename: /root/.ICEauthority Filename: /proc/13157/fd/3 Filename: /proc/13157/fdinfo/3 Filename: /proc/13157/task/13157/fd/3 Filename: /proc/13157/task/13157/fdinfo/3Search for each file, except the "/proc/" ones, and comment out those lines.In the "Devices & Kernel information" section, replace this:
with this:# # Critical devices # ( rulename = "Devices & Kernel information", severity = $(SIG_HI), ) { /dev -> $(Device) ; /proc -> $(Device) ; }In the "System boot changes" section, comment out the three entries starting with /var/ as shown below:# # Critical devices # ( rulename = "Devices & Kernel information", severity = $(SIG_HI), ) { /dev -> $(Device) ; /dev/pts -> $(Device) ; #/proc -> $(Device) ; /proc/devices -> $(Device) ; /proc/net -> $(Device) ; /proc/tty -> $(Device) ; /proc/sys -> $(Device) ; /proc/cpuinfo -> $(Device) ; /proc/modules -> $(Device) ; /proc/mounts -> $(Device) ; /proc/dma -> $(Device) ; /proc/filesystems -> $(Device) ; /proc/interrupts -> $(Device) ; /proc/ioports -> $(Device) ; /proc/scsi -> $(Device) ; /proc/kcore -> $(Device) ; /proc/self -> $(Device) ; /proc/kmsg -> $(Device) ; /proc/stat -> $(Device) ; /proc/loadavg -> $(Device) ; /proc/uptime -> $(Device) ; /proc/locks -> $(Device) ; /proc/meminfo -> $(Device) ; /proc/misc -> $(Device) ; }Add the two lines starting with ! to the "Root config files" section, as shown below. This will prevent Tripwire from reporting changes in the Dropbox.# # These files change every time the system boots # ( rulename = "System boot changes", severity = $(SIG_HI) ) { # /var/lock -> $(SEC_CONFIG) ; # /var/run -> $(SEC_CONFIG) ; # daemon PIDs # /var/log -> $(SEC_CONFIG) ; }Press Ctrl+X, Y, Enter to save the file.# These files change the behavior of the root account ( rulename = "Root config files", severity = 100 ) { /root -> $(SEC_CRIT) ; # Catch all additions to /root !/root/Dropbox; # Skip Dropbox folder !/root/.dropbox; # Skip Dropbox config folder
apt-get install python-pip -y

pip install speedtest-cli

speedtest-cli
twadmin -m P /etc/tripwire/twpol.txt

tripwire --init

tripwire --check
Go to twitter.com, sign up for a new account. Go go http://dev.twitter.com/apps
Click the "Create New App" button.
Fill in the form and click the "Create your Twitter application" button.
On the "Keys and Access Tokens" tab, in the "Your Access token" section, click the "Create my access token" button.
Note these items:
Tweeting PHP Script
On the monitoring server, (not the honeypot), place this PHP script, which I called twitpost.php. The only modification required is to put the four values you noted above into the script at the start of the "sendTweet" function.<?php function buildBaseString($baseURI, $method, $params) { $r = array(); ksort($params); foreach($params as $key=>$value){ $r[] = "$key=" . rawurlencode($value); } return $method."&" . rawurlencode($baseURI) . '&' . rawurlencode(implode('&', $r)); } function buildAuthorizationHeader($oauth) { $r = 'Authorization: OAuth '; $values = array(); foreach($oauth as $key=>$value) $values[] = "$key=\"" . rawurlencode($value) . "\""; $r .= implode(', ', $values); return $r; } function sendTweet(){ $oauth_access_token = "INSERT-YOUR-VALUE-HERE"; $oauth_access_token_secret = "INSERT-YOUR-VALUE-HERE"; $consumer_key = "INSERT-YOUR-VALUE-HERE"; $consumer_secret = "INSERT-YOUR-VALUE-HERE"; $twitter_timeline = "user_timeline"; // mentions_timeline / user_timeline / home_timeline / retweets_of_me // create request $postfields = array( 'status' => $_GET["status"] ); $oauth = array( 'oauth_consumer_key' => $consumer_key, 'oauth_nonce' => time(), 'oauth_signature_method' => 'HMAC-SHA1', 'oauth_token' => $oauth_access_token, 'oauth_timestamp' => time(), 'oauth_version' => '1.0' ); // merge request and oauth to one array // $oauth = array_merge($oauth, $request); // do some magic $base_info = buildBaseString("https://api.twitter.com/1.1/statuses/update.json", 'POST', $oauth); $composite_key = rawurlencode($consumer_secret) . '&' . rawurlencode($oauth_access_token_secret); $oauth_signature = base64_encode(hash_hmac('sha1', $base_info, $composite_key, true)); $oauth['oauth_signature'] = $oauth_signature; // make request $header = array(buildAuthorizationHeader($oauth), 'Expect:'); $options = array( CURLOPT_HTTPHEADER => $header, CURLOPT_POSTFIELDS => $postfields, CURLOPT_HEADER => false, CURLOPT_URL => "https://api.twitter.com/1.1/statuses/update.json", CURLOPT_RETURNTRANSFER => true, CURLOPT_SSL_VERIFYPEER => false); $feed = curl_init(); curl_setopt_array($feed, $options); $json = curl_exec($feed); curl_close($feed); return $json; } $tweet = sendTweet(); echo $tweet; ?>Violation and Login Detector
To prepare for this script, on your logging server, execute these commands:Save this script on your logging server, and run it periodically in a cron job. I called it tweet-honey.Replace "example.com" with the URL of your logging server, and "drupal.samsclass.info" with the URL of your honeypot.
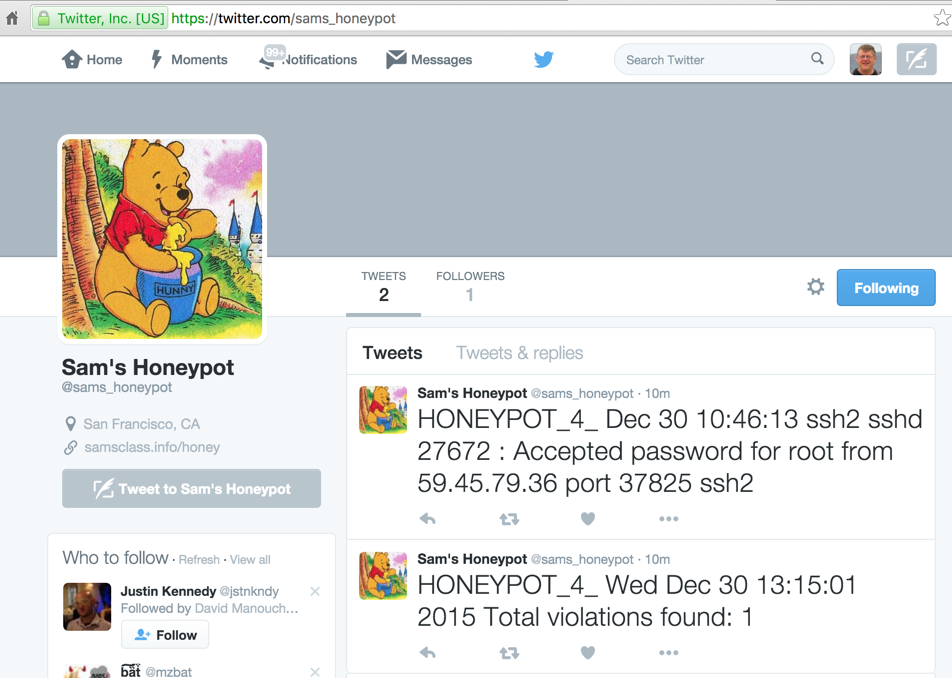
Now follow your honeypot's Twitter account, and use Twitter settings to alert you via Email or SMS.
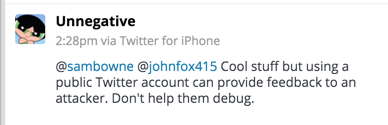
So to make these updates private, use the scripts below.
Tweeting PHP Script (DM Version)
On the monitoring server, (not the honeypot), place this PHP script, which I called twitdm.php. The only modification required is to put the four values you noted above into the script at the start of the "sendDM" function.<?php function buildBaseString($baseURI, $method, $params) { $r = array(); ksort($params); foreach($params as $key=>$value){ $r[] = "$key=" . rawurlencode($value); } return $method."&" . rawurlencode($baseURI) . '&' . rawurlencode(implode('&', $r)); } function buildAuthorizationHeader($oauth) { $r = 'Authorization: OAuth '; $values = array(); foreach($oauth as $key=>$value) $values[] = "$key=\"" . rawurlencode($value) . "\""; $r .= implode(', ', $values); return $r; } function sendDM(){ $oauth_access_token = "INSERT-YOUR-VALUE-HERE"; $oauth_access_token_secret = "INSERT-YOUR-VALUE-HERE"; $consumer_key = "INSERT-YOUR-VALUE-HERE"; $consumer_secret = "INSERT-YOUR-VALUE-HERE"; $twitter_timeline = "user_timeline"; // mentions_timeline / user_timeline / home_timeline / retweets_of_me // create request $postfields = array( 'screen_name' => $_GET["screen_name"], 'text' => $_GET["text"] ); $oauth = array( 'oauth_consumer_key' => $consumer_key, 'oauth_nonce' => time(), 'oauth_signature_method' => 'HMAC-SHA1', 'oauth_token' => $oauth_access_token, 'oauth_timestamp' => time(), 'oauth_version' => '1.0' ); // merge request and oauth to one array // $oauth = array_merge($oauth, $request); // do some magic $base_info = buildBaseString("https://api.twitter.com/1.1/direct_messages/new.json", 'POST', $oauth); $composite_key = rawurlencode($consumer_secret) . '&' . rawurlencode($oauth_access_token_secret); $oauth_signature = base64_encode(hash_hmac('sha1', $base_info, $composite_key, true)); $oauth['oauth_signature'] = $oauth_signature; // make request $header = array(buildAuthorizationHeader($oauth), 'Expect:'); $options = array( CURLOPT_HTTPHEADER => $header, CURLOPT_POSTFIELDS => $postfields, CURLOPT_HEADER => false, CURLOPT_URL => "https://api.twitter.com/1.1/direct_messages/new.json", CURLOPT_RETURNTRANSFER => true, CURLOPT_SSL_VERIFYPEER => false); $feed = curl_init(); curl_setopt_array($feed, $options); $json = curl_exec($feed); curl_close($feed); return $json; } $tweet = sendDM(); echo $tweet; ?>Violation and Login Detector
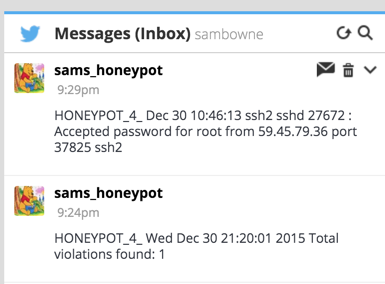
To prepare for this script, on your logging server, execute these commands:Save this script on your logging server, and run it periodically in a cron job. I called it dm-honey.Replace "example.com" with the URL of your logging server, and "drupal.samsclass.info" with the URL of your honeypot.
Also replace YOUR_SCREEN_NAME with the Twitter screen name to receive the DMs. That account must be following the honeypot account.
Now follow your honeypot's Twitter account, and use Twitter settings to alert you via Email or SMS.
Initial Server Setup with Ubuntu 14.04
How To Install Linux, Apache, MySQL, PHP (LAMP) stack on Ubuntu 14.04
How To Use Tripwire to Detect Server Intrusions on an Ubuntu VPS
How To Install and Setup Postfix on Ubuntu 14.04
tcpdump: Monitor ALL eth1 Traffic Except My Own SSH Session
Install Dropbox In An Entirely Text-Based Linux Environment
Manually Throttle the Bandwidth of a Linux Network Interface
Simplest PHP example for retrieving user_timeline with Twitter API version 1.1
TwitterOAuth complains undefined constants