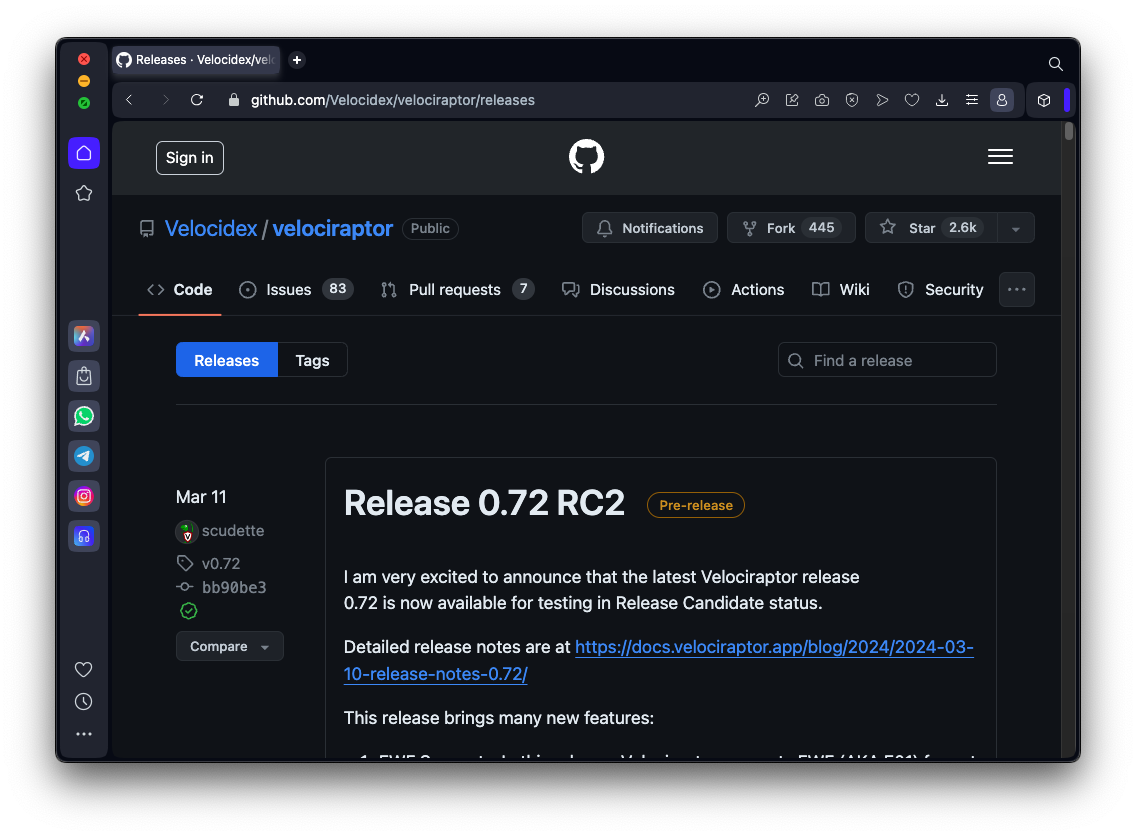
https://github.com/Velocidex/velociraptor/releases
Identify the latest version, as shown below.
Scroll down and expand the Assets container.
We will use two of these files: the 64-bit Linux installer and the Windows 64-bit EXE installer, outlined in the image below.
Make a note of these filenames.

These commands download the Linux installer, make it executable, and run it to create a server configuration file:
cd
mkdir velociraptor
cd velociraptor

wget https://github.com/Velocidex/velociraptor/releases/download/v0.73/velociraptor-v0.73.1-linux-amd64

chmod +x velociraptor-v0.73.1-linux-amd64
./velociraptor-v0.73.1-linux-amd64 config generate > velociraptor.config.yaml
Find your server's IP address and make a note of it.
ip a
nano velociraptor.config.yaml
Repeat the process to replace 127.0.0.1 with your Linux server's IP address for all occurrences (there are three of them).
Save the file with Ctrl+X, Y, Enter.
./velociraptor-v0.73.1-linux-amd64 --config velociraptor.config.yaml user add admin --role administrator
./velociraptor-v0.73.1-linux-amd64 --config velociraptor.config.yaml frontend -v
Leave this window open, and leave the process running.
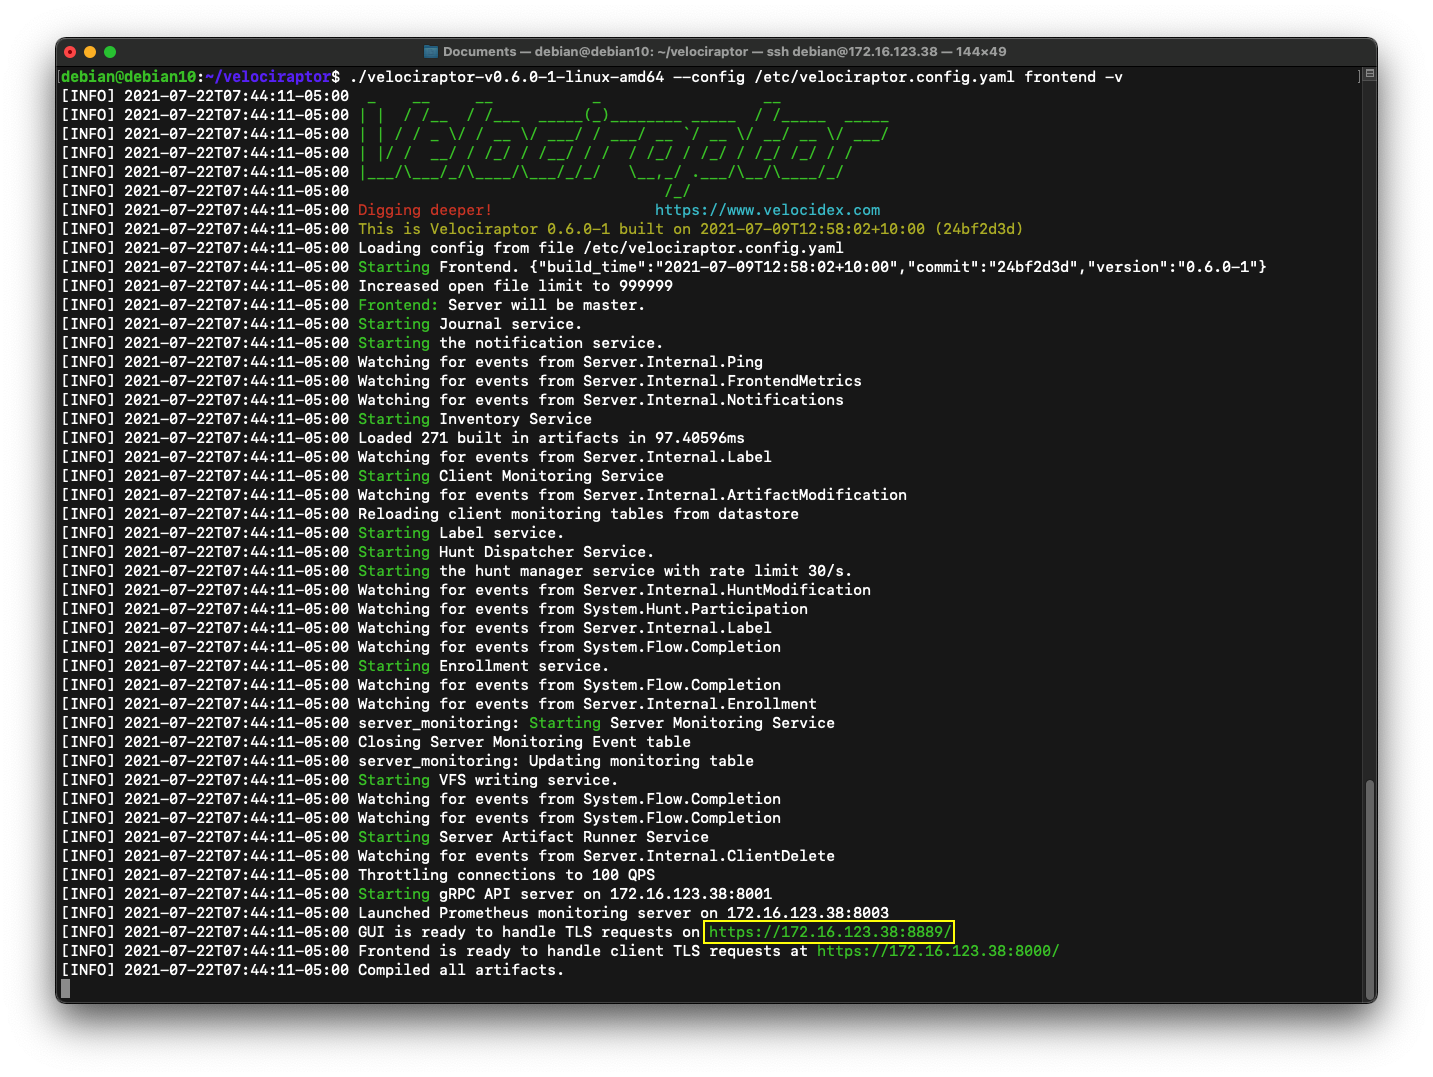
USE PORT 8889! If you use port 8000, you'll get a 404 error.
Approve the use of an unsigned certificate.
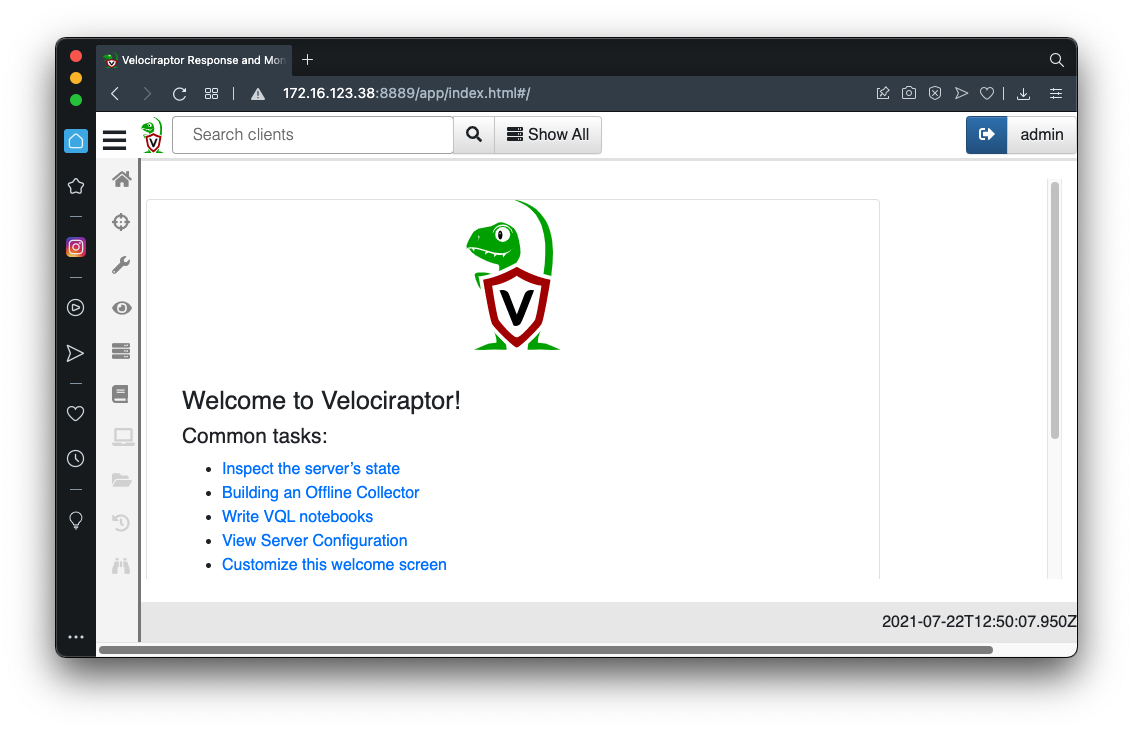
Log in as admin with the password you chose earlier.
You see the GUI, as shown below.
Note for Azure Users
If you are using Azure cloud machines, you will need to open TCP ports 8000 and 8889 in the Azure firewall on your Linux server, and view the GUI using the public IP address of your Linux server.To reach the firewall settings, start at https://portal.azure.com/#home and click "Virtual machines", click the name of your Linux server, and click Networking.
Then click the "Add inbound port rule" and configure a rule as shown below.
IR 371.1: Server Version (5 pts)
At the top left, click the house icon to go to the home page, which shows "Server status".Scroll to the bottom of the page.
The flag is covered by a green rectangle in the image below.
Troubleshooting
If the IP address of your Velociraptor server changes, you need to delete the /var/tmp/velociraptor folder or it will continue to tell clients to use the old IP address, even after you update the configuration files.
cd
cd velociraptor
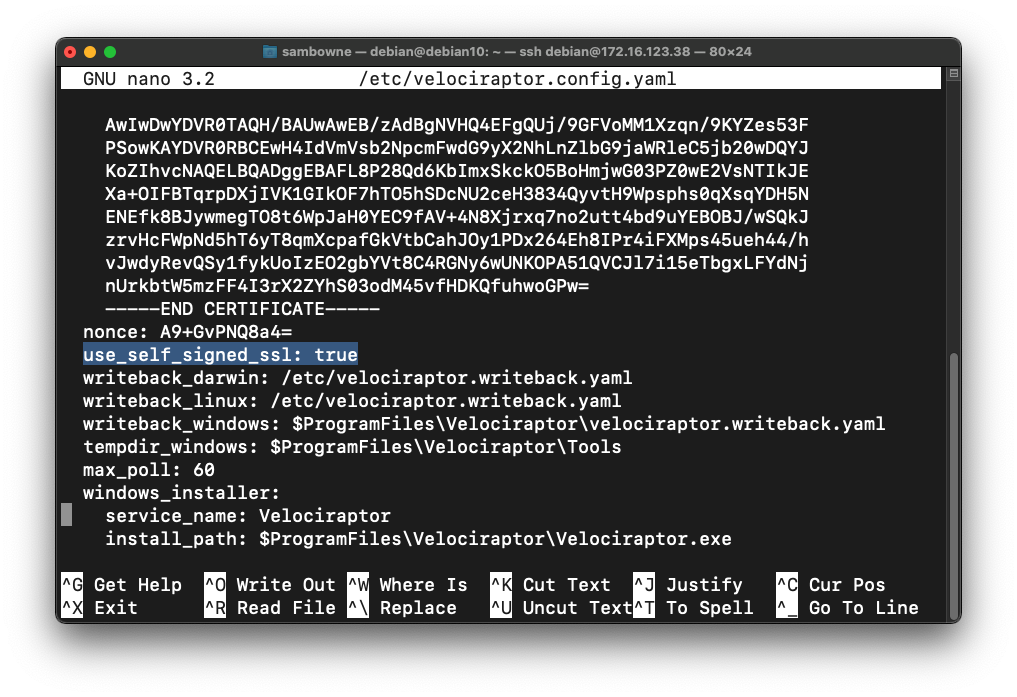
nano velociraptor.config.yaml
Below the "nonce: line, insert this line, as shown in the image below.
CAREFULLY INDENT the line with two spaces so it matches the lines above and below it.
use_self_signed_ssl: true
Save the file with Ctrl+X, Y, Enter.
Then click the + sign, outlined in blue in the image below.

In the "New Collection: Select Artifacts to collect" box, search for msi.
Click "Server.Utils.CreateMSI", as shown below.

At the bottom, click the "Configure Parameters" button, outlined in red in the image above.
In the "New Collection: Configure Parameters" box, at the top left, click the wrench icon, outlined in red in the image below.
In the CustomConfig field, enter the path to your client configuration file, which should be:
/home/debian/velociraptor/velociraptor.config.yamlas shown below. (The config filename is different than shown in the image below.)

At the bottom right, click Launch.
On the next page, in the top pane, click the first row.
In the lower pane, click the Log tab.
You should see a velociraptor MSI file created and uploaded, as outlined in red in the image below.

Then execute this command:
sudo find / | grep velociraptor | grep msi

Execute these commands:
sudo apt update
sudo apt install apache2 -y
sudo cp $(sudo find / | grep velociraptor | grep msi) /var/www/html/velociraptor.msi
sudo chmod a+r /var/www/html/*
ls -l /var/www/html

Note for Azure Users
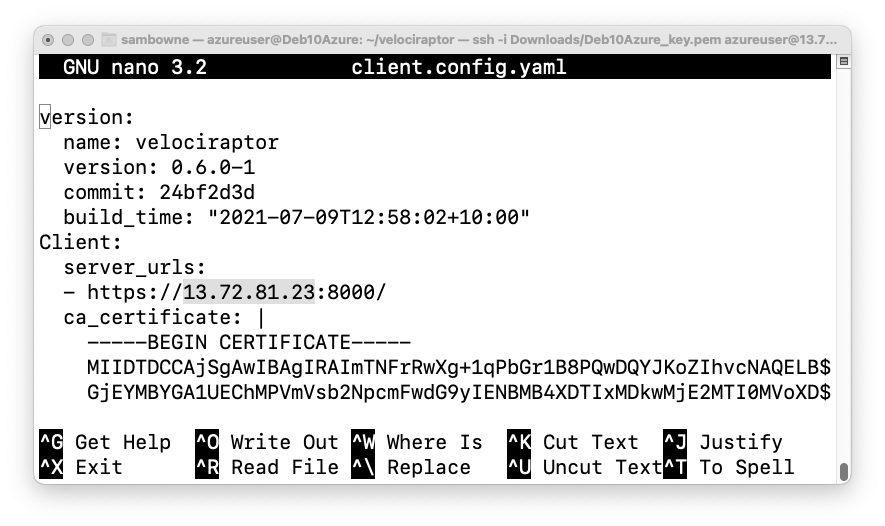
Before packaging the Windows client, edit the client.config.yaml file and replace the IP address in the Client section with the public address of your Linux server, as shown below.
http://192.168.0.36/velociraptor.msiIf you see a warning saying this file isn't commonly downloaded, click the three-dot icon and click Keep.
If you see a warning saying "Make sure you trust velociraptor.msi...", click "Show more", and then click "Keep anyway".
If a "Windows protected your PC" box pops uo, click "More info" and click "Run anyway". If a "User Account Control" box pops up, click Yes.
Troubleshooting Tips
Windows Defender
Windows Defender may block the velociraptor executable because it's unsigned.To prevent that, open "Windows Defender settings" and disable Virus protection, or exclude the folder Velociraptor is in from scanning.
Another solution is to install the signed Velociraptor executable and add a configuration file, as explained here.
Client Problems
Another useful troubleshooting technique is to run the client in verbose mode instead of as a service, with these commands:Removing the Client
To completely remove the Velociraptor client from the Windows machine, perform these steps:
- Delete the "C:\Program Files\Velociraptor" folder
- In an Administrator Command Prompt, execute this command:
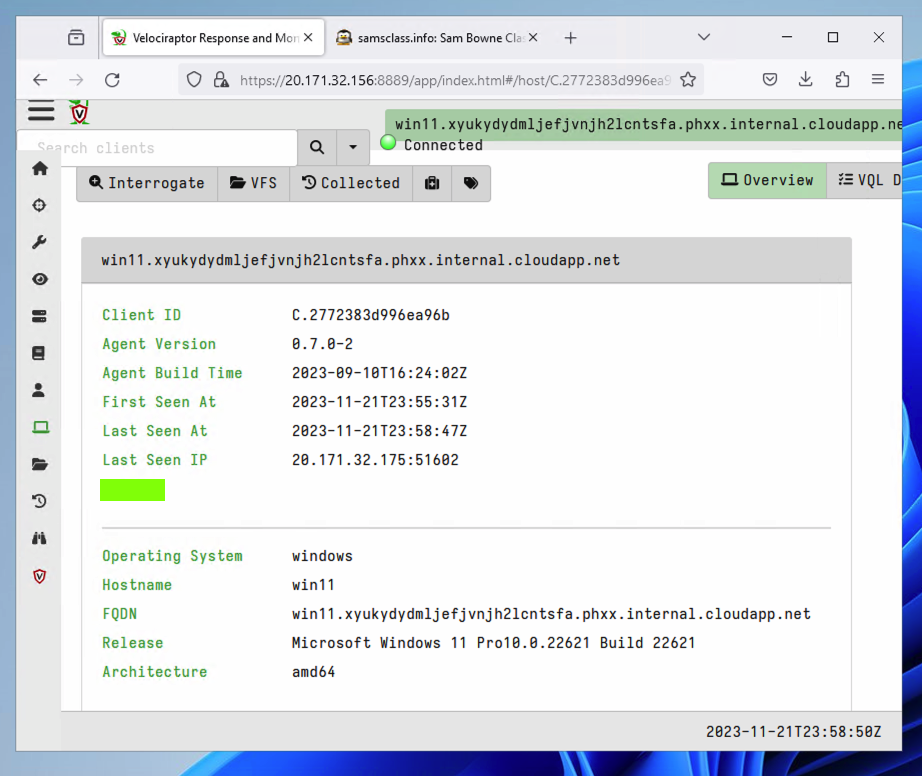
Click your client's Client ID, which appears in green text, as shown below.
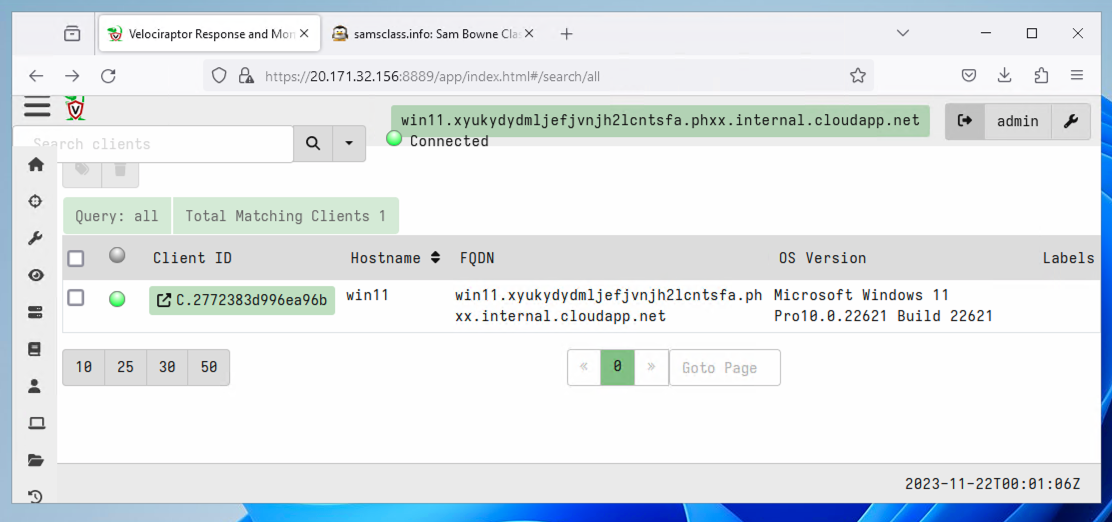
IR 371.2: Agent Name (5 pts)
The flag is covered by a green rectangle in the image below.
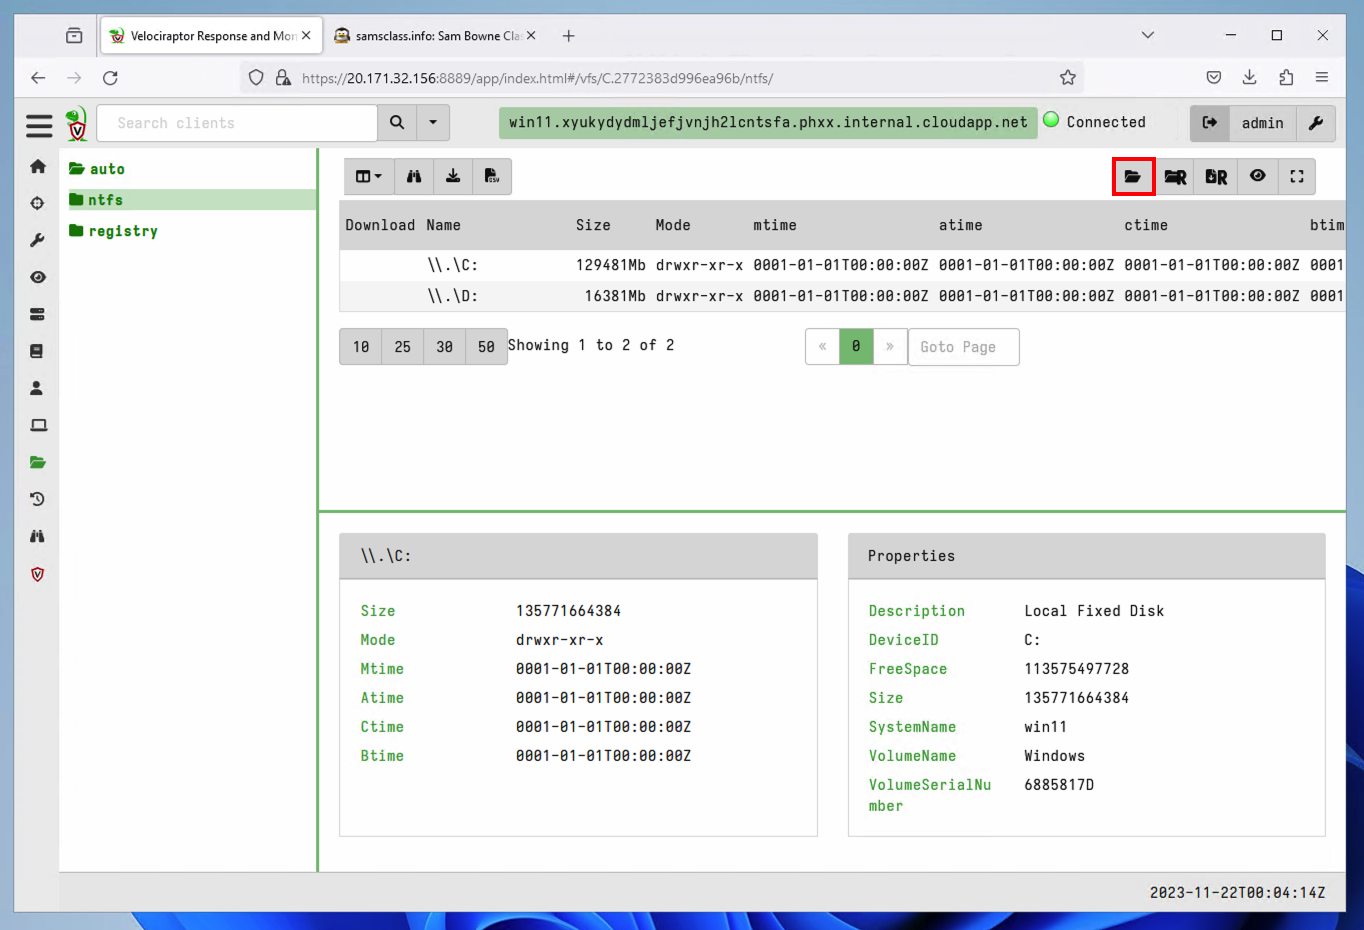
At the top left, there are three top-level categories: auto, ntfs, and registry.
Click ntfs. In the top center, click the first folder icon to refresh this directory, outlined in red in the image below.
IR 371.3: Registry Information (5 pts)
Refresh the registry category the same way.On the left side, click registry to expand it.
On the left side, click HKEY_CURRENT_USER. Refresh this container to see the contents.
The flag appears, covered by a green rectangle in the image below.
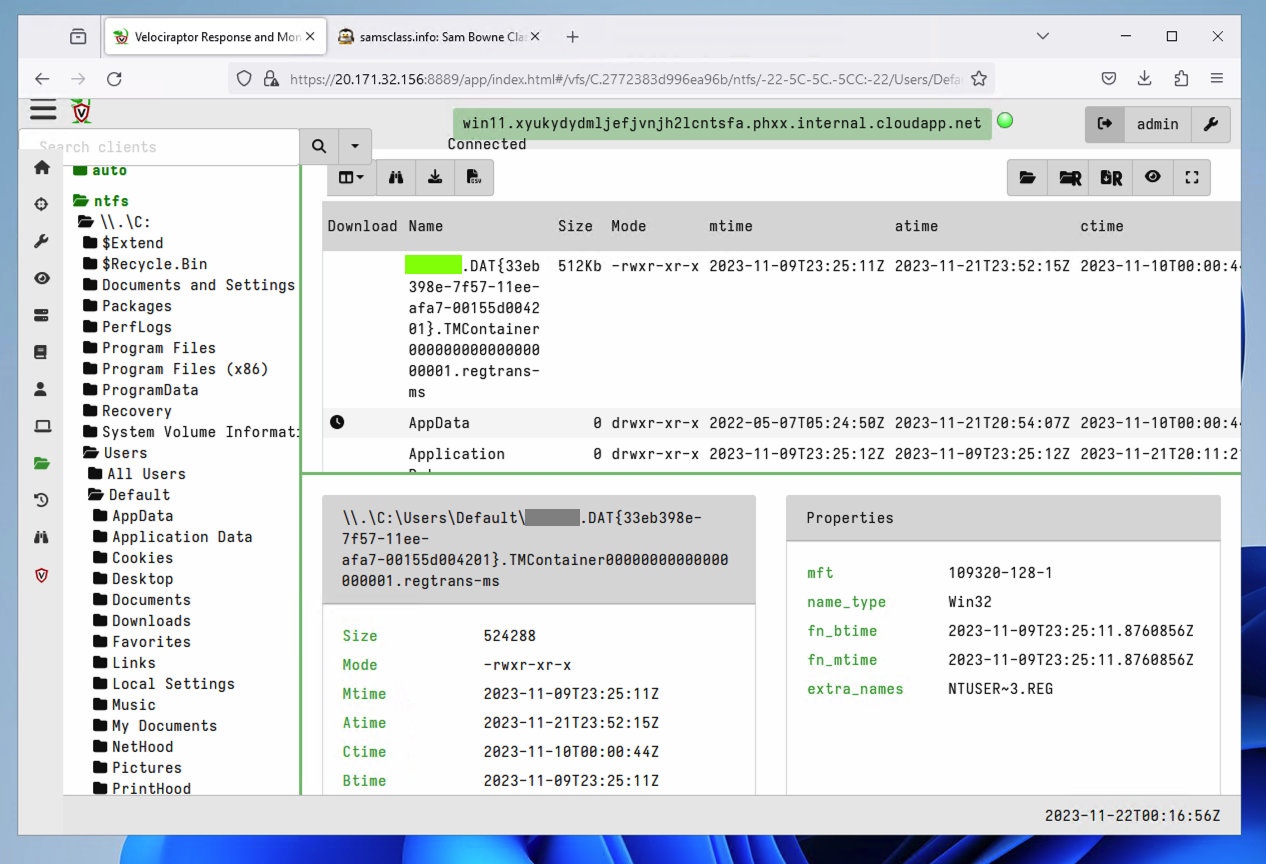
IR 371.4: Exploring the File System (5 pts)
In the ntfs category, refresh these items:The flag appears, covered by a green rectangle in the image below.
- \\.\C: (You may need to refresh the browser to see the tree on the left side)
- Users (You may need to refresh the browser to see the tree on the left side)
- Default
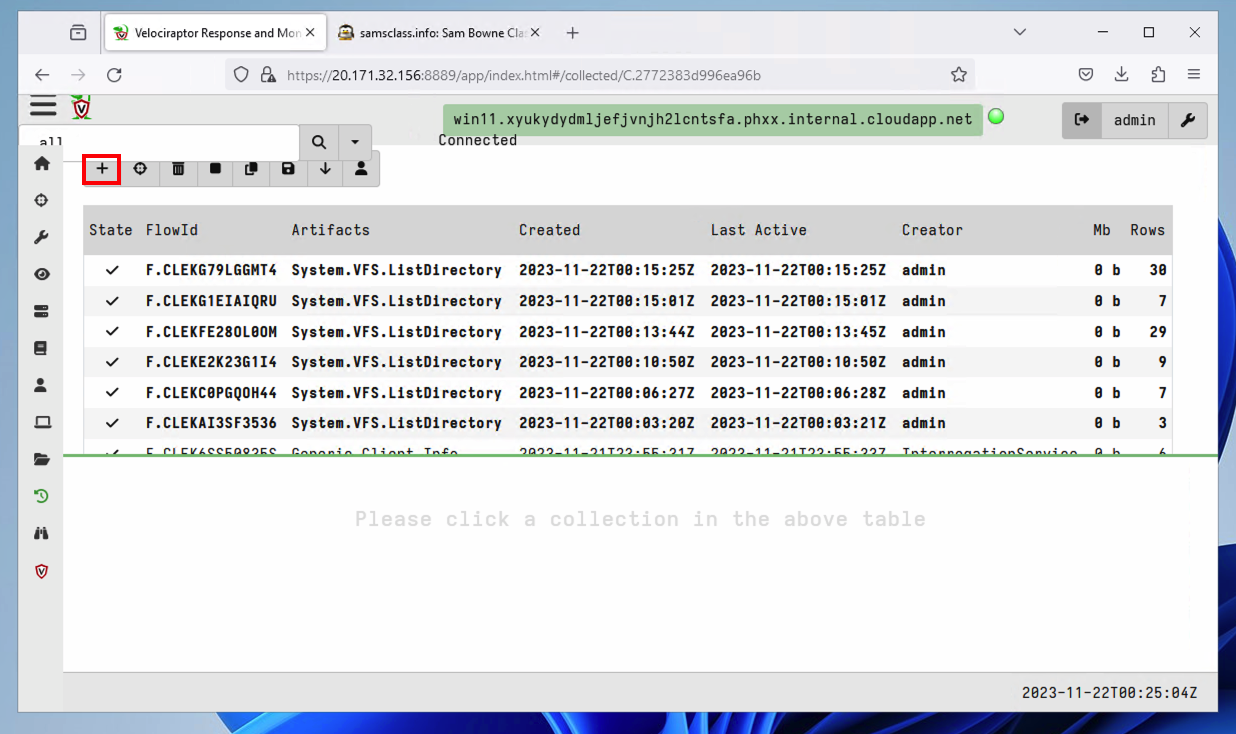
In the Velociraptor GUI, at the top left, click the down-arrow next to the search box. Click "Show All".
Click your client's Client ID, which appears in green text.
At the top center, click the Collected button.
At the top left, click the plus-sign, outlined in red in the image below.
At the top left, in the search box, type netstat.
Click Windows.Network.NetstatEnriched.
A description of this artifact appears, as shown below.

At the lower left, click the "Configure Parameters" button.
At the top left, click the wrench icon.
In the "ProcessNameRegex" field, enter velociraptor as shown below.
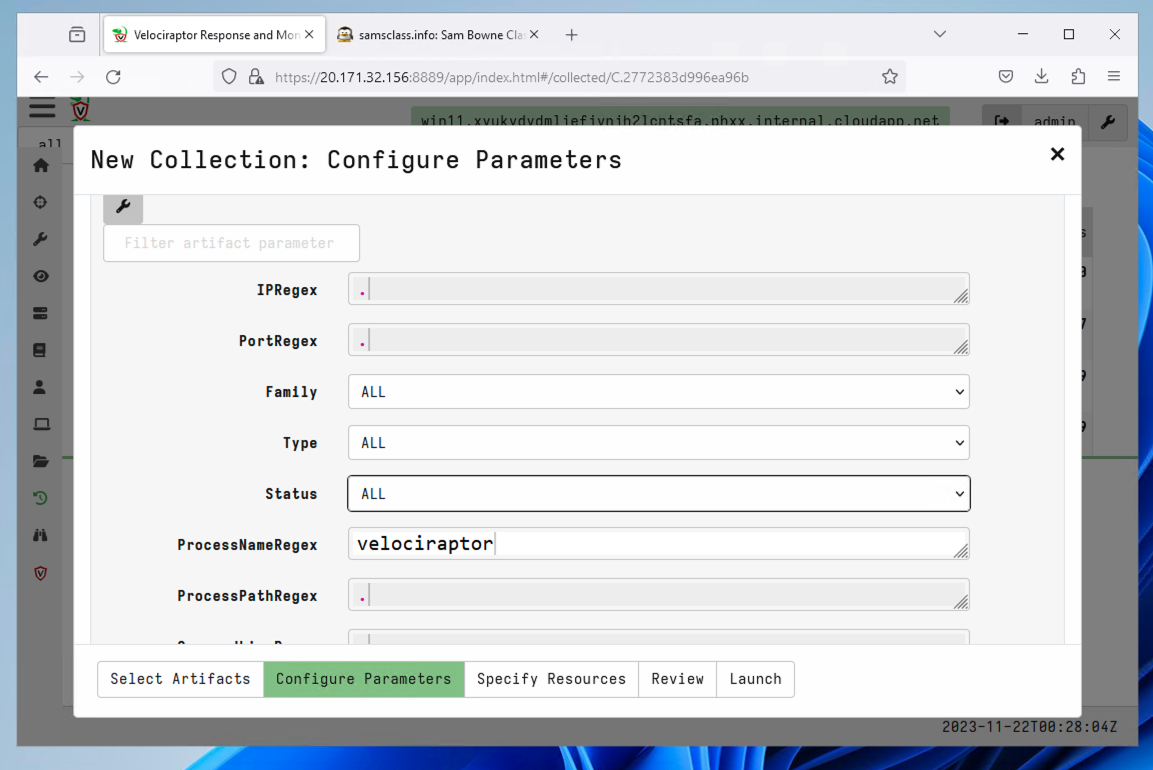
At the lower right, click the Launch button.
In the next screen, at the top center, click the Windows.Network.NetstatEnriched line to highlight it.
In the lower pane, click the Results tab.
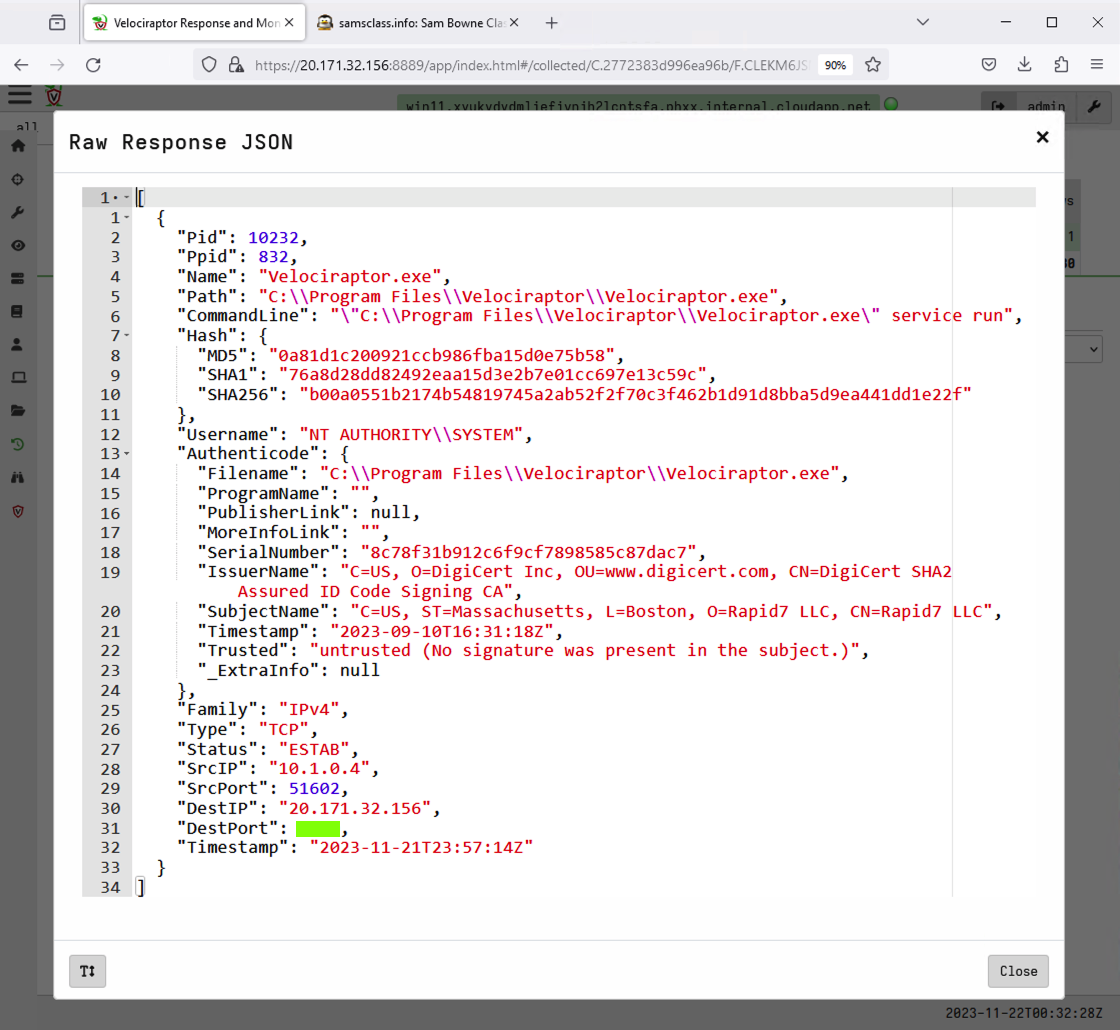
You see information about the Velociraptor process, as shown below.
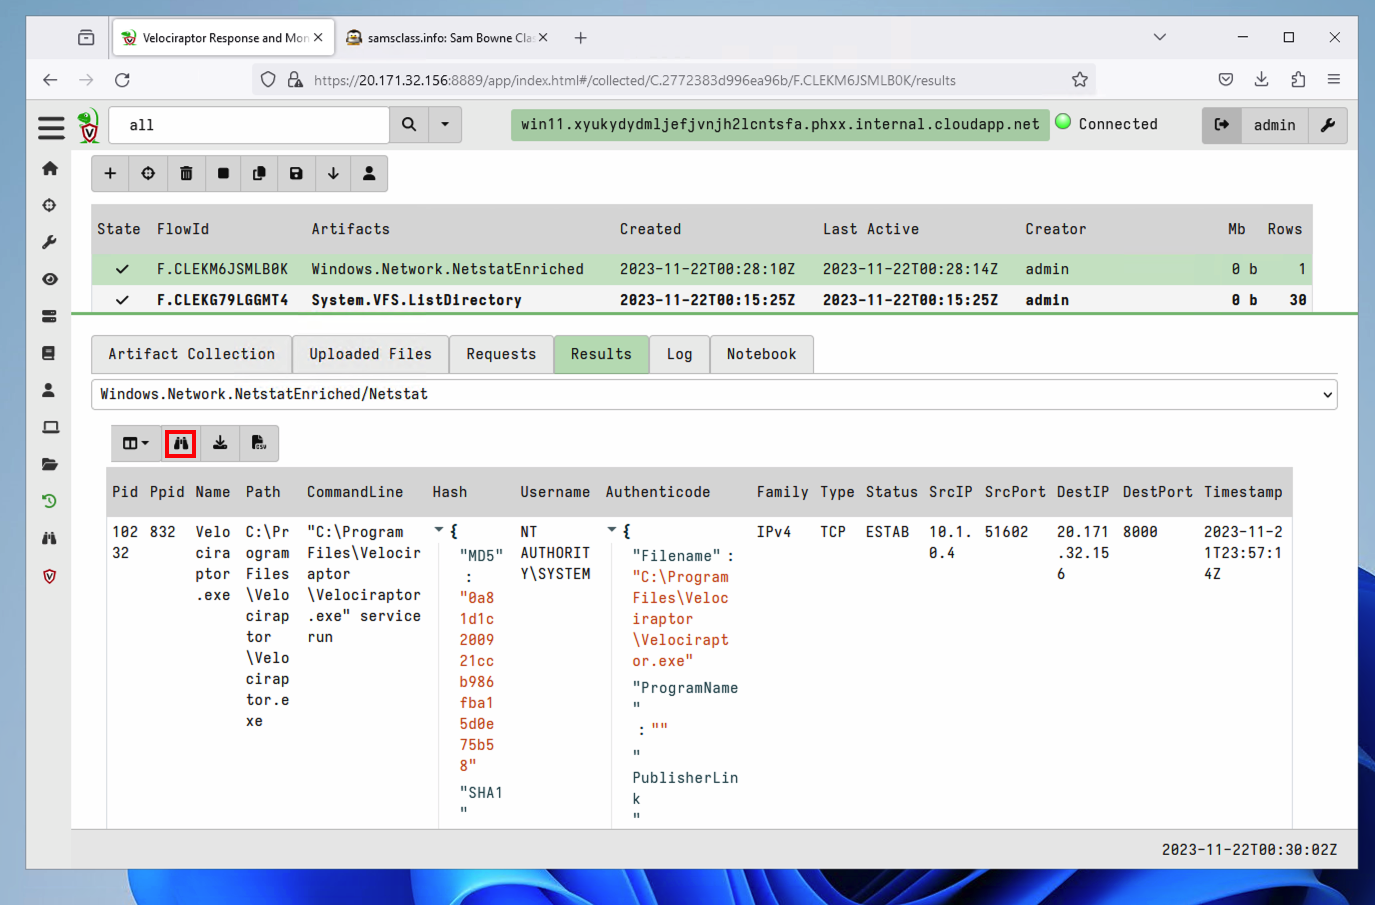
IR 371.5: DestPort (5 pts)
In the lower pane, click the binoculars icon, outlined in red in the image above.The flag appears, covered by a green rectangle in the image below.
Note: the name hs changed from "DestPort" to "RPort" in version 0.73
Posted 5-7-2021
Openssh install added 7-31-2021
IP address change marked as optional 8-2-2021
Azure notes added 11-4-21
Windows Defender note added 9-16-22
Version box added 10-24-22
Updated and flag 2 changed 11-21-23
Alternative method of moving the file added 3-27-24
Updated to Velociraptor version 9.72 RC 2 and video added 4-16-24
Updated to Velociraptor version v0.73.1, and flag 1 updated 11-19-24
Removed a sudo, added a client and a server troubleshooting note 11-28-24
Path to client config file updated 12-11-24