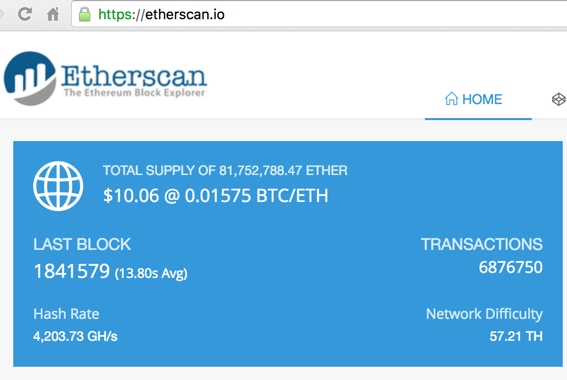
Live data about Ethereum appears, as shown below. When I did it (7-7-16), there were 81 million Ethers, worth $10 each, for a total market capitalization around $800 M. This makes Ethereum the second largest cryptocurrency--only Bitcoin is larger, with a market cap of about $12 B.
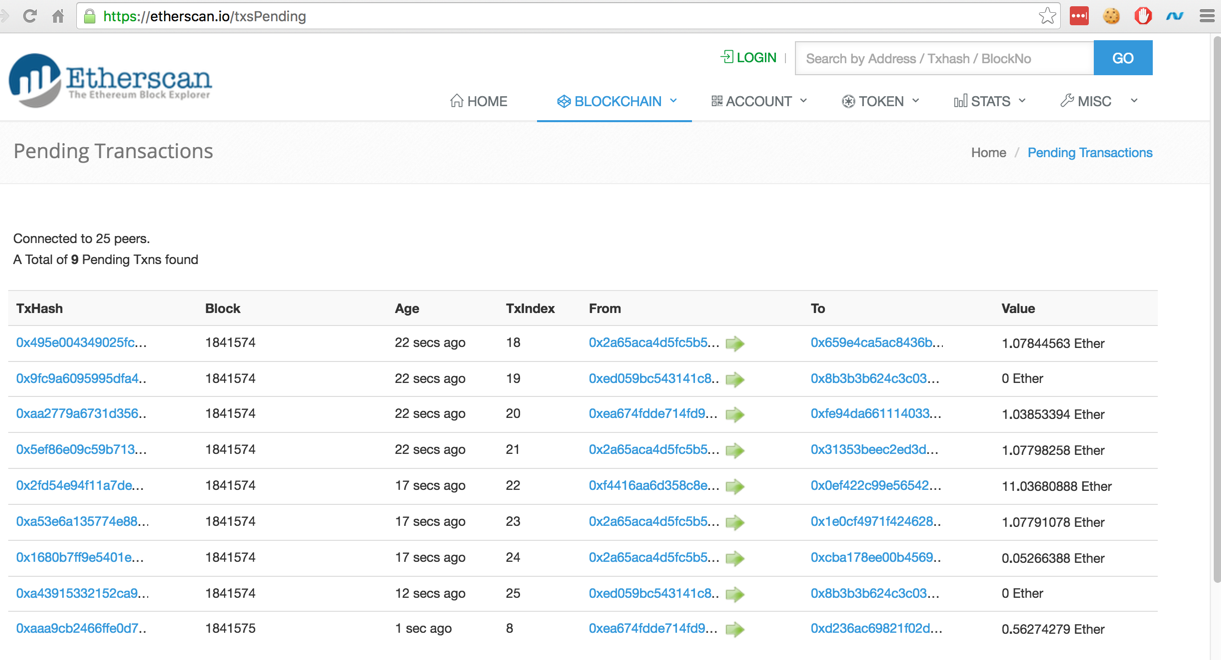
In the top center, hover the mouse over BLOCKCHAIN and click "View Pending Txns".
A short list of pending transactions appears, as shown below. Refresh your browser every few seconds to see how it works--transactions accumulate for about 30 seconds, then vanish, as the block is mined. The time between blocks varies quite a bit--I saw one block as long as 1 minute.
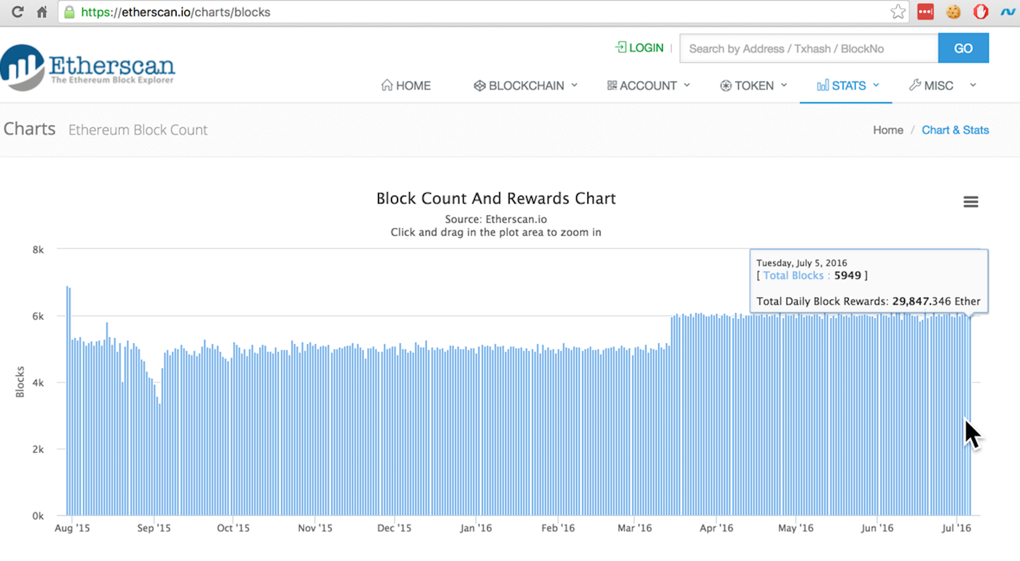
In the top section, hover the mouse over STATS and click "Block Count Chart".
A chart appears, as shown below. As you can see, Ethereum has approximately 6000 blocks per day -- approximately one every 30 seconds.
sudo apt-get install -y software-properties-common
sudo add-apt-repository -y ppa:ethereum/ethereum
sudo apt-get update
sudo apt-get install -y ethereum
cd
mkdir eth-test
cd eth-test
nano genesis.json
{
    "nonce": "0x0000000000000042",
    "mixhash": "0x0000000000000000000000000000000000000000000000000000000000000000",
    "difficulty": "0x4000",
    "alloc": {},
    "coinbase": "0x0000000000000000000000000000000000000000",
    "timestamp": "0x00",
    "parentHash": "0x0000000000000000000000000000000000000000000000000000000000000000",
    "extraData": "Custem Ethereum Genesis Block",
    "gasLimit": "0xffffffff"
}
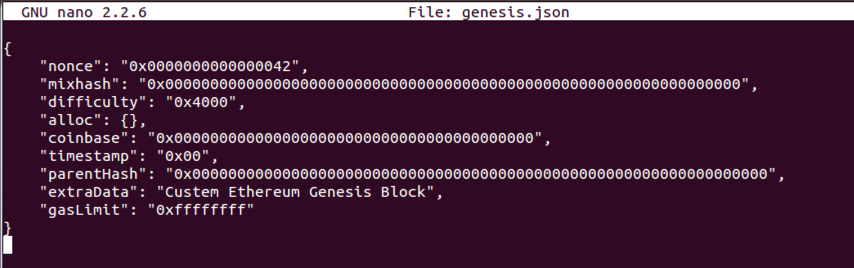
Save the file with Ctrl+X, Y, Enter.
mkdir eth-data
geth --genesis genesis.json --datadir eth-data --networkid 123 --nodiscover --maxpeers 0 console
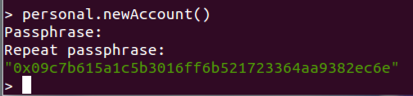
personal.newAccount()
Exit the geth console with:
exit
nano genesis.json
{
    "nonce": "0x0000000000000042",
    "mixhash": "0x0000000000000000000000000000000000000000000000000000000000000000",
    "difficulty": "0x4000",
    "alloc": {
    "0x09c7b615a1c5b3016ff6b521723364aa9382ec6e": {
        "balance": "10000000000000000000"
   		}
   	},
    "coinbase": "0x0000000000000000000000000000000000000000",
    "timestamp": "0x00",
    "parentHash": "0x0000000000000000000000000000000000000000000000000000000000000000",
    "extraData": "Custem Ethereum Genesis Block",
    "gasLimit": "0xffffffff"
}
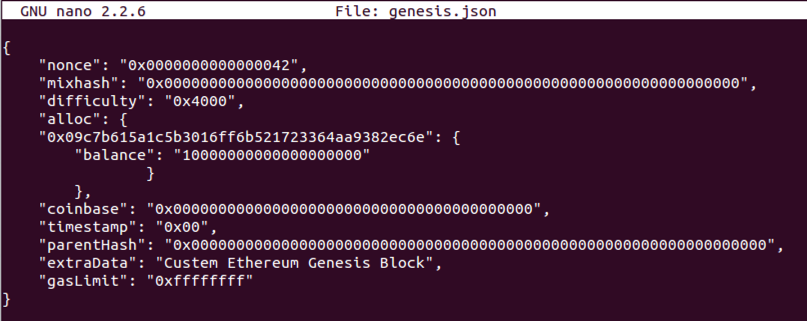
Save the file with Ctrl+X, Y, Enter.
cd eth-data
rm -rf chaindata dapp history nodekey
cd ..
geth --genesis genesis.json --datadir eth-data --networkid 123 --nodiscover --maxpeers 0 console
primary = eth.accounts[0]
web3.fromWei(eth.getBalance(primary), "ether")

First execute this command to exit the geth console:
exit
geth --mine --datadir eth-data --networkid 123 --nodiscover --maxpeers 0 console 2>>geth.log
Note: If you use Geth/v1.5.0-unstable, as shown in the image below, the project will fail. I modified the instructions so you should have a stable version 1.4.9 instead.

Execute this commands to see your balance:
primary = eth.accounts[0]
balance = web3.fromWei(eth.getBalance(primary), "ether")

Open a new Terminal window, to see a Bash prompt ($). Execute this command:
sudo add-apt-repository ppa:ethereum/ethereum
Execute these commands:
sudo apt-get update
sudo apt-get install solc -y
which solc
/usr/bin/solc

Return to the Terminal window showing the geth console. Execute these commands, adjusting the path in the first command to point to your solc location, if necessary.
admin.setSolc("/usr/bin/solc")
eth.getCompilers()

contract mortal {
    /* Define variable owner of the type address*/
    address owner;

    /* this function is executed at initialization and sets the owner of the contract */
    function mortal() { owner = msg.sender; }

    /* Function to recover the funds on the contract */
    function kill() { if (msg.sender == owner) selfdestruct(owner); }
}

contract greeter is mortal {
    /* define variable greeting of the type string */
    string greeting;

    /* this runs when the contract is executed */
    function greeter(string _greeting) public {
        greeting = _greeting;
    }

    /* main function */
    function greet() constant returns (string) {
        return greeting;
    }
}
primary = eth.accounts[0]
personal.unlockAccount(primary)

var greeterSource = 'contract mortal { address owner; function mortal() { owner = msg.sender; } function kill() { if (msg.sender == owner) suicide(owner); } } contract greeter is mortal { string greeting; function greeter(string _greeting) public { greeting = _greeting; } function greet() constant returns (string) { return greeting; } }'

In the geth console, execute this command.
var greeterCompiled = web3.eth.compile.solidity(greeterSource)

In the geth console, paste in these commands.
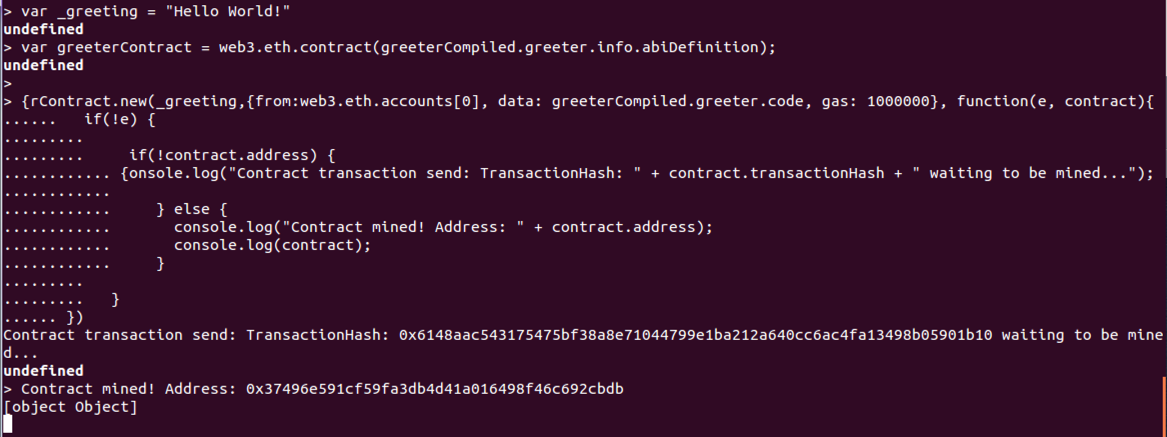
var _greeting = "Hello World!"
var greeterContract = web3.eth.contract(greeterCompiled.greeter.info.abiDefinition);

var greeter = greeterContract.new(_greeting, {from: eth.accounts[0], data: greeterCompiled.greeter.code, gas: 1000000}, function(e, contract){
  if(!e) {

    if(!contract.address) {
      console.log("Contract transaction send: TransactionHash: " + contract.transactionHash + " waiting to be mined...");

    } else {
      console.log("Contract mined! Address: " + contract.address);
      console.log(contract);
    }

  }
})
eth.getCode(greeter.address)
greeter.greet()

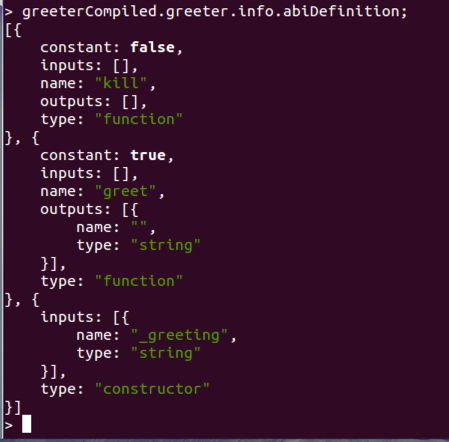
To see it, execute this command:
greeterCompiled.greeter.info.abiDefinition;
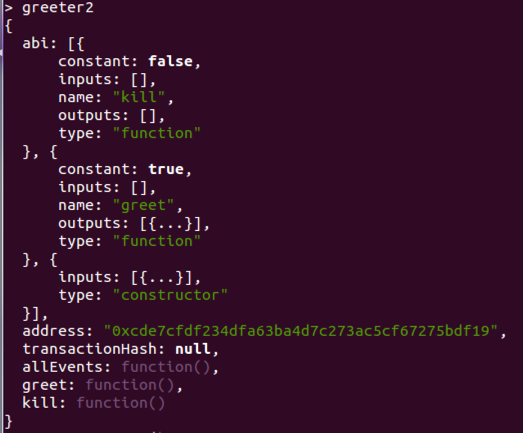
Execute this command, all on one line. Replace the address at the end with the your greeter's address, which you noted earlier.
var greeter2 = eth.contract([{constant:false,inputs:[],name:'kill',outputs:[],type:'function'},{constant:true,inputs:[],name:'greet',outputs:[{name:'',type:'string'}],type:'function'},{inputs:[{name:'_greeting',type:'string'}],type:'constructor'}]).at('0xcde7cfdf234dfa63ba4d7c273ac5cf67275bdf19');

To see the methods and attributes of the "greeter2" object, execute this command:
greeter2
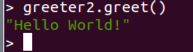
To run the greet method of the greeter2 object, execute this command:
greeter2.greet()
You can't do that with a simple call to a function like greet(), because adding or deleting something from the blockchain costs Ether. That requires a transaction, and you must specify which account will be used to pay the cost.
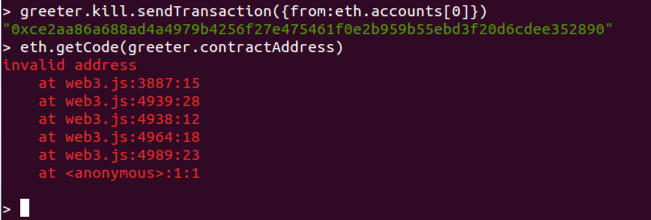
In the geth console, execute these commands, to delete the greeter contract and verify that it is gone.
greeter.kill.sendTransaction({from:eth.accounts[0]})
eth.getCode(greeter.contractAddress)