Overview
You need two images to work with -- a JPEG image and a GIF. The effects here work best if the JPEG is a detailed painting or photograph, and the GIF is a cartoon or line drawing.You can use images you created, or find new images on the Web. Save both images in a floppy disk or anywhere else you can find them. Make a note of the names of both images, their file sizes, and the URLs you got them from (if they are not your own property).
In my examples below, I will use the filenames ship.jpg and bird.gif for the original images. Your images may have any name you like. In this homework, you will make seven images by modifying those two images, and make a web page with all seven images on it.
Downloading Irfanview
You need a graphics program to modify the images. For PCs, the easiest one is Irfanview. To get it:- Open a browser and go to irfanview.com
- On the left, click Download
- Click the upper link, labelled TUCOWS Worldwide Network - Download Irfanview
- A TUCOWS window opens. On the right, under the Download title, find your
operating system and click on it.
- A page opens with a Software Library banner. In the United
States section, select California.
- A page showing one or more MIRROR NAMES appears. Click on one of the MIRROR NAMES.
- If you have Service Pack 2, an Information Bar window pops up, because
Service Pack 2 blocks the download. Click OK to close the
Information Bar window. Click the yellow Information Bar near
the top of the browser window, and select Download File.
- If a File Download - Security Warning box opens, click the
Save button. Save the file on your desktop. It is not big --
smaller than 1 MB, so it can easily be downloaded even with a dial-up
connection.
- Close all windows and double-click the iview392.exe file on your
desktop. If a new version has been released since I wrote these
instructions, the number may be larger than 392.
- If a Security Warning box pops up, click Run.
- An Irfanview Setup window opens. Click the Next button four times. When you see an Installation Successful! message, click the Done button.
JPEG Compression
- Click Start, All Programs, Irfanview,
Irfanview 3.92 to launch Irfanview.
- Click File, Open, and open your original JPEG image.
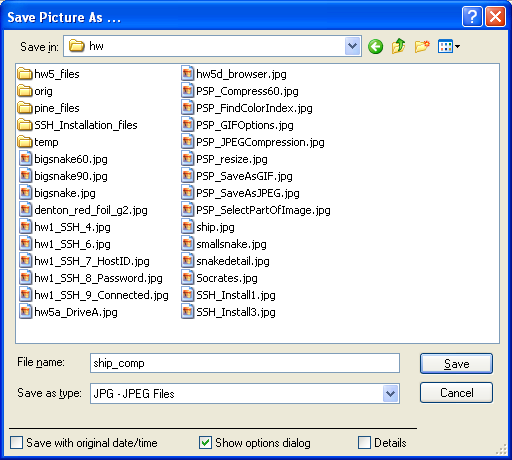
- Click File, Save As... to open the Save Picture As... box as shown to the right on this page. In the Save as type: drop-down list box at the bottom, select JPG - JPEG Files.
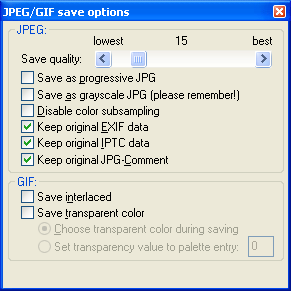
- In the JPEG/GIF Save Options box, drag the Save quality
slider to 15, as shown to the right on this page.
- In the Save Picture As... box, navigate to your floppy disk, or to the folder you are using, change the filename by adding "_comp" to it (to indicate that this is a compressed file), and click Save.
- Open My Computer and open the Floppy Disk (or the other folder you are using). Click View, Details to show file sizes. Find the original JPEG and the compressed version, as shown to the right on this page. The compressed version should be much smaller -- half as large or smaller. If it is not, repeat the process above, but drag the Save quality slider to a lower value.
- Close Irfanview.

Shrinking an Image
- Click Start, All Programs, Irfanview,
Irfanview 3.92 to launch Irfanview.
- Click File, Open, and open your original JPEG image.
- Click Image, Resize/Resample. In the
Resize/Resample image box, click the Half button, and then
click the OK button. You should see your image shrink.
- Click File, Save As... to open the
Save Picture As... box.
In the Save as type: drop-down list box at the bottom,
select JPG - JPEG Files.
- In the JPEG/GIF Save Options box, drag the Save quality
slider to 50.
- In the Save Picture As... box, navigate to your floppy disk,
or to the folder you are using, change the filename by adding "_half" to
it, and click Save.
- Close Irfanview.
Cropping an Image
- Click Start, All Programs, Irfanview,
Irfanview 3.92 to launch Irfanview.
- Click File, Open, and open your original JPEG image.
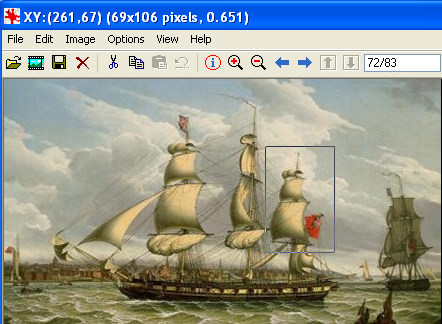
- Click on your image and drag to select a portion of the image, as shown
to the right on this page.
- Press Ctrl+X on the keyboard to cut out the selected portion of the
image, and Ctrl+V to paste it in as a new image. You should see
only the selected part in the Irfanview window.
- Click File, Save As... to open the
Save Picture As... box.
In the Save as type: drop-down list box at the bottom,
select JPG - JPEG Files.
- In the JPEG/GIF Save Options box, drag the Save quality
slider to 50.
- In the Save Picture As... box, navigate to your floppy disk,
or to the folder you are using, change the filename with the same name
as your original JPEG image, with a "_detail" added to
it, and click Save.
- Close Irfanview.
Transparent GIF
- Click Start, All Programs, Irfanview,
Irfanview 3.92 to launch Irfanview.
- Click File, Open, and open your original GIF image.
- Click File, Save As... to open the
Save Picture As... box.
In the Save as type: drop-down list box at the bottom,
select GIF - Compuserve GIF.
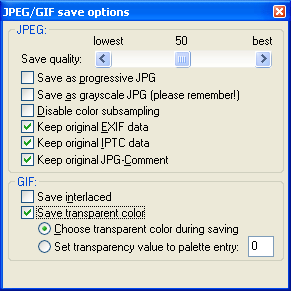
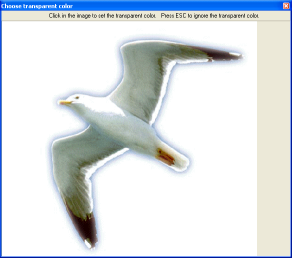
- In the JPEG/GIF Save Options box, check the Save transparent color
box and verify that the Choose transparent color during saving
option is selected, as shown to the right on this page.
- In the Save Picture As... box, navigate to your floppy disk,
or to the folder you are using, change the filename with the same name
as your original GIF image, with a "_tr" added to
it, and click Save.
- A Choose transparent color box appears with your image in it. Click on the image, on a portion of it with the color you want to make transparent.
- Close Irfanview.
NOTE: Some GIFs on the Internet are already transparent. If you want to remove transparency information from an image, unckeck the the Save transparent color box and save it as a GIF.