CNIT 131 Bowne HW 4
Configuring an E-Mail Client and Sending a Password-Protected File
This assignment is worth 25 points.
WARNING TO STUDENTS USING PUBLIC MACHINES IN THE ICL-1 LAB OR OTHER
COMPUTER LABS: If you have important mail in your pine Inbox it will be
lost when you do this homework. Move important mail to a folder other than
Inbox before starting this homework assignment. If you do not know how to
make a folder in pine, see me during an office hour or after class so I can
show you how.
Configuring an E-Mail Client
 You need to configure an e-mail client for this assignment. The instructions
below are for Microsoft Outlook, the most popular client, but you can
use Netscape, Outlook Express, Eudora, or any other e-mail client if you
prefer.
You need to configure an e-mail client for this assignment. The instructions
below are for Microsoft Outlook, the most popular client, but you can
use Netscape, Outlook Express, Eudora, or any other e-mail client if you
prefer.
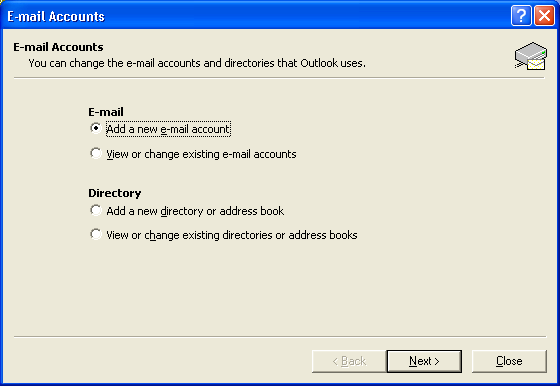
1. Start Microsoft Outlook with Start, Programs,
Microsoft Outlook. Select Tools, E-mail Accounts
from the menu bar. When the E-mail Accounts window opens
as shown to the right on this page, click Add a new e-mail account
and then click Next.
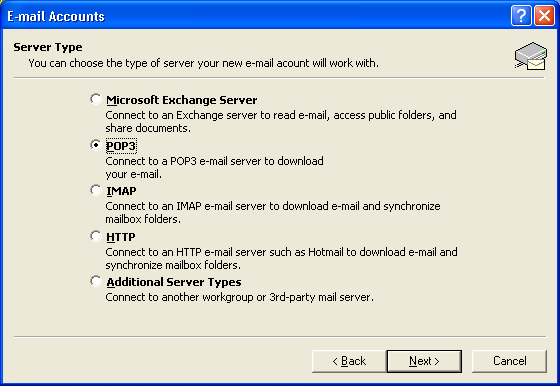 2. In the next window, select POP3
and then click Next.
2. In the next window, select POP3
and then click Next.
 3. In the next window, fill in your name, e-mail address, and hills user ID
on the left side. If you are using a public machine, leave the password
blank and uncheck the Remember Password box. On the right side,
enter hills.ccsf.cc.ca.us for both the Incoming and Outgoing
server names. Click Next. In the next window, click Finish.
3. In the next window, fill in your name, e-mail address, and hills user ID
on the left side. If you are using a public machine, leave the password
blank and uncheck the Remember Password box. On the right side,
enter hills.ccsf.cc.ca.us for both the Incoming and Outgoing
server names. Click Next. In the next window, click Finish.
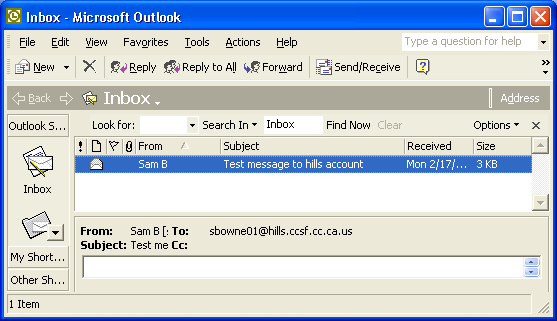 4. In the main Outlook window, click Send/Receive.
When a box pops up asking for your password, type it in.
Locate a message sent to your hills account and click on it so that the
hills address is visible in the preview pane (the lower part of the
window). If your inbox is empty, send yourself a test message like
the one you see in the figure to the right on this page.
4. In the main Outlook window, click Send/Receive.
When a box pops up asking for your password, type it in.
Locate a message sent to your hills account and click on it so that the
hills address is visible in the preview pane (the lower part of the
window). If your inbox is empty, send yourself a test message like
the one you see in the figure to the right on this page.
5. Print a screen image of your Outlook screen
Hold down the ALT key and press the PrntScrn key on your
keyboard to copy the active window to the
clipboard. Then click the Start, Programs, Accessories,
WordPad to open a WordPad window.
Type Ctrl+V to paste the screen image into WordPad, and then select
File, then Print from the WordPad menu bar to print it.
Check the printout to make sure your hills address is visible.
Close WordPad.
Write Your Name and hw4 on the printout
and turn it in in class.
Creating a Password-Protected Document
 6. Start Microsoft Word (NOT WordPad or NotePad) and make a document
containing your name. You may use any readable font face and size.
6. Start Microsoft Word (NOT WordPad or NotePad) and make a document
containing your name. You may use any readable font face and size.
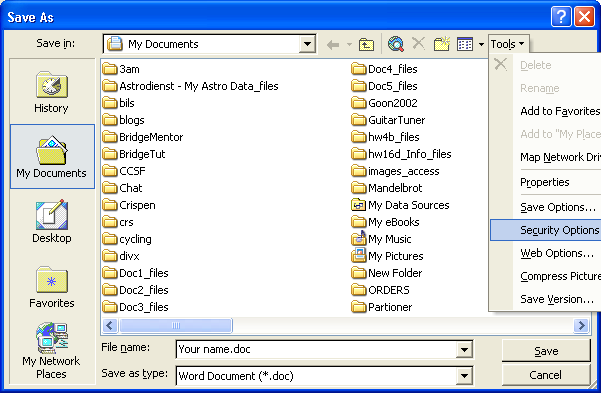
7. Select File, Save As... from the menu bar to open the
Save As... dialog box as shown to the right on this page.
8.Select Tools, then Security Options inside the Save As dialog
box as shown to the right on this page.
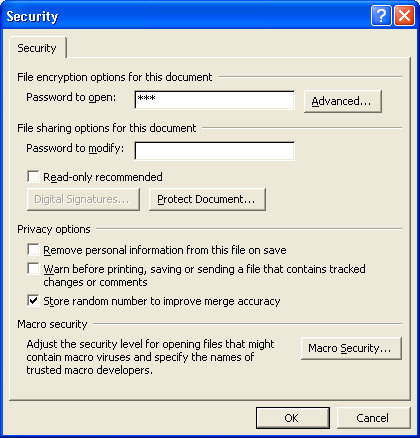 9. The Security dialog box opens as shown to the right on this page.
Type in the password sam into the Password to open box.
Click OK. Enter the password again, and then click OK.
Use lowercase letters for the password.
Enter the filename hw4 and save the document on your floppy disk.
Word will add the extension .doc. Close Word.
9. The Security dialog box opens as shown to the right on this page.
Type in the password sam into the Password to open box.
Click OK. Enter the password again, and then click OK.
Use lowercase letters for the password.
Enter the filename hw4 and save the document on your floppy disk.
Word will add the extension .doc. Close Word.
Sending a Password-Protected Document
 10. Open Outlook and click the New button to create a new
e-mail message. Address it to me at sbowne@ccsf.edu and enter a
subject of CNIT 131 Mon & Wed 11 am hw4 from Your Name, as shown on the figure
to the right on this page, using the correct class meeting time and your name.
Click the Attachment button (it looks like a paper clip).
10. Open Outlook and click the New button to create a new
e-mail message. Address it to me at sbowne@ccsf.edu and enter a
subject of CNIT 131 Mon & Wed 11 am hw4 from Your Name, as shown on the figure
to the right on this page, using the correct class meeting time and your name.
Click the Attachment button (it looks like a paper clip).
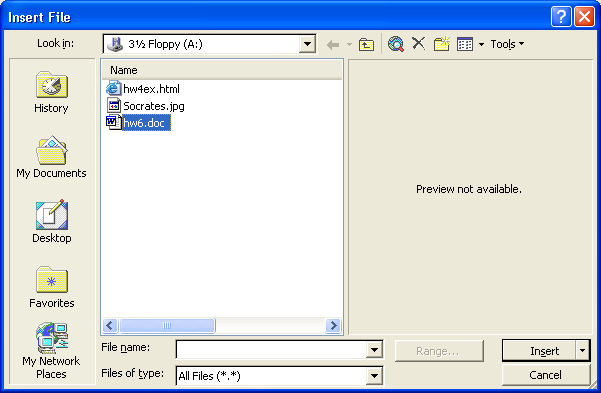 11. In the Insert File box, navigate to the hw4 file you
just saved, click on it, and click the Insert button.
11. In the Insert File box, navigate to the hw4 file you
just saved, click on it, and click the Insert button.
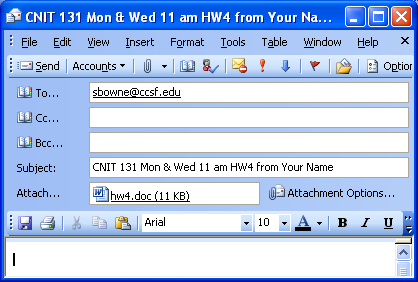 12. Your message should show an attached file, as shown to the right on
this page. Add your own e-mail address to the Cc: field and send the
message. When you get your copy, double-click on the attachment and
verify that it is password-protected with the password sam and that
it contains your name.
12. Your message should show an attached file, as shown to the right on
this page. Add your own e-mail address to the Cc: field and send the
message. When you get your copy, double-click on the attachment and
verify that it is password-protected with the password sam and that
it contains your name.
Grading
For grading, hw4 is broken into two parts: hw4a is the printout
of a properly configured e-mail client, and is worth 15 points. hw4b is
the e-mail message containing a password-protected file, and it worth 10 points.
Revised 8-21-04