CNIT 129S Proj 6: Linux VM (15 pts.)
What You Need
A computer running any OS to serve as the host.
You Can Use Kali
If you already have a Kali VM, feel free to use that
instead of the Ubuntu VM described below.
Just turn in a screenshot of the Kali desktop.
Purpose
For future projects, you'll need a Linux
computer. For most students, the best
solution is to use a Ubuntu virtual machine.
However, if you have a cloud server, or
some other version of Linux available, such
as Fedora or Kali, you can use that instead.
Installing Virtualization Softare
The virtualization software emulates the
hardware of a computer, and runs virtual
machines. Here are the software products
I recommend. Choose one you like and install
it.
If you are working in S214, VMware Player
is already installed, so you can skip this
step.
Installing an Archive Utility
You need software that can unpack a 7-zip
archive.
If you are working in S214, 7-Zip
is already installed, so you can skip this
step.
Downloading a Virtual Machine
Go to
http://www.osboxes.org/ubuntu/#ubuntu-16-04-vmware
Find the Ubuntu 14.04 Xenial (Final Version),
as shown below.
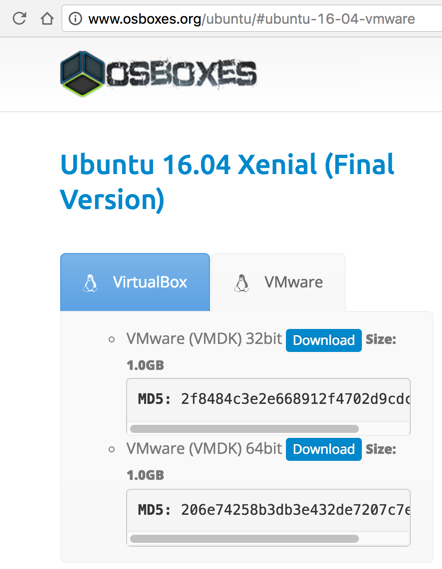
Download the appropriate version
for your
virtualization software. I recommend
the 32-bit version for Mac OS X and the 64-bit version
for 64-bit Windows.
Unpacking the File
You will end up with a 7-zip archive,
such as Ubuntu_16.04_Xenial-VM-32bit.7z.
Right-click the file, point to 7-Zip, and extract it into a place where you can find it, such as your Documents folder.
Don't put virtual machines on the C: drive in
S214--create a folder on another partition instead.
Creating Your Virtual Machine
After unpacking, you end up with
a single file, as shown below.
This is a virtual hard disk.

Using your virtual machine software,
create a new virtual machine,
telling it to use that virtual hard
disk.
Here are the steps to do that for
various virtualization applications:
VMware Player on 64-bit Windows
- I followed the procedure in this video
- Use the 64-bit Ubuntu image.
- From the Home screen, on the right side, click "Create a New Virtual Machine".
- In the "Select the Installation Method" box, click "I will install the operating system later" and click Next.
- In the "Choose Operating System" box, click Linux and Ubuntu and click Next.
- In the "Name the Virtual Machine" box, click the Browse... button and select a location for your VM. Don't use the C: drive in S214. Click Next.
- In the "Specify Disk Capacity" box, Click Next.
- In the "Ready to Create Virtual Machine" box, Click Finish.
- In the lower right of the VMware Player window, click "Edit virtual machine settings".
- In the lower left of the "Virtual Machine settings" window, click the Add... button.
- In the "Add Hardware Wizard", accept the default selection of "Hard Disk" and click Next".
- If a screen appears asking you to "Select a Disk Type", choose "SATA" and click Next.
- In the "Select a Disk" box, click "Use an existing virtual disk" and click Next.
Click the "Select an Existing Disk" button, browse to the "Ubuntu 16.04 64bit.vmdk" file you unzipped, click Open, and click Finish.
- Browse to a folder to store your VM. If you are in S214, don't put your VM on the C: drive. Click Save.
Troubleshooting
If you see a message saying "no operating system found",
edit the virtual machine settings and delete the
20 GB hard disk.
|
VMware Fusion
- Start VMware Fusion
- Click File, New... from the menu bar
- In the "Select the Installation Method" box, click "Create a custom virtual machine and click Continue.
- In the "Choose Operating System" box, click Linux and Ubuntu and click Continue.
- In the "Choose a Virtual Disk" box, click "Use an existing virtual disk".
Click the "Choose virtual disk..." button, browse to the file you unzipped, click Choose, and click Continue.
- Click Finish.
- Browse to a folder to store your VM. If you are in S214, don't put your VM on the C: drive. Click Save.
VirtualBox
- Start VirtualBox
- Click the New icon
- In the "Name and operating system" box, enter a name of "Ubuntu 16.04", select a Type of Linux
and a Version of "Ubuntu 32-bit". Click Continue.
- In the "Memory s1ze" box, accept the default of 768 MB and click Continue.
- In the "Hard Disk" box, click "Use an existing virtual hard disk file".
Click the "Choose virtual disk..." button. Click the little yellow icon, browse to the file you unzipped, click Open, and click Create.
- Click Start.
Logging In
Your VM launches. Log in with:
- Username: osboxes.org
- Password: osboxes.org
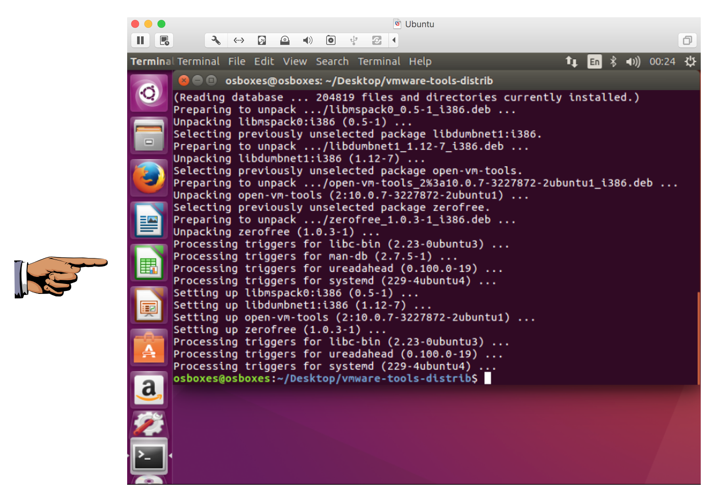
Install VMware Tools or VirtualBox Additions
This software allows you to drag and drop files
into the VM. Follow the appropriate instructions below,
If you are using VMware
On the Ubuntu desktop,
click the top left icon and type in Term
Click Terminal.
In the Terminal, execute this command:
sudo apt-get update
It asks for a password. Enter
osboxes.org
In the Terminal, execute these commands:
sudo apt-get install open-vm-tools -y
sudo apt-get install open-vm-tools-desktop -y
sudo reboot
Troubleshooting
If you see this error message:
Unable to lock the administration directory (/var/lib/dpkg/) is another process using it?
Execute this command to reboot the server:
sudo reboot
|
If you are using VirtualBox
- To release the cursor from the VM, you
need to press one or more keys on the keyboard.
The required key is shown at the bottom right of
the VirtualBox Ubuntu VM. On my Mac, it's the left
Command key.
- From the VirtualBox menu bar, click
Devices, "Install Guest Additions CD
Image...".
- A box pops up, asking if you want to run
software. Click Run.
- It asks for a password. Enter
osboxes.org
- The software compiles and installs automatically.
Saving the Screen Image
Make sure your Linux desktop is visible,
as shown above.
Click the host computer's desktop.
Press Shift+PrntScrn key to capture the entire desktop.
If you are using a Mac, press Shift+Cmd+3
YOU MUST SUBMIT A WHOLE-DESKTOP IMAGE FOR FULL CREDIT
Save this image as a PNG file, named
"Proj 6 from YOUR NAME"
Turning in Your Project
Email the image to cnit.129S@gmail.com
with a subject of
"Proj 6 from YOUR NAME".
Posted 9-19-16
Revised 10-4-16
Revised to use SATA connection 2-14-18
Troubleshooting tips added 2-4-19
Sam Bowne