
Genymotion is a very nice, luxurious Android virtual machine, more convenient and efficient than the emulator Google Studio provides.
But you'll be dependent on the lab to do future projects, and the lab can get crowded. It'll be a lot more conveneint for you to set this up on your own computer.
https://www.genymotion.com/fun-zone/
Click "Download Genymotion Personal Edition".
In the next screen, click "Create an account". Fill in the form with your email address and other details, as shown below.
Accept the terms and click "Create account".
Download links appear. Download the correct version for your OS. There are four choices:
While the download proceeds, check your email and activate your Genymotion account.
Ubuntu Users
If you are using Ubuntu, execute these commands:You should see the name of the downloaded file, which should be something like genymotion-2.7.2-linux_x64.bin. Use that name in the next two commands:
Sign in with your Genymotion account to see available devices.
Select Google Galaxy Nexus - 4.3 - API 18 - 720x1280". Click Next twice.
The virtual device downloads (about 150 MB).
Click Finish.
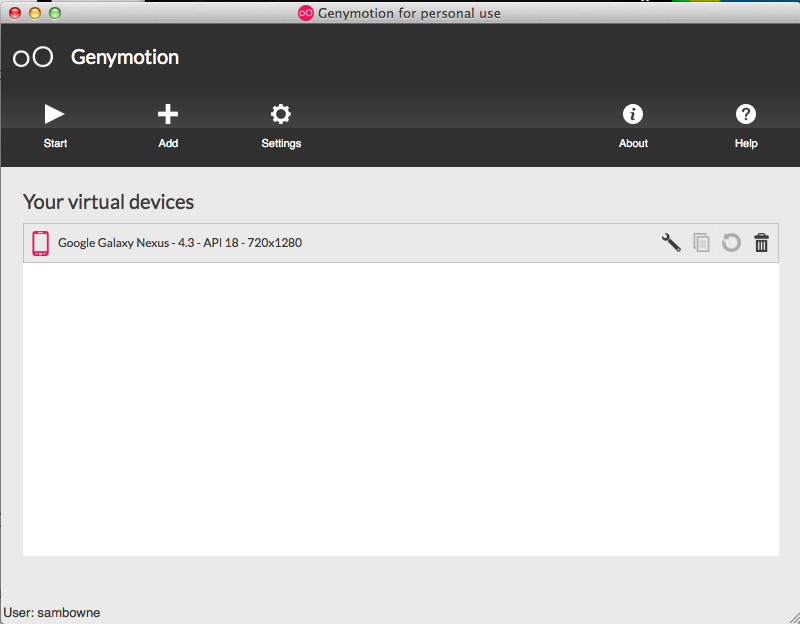
In Genymotion, you now see a virtual device, as shown below.
In Settings, on the General tab, make sure your Genymotion username and password are entered, as shown below.

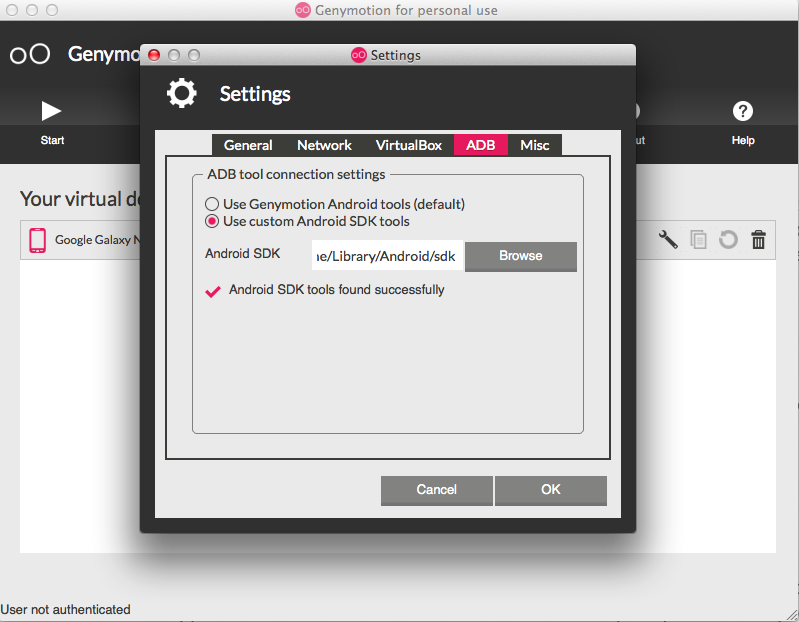
On the ADB tab, fill in the SDK Path for your host system, as shown below.
To find your SDK path, open Android Studio and click Tools, Android, "SDK Manager".Here are the paths for a user named "student" on the three operating systems:
Click OK.
Note: the Network tab here is used to configure an interface that is used only for Genymotion updates, not for Internet traffic to the Android device. Just ignore it.
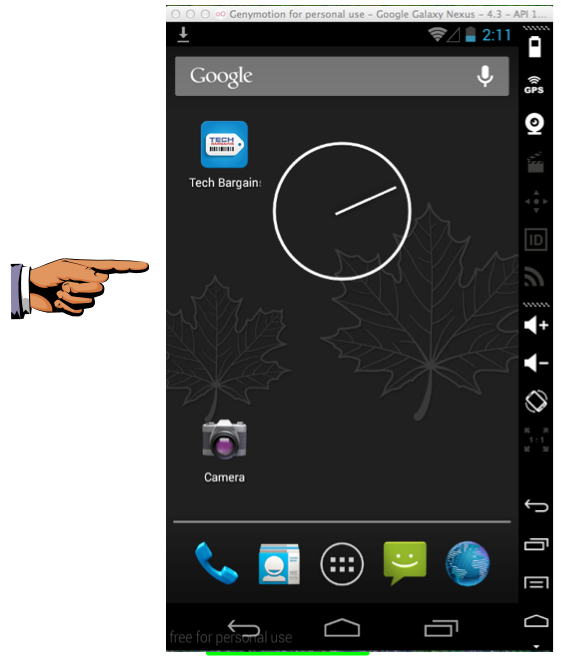
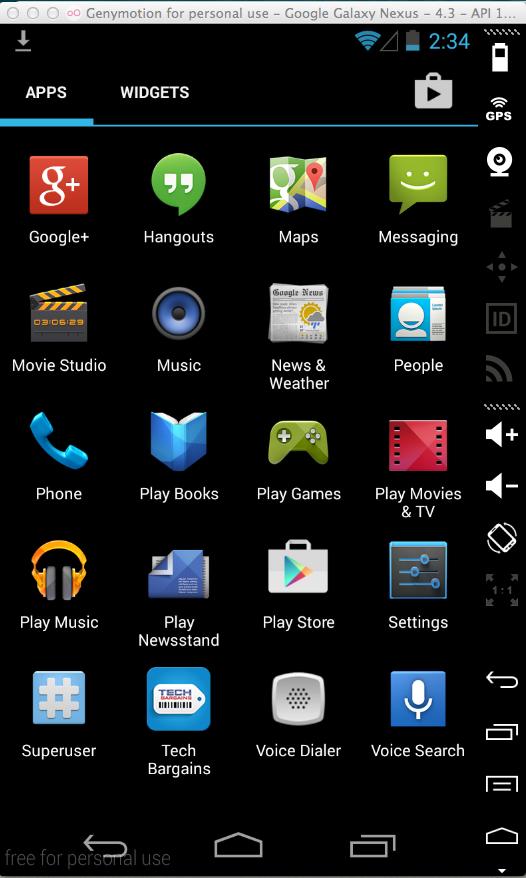
The Android device starts up. Swipe up with the mouse to see the Home Screen, as shown below.
Save a full-desktop image. On a Mac, press Shift+Commmand+3. On a PC, press Shift+PrntScrn and paste into Paint.
YOU MUST SUBMIT A FULL-SCREEN IMAGE FOR FULL CREDIT!
Save the image with the filename "YOUR NAME Proj 2a", replacing "YOUR NAME" with your real name.
On your host computer, in a Web browser, download this file. It's about 9.4 MB in size.
https://samsclass.info/128/proj/Genymotion-ARM-Translation_v1.1.zip
After the download completes, drag the file and drop it onto the Genymotion Android home screen.
A dialog will appear and show a file transfer in progress, then another dialog will appear and ask if you want to flash it on the emulator.
Click OK.
A box will appear telling you to reboot the device.
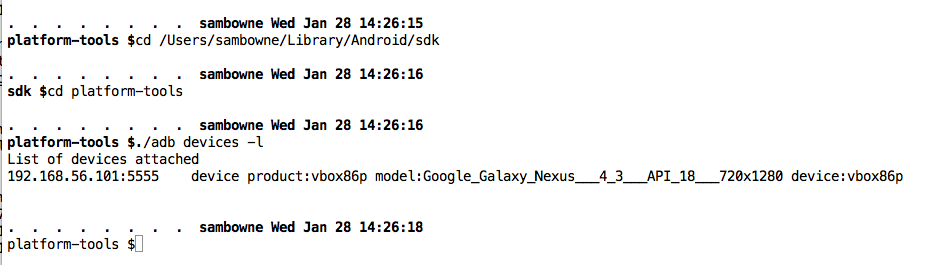
Execute these commands, changing the path in the first command to your correct SDK path.
NOTE: If you are using Windows, remove the "./" before "adb".
cd /Users/sambowne/Library/Android/sdk

cd platform-tools

./adb devices -l
You should see the Nexus device listed, as shown below.
Execute this command to reboot the Nexus.
./adb reboot
https://samsclass.info/128/proj/gapps-jb-20130813-signed.zip
After the download completes, drag the file and drop it onto the Genymotion Android home screen.
A dialog will appear and show a file transfer in progress, then another dialog will appear and ask if you want to flash it on the emulator.
Click OK.
A box will appear telling you to reboot the device.
./adb reboot
Click the circle at the bottom center.
Drag the screen to the left to get to the second page of apps.
you should see "Play Store", as shown below.
TroubleshootingIf Play Store doesn't appear, you may need to reboot again or even reinstall one or both of the packages.If you still have problems, consult this page: How to install Google Play Services in a Genymotion VM
|
When you are prompted to, log in with a Gmail account.
The Play Store opens, as shown below.

Save a full-desktop image. On a Mac, press Shift+Commmand+3. On a PC, press Shift+PrntScrn and paste into Paint.
YOU MUST SUBMIT A FULL-SCREEN IMAGE FOR FULL CREDIT!
Save the image with the filename "YOUR NAME Proj 2b", replacing "YOUR NAME" with your real name.
If you have a PC, execute the ipconfig command.
If you have a Mac or Linux, execute the ifconfig command.
Find the IP address of the interface that goes to the Internet and make a note of it.
In a Web browser, go to http://portswigger.net/burp/download.html
At the bottom of the "Free Edition" column, click "Download now".
A "burpsuite_free_v1.6.jar" file downloads. If you are using Windows or a Mac, double-click the file to launch it.
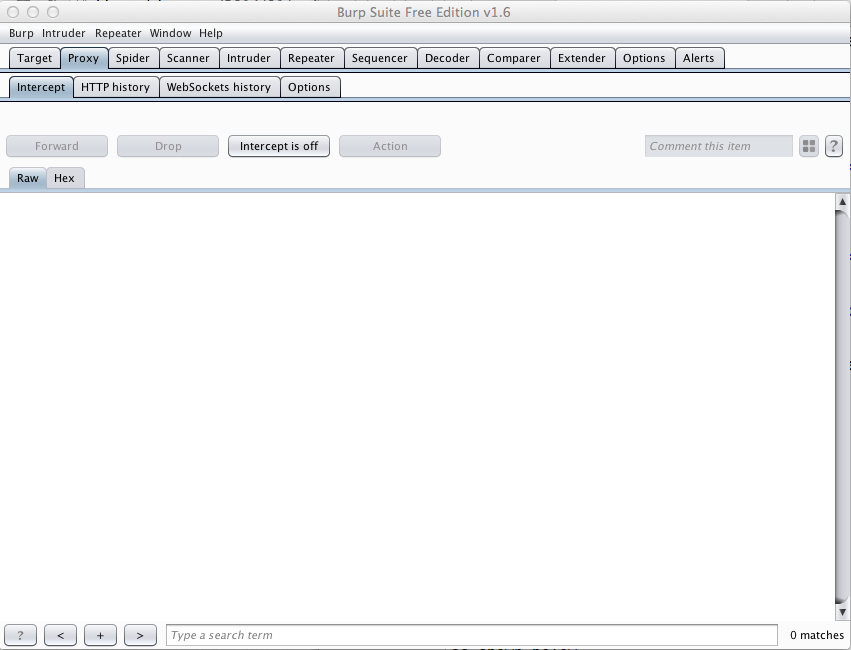
Burp opens, as shown below.
Ubuntu Users
If you are using Ubuntu, execute these commands:You should see the name of the downloaded file, which should be something like burpsuite_free_v1.6.01.jar. Use that name in the commands below:

In Burp, click the Proxy tab.
Click the Intercept sub-tab.
Click the "Intercept is on" button, so it shows "Intercept is off", as shown below.
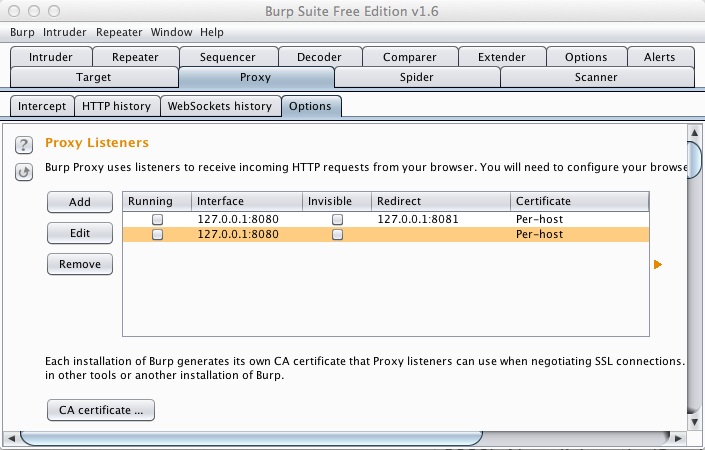
Click the Options sub-tab.
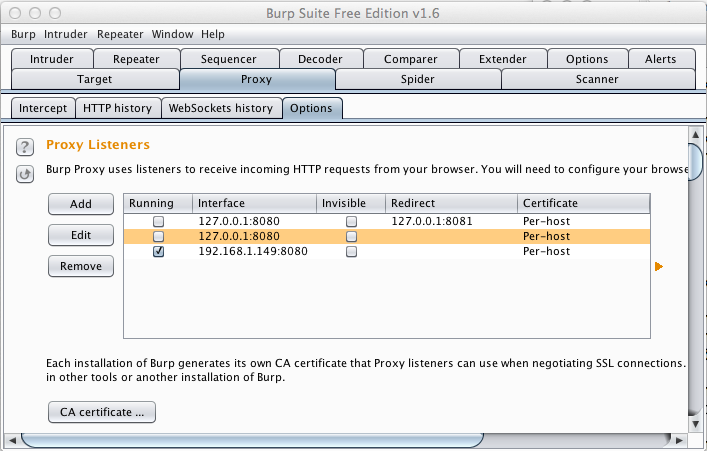
If any listeners are running, clear their check-boxes to stop them, as shown below.
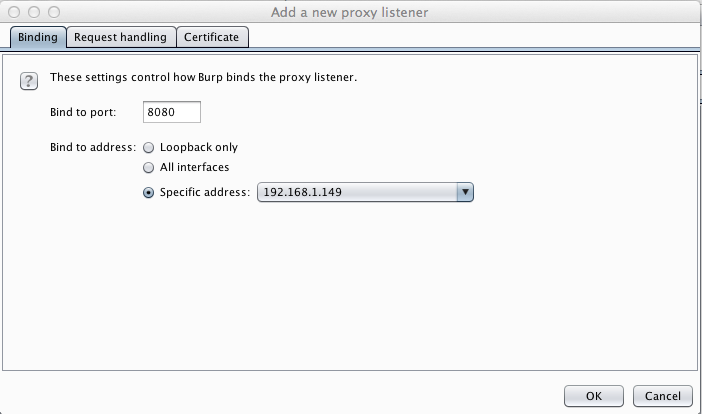
Click the Add button.
In the "Add a new listener" box, in the "Bind to port" field, enter 8080.
In the "Specific address" list box, select your host computer's IP address that you determined earlier, as shown below.
Click OK.
Burp should now show a listener on your IP address and port 8080, as shown below.
Click the Target tab.
Click the Scope sub-tab.
In the "Include in scope" section, clear all the check boxes, as shown below.
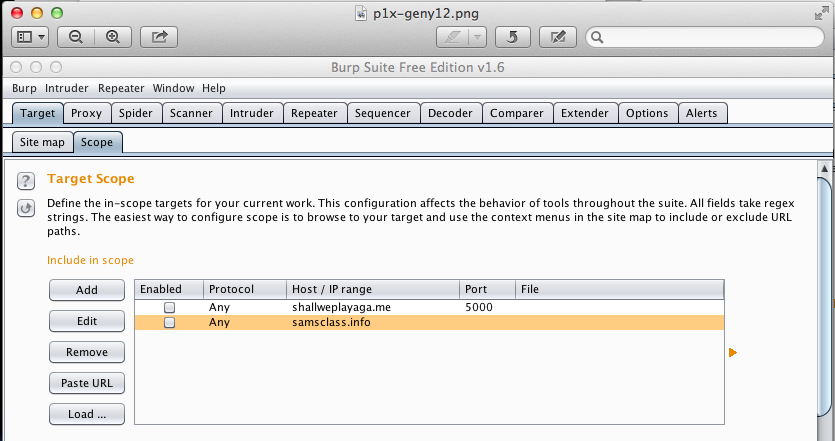
Click the Add button.
In the "Add URL to include in scope" box, click OK.
Burp now shows a scope of "any", as shown below.
Drag the screen to the left to see the second page of apps.
Click Settings.
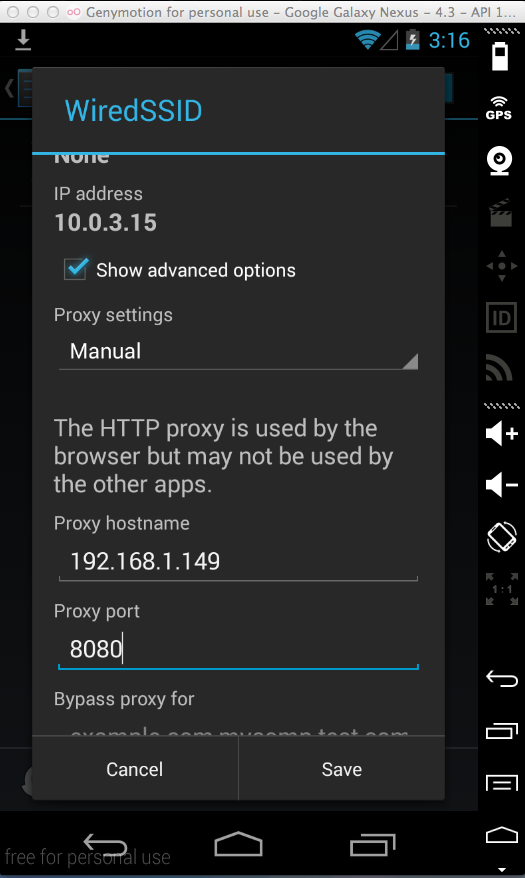
In Settings, click Wi-Fi.
Click and hold WiredSSID until a box pops up.
Click on "Modify network".
Check the "Show advanced options" box and select Manual from the Proxy Settings menu.
Enter your host machine's IP address in the "Proxy hostname" field, and 8080 in the "proxy port" field, as shown below.
Then click Save.
"Hackazon" opens, as shown below.

In Burp, click the Proxy tab.
Click the "HTTP history" sub-tab.
Find a line that shows a component of the hackazon.samsclass.info page loading, as shown below.

Save a full-desktop image. On a Mac, press Shift+Commmand+3. On a PC, press Shift+PrntScrn and paste into Paint.
YOU MUST SUBMIT A FULL-SCREEN IMAGE FOR FULL CREDIT!
Save the image with the filename "YOUR NAME Proj 2c", replacing "YOUR NAME" with your real name.
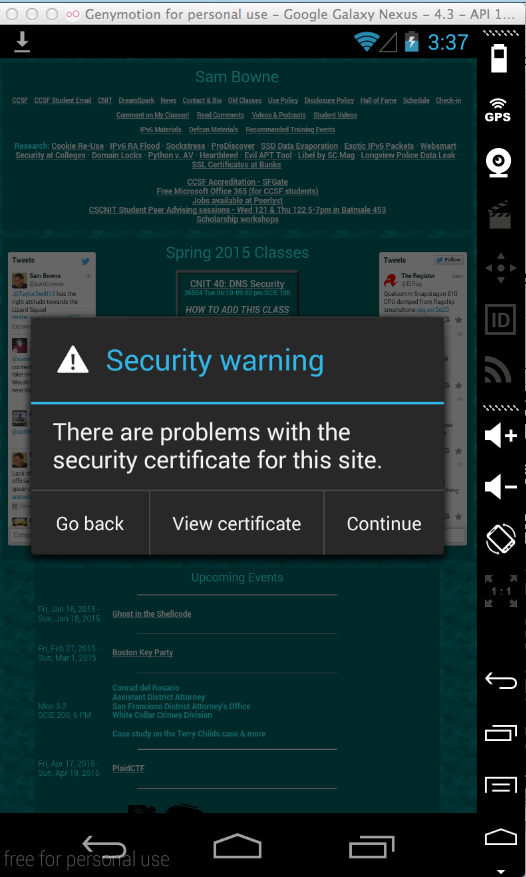
A "Security warning" box pops up, as shown below.
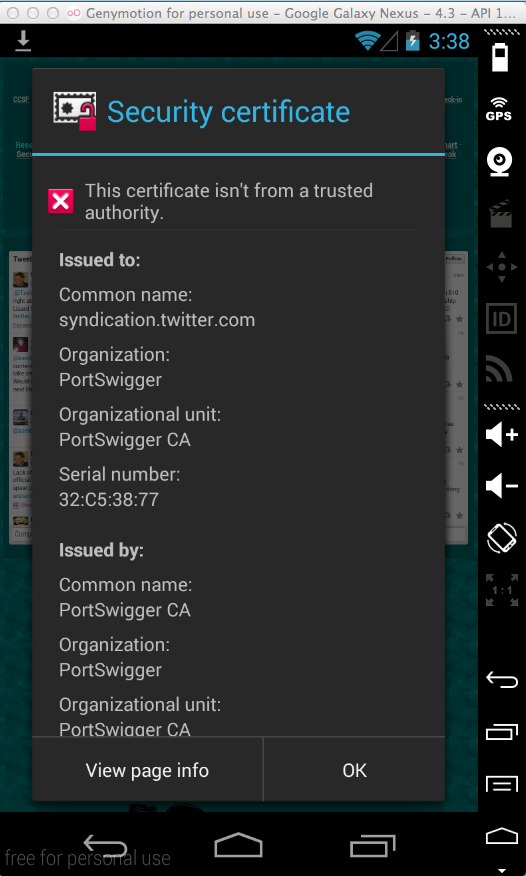
Click "View certificate".
This certificate is from "PortSwigger", the makers of Burp, as shown below.
We want to add PortSwigger as a trusted certificate authority to get rid of these messages.
In Burp, click the Proxy tab.
Click the Options sub-tab.
Click the "Import /export CA certificate..." button.
In the "CA Certificate" box, in the Export setion, click the "Certificate in DER format" button, as shown below.
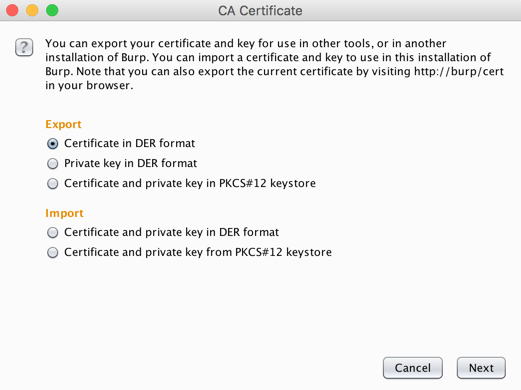
Click Next.
Save the certificate somewhere you can find it, such as on your Desktop.
Give it a name of portswigger.cer, as shown below.
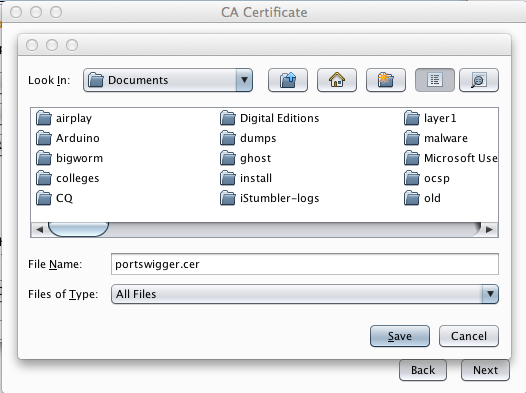
Click Save.
Click Next. Click Close.
From the Android home screen, click the circle icon in the bottom center.
Drag the screen to the left to see the second page of apps.
Click Settings.
In Settings, scroll down and click Security.
In Security, click "Screen lock". On the "Choose screen lock" page, click PIN.
Type in a PIN you can remember, such as 1234. Click Continue. Re-enter the same PIN and click OK.
A message appears, saying "Files successfully copied to sdcard/Download", as shown below.
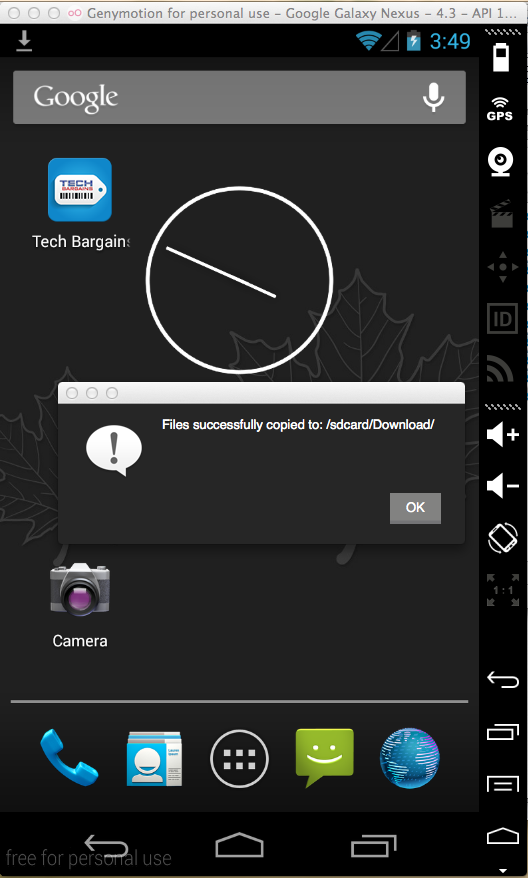
Click OK.
From the Android home screen, click the circle icon in the bottom center.
Drag the screen to the left to see the second page of apps.
Click Settings.
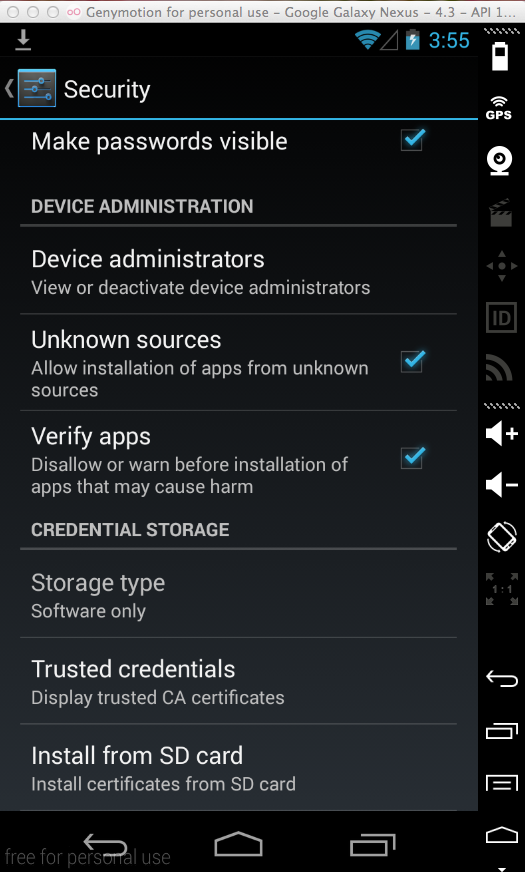
In Settings, scroll down and click Security.
In Security, scroll down and click "Install from SD card", as shown below.
A box pops up titled "Name the certificate".
Click OK.
Enter your PIN if you are prompted to.
A box pops up, saying "Portswigger is installed".
If you see "Security warning" boxes, click "Go back" until they vanish.
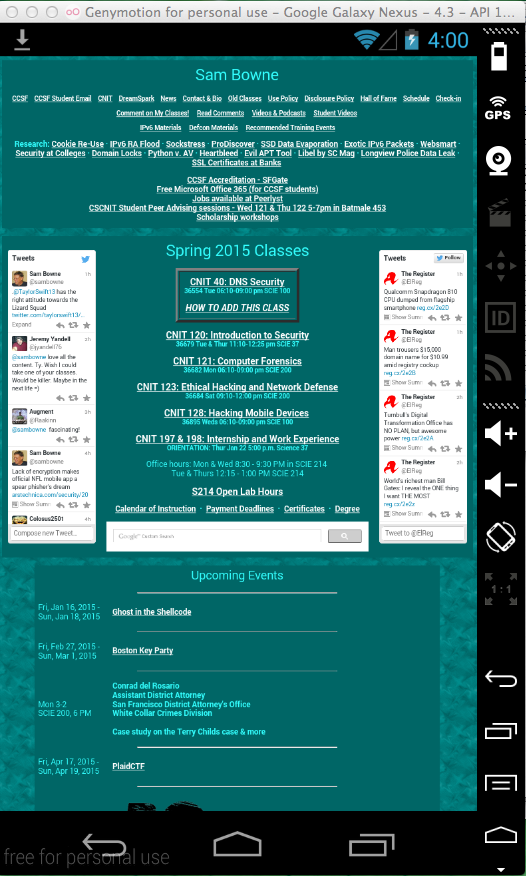
Go to
The page should load without any error messages, as shown below.
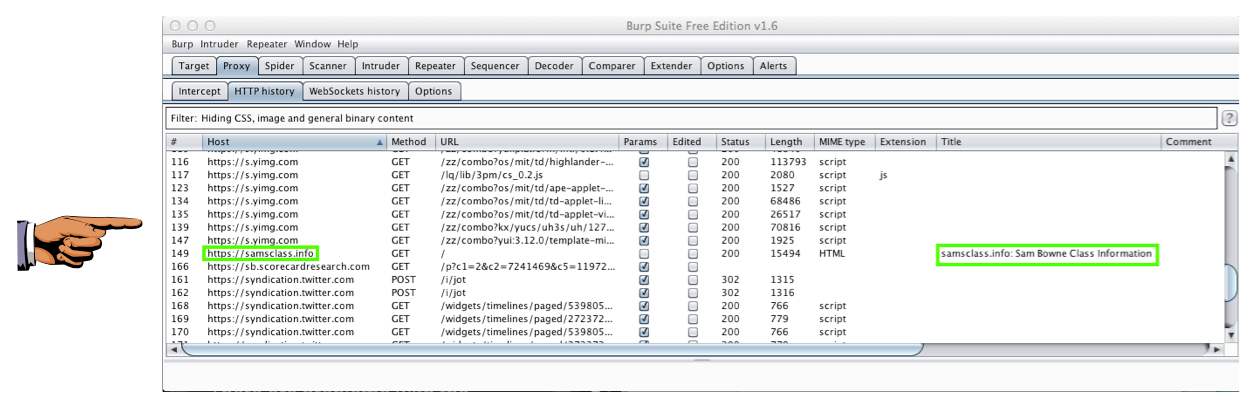
Click the "HTTP history" sub-tab.
Find the line that shows the https://samsclass.info page loading, as shown below.
Save a full-desktop image. On a Mac, press Shift+Commmand+3. On a PC, press Shift+PrntScrn and paste into Paint.
YOU MUST SUBMIT A FULL-SCREEN IMAGE FOR FULL CREDIT!
Save the image with the filename "YOUR NAME Proj 2d", replacing "YOUR NAME" with your real name.
From the Android home screen, click the circle at the bottom center.
Drag the screen to the left to see the second page of apps.
Click Settings.
In Settings, click Wi-Fi.
Click and hold WiredSSID until a box pops up.
Click on "Modify network".
If necessad\ry, check the "Show advanced options" box. Select None from the Proxy Settings menu, as shown below.
Then click Save.

Android Assessments with GenyMotion + Burp
HOW TO INSTALL GENYMOTION ANDROID EMULATOR IN UBUNTU