ChromeOS has its virtues, but it is unable to run VirtualBox, so I could not use it.
I tried Chrubuntu but although the installer ran, it refused to boot.
I tried Crouton, a chroot-based way of running Ubuntu inside ChromeOS. However, the Linux kernel ChromeOS uses is too old. At first,VirtualBox won't install, and even after changing kernel flags it runs poorly. It is impossible to create a host-only interface in VirtualBox, which prevents Genymotion from starting.
I decided that the only way to get the Chromebook to be useful was to get a real Ubuntu OS running directly on the hardware. But the firmware does not allow booting from USB at all, and it doesn't let any other OS launch from the SSD.
My solution was to completely disable the internal SSD by replacing the firmware with hacked firmware that allows USB boot only. The result is a machine that runs slowly enough to be irritating, but it runs, and is cheap and very portable.
Making Bootable Ubuntu USB from a Mac
Download the ISO from Ubuntu.com.In a Terminal window, execute these commands:
Plug in the USB drive. In a Terminal window, execute this command:hdiutil convert -format UDRW -o ubuntu-15.04-desktop-amd64 ubuntu-15.04-desktop-amd64.isodiskutil list
Look for the new item--for me it was /dev/disk3 In a Terminal window, execute these commands:diskutil listHere are instructions from Ubuntu for three operating systems:diskutil unmountDisk /dev/disk3sudo dd if=ubuntu-15.04-desktop-amd64.dmg of=/dev/rdisk3 bs=1m
diskutil eject /dev/disk3
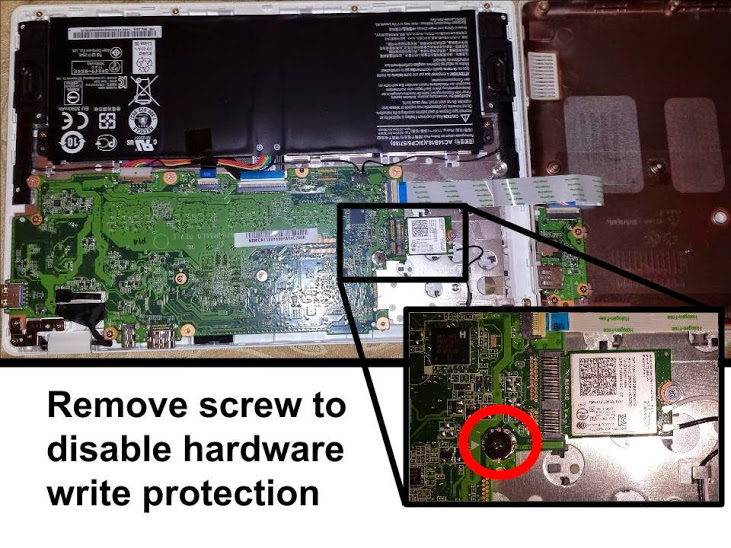
You need to remove this screw, next to the wireless NIC:
I got that image from this page:
Reassemble your Chromebook and plug in the power.
To enter developer mode press the following key combination:
Esc + Refresh + Power Button
(The refresh button is the 4th button from the left at the top and looks like a curly arrow).
Upon restart, a "scary screen" appears, saying "Chrome OS is missing or damaged".
Press Ctrl+D. From now on you need to press Ctrl+D every time you launch ChromeOS.
It says "To turn OS verification OFF, press ENTER".
Press Enter.
Now it says "OS verification is OFF".
After 20 seconds it beeps and says "Your system is transitioning to Developer Mode."
After 6 minutes, the "OS Verification is OFF" message appears again, there are three beeps, and the Chromebook restarts.
Now it says "OS verification is OFF".
Press Ctrl+D Chrome OS starts.
Click Continue.
Click "Accept and Continue".
Log in with a Google account.
A Chrome browser window opens.
https://johnlewis.ie/baytrail-release/
If it works, please donate some money to him.
With ChromeOS booted up and running, open a Chrome browser. Press Shift+Ctrl+T to open a crosh shell.
Execute these commands to get the rom-flashing script:
shell

cd

curl -k -L -O https://johnlewis.ie/flash_chromebook_rom.sh

ls -l f*
sudo -E bash flash_chromebook_rom.sh
Put the USB stick you want to use to run Ubuntu on the left port.
Put a Ubuntu 15.04 install USB on the right side.
Power off and restart your Chromebook.
The prompt says "SeaBIOS" and then "Press ESC for boot menu".
Press Esc.
Press the number corresponding to your install USB.
When the little Ubuntu man appears at the bottom of the screen, press Enter.
Select English.
Select "Install Ubuntu".
At the "Welcome" box, accept the default selection of "English" and click Continue.
At the "Wireless" box, accept the defajult selection of "I don't want to connect..." and click Continue.
At the "Preparing to install Ubuntu" screen, accept the default selections and click Continue.
Now you must wait for a long time (15-30 minutes) because of a defect in the Ubuntu installer. It is making hundreds of attempts to read/write from a SSD partition, which it cannot do. This is harmless but time-consuming.
When the "Installation type" box appears, click the "Erase disk and install Ubuntu" button. Click Continue.
In the "Erase disk and install Ubuntu" box, select your target USB drive. In my case, it was SCSI1. Click "Install Now".
After a minute or so, a box pops up titled "Write the changes to disks?". Click Continue.
In the "Where are you?" box, select your location and click Continue.
In the "Keyboard layout" box, accept the default of "English (US)" and click Continue.
In the "Who are you?" box, enter account information and click Continue.
The installation process takes a while. When I did it, it took 35 minutes.
When you see a prompt asking you to remove the installation media, do that and press Enter.
When the machine restarts, press Esc and 1. You now have Ubuntu!
How to install Ubuntu and Minecraft on the HP Chromebook 14
Setup for Android Auditing on Ubuntu Linux
https://github.com/divx118/crouton-packages/blob/master/README.md