If you don't have it, do these steps:
Open a Web browser and go to
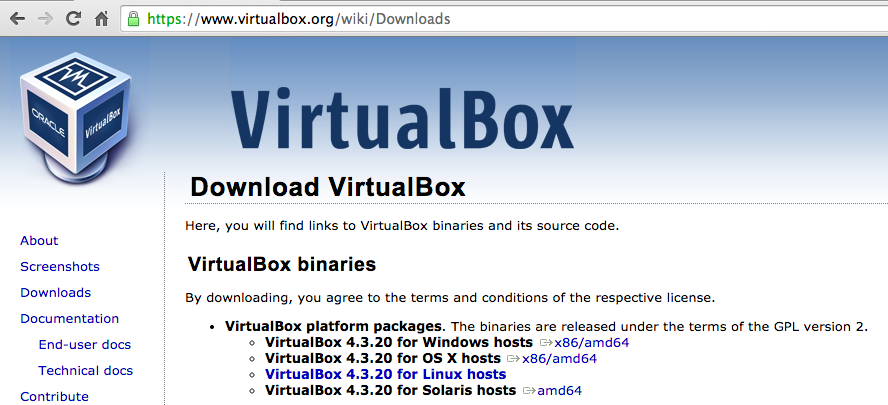
On the left side of the page, click Downloads.
On the next page, download the appropriate "VirtualBox platform package" for your computer, as shown below. The Windows version is a 105 MB download.
Install Virtualbox on your computer, accepting the default options.
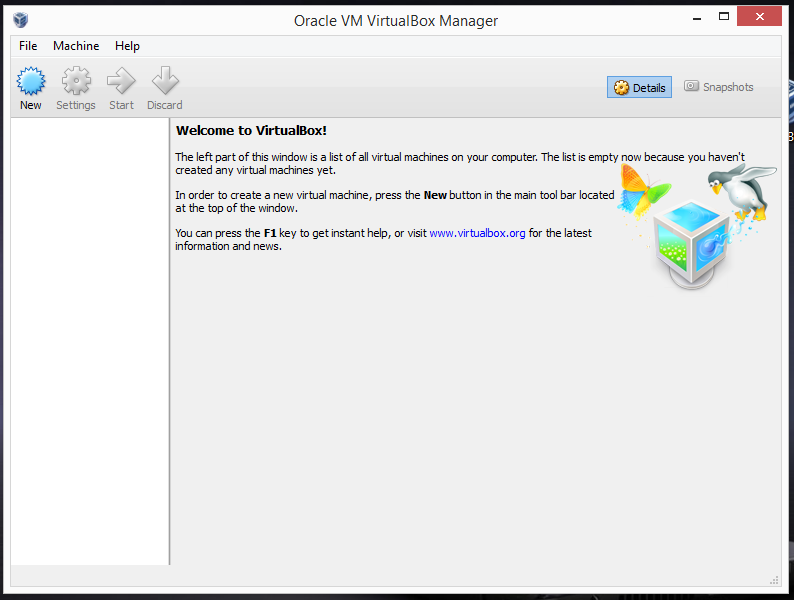
After the installation, VirtualBox opens, as shown below.
https://samsclass.info/128/proj/Andx86-1G.zip
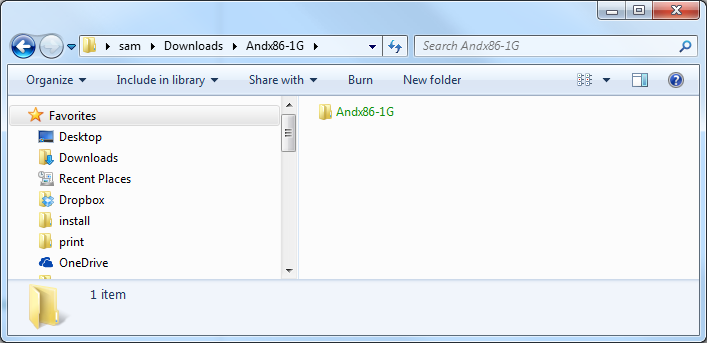
Right-click the file, click "Extract All...", Extract. A folder opens, as shown below.
If the folder is green, this means Windows thinks it's encrypted, which is a known problem with Zip archives copied from Mac to Windows. To remove the encryption, right-click the folder, click Properties, click Advanced, and clear the "Encrypt contents to secure data" box. Then click OK three times. The process takes a couple of minutes.
Launch VirtualBox.
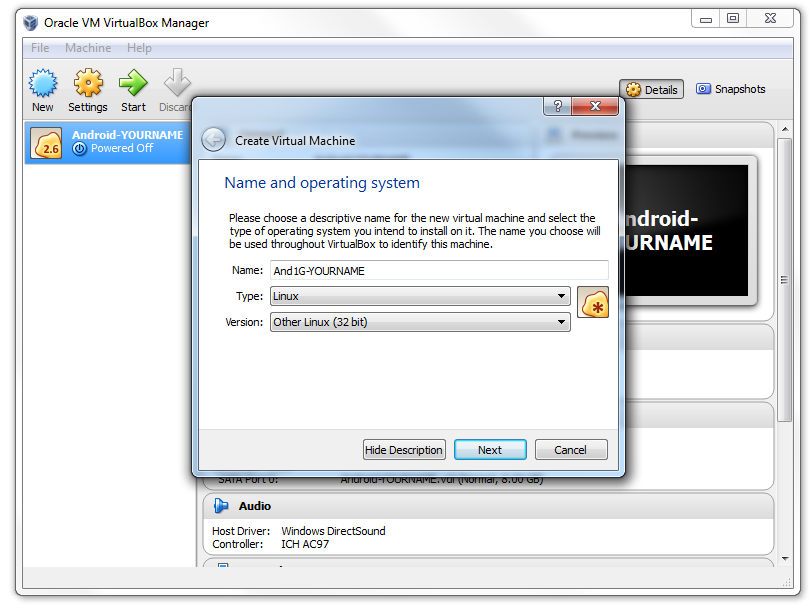
In the "Name and operating system" box, enter these values, as shown below.
Replace "YOURNAME" with your own name.
Click Next.
In the "Memory size" box, enter 512MB.
Click Next.
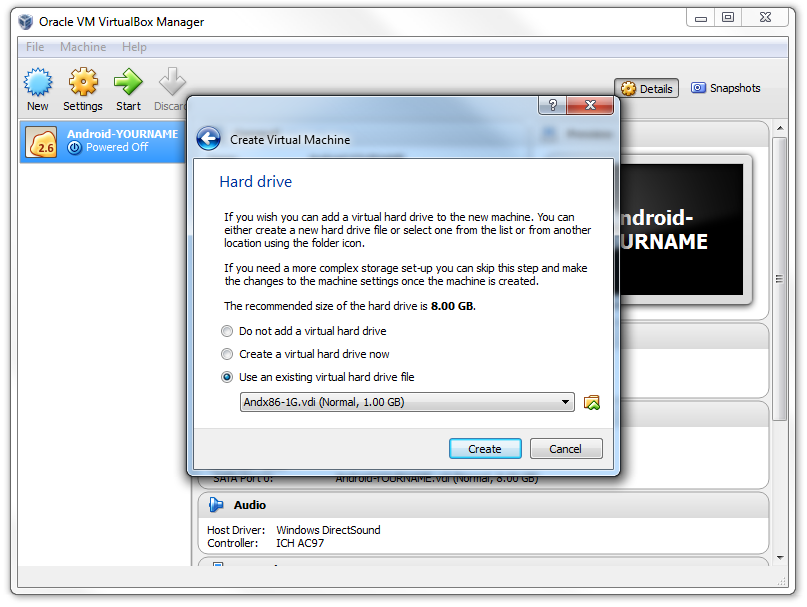
In the "Hard drive" box, click the "Uae an existing virtual hard drive" button. Click the little yellow folder icon on the right side, and navigate to the Andx86-1G.vdi in the folder you unzipped previously, as shown below.
Click Create.
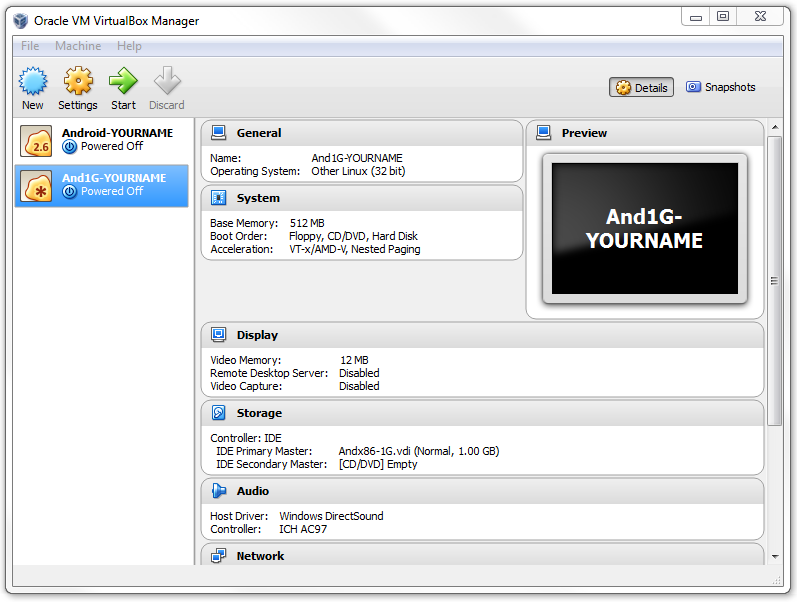
Your VM now appears in the left pane of the VirtualBox window, as shown below.
Click the green Start arrow.
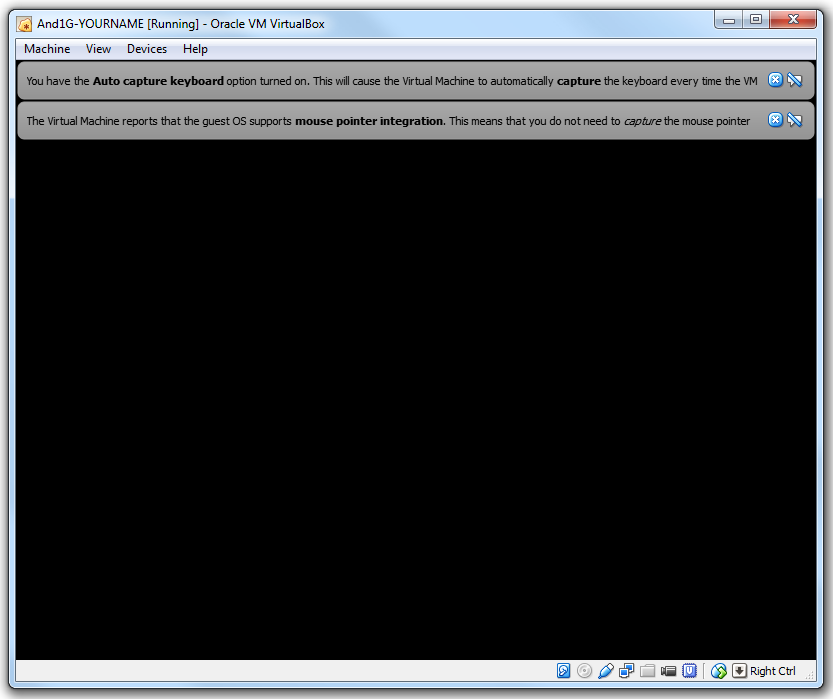
The virtual machine startsm but the screen turns black and shows two gray message bars at the top, as shown below.
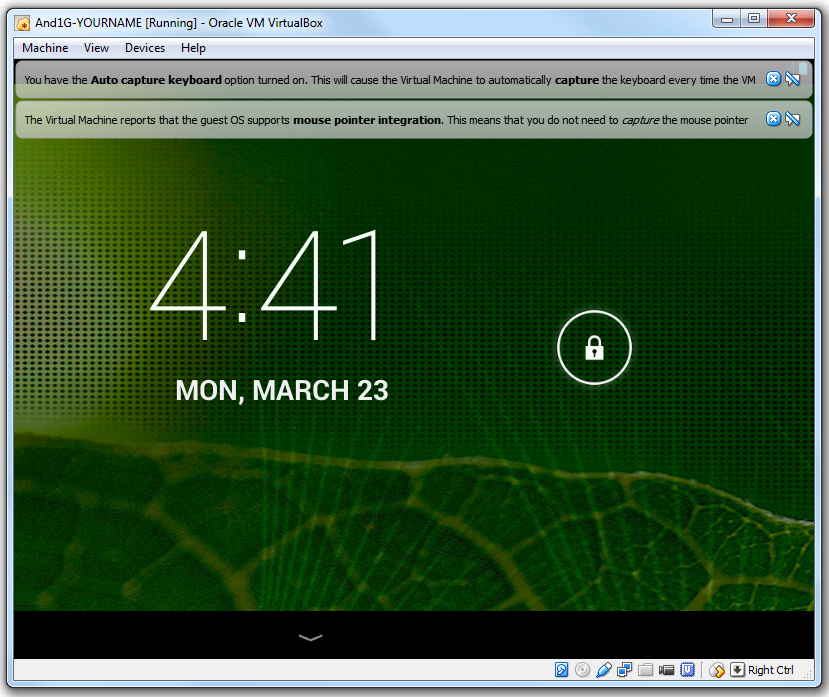
Click Machine, "ACPI Shutdown". This wakes the virtual machine, as shown below.
Note: in S214, on Ubuntu Linux, if the VirtualBox menu bar is not visible, press Right Ctrl+Home
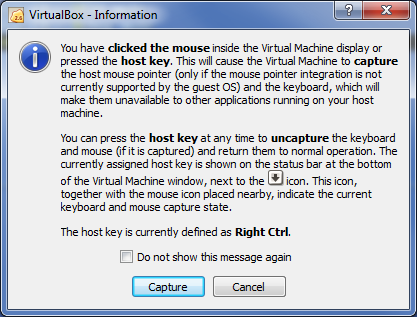
Click in the VM.
An Information box pops up, as shown below. Click Capture.
The mouse pointer appears inside the VM. Drag the padlock to the right to get to the Home Screen, as shown below.
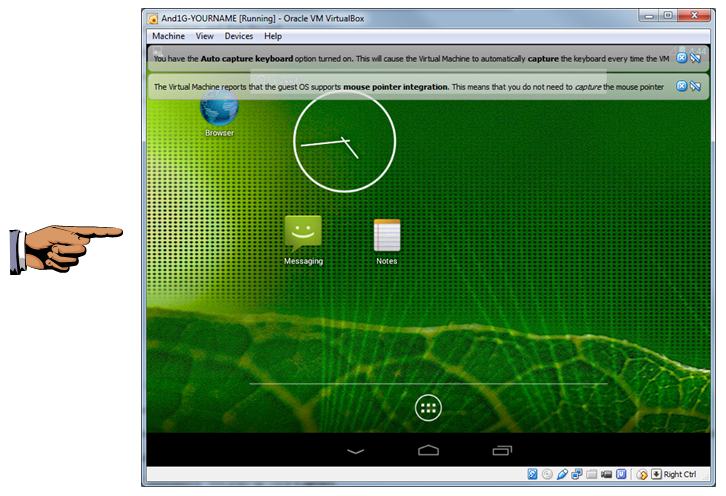
You will see the keystroke indicated that can release the cursor from the virtual machine.
On a Mac, it is the left Command button, as shown in the image above.
On a PC, it's the Right Ctrl key.
Press the indicated key.
The mouse pointer escapes from the VM.
Click the X in the gray bars at the top of the window to close them.
Press Shift+PrintScrn to save a full-desktop image.
YOU MUST SUBMIT A FULL-SCREEN IMAGE FOR FULL CREDIT!
Save the image with the filename "YOUR NAME Proj 14a", replacing "YOUR NAME" with your real name.
Note for Linux Users
If you are using Linux, instructions for installing Android Studio are at the link below. We don't need GenyMotion for this project.Then return to these instructions and resume at Task 3.
Follow the instructions on the Web page to download and install Android Studio for your OS. The Mac version is 234 MB in size, but the Windows version is 828 MB.
Finish the install and launch Android Studio.A box pops up, asking if you want to import settings from a previous installation. Accept the default selection refusing to do that.
The Setup Wizard launches. Click Next.
If you are using a PC, start the installation process.
In either case, you will probably see a screen saying that you need the Java SDK, as shown below.
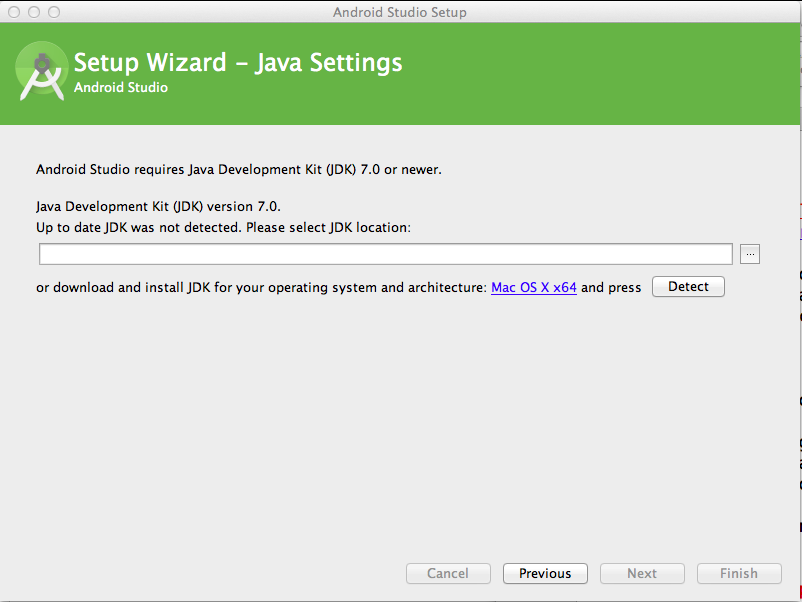
In the Android Studio Setup Wizard, click the blue link.
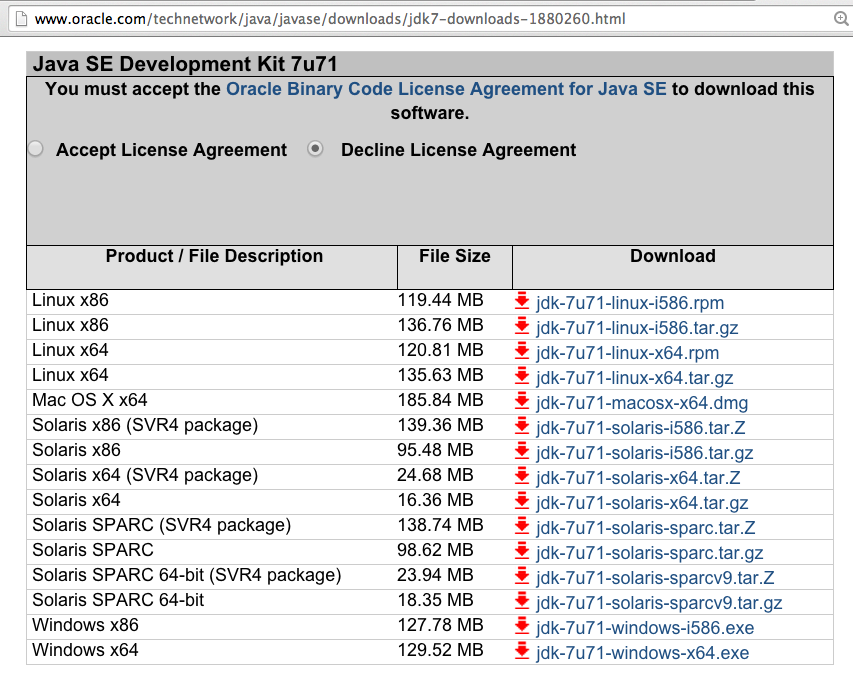
Download the correct Java SDK for your OS, as shown below.
Install the Java SDK, with the default options.
Install Android Studio with the default options.
Accept all the license agreements, of course.
It's a long process, with a lot of files downloaded and installed.
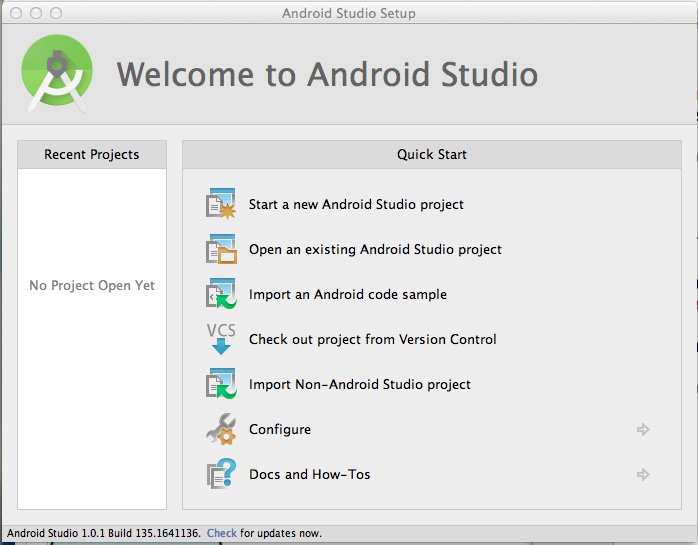
When the install finishes, Android Studio launches.
You should see the "Welcome to Android Studio" screen, as shown below.
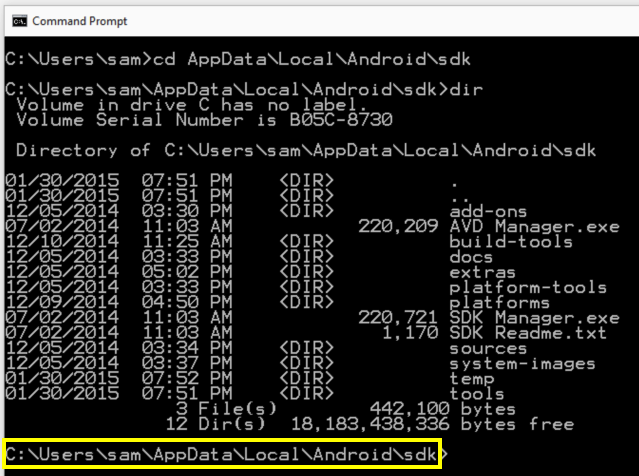
Click Start, type in CMD and press Enter to open a Command Prompt window.Note: don't use an Administrator Command Prompt
Execute these commands:
cd AppData\Local\Android\sdkdir

You should see several items here, including "platform-tools", as shown above.
The SDK path appears in the last line, as highlighted in the image above. It will be something like this:
C:\Users\sam\AppData\Local\Android\sdk
In a Terminal window, execute these commands:cdcd Library/Android/sdk
ls
pwd
You should see several items here, including "platform-tools", as shown above.
The SDK path appears in the last line, as highlighted in the image above. It will be something like this:
/Users/sambowne/Library/Android/sdk
Do not use the literal string "YOURNAME" -- replace that with your own name without any embedded spaces.
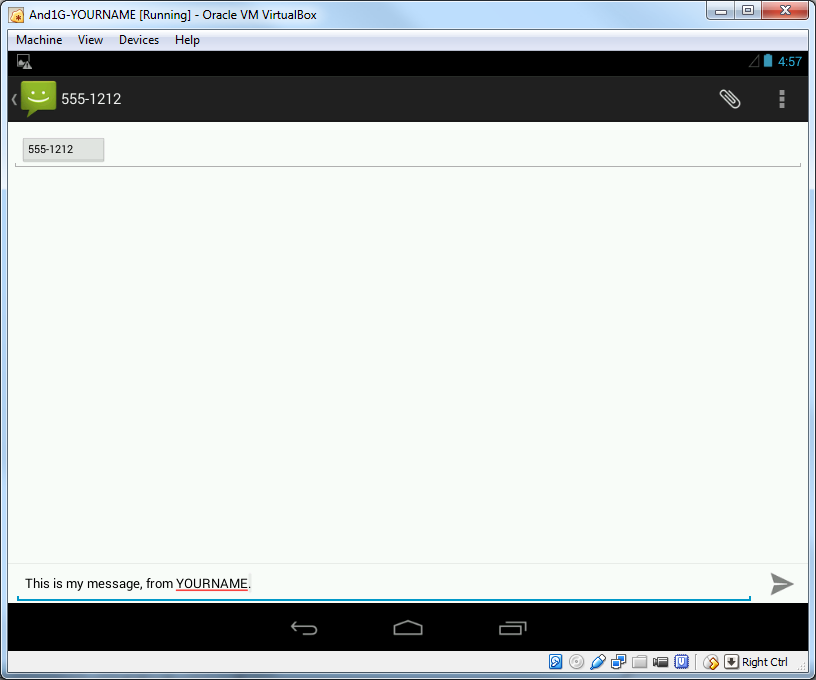
At the lower right, click the arrow icon to send your message.
A message says "Currently unable to send..". That's OK, it saved the message locally, which is what we wanted.
In the bottom center, click the icon shaped like an open business envelope. This takes you back to the home screen.
Click Notes. At the top right, click the little icon of a pencil and paper.
Compose a note containing your name, as shown below.
Do not use the literal string "YOURNAME" -- replace that with your own name without any embedded spaces.
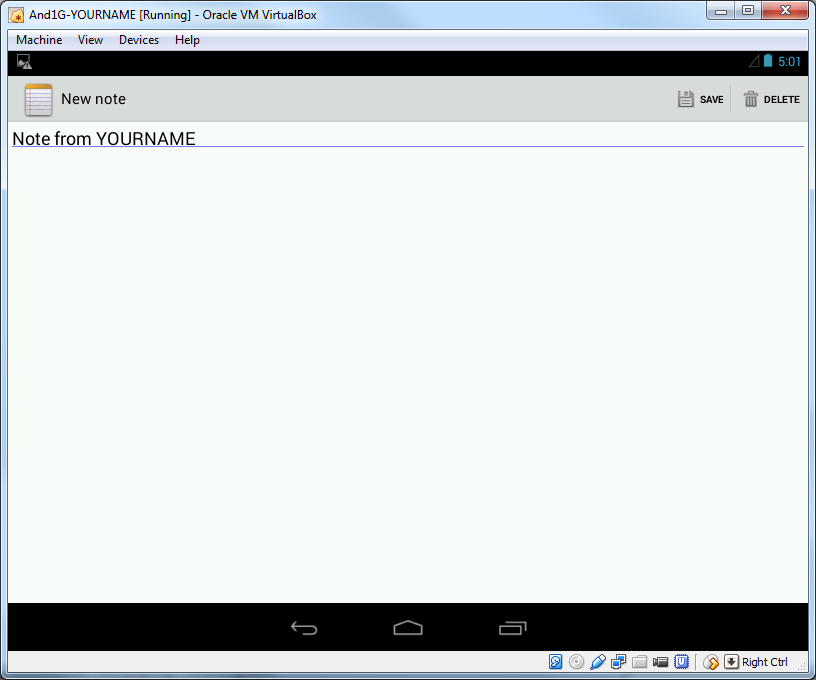
At the top right, click SAVE.
Open a Web browser and go to
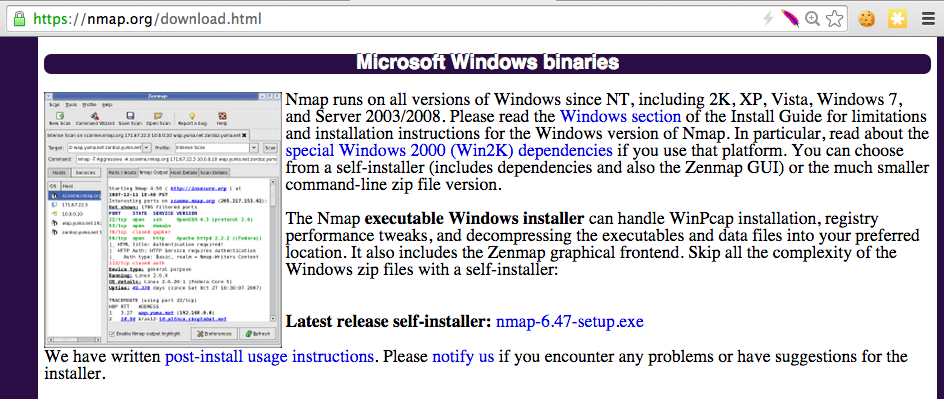
https://nmap.org/download.html
Scroll down to the "Microsoft Windows binaries" section, as shown below, and click on the link labelled "Latest release self-installer:", as shown below.
When I did it, it was nmap-6.47-setup.exe.
Download and install the software with the default options. It will also install WinPCap.
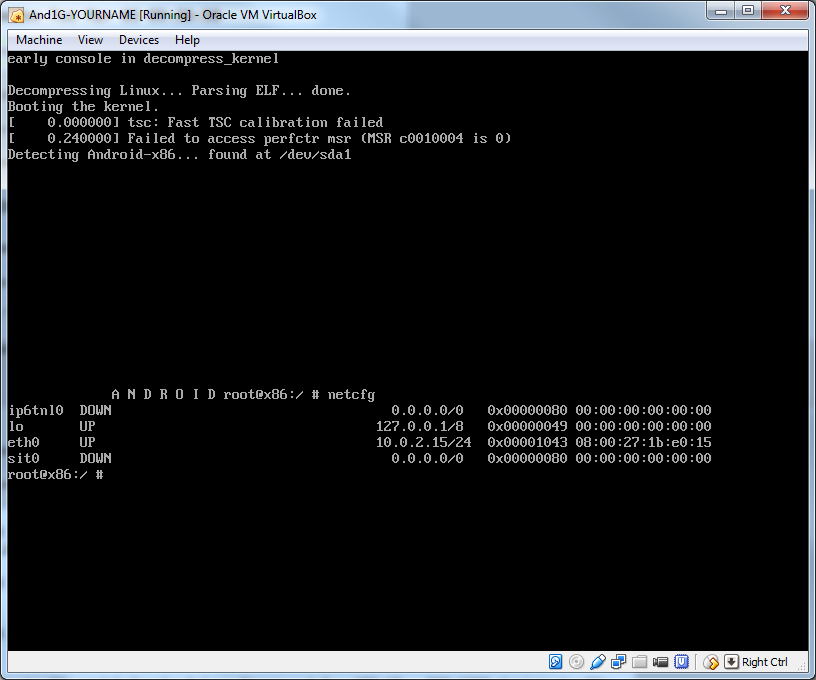
Click in the Android VM. Press Alt+F1. (On a Macbook, press fn+opt+F1. On the Macs in S214, press RightCtrl+Alt+Fn+F1).
A Linux terminal opens in the Android VM. Execute this command:
netcfg
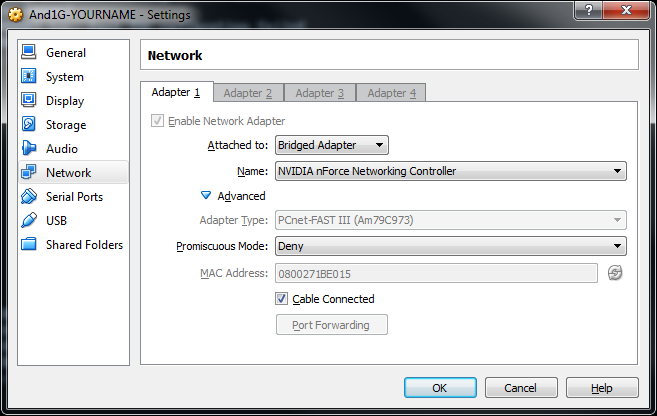
That won't work. Press the button to release the cursor from the VM and click Devices, Network, "Network Settings".
Change the "Attached to" setting to "Bridged Adapter", as shown below. Then click OK.
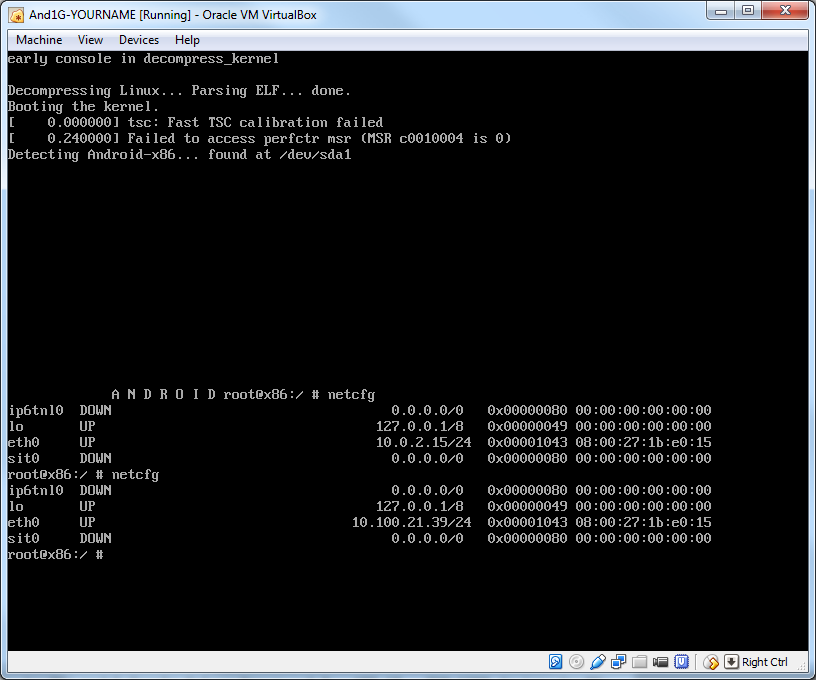
In the Android terminal window, execute this command again:
netcfg
Execute these commands, changing the path in the first command to your correct SDK path.
Change the address in the third command to the correct address of your Android VM.
NOTE: If you are using a Mac, add a "./" before "adb".
cd AppData\Local\Android\sdk

cd platform-tools

adb connect 10.10.21.39
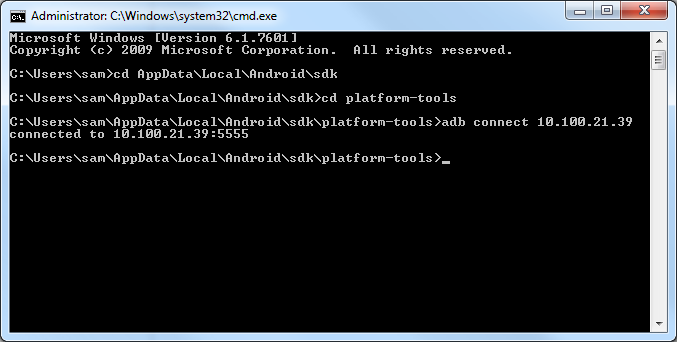
NOTE: If you are using a Mac or Linux, add a "./" before "adb".
adb shell

mount
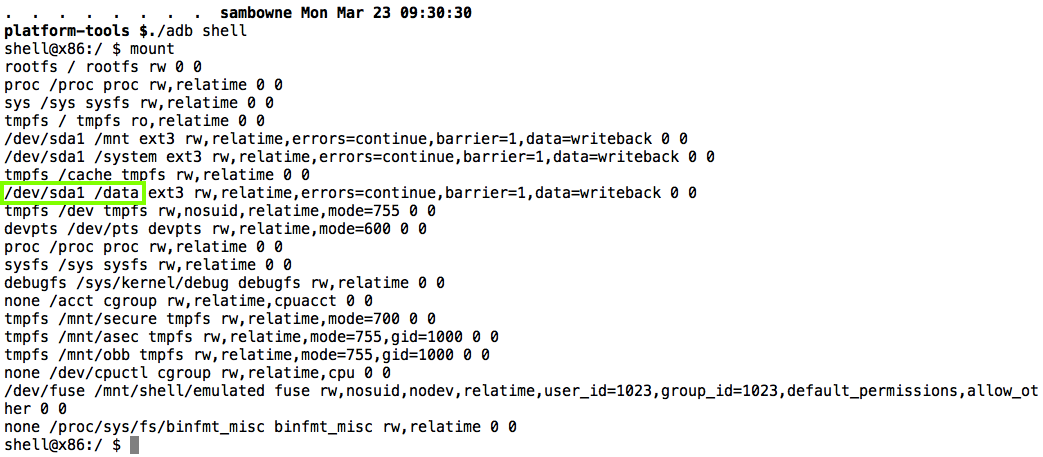
The /data partition is at /dev/block/sda1, as highlighted in the image above.
At the "shell@x86:/ $" prompt, execute this command:
df
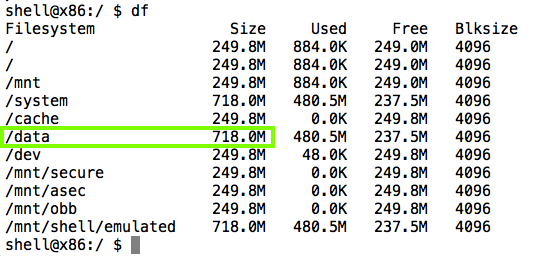
The /data partition is where apps store their data; the main place to find forensic artifacts.
Navigate to the sdk/platform-tools directory.
Execute this command:
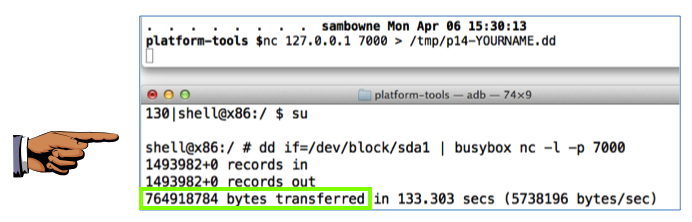
NOTE: If you are using a Mac or Linux, add a "./" before "adb". On the host Mac,
adb forward tcp:7000 tcp:7000
su

dd if=/dev/block/sda1 | busybox nc -l -p 7000

If you are using Windows, open a new Administrator Command Prompt window (you cannot write to the root of C: without Administrator privileges) and execute this command:
ncat 127.0.0.1 7000 > C:/p14-YOURNAME.dd
nc 127.0.0.1 7000 > /tmp/p14-YOURNAME.dd
Press Shift+PrintScrn to save a full-desktop image.
YOU MUST SUBMIT A FULL-SCREEN IMAGE FOR FULL CREDIT!
Save the image with the filename "YOUR NAME Proj 14b", replacing "YOUR NAME" with your real name.
dir c:
If that happens, try using "nc" or "nc64" instead of Ncat. You can get those programs here:
https://eternallybored.org/misc/netcat/
In a Web browser, go here:
http://technet.microsoft.com/en-us/sysinternals/bb897439
Click the "Download Strings" link.
Save the Strings.zip file on your desktop.
Right-click it and click "Extract All...", Extract.
A window opens showing a strings.exe file.
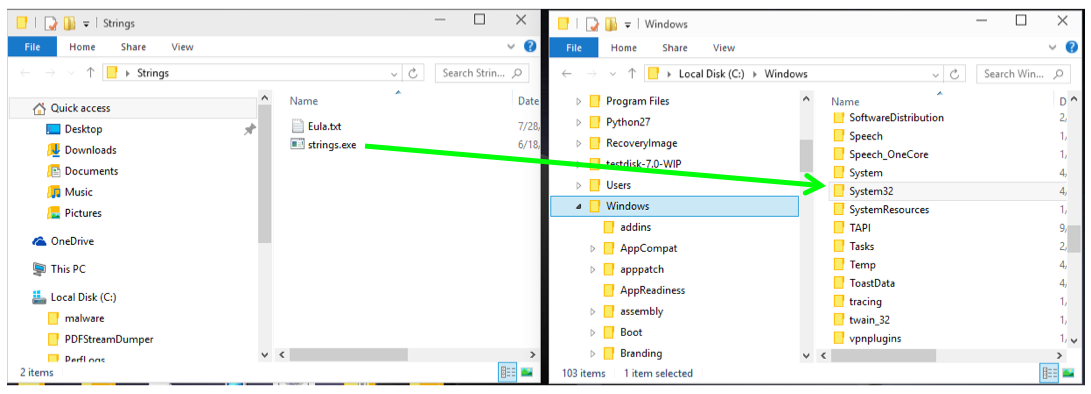
Open a second Windows Explorer window and navigate to the C:\Windows folder.
Drag the strings.exe file into the C:\Windows\System32 folder, as shown below.
If a "User Account Control" box pops up, approve the privilege escalation.
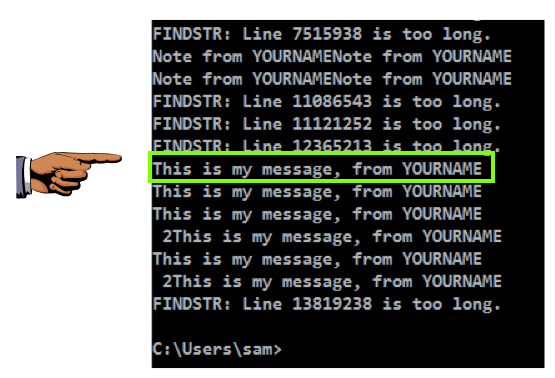
strings C:\p14-YOURNAME.dd | findstr YOURNAME
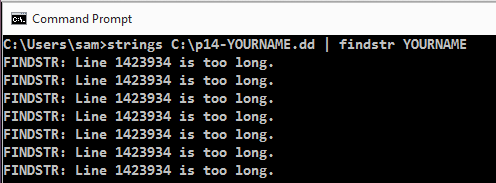
Eventually, findstr will pause its complaints long enough to show you the actual evidence lines containing YOURNAME, as shown below.
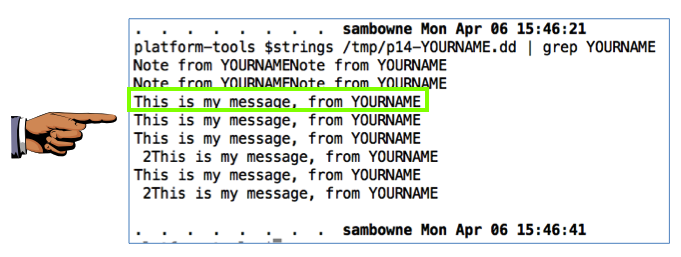
strings /tmp/p14-YOURNAME.dd | grep YOURNAME
YOU MUST SUBMIT A FULL-SCREEN IMAGE FOR FULL CREDIT!
Save the image with the filename "YOUR NAME Proj 14c", replacing "YOUR NAME" with your real name.
Review of Android Partition Layout
DD over Netcat for a Cheap Ghost Alternative
Android Forensics, Part 1: How we recovered (supposedly) erased data
Live imaging an Android device | Free Android Forensics (from 2014)
http://virtualboxes.org/images/android-x86/