www.vmware.com/go/downloadplayer
In the VMs-S214 window, right-click the empty space and click New, Folder. Name the folder "YOUR NAME VMs" replacing YOUR NAME with your own name.
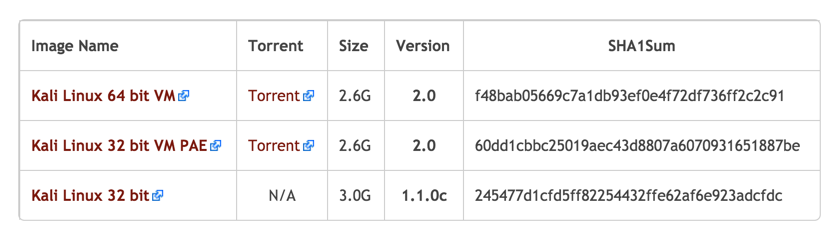
Download the "Kali Linux 32 bit VM PAE" file, as shown below.
If you are using a Mac, get Ez7z
Right-click the Kali-Linux-2.0.0-vm-i686.7z file, click 7-Zip, and click "Extract Files...". In the "Extract to:" box, enter the path to the folder you prepared, such as "G:\YOURNAME\Kali". Click OK.
If you don't see a user named "root", click Other....
Log in to Kali with the username root and a password of toor
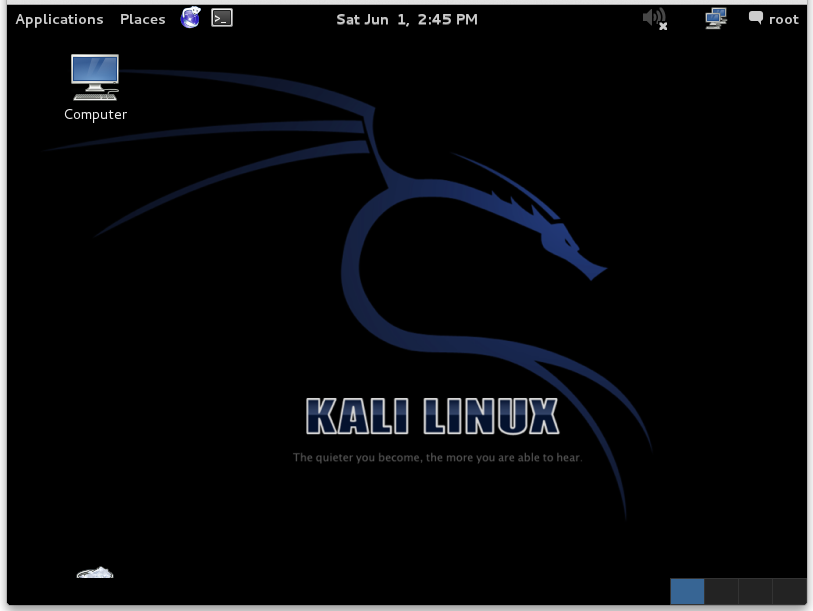
You should see the Kali Linux desktop as shown below:
Troubleshooting
If your Kali virtual machine won't start, you probably didn't extract both compressed files. This is a very common mistake. You need all the files from both the ZIP archive and the 7Z archive in the same folder.
In the "Virtual Machine Settings" box, on the left side, click "Network Adapter".
On the right side, click "Bridged: Connect directly to the physical network". Click OK.
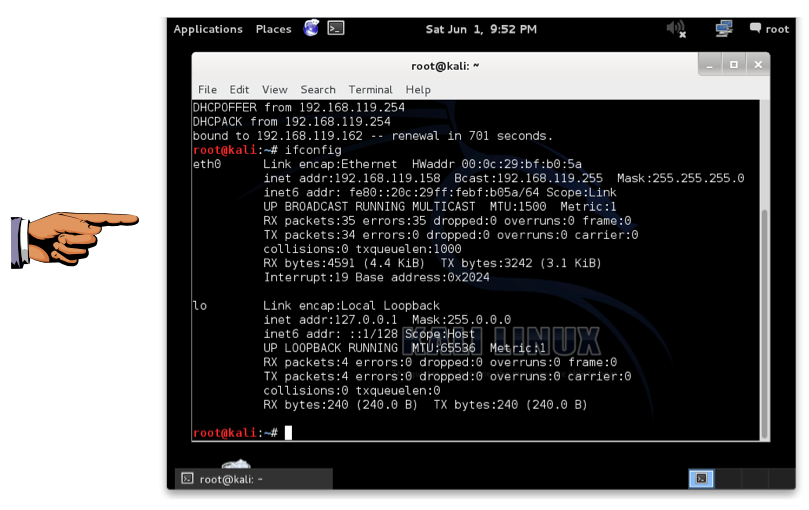
At the top left of the Kali Linux desktop, find these items:
In the Terminal window, type in this command to get a new IP address, and then press the Enter key:
dhclient -v
ifconfig
Click the taskbar at the bottom of your host Windows 7 desktop, to make the host machine listen to the keyboard, instead of the virtual machine.
Press the PrintScrn key in the upper-right portion of the keyboard. That will copy the whole desktop to the clipboard.
YOU MUST SUBMIT A FULL-SCREEN IMAGE FOR FULL CREDIT!
On the host machine, not the virtual machine, click Start.
Type mspaint into the Search box and press the Enter key.
Click in the untitled - Paint window, and press Ctrl+V on the keyboard. The desktop appears in the Paint window.
Save the document with the filename "YOUR NAME Proj 10", replacing "YOUR NAME" with your real name.
Email the image to me as an attachment. Send it to: cnit.120@gmail.com with a subject line of "Proj 10 From YOUR NAME", replacing "YOUR NAME" with your real name.
Send a Cc to yourself.
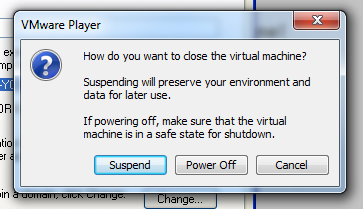
Suspend freezes your VM in its current state. This is usually the best choice.
Power Off is only for emergencies, when the guest operating system has crashed. It's the equivalent of pulling out the power plug on a real computer.
Click Suspend.
Last Modified: 3-22-16