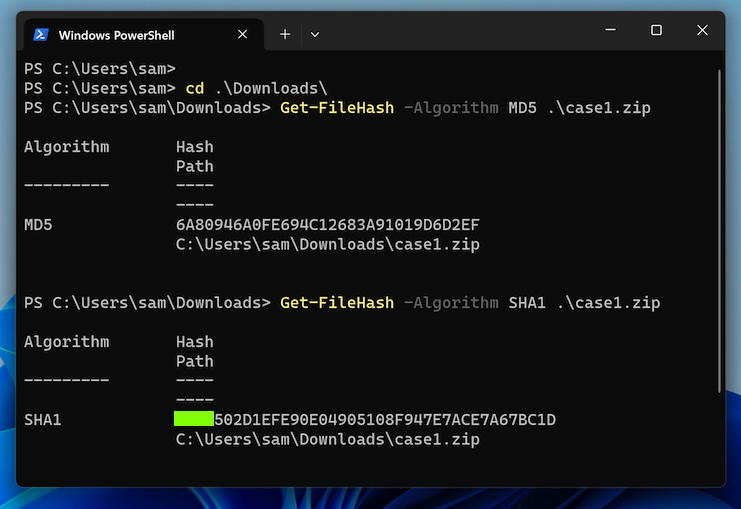
F 201: Rhino Hunt with Autopsy (15 pts + 10 extra)
What You Need for This Project
A Windows machine with Autopsy installed
Purpose
To practice basic forensic techniques:
Reading a scenario
Verifying a hash value
Extracting files from a disk image with Autopsy
Scenario
The city of New Orleans passed a law in 2004 making possession of nine or more unique
rhinoceros images a serious crime. The network administrator at the University of New
Orleans recently alerted police when his instance of RHINOVORE flagged illegal rhino
traffic. Evidence in the case includes a computer and USB key seized from one of the
University’s labs. Unfortunately, the computer had no hard drive. The USB key was
imaged and a copy of the dd image is the case1.zip file you’ve been given.
In addition to the USB key drive image, three network traces are also available—these
were provided by the network administrator and involve the machine with the missing
hard drive. The suspect is the primary user of this machine, who has been pursuing his
Ph.D. at the University since 1972.
Drag the case1.zip file and drop
it on the Hashcalc window.
You see various hash values, including
MD5 and SHA1,
as shown below.
F 201.1: SHA1 (5 pts)
Verify that the MD5 value matches the
value shown below. If it does not,
re-download the evidence file.
The flag is the first portion of the
SHA1 address, covered by a green rectangle
in the image below.
Unzipping the Evidence File
Right-click the case1.zip file and click
"Extract All...". Click the Extract button.
You see four files, as shown below.
Creating an Autopsy Case
Launch Autopsy. In the Welcome box,
click "New Case".
Make these selections:
Name your case F201 and click Next.
Select your Documents folder.
Assign it a case number of F201 and click Finish.
In the "Select Host" page, click Next.
In the "Select Data Source Type" page, accept the default of "Disk Image or VM File" and click Next.
In the "Select Data Source" page, click Browse, navigate to the RHINOUSB.dd file, and double-click it. Then click Next.
In the "Configure Ingest" page, click Next.
Click Finish.
When the data file is imported and processed,
in the left pane of Autopsy, expand
the containers to see the
Images and "Deleted Files",
as shown below.
F 201.2: Mother and Child (5 pts)
Find the image of a mother rhinoceros and her
child. That's the
flag.
Examining Deleted Files
In the left pane, select All.
The deleted files appear in the right pane,
as shown below.
Sorting by File Type
In the top right pane, scroll to the
right. Click "MIME Type",
outlined in red in the image below,
to sort the files, and put
the "application/msword" file
at the top.
Reading the Diary
The "application/msword" file is a diary.
Read through it and find the flag below.
F 201.3: Hard Drive (5 pts)
Find the location of the missing hard drive. That's the
flag.
F 201.4: Email Address (10 pts extra)
There are two files containing an email address at
MIT. Only one of the files has a filename.
That filename is the flag.
Posted: 8-26-22
Directory selection step added 10-12-22
Video added 3-12-23