In a Terminal window, enter this command, and then press Enter:
ping samsclass.info
Make sure you are getting replies. If you are not, you need to correct your networking problems before proceeding.
  mkdir /cert

  cd /cert

  openssl genrsa -des3 -out server.key 4096
For this project I recommend using a phrase of password -- use a more secure password on a real production server, of course.
When you are prompted to enter the passphrase a second time, do so. You won't see anything on the screen when typing in the passphrases, which is normal for Linux.
openssl req -new -key server.key -out server.csr
Enter a Country Name of US
Enter a State or Province Name of CA
Enter a Locality Name of San Francisco
Enter an Organization Name of YOUR NAME -- don't enter the literal words "YOUR NAME" -- use your own first and last name.
Leave the Orgizational Unit Name blank, by pressing Enter.
Enter an Common Name of YOUR NAME -- don't enter the literal words "YOUR NAME" -- use your own first and last name.
Leave the Email Address blank, by pressing Enter.
Leave the Challenge Password blank, by pressing Enter.
Leave the "optional company name" blank, by pressing Enter.
openssl x509 -req -days 365 -in server.csr -signkey server.key -out server.crt
openssl rsa -in server.key -out server.key.insecure
In a Terminal window, enter these commands, pressing Enter after each one.
mv server.key server.key.secure

mv server.key.insecure server.key
ls
Note that the first character is a lowercase L, not the numeral 1.
You should see these four files:
server.crt: The self-signed server certificate.
server.csr: Server certificate signing request.
server.key: The private server key, does not require a password when starting Apache.
server.key.secure: The private server key, it does require a password when starting Apache.
mkdir /etc/apache2/ssl

cd /cert

cp server.key /etc/apache2/ssl

cp server.crt /etc/apache2/ssl

a2enmod ssl

ln -s /etc/apache2/sites-available/default-ssl /etc/apache2/sites-enabled/000-default-ssl
In a Terminal window, enter these commands, pressing Enter after each one.
cd /var

mkdir www-ssl
cd /etc/apache2/sites-available

cp /etc/apache2/sites-available/default default_original

cp /etc/apache2/sites-available/default-ssl default-ssl_original
ifconfig
Find your IP address and make a note of it.
Note: If your IP address changes, you will have to re-edit two files to continue this project. I therefore recommend using NAT networking in VMware so your IP address does not change as often.
In a Terminal window, enter this command, and then press Enter:
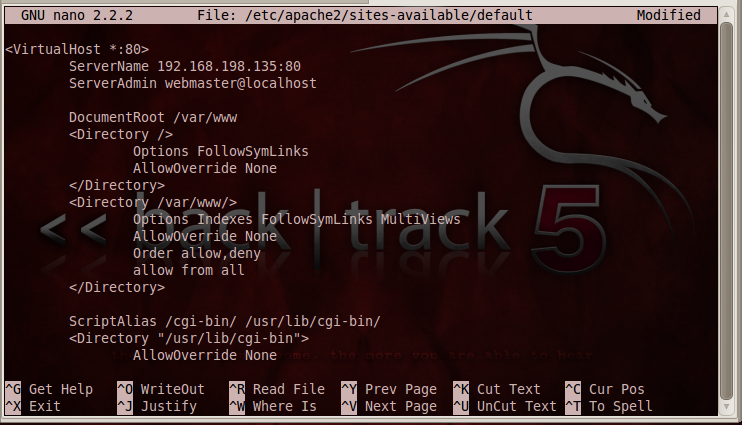
nano /etc/apache2/sites-available/default
In the text editor, add this line after the <VirtualHost *:80> line, using your correct IP address instead of the example below:
ServerName 192.168.198.135:80
Your file should look like the image below:
Press Ctrl+X, Y, Enter to save the file. In a Terminal window, enter this command, and then press Enter:
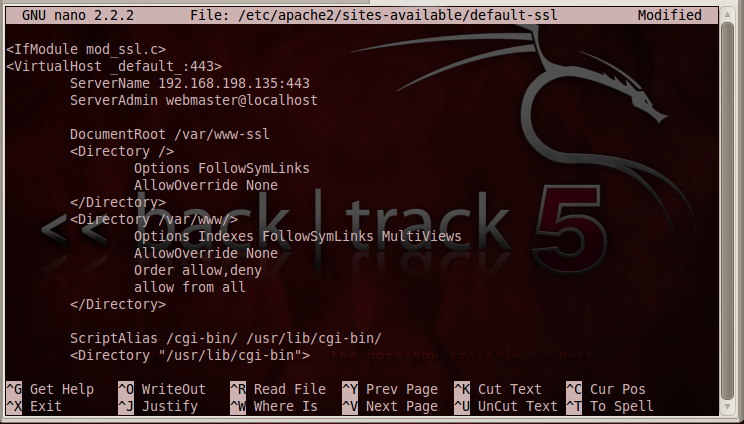
nano /etc/apache2/sites-available/default-ssl
In the text editor, add this line after the <VirtualHost *:443> line, using your correct IP address instead of the example below:
ServerName 192.168.198.135:443
Change the line that reads:
DocumentRoot /var/www
DocumentRoot /var/www-ssl
Your file should look like the image below:
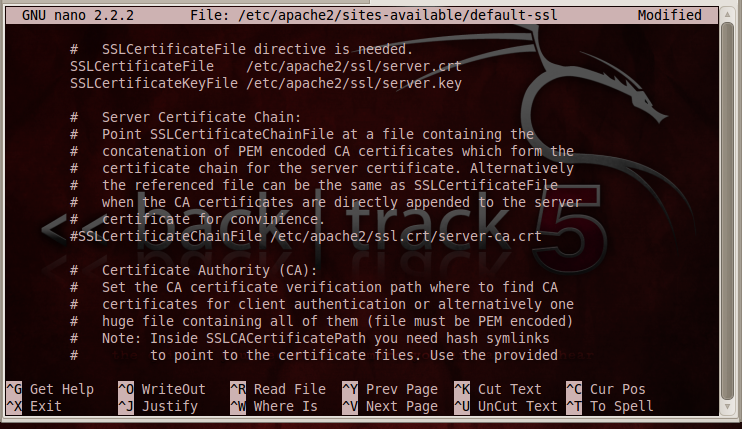
Scroll down and find these two lines:
        SSLCertificateFile    /etc/ssl/certs/ssl-cert-snakeoil.pem

        SSLCertificateKeyFile /etc/ssl/private/ssl-cert-snakeoil.key
Change them to this:
        SSLCertificateFile    /etc/apache2/ssl/server.crt

        SSLCertificateKeyFile /etc/apache2/ssl/server.key
Your file should look like the image below:
Press Ctrl+X, Y, Enter to save the file.
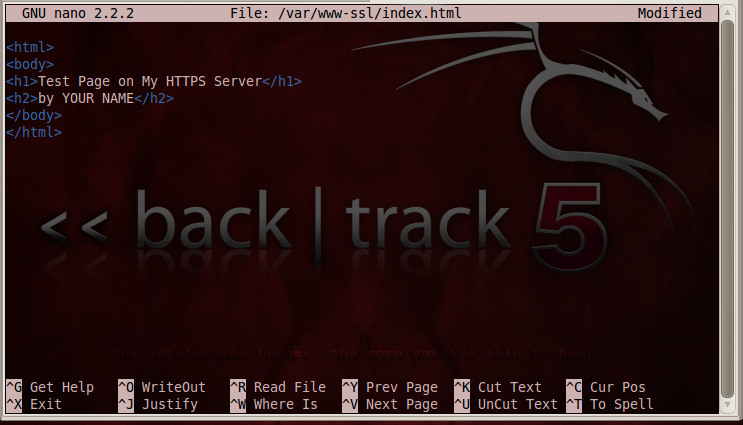
nano /var/www-ssl/index.html
In the text editor, enter this code, replacing "YOUR NAME" with your own name:
<html>
<body>
<h1>Test Page on My HTTPS Server</h1>
<h2>by YOUR NAME</h2>
</body>
</html>
Your file should look like the image below:
Press Ctrl+X, Y, Enter to save the file.
service apache2 restart
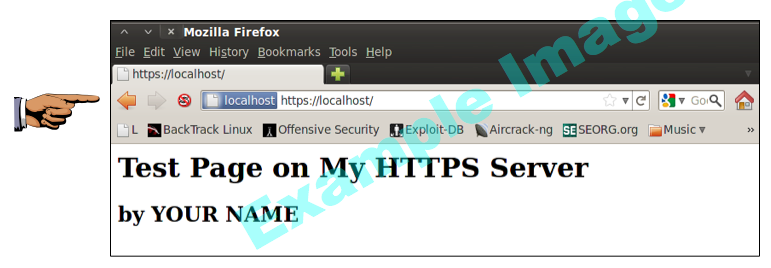
In IceWeasel, enter this URL, and then press Enter:
https://localhost
A warning page appears, saying "This Connection is Untrusted". That's happening because your SSL certificate is self-signed, rather than purchased from a real Certificate Authority like Verisign.
Click "I Understand the Risks".
Click the "Add Exception" button.
Click the "Confirm Security Exception" button.
Your secure web page opens, as shown below:
Press Ctrl+X, Y, Enter to save the file.
Save a screen capture with a filename of "Proj 17 from YOUR NAME".
Email the image to cnit.120@gmail.com with a subject of "Project 17 from YOUR NAME".
Last modified: 9-24-15