Project 13: Router Advertisements (15 pts.)
What You Need
You need a computer with
the gogoCLIENT installed and connected in Authenticated mode.
I used a Win 7 PC.
Configuring the gogoCLIENT
On the Windows 7 host, set up a gogo6 tunnel.
If you don't already have that ready, start with these steps:
How to set up the gogoCLIENT with a Freenet6 account
On the Basic tab, use your Freenet6 name and password and connect to
authenticated.freenet6.net
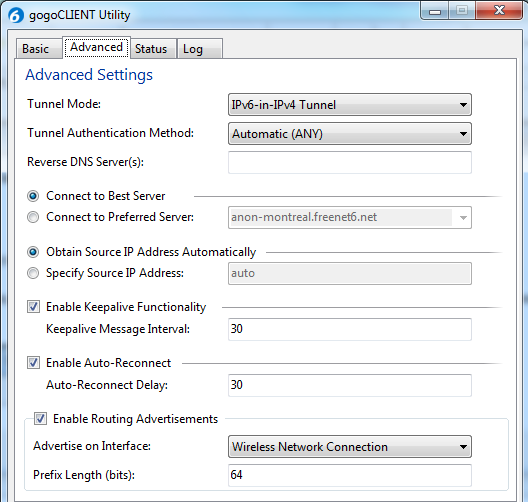
On the Advanced tab, check the "Enable Routing Advertisements" box,
and select the interface that goes to the Internet (in my case, the WiFi-USB),
as shown below on this page:
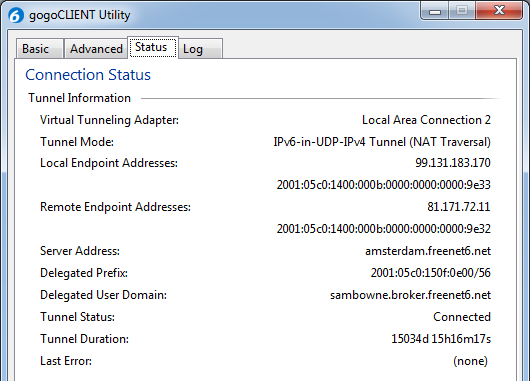
On the Status tab, you should see your Delegated Prefix.
In the example below, it is 2001:05c0:150f:0e00::/56.
Even though I was delegated a /56, the gogoCLIENT will only
advertise the first /64 network in that range.
Finding Addresses
Click Start, type CMD, and press Enter.
In the Command Prompt, type IPCONFIG /ALL and press Enter.
Scroll up to find the interface that goes to the Internet.
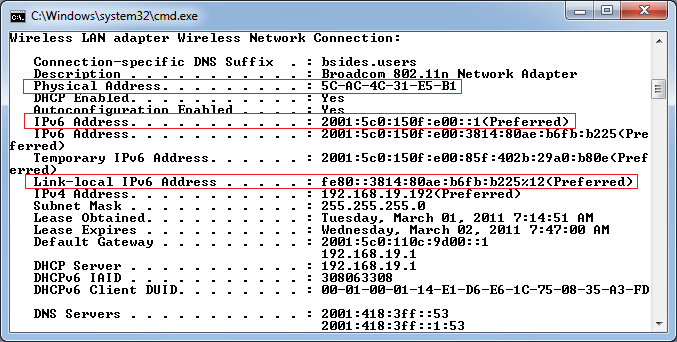
Find these items, as indicated by the red boxes in the image shown below:
- Physical Address
- IPv6 Address
- Link-Local IPv6 Address and Interface ID
The Interface ID appears after the IPv6
address, indicated by a % sign, so in the example below the
Link-Local IPv6 Address is fe80::3814:80ae:b6fb:b225 and the
Interface ID is 12.
Capturing a Router Advertisement with Wireshark
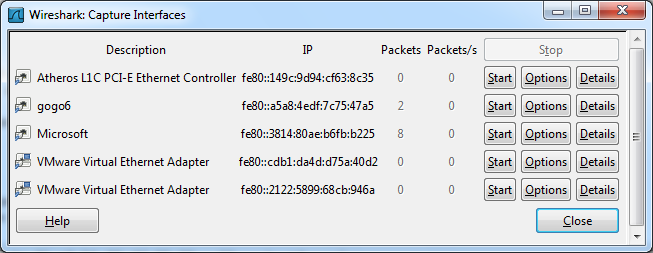
On your Router Machine, start Wireshark. From the menu, click
Capture, Interfaces. Find the interface with
the Link-Local IPv6 Address you found with IPCONFIG /ALL,
and click the Start button to begin capturing packets
from that interface.
At the top left of the Wireshark window, in the "Filter" line, type
icmpv6. Click Apply.
Wait until you see an ICMPv6 Router Advertisement packet,
as shown in the figure below on this page. It might take
five or ten minutes. To make it faster, you can disconnect and
reconnect the gogoCLIENT. A few seconds after it reconnects, it will
send out a Router Advertisement.
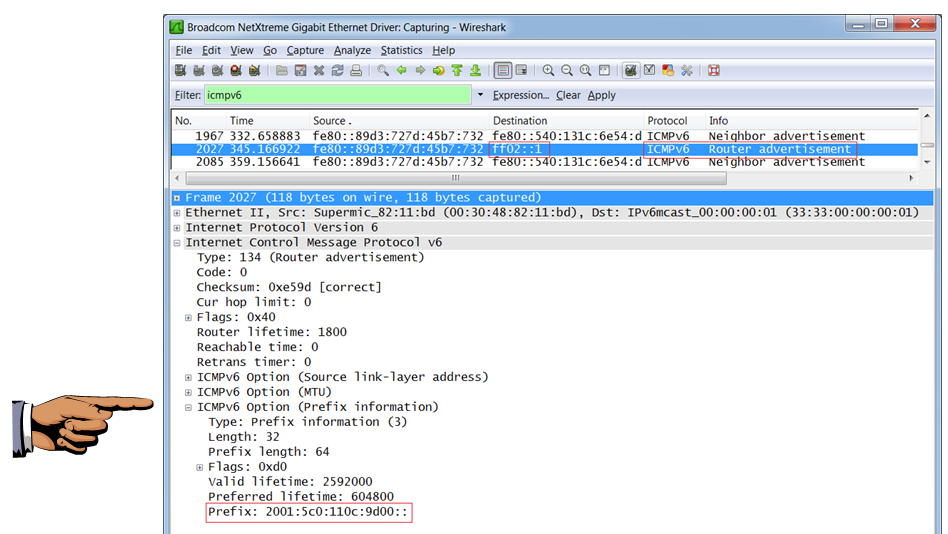
When you find a Router Advertisement packet,
click it in the top pane to select it, and expand it in the
middle pane to find these items,
as indicated by the red boxes in the image shown below:
- Destination address: ff02::1
ff02::1 is a well-known address
called the �all-hosts link-local multicast address�. Every host on
the local network (the �local link�, which is everything up to the first
router) will be listening for traffic sent to this address.
- Protocol and Info: ICMPv6 Router Advertisement
- Prefix
Interfaces on the local network will auto-configure addresses with
this prefix, in a process known as SLAAC (Stateless Autoconfiguration).
Save a screen shot of this image with the filename
Proj 13 from Your Name
Email the image to cnit.124@gmail.com with a subject line of
Proj 13 from Your Name
Troubleshooting
If you see Router Advertisements but they don't contain the Prefix,
try these steps:
- In an Administrator Command Prompt, execute these commands (replacing the
interface and prefix with the correct values for your system):
netsh int ipv6 add route interface="Wireless Network Connection" prefix=2001:5c0:150f:e00::/64 publish=yes

set int "Wireless Network Connection" rou=e adv=e
- In the gogoCLIENT utility, on the Basic tab, check the
"Launch the gogoCLIENT service at system startup" box.
Restart your Windows 7 machine.
Sources
http://www.telecom.otago.ac.nz/tele301/student_html/v6bootcamp-observer-advertisements.html
http://social.technet.microsoft.com/Forums/en/winserverPN/thread/76a241f5-682b-42a4-bc0c-0a5ce1fa7e63
Last modified 4-21-2011 10 am